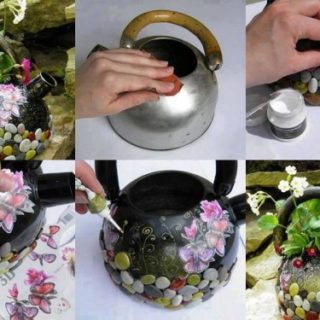
Sometimes it’s nice to add a little bit of sparkle, personality, or simple DIY beauty to the garden, to contrast with and highlight the natural beauty you’ve so carefully cultivated! That’s why we’ve already started making ourselves some pretty garden balls in different designs and DIY techniques. Come spring, we’ll nestle them amongst the plants once the ground is dry and watch the flowers bloom all around them.
Are you just as interested in DIY garden balls as we are because you can’t resist the opportunity to make a space even more lovely than it already is, especially if it means putting your crafting skills to good use? In that case, here’s a list of 15 of the best designs and ideas we’ve come across so far in our search for the perfect pieces for this spring!
Have you always appreciated the classic gazing ball style that you’ve often seen in public gardens or floral greenhouse centres but rather than simply buying them, you’d rather make a version of your very own? Then check out just how HGTV made that happen in detail! They used flat backed crafting marbles and glue to create a kind of zen looking glass mosaic effect.
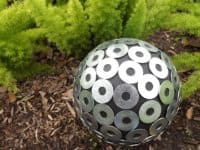
2. Gazing ball from metal washers and an old bowling ball
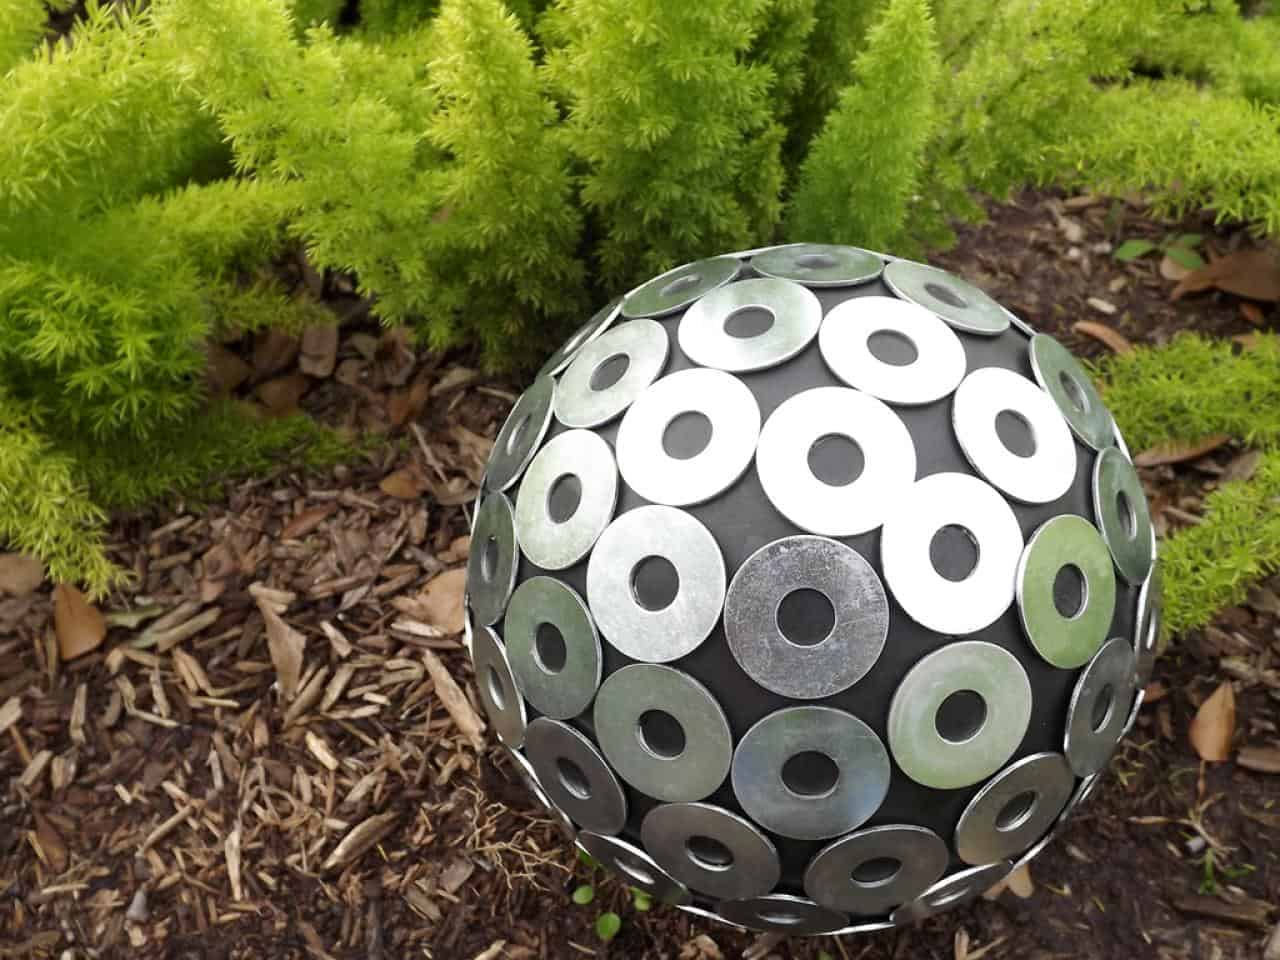
Have you always loved the idea of upcycling in your DIY processes whenever you can so you’re actually looking for a gazing ball idea that’s made from things you either already have in your house or might be able to find in a thrift store? In that case, grab yourself some spare metal washers and an old three-hole bowling ball and check out this awesomely reflective metal garden ball tutorial on Green Diary!
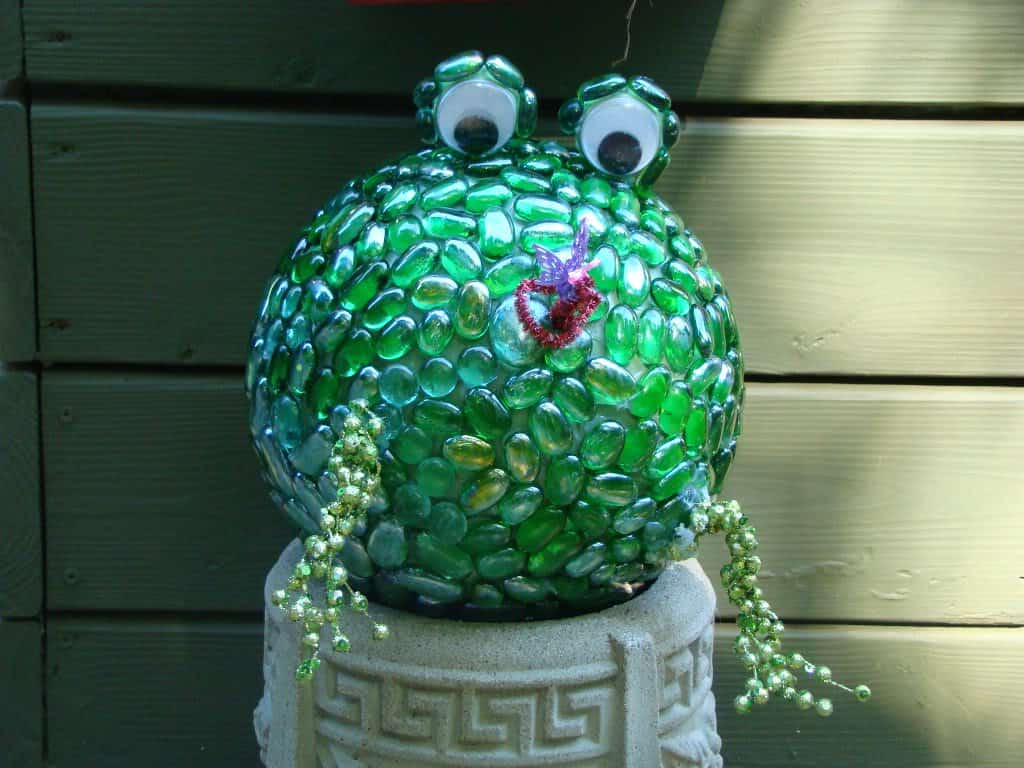
Have you made several glass marble gazing balls before and, even though you really like both the process and the finished product of the technique, you’re looking for a way to chance this year’s version up a little bit? In that case, we think you sound like the perfect person to try making yourself a funny little garden frog, just like this one from Cool Creativity! They used a bowling ball, green glass marbles, and some malleable but strong crafting wire to make the frog’s body, face, and legs.
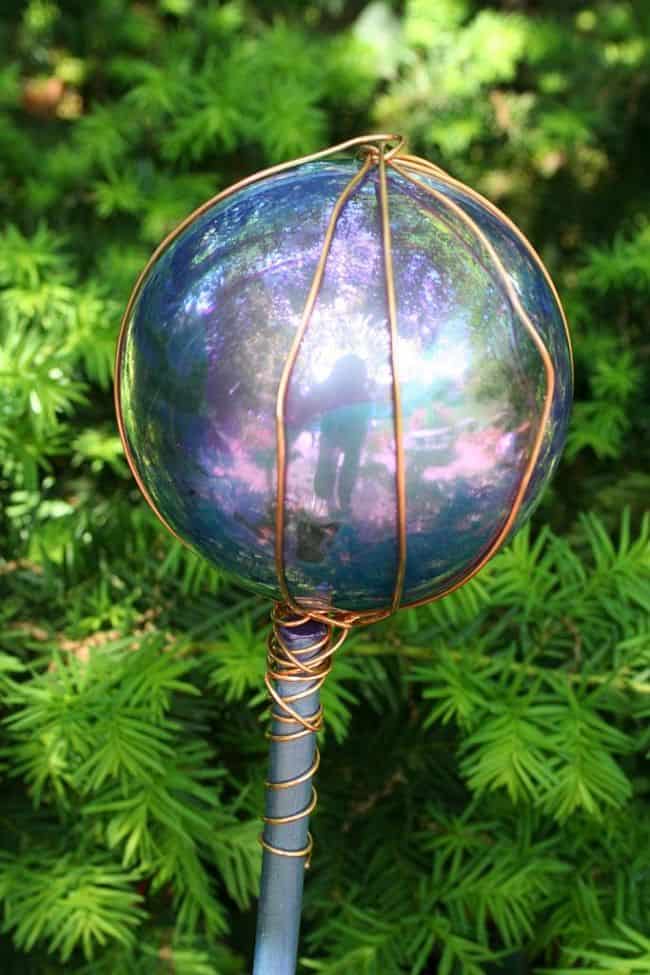
Have you always loved the idea of gazing balls so much that you actually want to put a few in your yard even though you don’t have a colorful floral garden, but the plants back there are still quite thick and you’re not keen on the idea of trimming them down? Then perhaps you’d get a better result mounting your gazing balls on sticks so they can be seen above the greenery! Pink and Green Mama guides you through the process of wire wrapping a pretty reflective glass ball onto a metal pole buried in the ground.
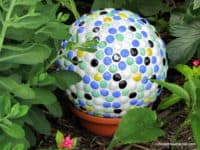
Perhaps you’ve already got some marbles that you were hoping to use to make your gazing ball but you accidentally bought the rounded kind rather than the glass ones with the flat backs? Well, don’t panic just yet! You can totally still use these to make a gazing ball that will look great mounted on a terra cotta pot in your garden! Check out how House of Hawthornes made it happen with an old bowling ball and some air dry caulking to nestle the marbles into and hold them in place.
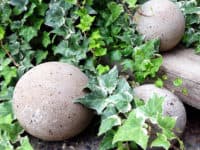
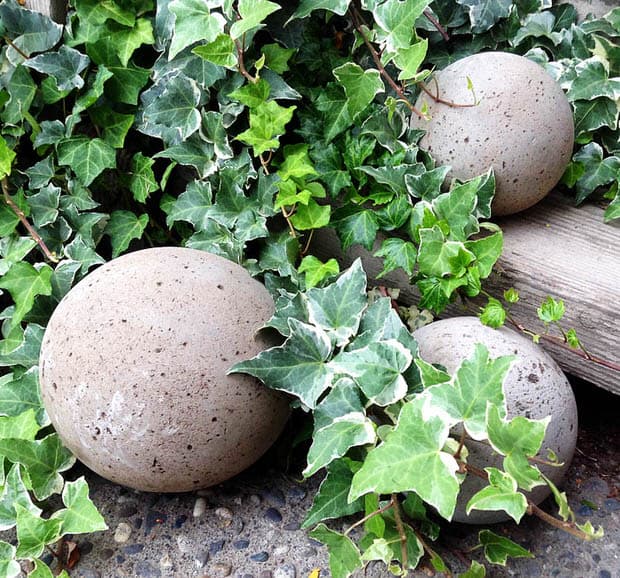
Is the style of your home actually a little more industrial chic and you’ve been looking for ways to translate that aesthetic into your garden too? Then perhaps these slightly more downplayed DIY concrete garden balls are a better alternative for you! Remodelaholic shows you exactly how to make your own using powder concrete mix. We have a feeling you’ll be surprised at how simple these really are to make.
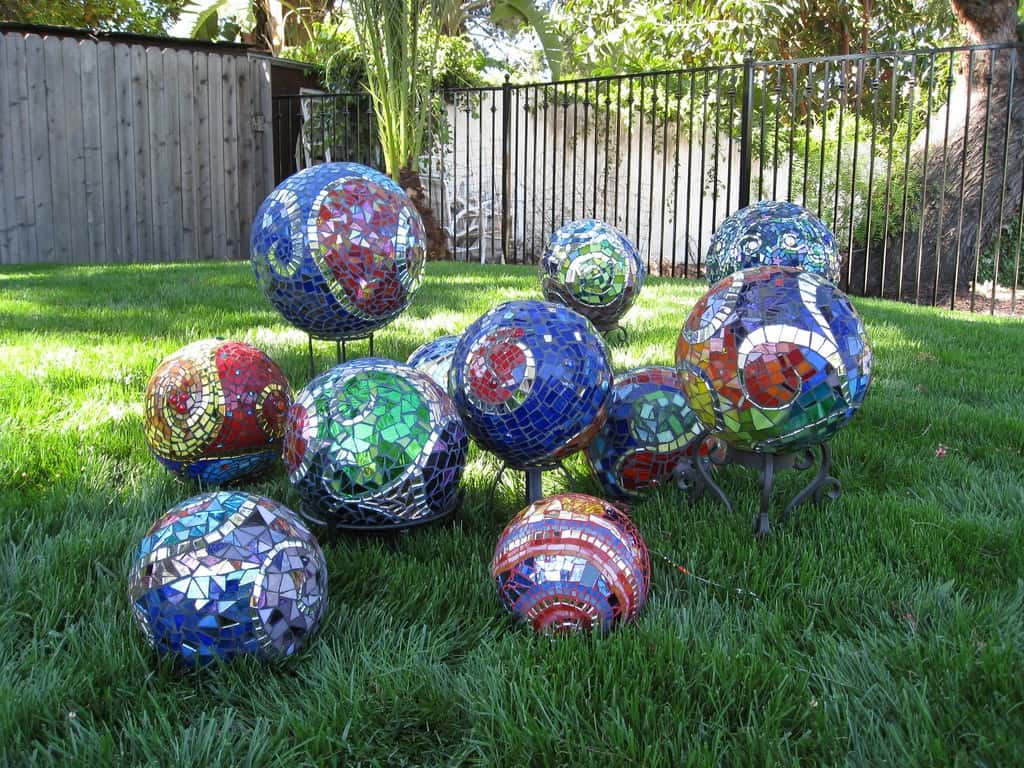
Are the mosaic techniques that so many of these designs use catching your eye more than anything else, but you’re not sure rounded or flat marbles are quite the effect you’re looking for? Then maybe you’d prefer this stained glass inspired design from Garden Lovers Club! They show you how to create a reflective glass mosaic using pieces of broken mirror, cut up CDs or DVDs, and similar materials. We love the way they made a cluster of gazing balls featuring all different sizes, like a little statement garden of its own!
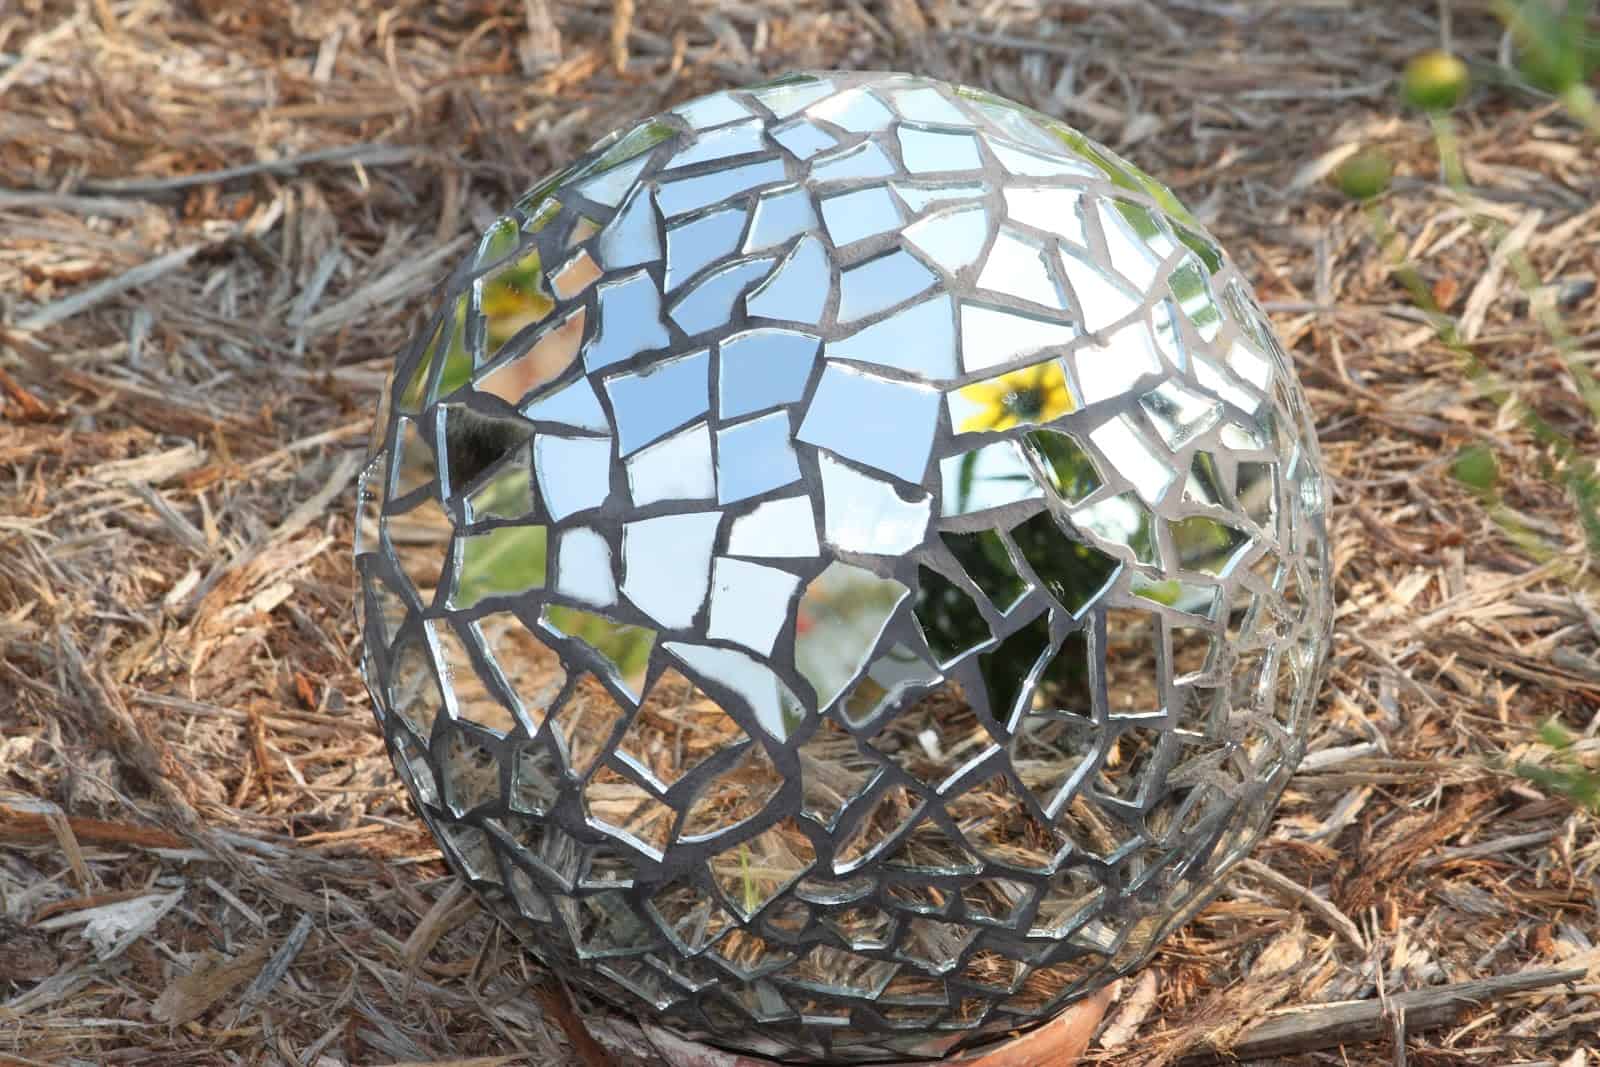
Were you instantly intrigued the moment you heard us say the word “mirror” in reference to a decorative ball because it made you think of the awesome disco balls you’ve seen in your favourite dance clubs or at cool parties? Well, who says you can’t make your very own disco ball and nestle it amongst the plants for an awesome contrast? Check out how Fadley Living made this garden disco ball using an old bowling ball and broken mirror pieces. Just be careful of sharp edges!
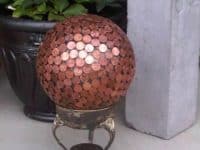
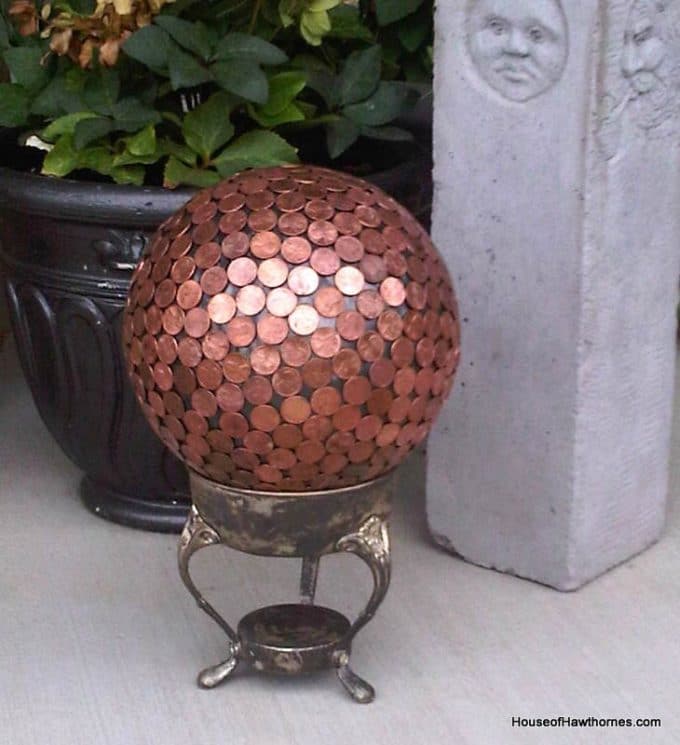
Are you always on the lookout for interesting ways to use your spare change? Then we have a feeling you’ll find this coin gazing ball idea from House of Hawthornes intriguing, especially if you live in a country that has discontinued pennies! Their tutorial shows you how to cover an old bowling ball in a mosaic layer of coins and mount it on an old planter stand.
Maybe you were pretty into the caulking idea because you actually already have some air dry caulking you can use, but you think you’d prefer something a little more natural looking than swirly coloured marbles or reflective mirror pieces? In that case, we’d suggest trying your hand at making a garden pebble version of the gazing balls you’ve seen so far instead! Find out how simply it can be done on Make The Best of Things.
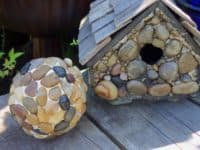
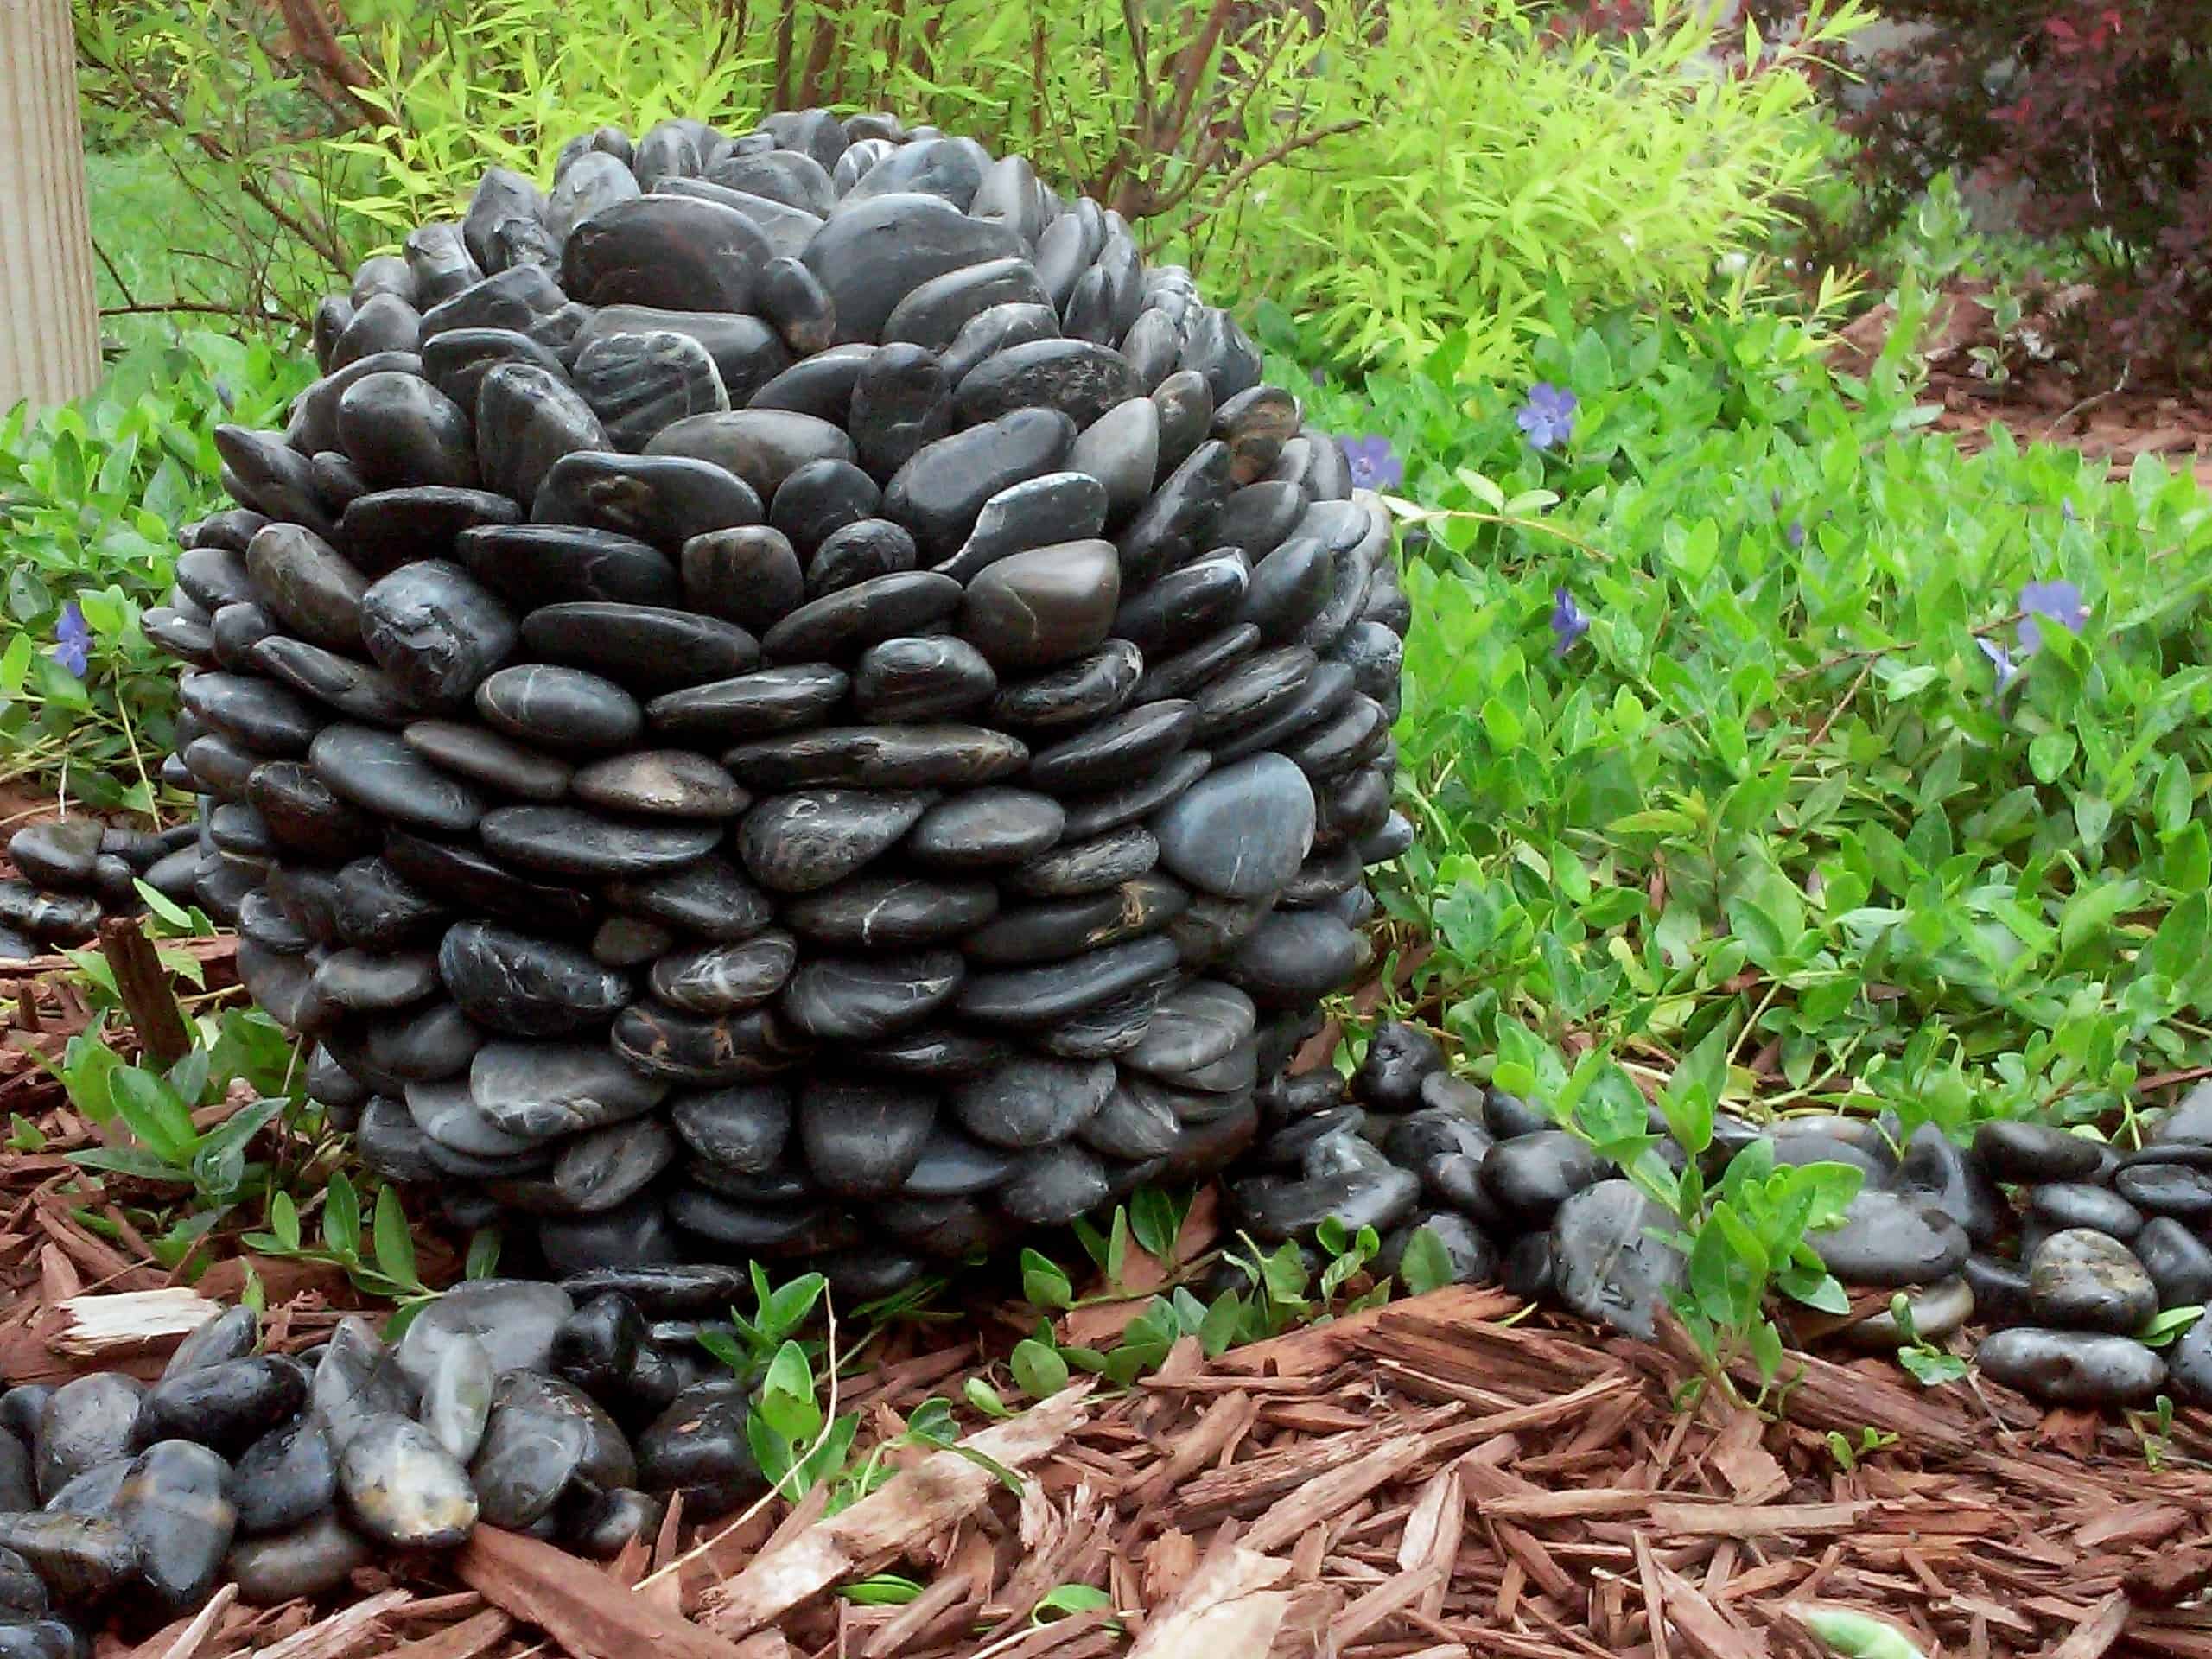
Have we almost got you settled on an idea with the stone concept we just showed you above but you’d actually prefer something a little darker and more textured, perhaps with more polished stones like you might find in a zen rock garden at the spa? In that case, we think this horizontally layered rock gazing ball featured on Pay Younger might be a little more up your alley! Their tutorial shows you how to mount the rocks by their sides instead of flat against the ball.
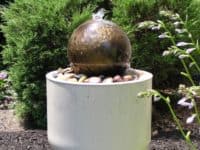
In your hunt for thrifted bowling balls, did you find one with a lovely marbled design so pretty that you don’t really want to cover it up, but you’re still intent on making yourself some kind of gazing ball décor? In that case, we think maybe you’d prefer this fantastic infinity ball fountain project outlined on Cot Cozy! The details of this idea are a little more high maintenance than what you’re seen so far, but you’ll feel pretty accomplished when you see that bowling ball floating weightlessly on the water like magic when you’re finished.
Since you started looking at your options, have your kids taken note of all the neat gazing ball projects you’ve been finding and now they want in on the fun? In that case, maybe you’d be better off trying a painting project that features simple, kid-friendly shapes! Check out how Little Sprouts by Lindsay upcycled a number of old thrift shop bowling balls by painting them with polka dots and arranging them in a line to make the pieces of a cute garden caterpillar.
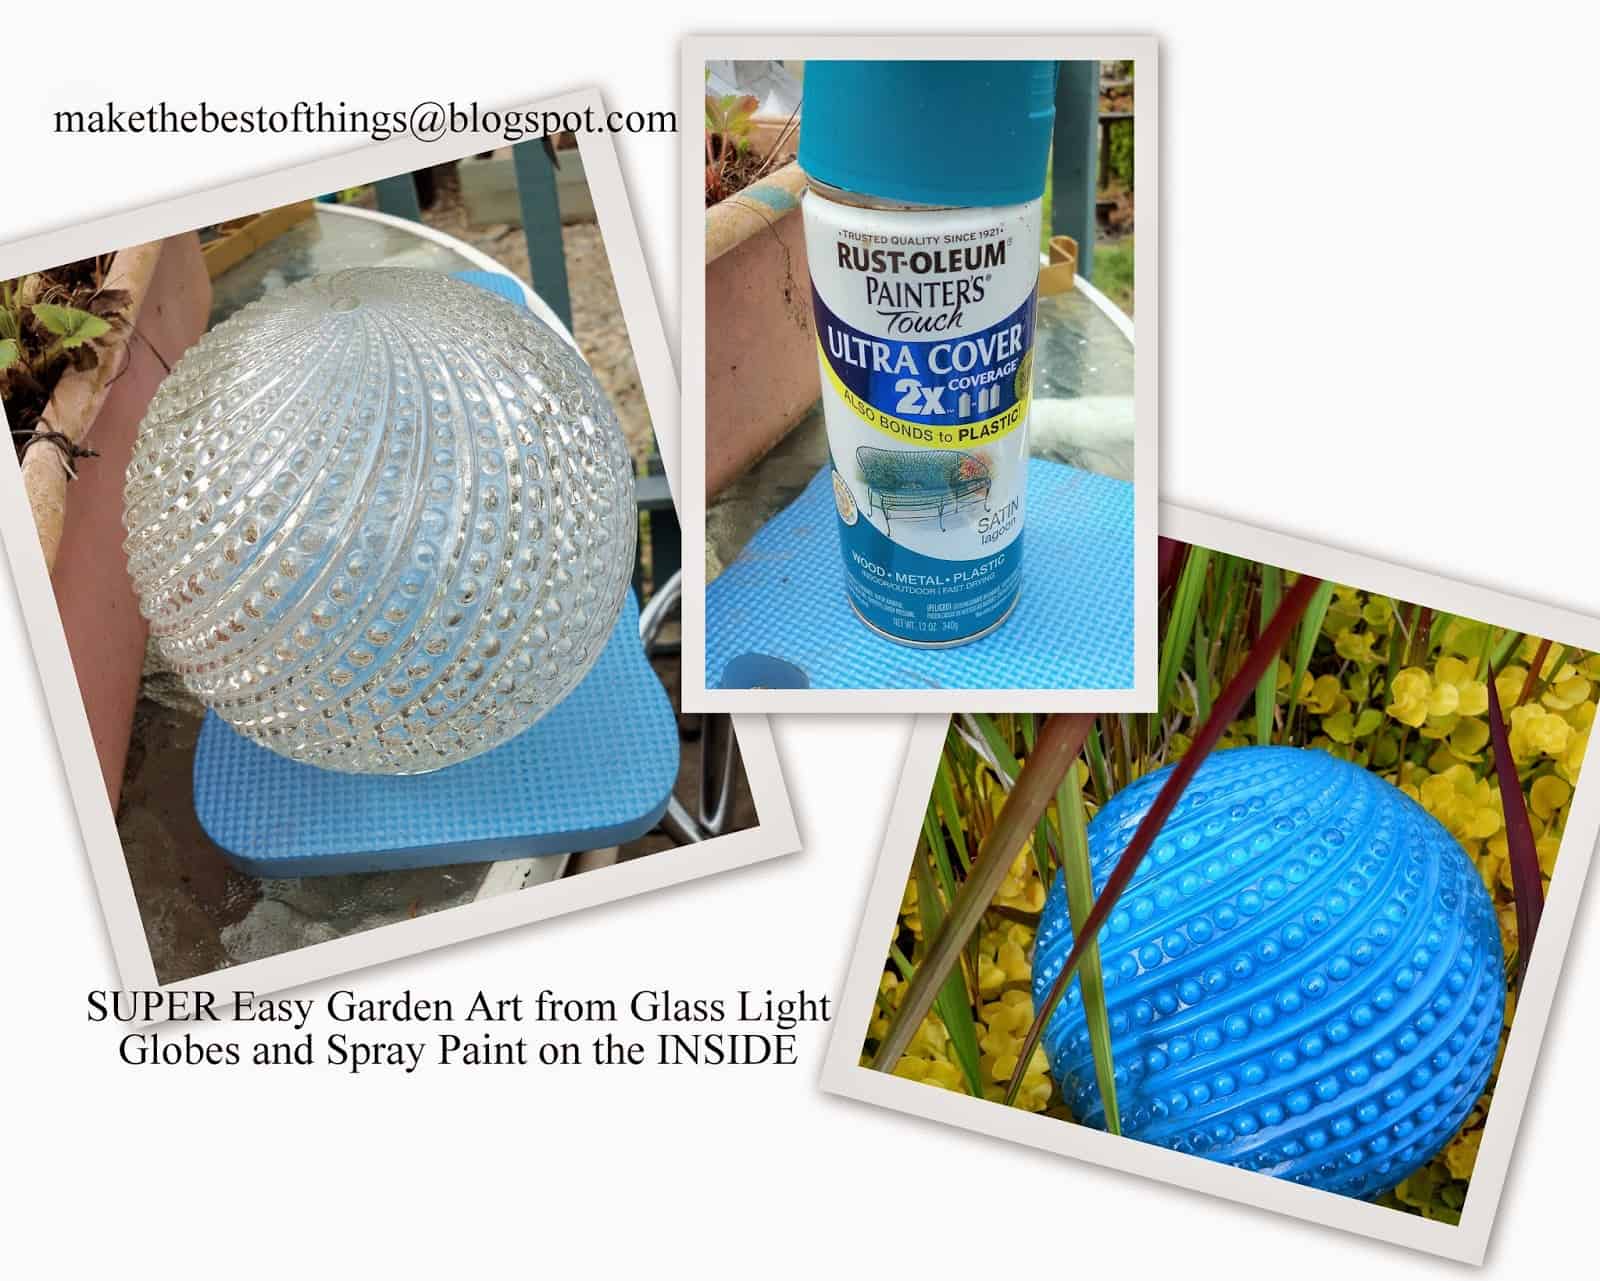
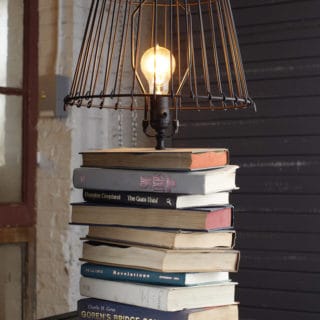
So far we’ve talked a lot about upcycling bowling balls in your DIY garden ball process, but what if you haven’t been able to find any? In that case, we definitely think you’d be better trying your hand at this rounded glass lampshade craft featured on Make The Best of Things. We like this idea because, if you’re lucky, you’ll find a glass lamp that already has a fun textured pattern, so all you need to do is paint the inside so the colour shows through!
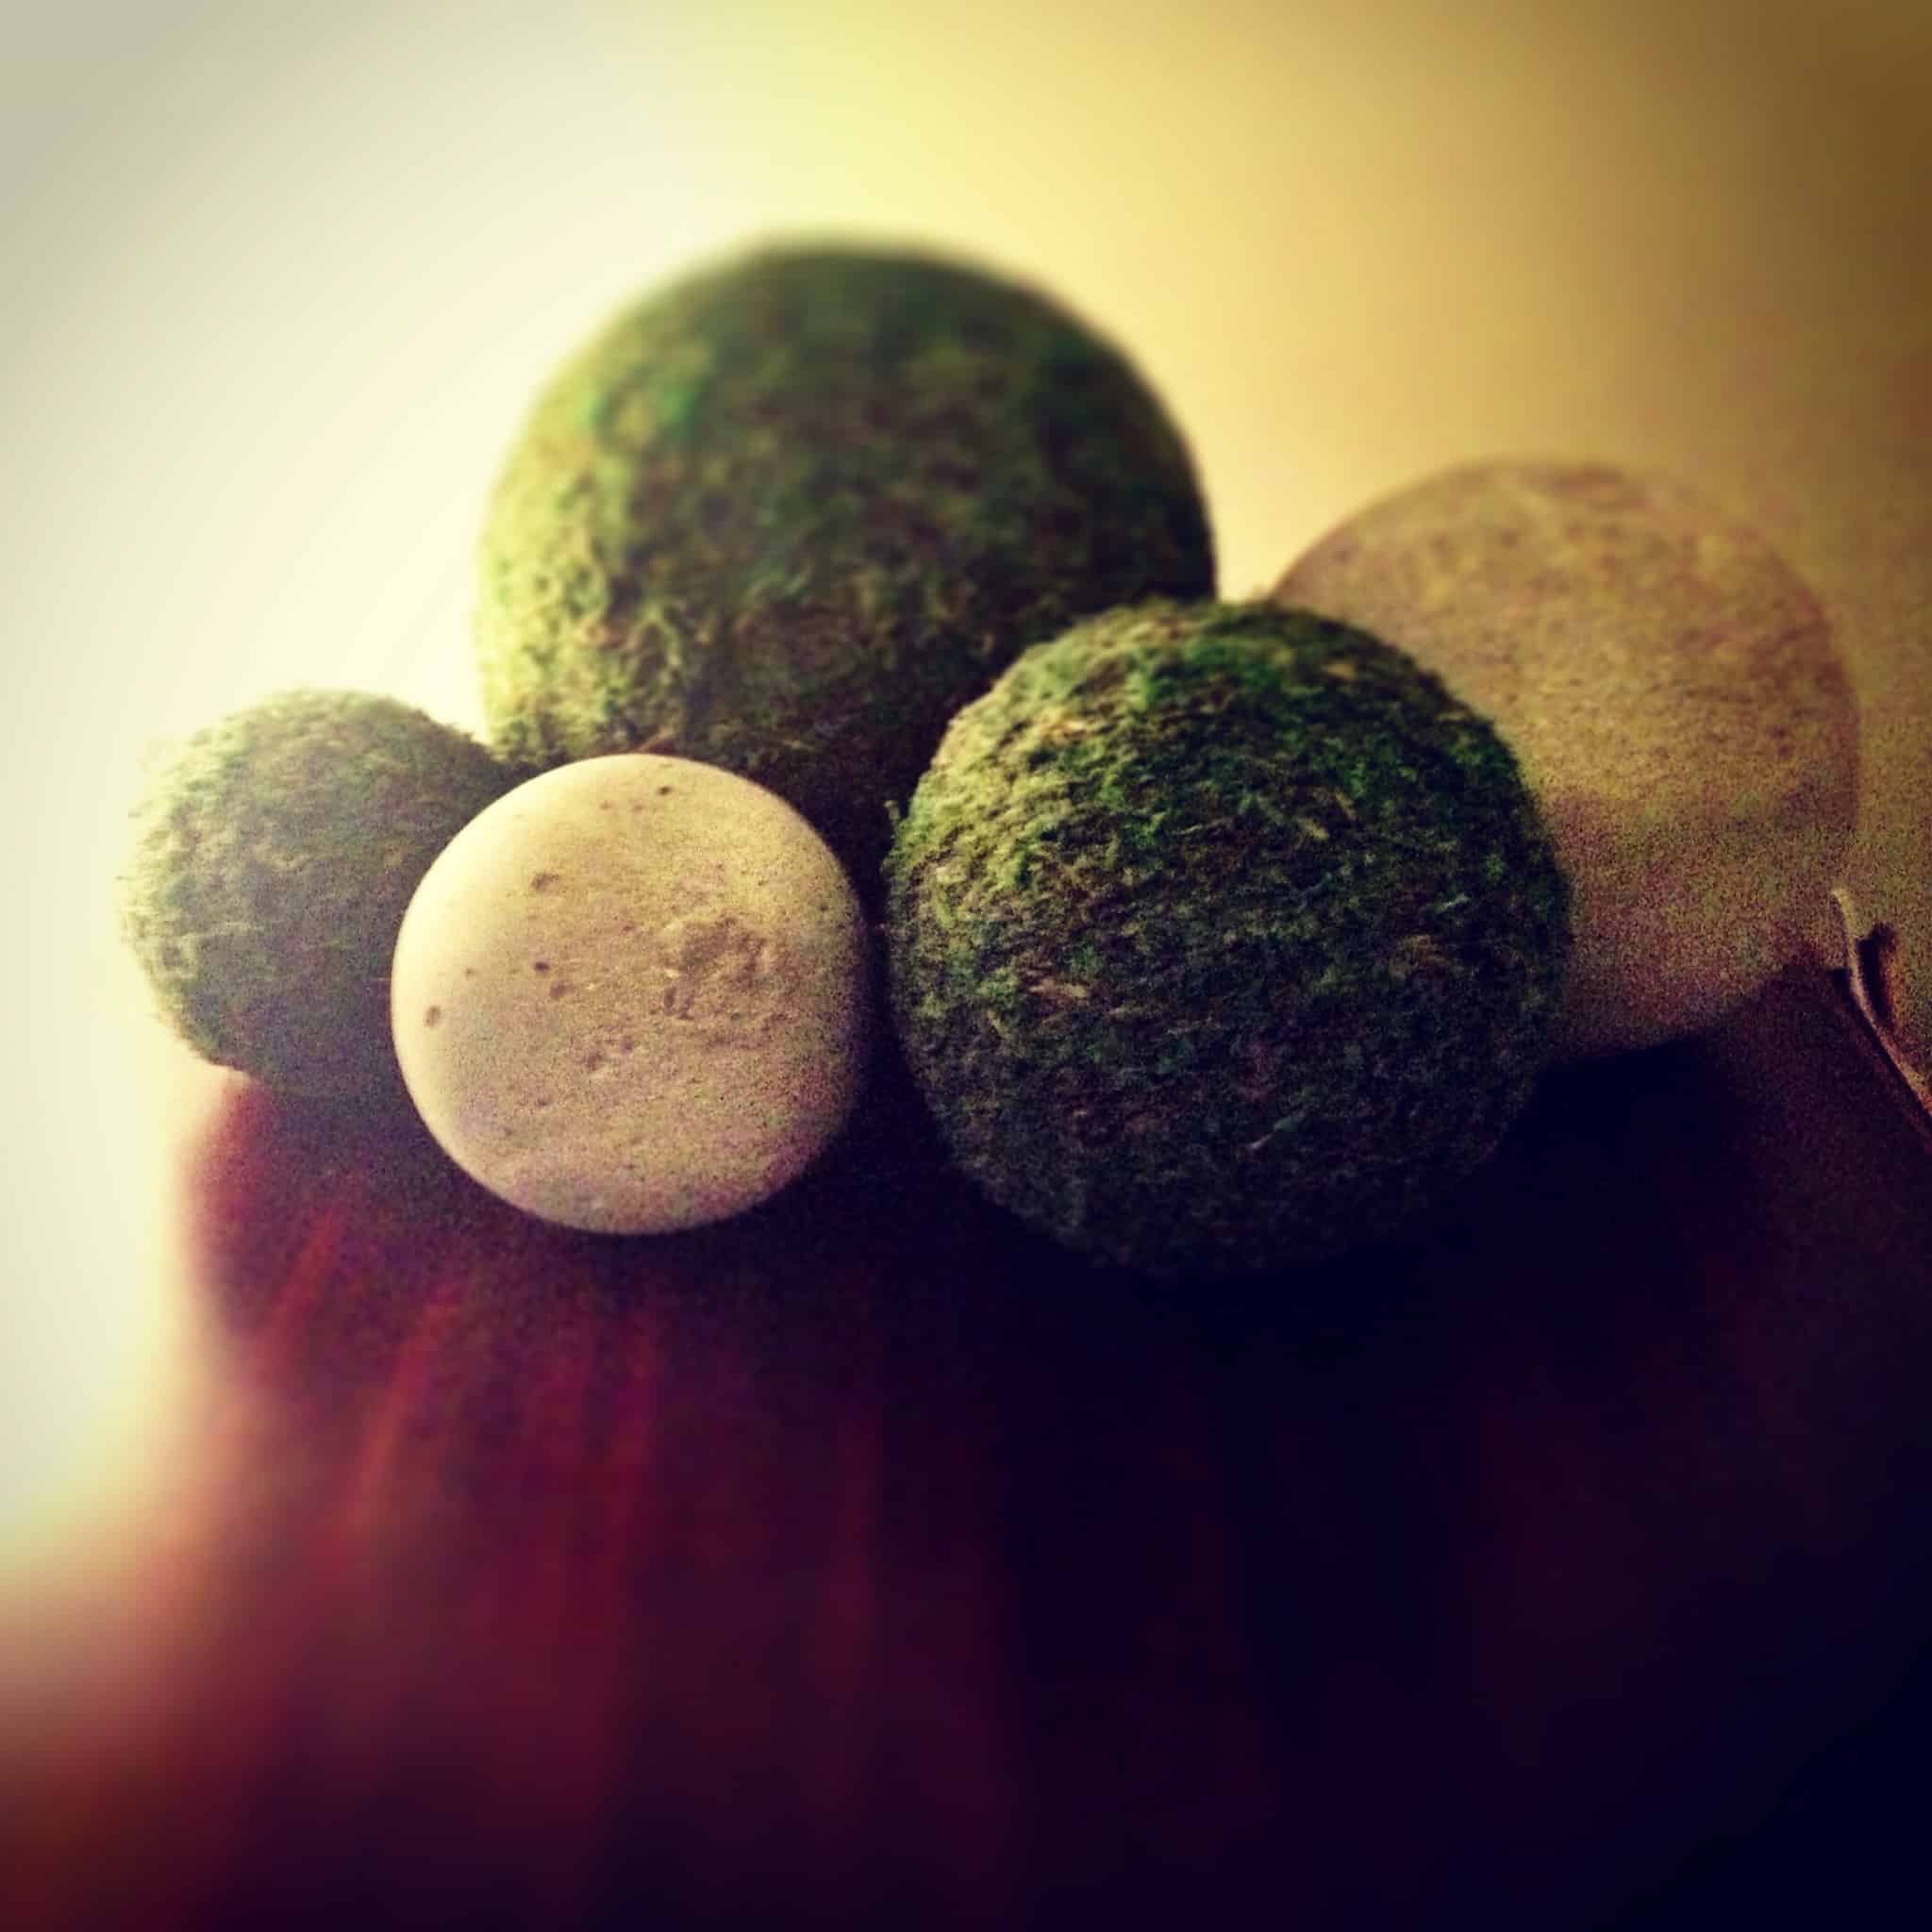
Did we really catch your attention with the idea of making a more natural looking garden ball and you’re already leaning towards making a DIY concrete version, but you’d rather contribute to the greenery of the area rather than using rocks? Then we have a feeling you’ll love the way these looks hand crafted moss covered garden balls look nestled amongst the plants! Find out how they’re made step by step on Hello Homebody.
Everybody loves a good garden, but some of us simply don’t have the option of a backyard. That doesn’t mean we have to totally give up on being surrounded by greens though! You can bring the nature inside by setting up a creative indoor garden that will serve your most basic culinary needs and add to your decor with its liveliness! Check out this incredible selection of DIY indoor gardens!
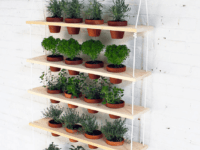
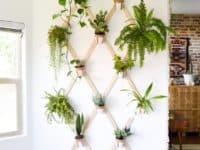
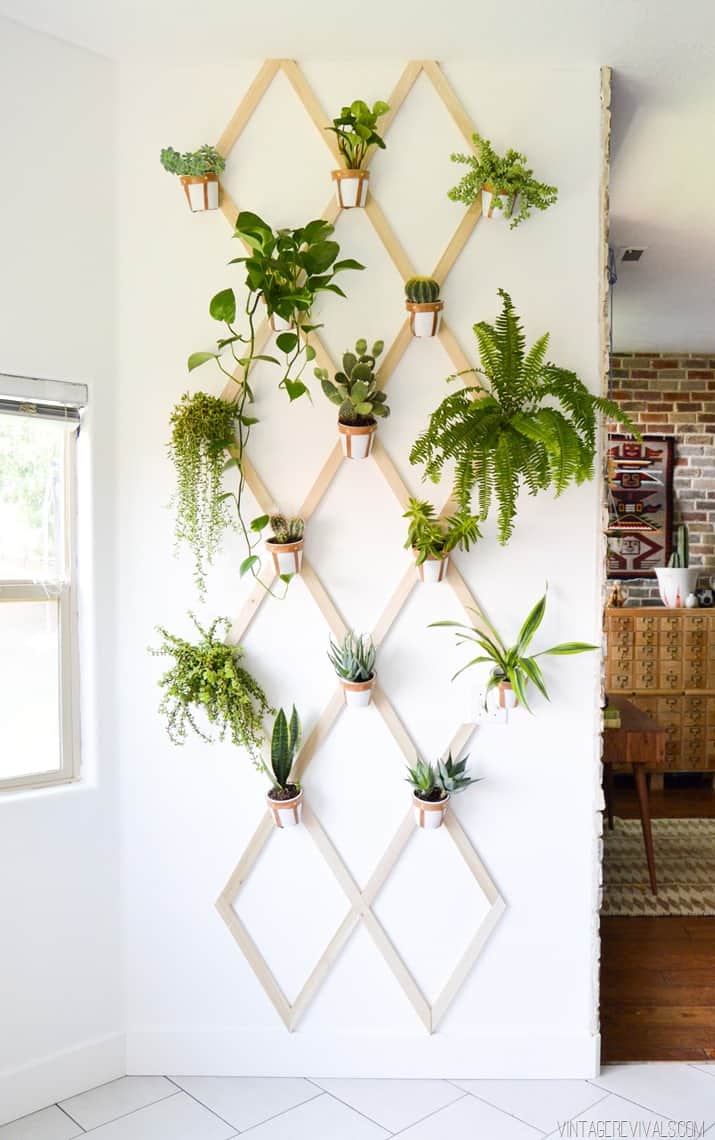
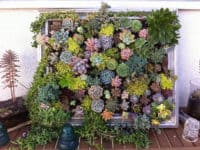
Vintage Revivals features an outstanding trellis wall garden that is a serious competition to any outdoor garden, not to mention a marvelous decor piece! It’s an element that brings together functionality and visual appeal, making it the perfect choice for utilizing a tall vertical space!
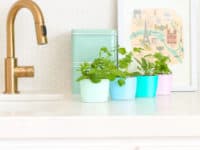
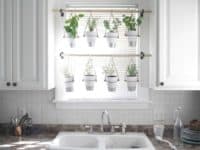
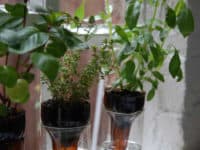
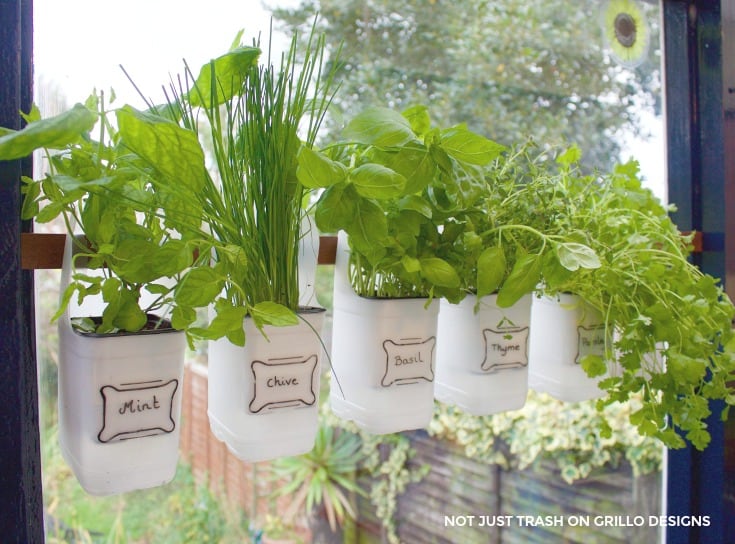
If you love to be creative in the kitchen, you know that nothing beats cooking with fresh herbs. They give any meal a strong and recognizable taste, so it’s always good to keep them on hand. The Bird and Her Song shares a lovely DIY idea for a hanging herb garden!
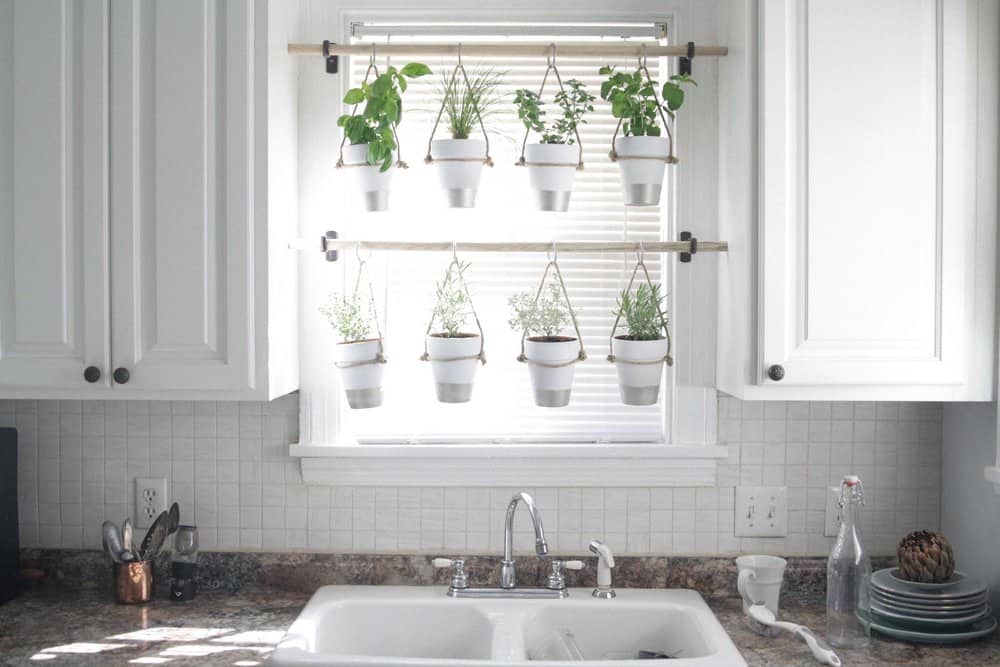
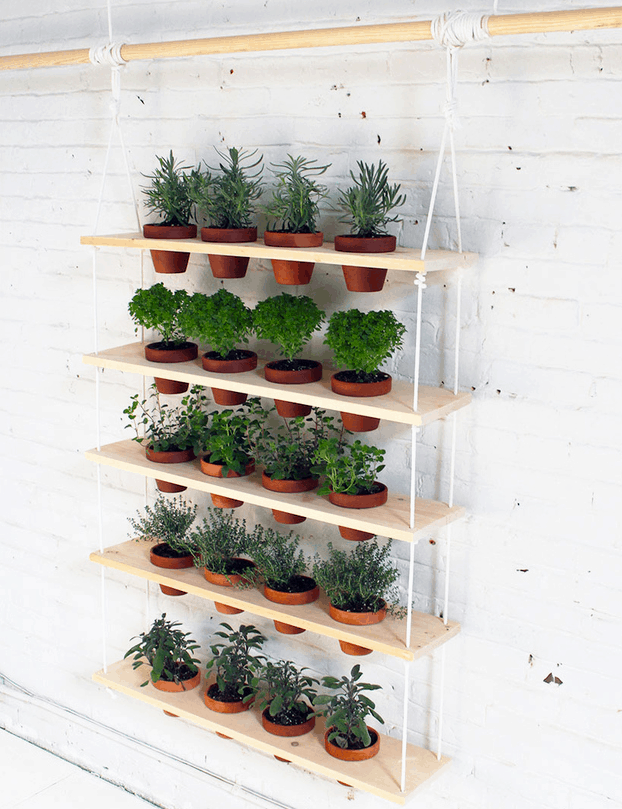
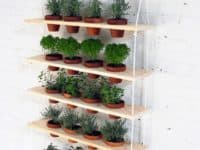
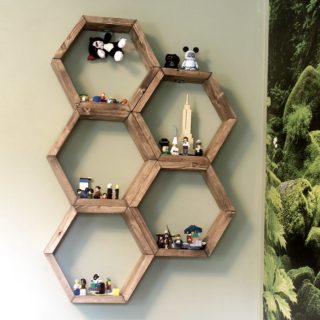
When you’re creating an indoor garden remember that vertical space is your best friend. If you have an empty wall that could use some decoration, visit Homesteading to learn how you can build this hanging shelf garden that provides you with a lot of gardening options!
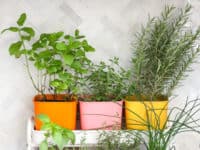
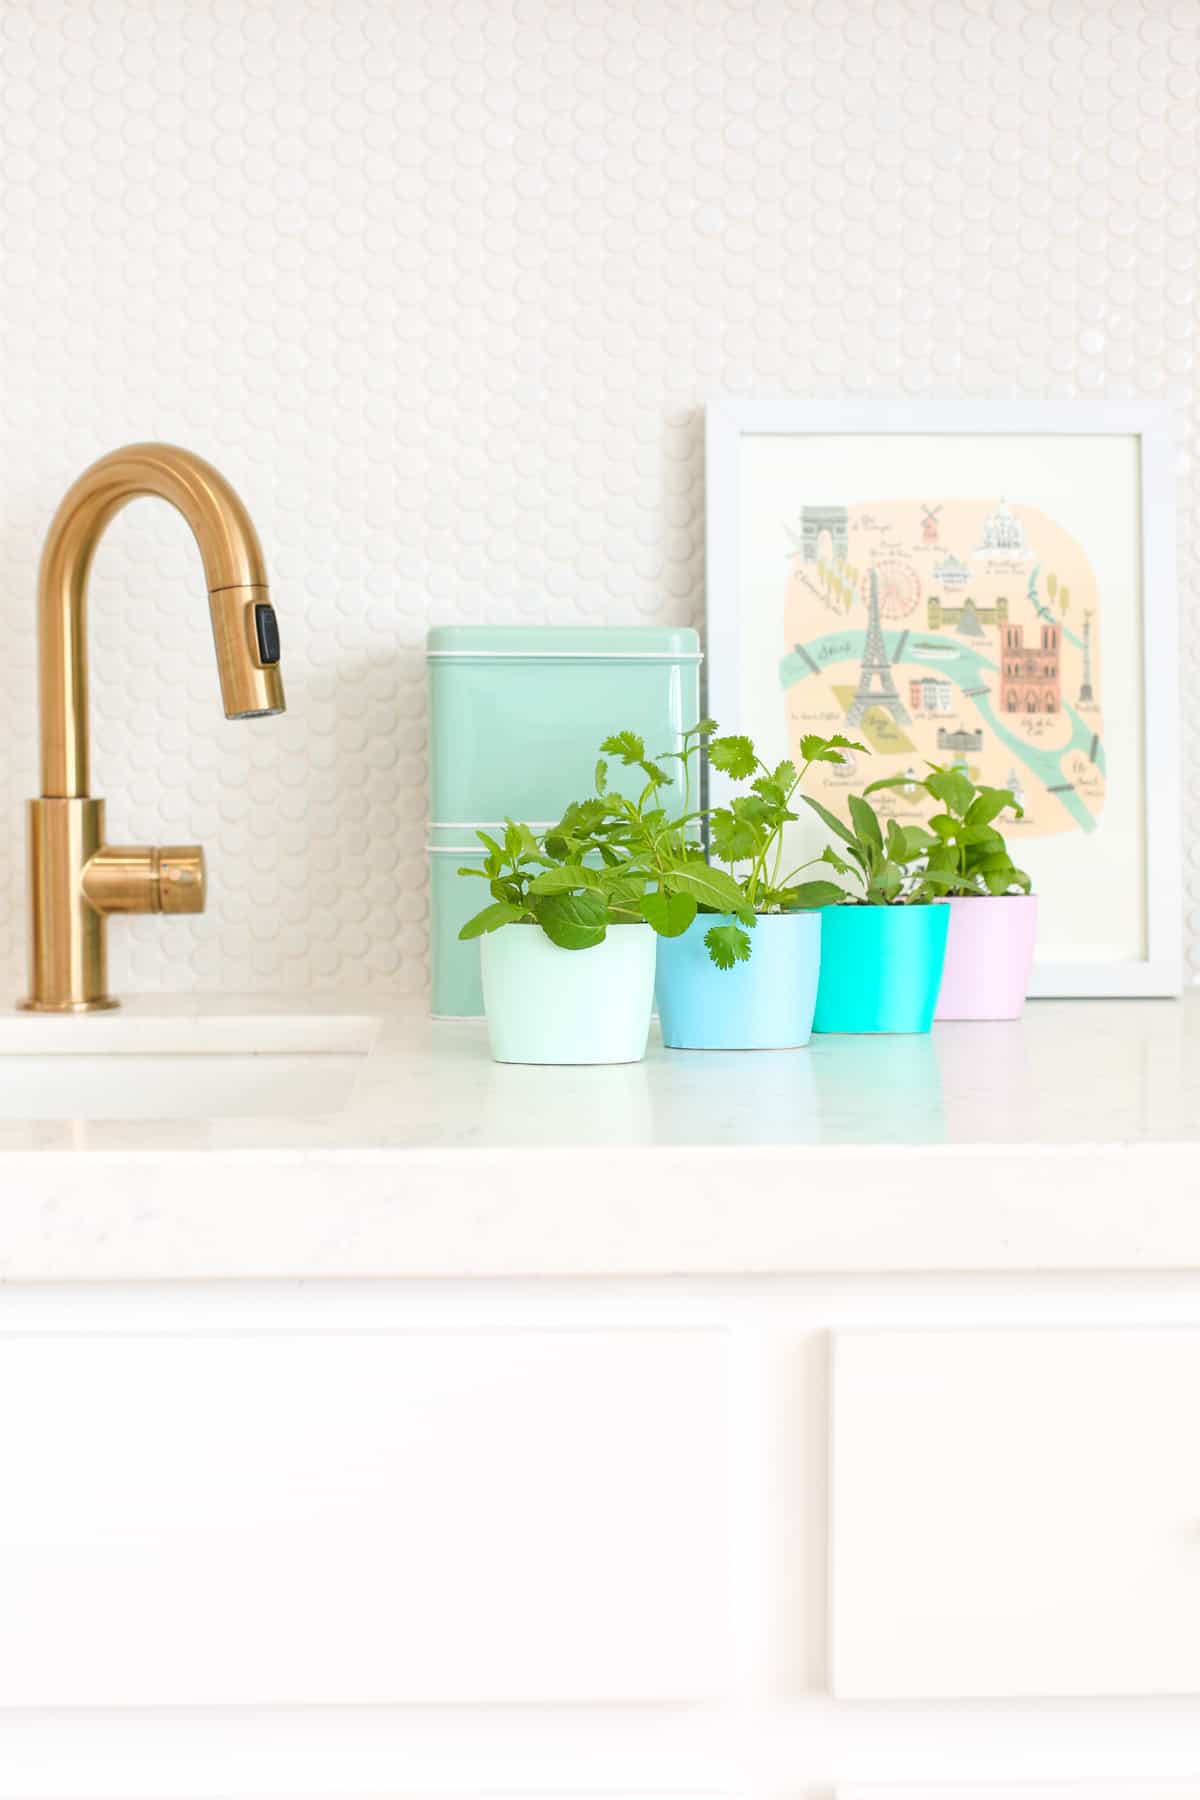
Your indoor garden can be very simplistic. To avoid the kitchen becoming too cluttered, only keep a couple of planters around! This project doesn’t have to put a financial strain on you at all – Lovely Indeed will show you how a few upcycling tricks will result in a super adorable, minimalist indoor garden!
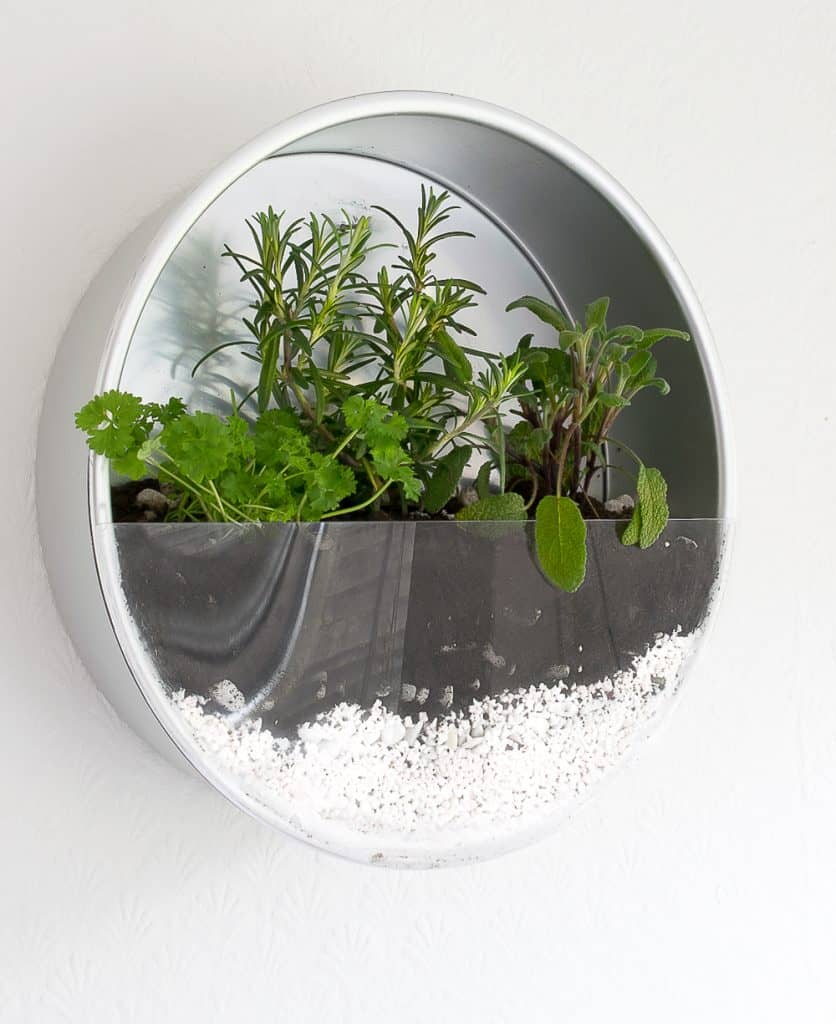
Every time we decide on a new DIY project we first look around our homes to see what we can repurpose and reuse! Did you know that a round baking tin can be a great place to plant your indoor garden? Head over to Grillo Designs to find out everything about this fantastic idea!
Humans produce so much trash every day that any time you can avoid throwing something away and choose to repurpose it instead, you’re doing something good for the environment! For example, instead of throwing away your bottles, why don’t you follow Design Sponge‘s example and turn them into creative planters!
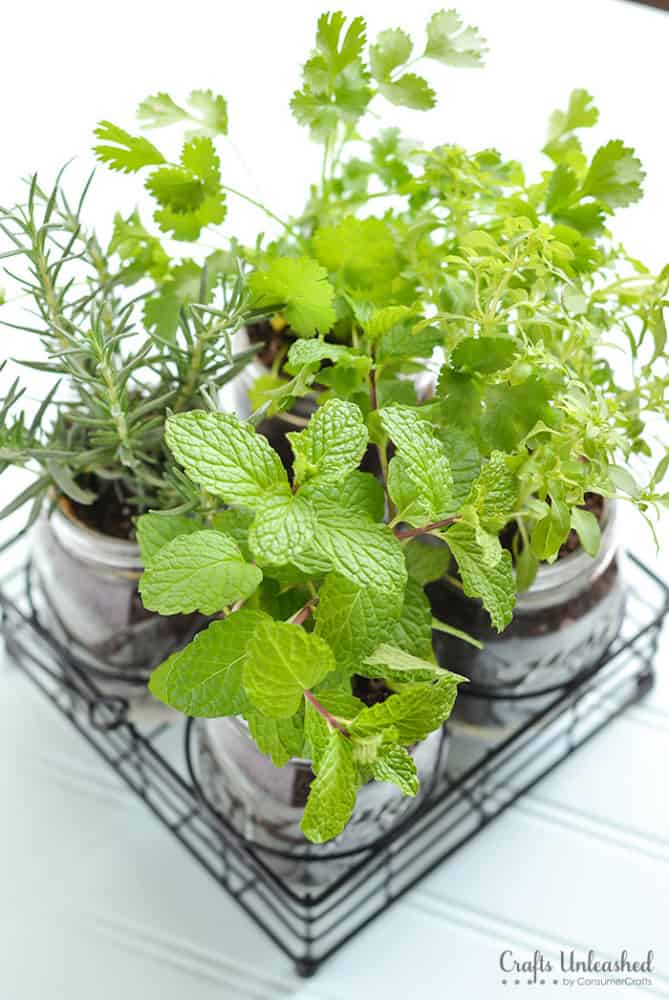
If you are looking for the quickest and most simple way to create an indoor garden, one that isn’t attached to one place but is movable around, our first pick would be mason jars! Crafts Unleashed will show you how you can use them to create a chic herb garden!
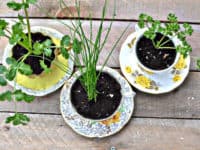
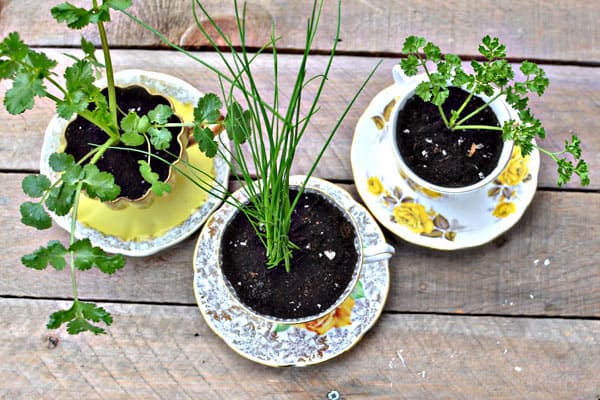
When you’re creating a garden indoors there’s a strong need for it to contribute to your interior as well. Maybe your home could do with a touch of old-fashioned tea party inspiration? Thrift some old teacups and learn how you can turn them into a herb garden at Intimate Weddings!
We love buying things on discount and then using them for a totally different purpose than they’re originally meant for! It makes us feel super creative and a little bit rebellious. Make your own rules and plant your indoor garden in a utensil caddy, following Unsophisticook‘s example!
Before you throw away the big milk bottles, ask yourself if maybe your kitchen could benefit from some greenery? Not only are you going to be able to prepare your meals with fresh herbs, your interior will also be spiced up by nature! Those are reasons enough to copy the indoor garden we found at Grillo Designs!
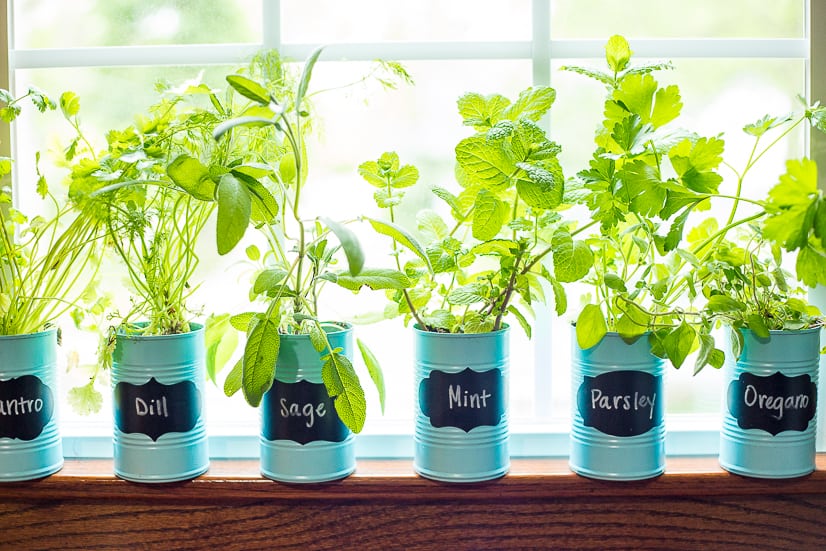
Tin cans are always fun to create with, especially because we usually have them at hand. They are a wonderful alternative to mason jars, because they are a little more customizable and won’t break if they fall to the floor – a great thing to consider if you have kids! Find out all about this tin can indoor garden at The Gracious Wife.
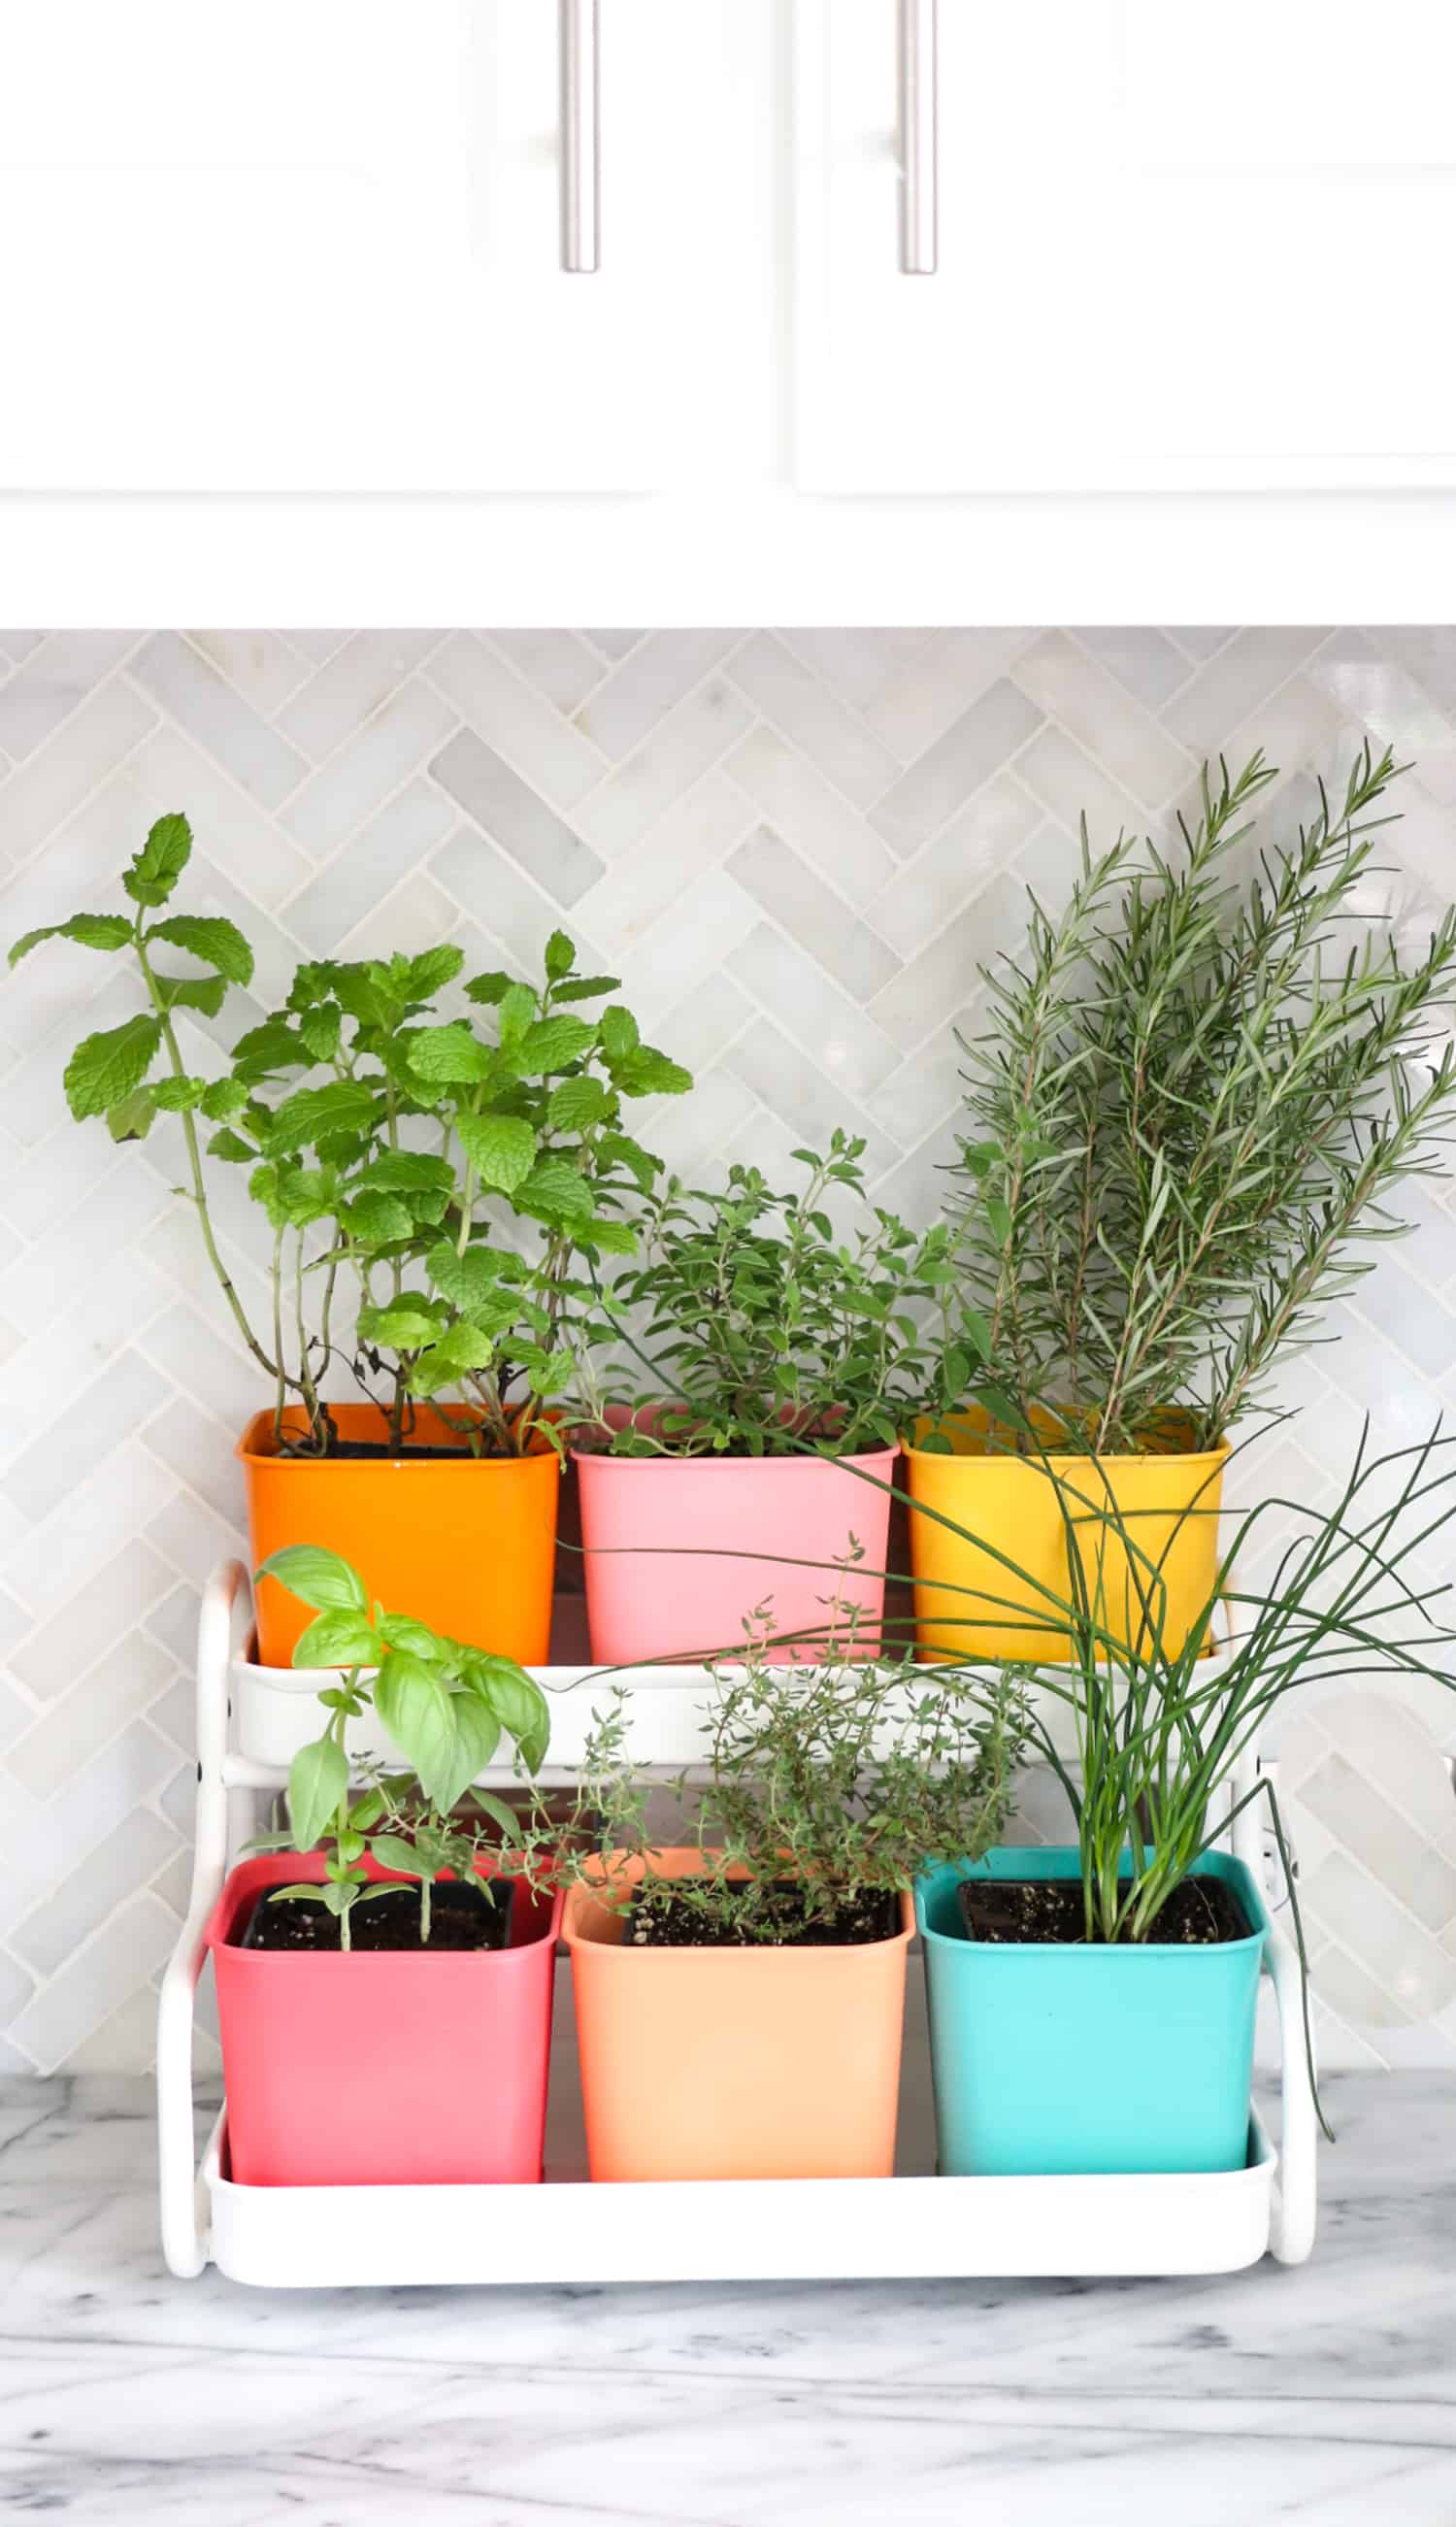
You’ve decided that your home is in a serious need of color and we couldn’t agree more! While we love the monochrome color palette, we are also big fans of infusing our living space with uplifting colors. Make your space more cheerful and lively by re-creating this colorful indoor garden by A Beautiful Mess!
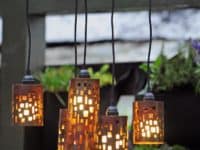
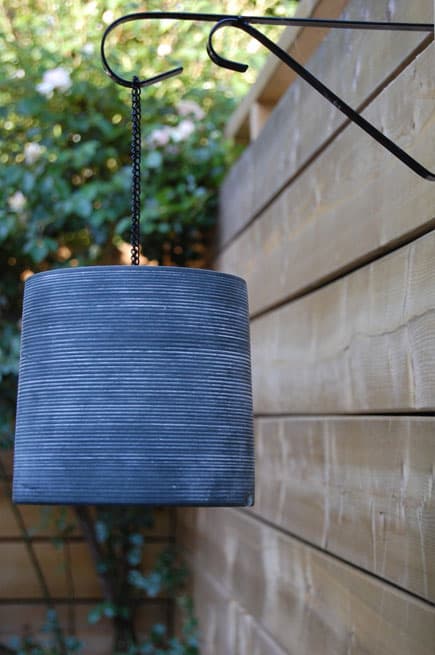
Lighting is always important in any space that you spend a lot of time in, but we find that most people we know forget how crucial lighting can be outside their home, as well as inside. This is especially true on these warm summer nights when you want to spend time socializing with friends on the patio or enjoying some fresh air on your balcony or by the pool! We realized while sitting on our patio recently that our yard was far too dark for our lighting, so we immediately began hunting for cute outdoor lighting options that, like everything else in our lives, we can make all by ourselves.
Just in case you’re in need of a bit of outdoor lighting too, check out these 15 super creative and extra fun DIY garden light ideas that will help you keep your outdoor space as usable as possible all year round!
Have you always loved a project that will let you make something new while also repurposing something old? Then we have a feeling you’ll enjoy making this awesome upside down basket lamp design from The Art of Doing Stuff. We actually made these ourselves and we loved the way the light shone through the spaces in the wicker!
Do you live somewhere very warm where, at least in the summer, a cactus plant might survive and even thrive in your back yard? Then you’ve got the perfect opportunity to make this absolutely awesome project from Apartment Therapy! We’d sure never thought of a cactus as a potential light source before we saw this tutorial, but now we’re practically obsessed with the idea because they look so simultaneously funny and impressive.
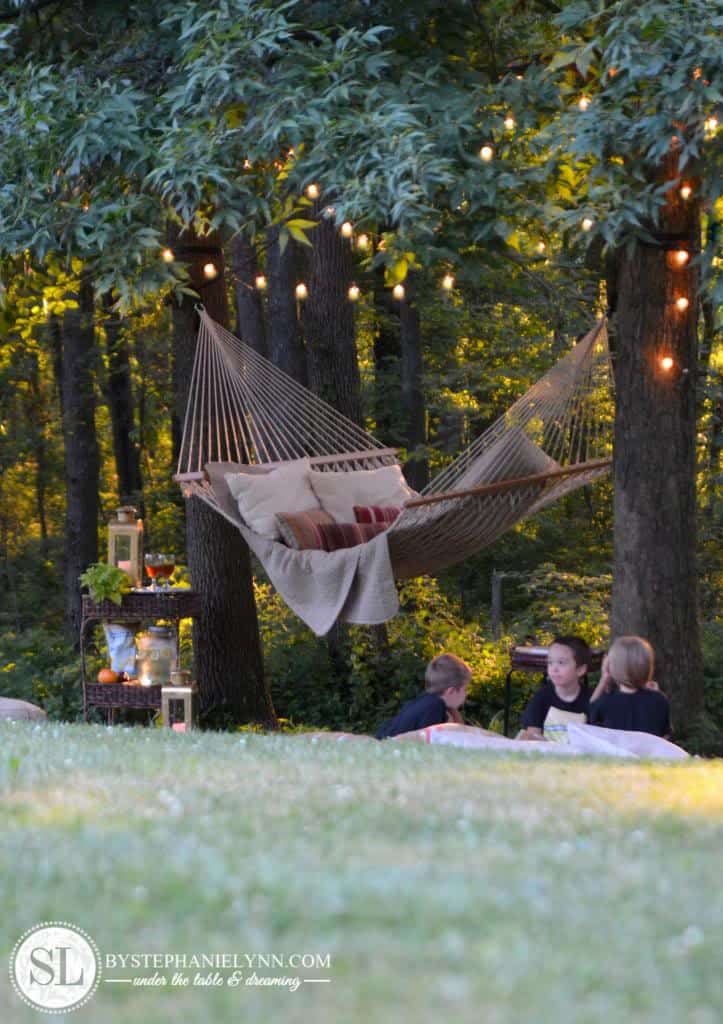
Few things are quite as relaxing as laying in a hammock late on a summer’s evening and feeling yourself sway in the breeze with nothing but calm around you. That is, few things except the magical feeling of doing just that under a lovely set of string lights that look like stars in the sky! By Stephanie Lynn shows you how to fasten and connect the lights properly, positioning them neatly in the trees above the hammock haven.
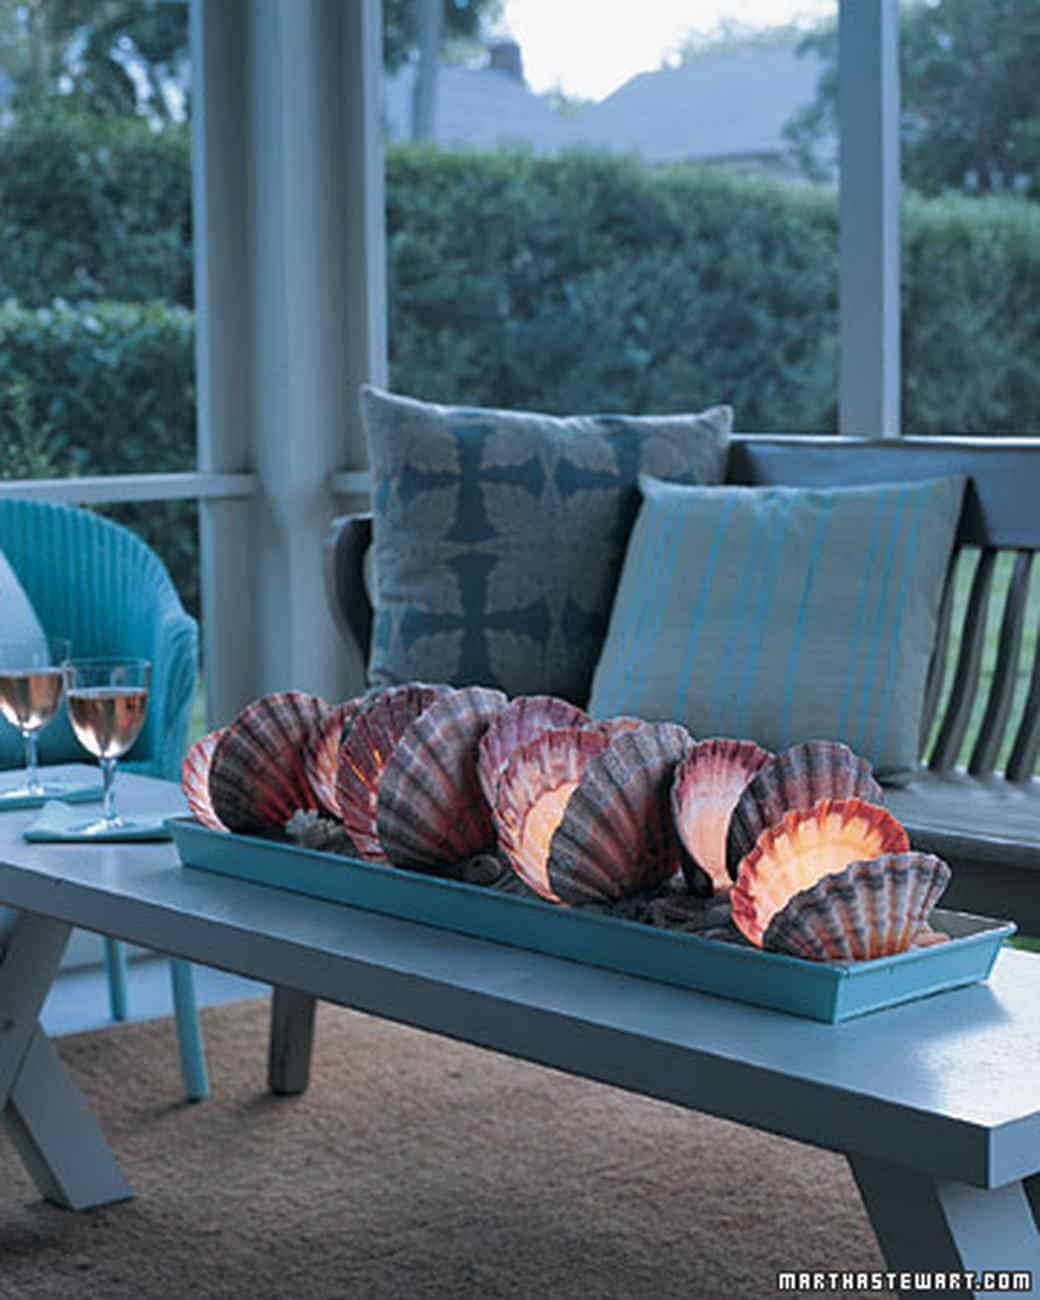
Do you already have decent lighting on your porch so you know you’ll be able to see just find when you sit out there in the evenings this summer, but you’d still like some kind of awesome, crafty lighting alternative to really just set the mood and add some personality to the space? Well, if you’re a beach lover, you’re going to adore this glowing seashell tray idea from Martha Stewart. Their description is brief because you’ll catch on to how to make your own so easily!
Is your very favourite thing to do outside all summer celebrating your child’s birthday in the warm weather? Then here’s an awesome outdoor lighting solution that’s also totally appropriate for the occasion! We love the simple way Crème de la Craft outlines the process of making cone lights out of tools that are super easy to come by; paper birthday hats and simple white string lights!
Okay, we know this picture doesn’t actually show what the lights would look like outside specifically, but we’ll ask you to use your imagination with this one! These stunning little paper origami lights look so whimsical and pretty dangling along a covered porch with the light shining through the colours and patterns that we just couldn’t help but include them on our list. Just make sure the porch is in fact a covered one so your origami pieces don’t get soggy if it rains! Get the full instructions for making your own on Guusje’s Appeltaart.
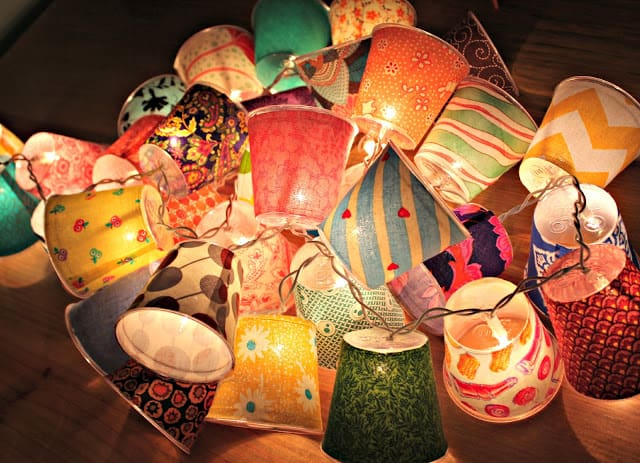
Just to make sure you have lots of options, here’s another simple string light option that will look just as great lighting up your deck or porch outside as it does inside! Taylor Made Creates shows you step by step how they drilled holes in the bottoms of some plastic cups, covered them with differently patterned scrap fabric, and attached them over string light bulbs like tiny shades.
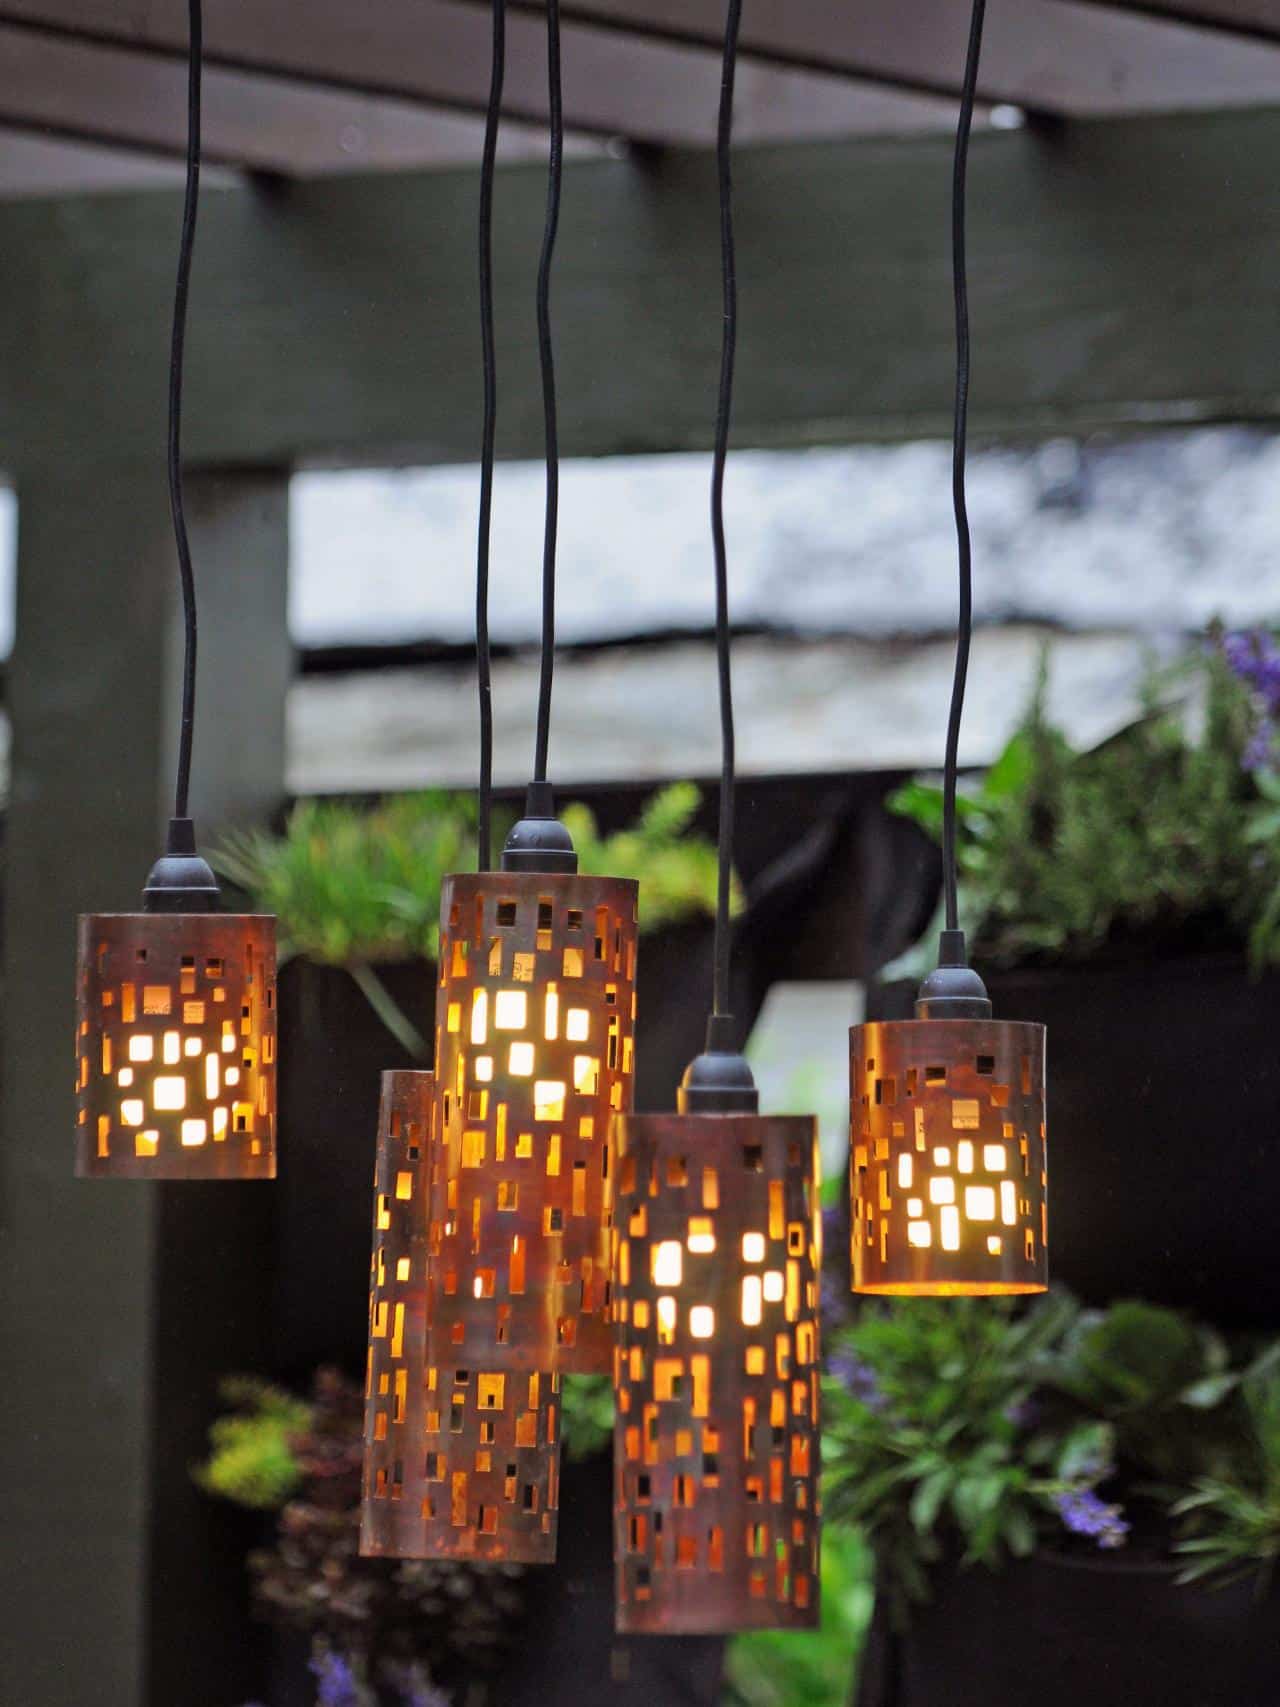
Have you always loved the look of cut out shades no matter the lighting source because of the way the light starts to glow through the shapes for a cool dabbling effect? Then we have a feeling you’ll totally dig the way HGTV made these awesome outdoor pendant lights by cutting the bottoms off some cut out candle holders and fitting them over individual hanging bulbs!
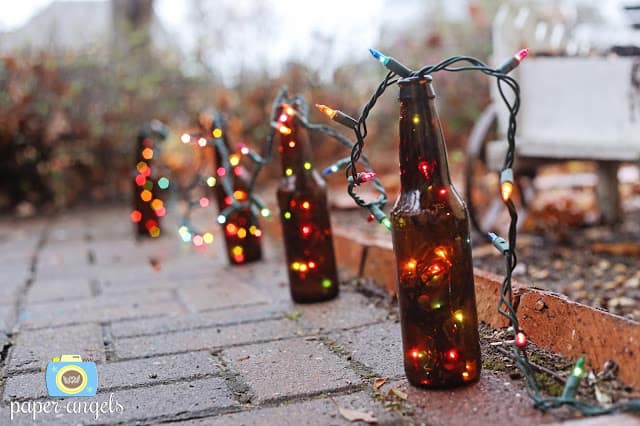
Are you the kind of person who likes to make your love for DIY projects and upcycling ideas apparent whenever you can? We think some of those clearly homemade designs that repurpose household things end up looking the absolute coolest of any designs we see! That’s why we loved this beer bottle string light idea from Paper Angels so much. Their installation is pictured lining a pathway, which is a great idea, but these would also look cool down the centre of the table on your porch, like a table runner.
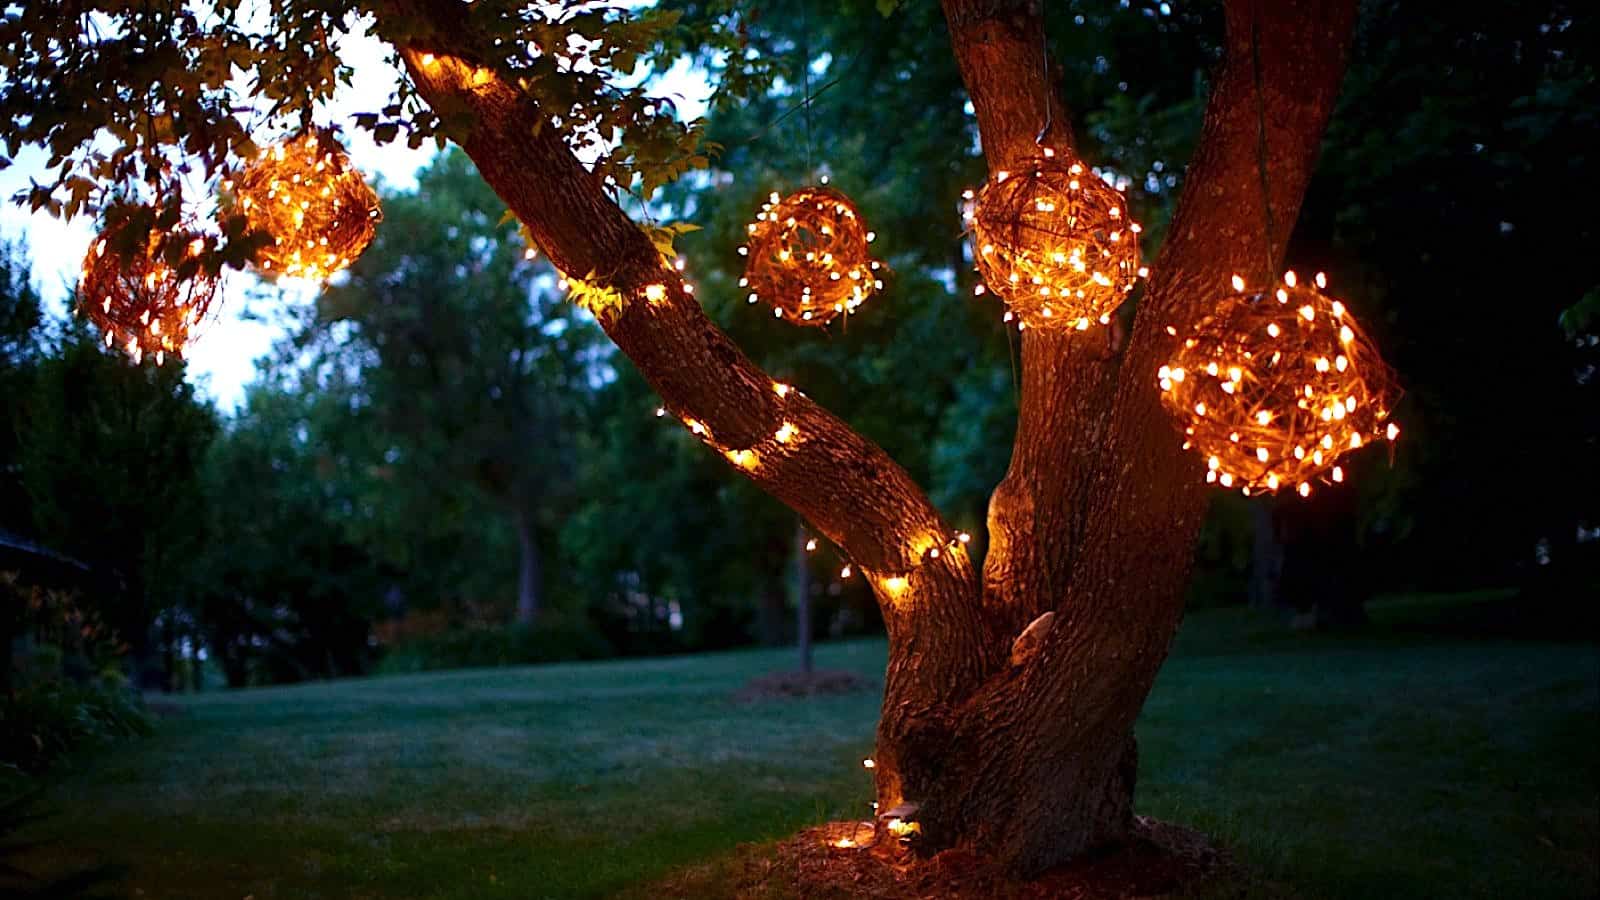
Do you love the idea of light orbs but most of the spherical options you’ve seen so far for outdoor lighting have looked very modern, while your personal style is a little more rustic chic? In that case, we think you simply must take a good look at these grapevine alternatives from Lynne Knowlton! Besides being absolutely gorgeous, they’re surprisingly easy to make for how lovely and woven they look.
We’ve talked a lot about wrapping string lights around structures of various shapes, but can you blame us when there are so many stellar designs to choose from? Just in case we’ve peaked your interest with that concept but not quite kept it with a single idea yet, here’s another one for your consideration! Sarah With an H suggests wrapping string lights around and around a hula hoop and then hanging it from your porch cover so it sits horizontally and dangles a few of the delicate lights in a pretty circular shape.
Are you the kind of garden lover who’s always open to the idea of adding a little greenery to just about any DIY project you can get your hands on? Well, it might not sound like lighting is really the kind of project you can do that with, but Erin Ever After has found a way and it is awesome! Their tutorial guides you through the process of weaving string lights through a tray of lovely little succulent plants to create a glowing display of greenery that we just can’t stop starting at.
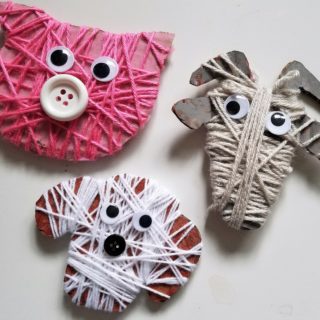
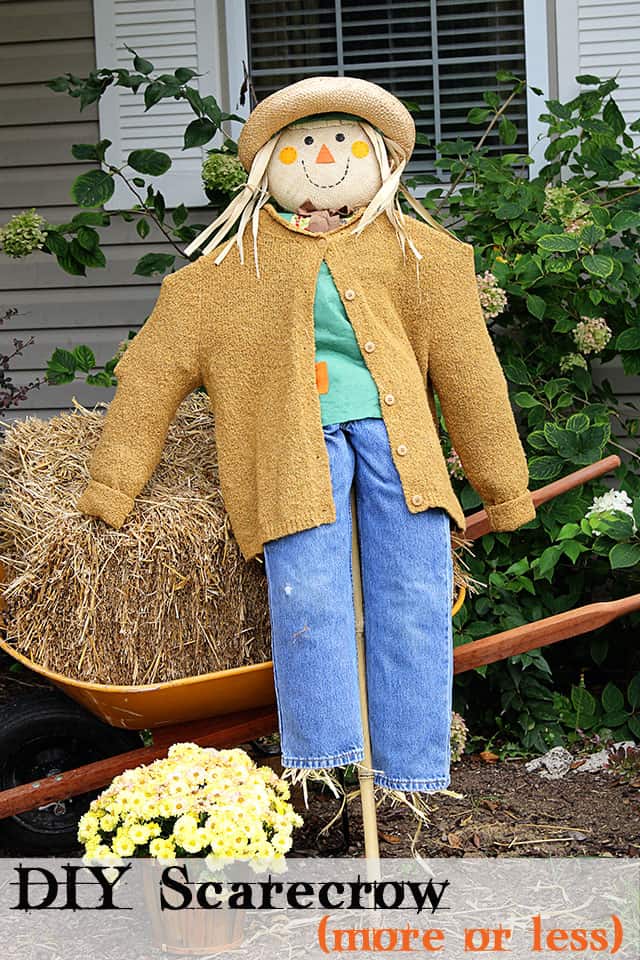
The idea of making your own scarecrow might not be a common one, or at least that’s what we thought until we started actually searching for tutorials! When we decided we wanted to make our own we thought of a few different ways we could do it but we wanted a bit of help and reassurance from people who had done it before. That’s how we found out that there are plenty of other people that make their own scarecrows too and they’ve written about their experiences to help people like us (and you) out!
Check out these 15 different ways to make cute scarecrows of all different kinds to protect your gardens (or even just add a cute country-like aesthetic to your home)
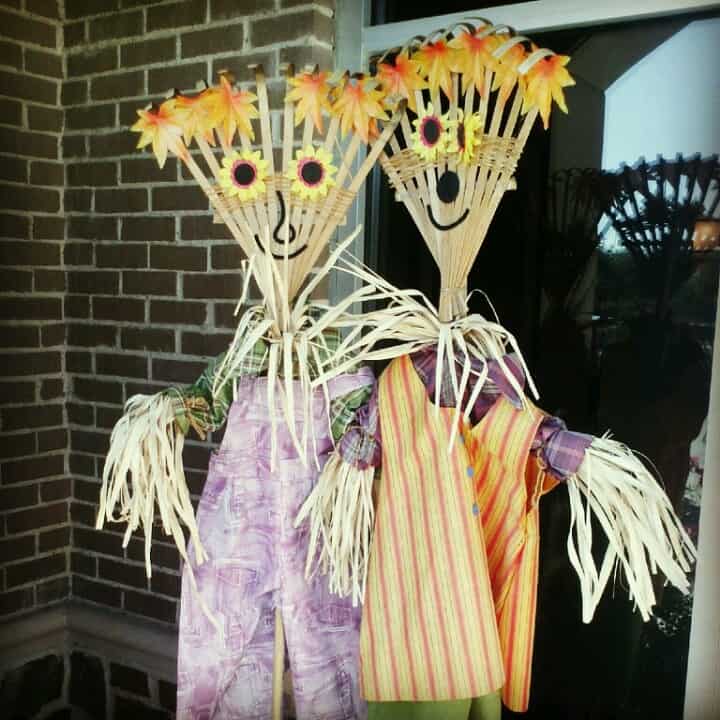
Are you happy to have any kind of scarecrow in your garden as long as it does the trick and looks cute, even if it doesn’t actually have real arms, legs, and a head like some scarecrows that actually mock the human form do? Then this cute little scarecrow made from a rake and some faux hay is perfect! We like the idea of using fake straw rather than real straw because we’re actually allergic to hay. See things in better detail on Pinterest!
Did you have some good ideas about how to make every part of your scarecrow except the frame itself and you’re worried that what you’ve got planned might be a little too floppy? Then check out how We Call It Junkin’ stabilized their scarecrow using a sturdy frame made of PVC pipes!
Was the thing that actually caught your attention most and made you want to make a scarecrow of your own actually a little premade scarecrow from a show? Well, rather than starting from scratch and just trying to mimic what you saw in the store, why not actually use that as a base and build your own ideas on top of it? That’s what House of Hawthornes did here and we think it turned out wonderfully!
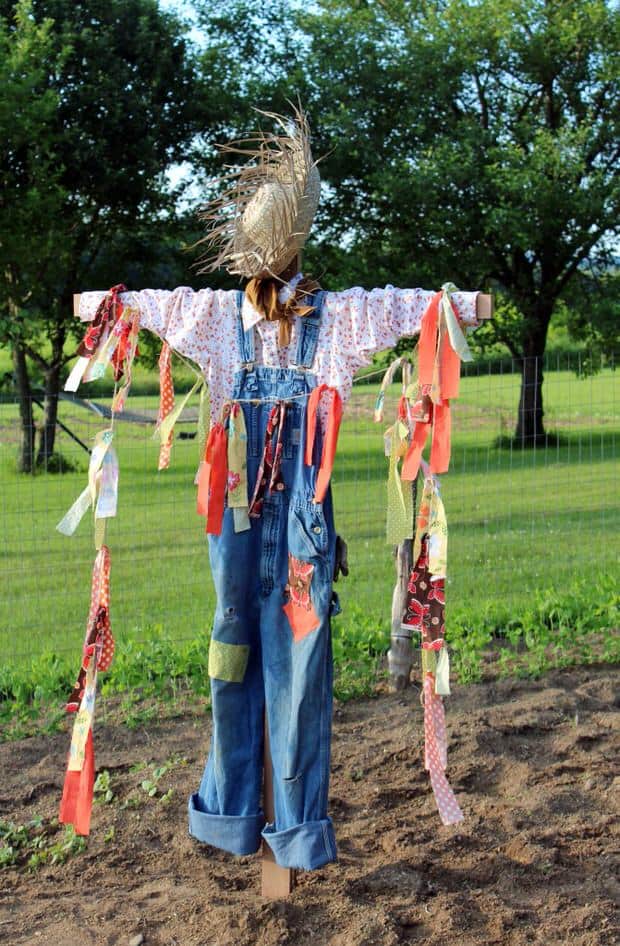
Are you, once again, not that concerned with making your scarecrow look like an actual person but you’d like to make sure it has maximum bird and critter scaring power? There are plenty of ways to do that, but one of our favourite techniques when it comes to both effectiveness and visual appeal is this stripped fabric idea from The Budget Decorator. They’ve used scraps of brightly coloured and patterned material tied to their wooden framed scarecrow so that the strips will blow in the wind and keep animals out of your garden.
Perhaps you clicked on this article hoping to see all kinds of scarecrow themed crafts rather than just tutorials about how to make actual scarecrows themselves? Well, if you ask us, food and things made in the kitchen are just as much a part of the DIY world than anything else! That’s why we loved this adorably decorated scarecrow cookie idea from Blessed Beyond Crazy. This one’s a great idea for getting your kids involved in the DIY process.
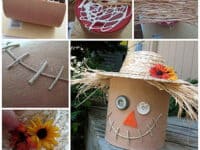
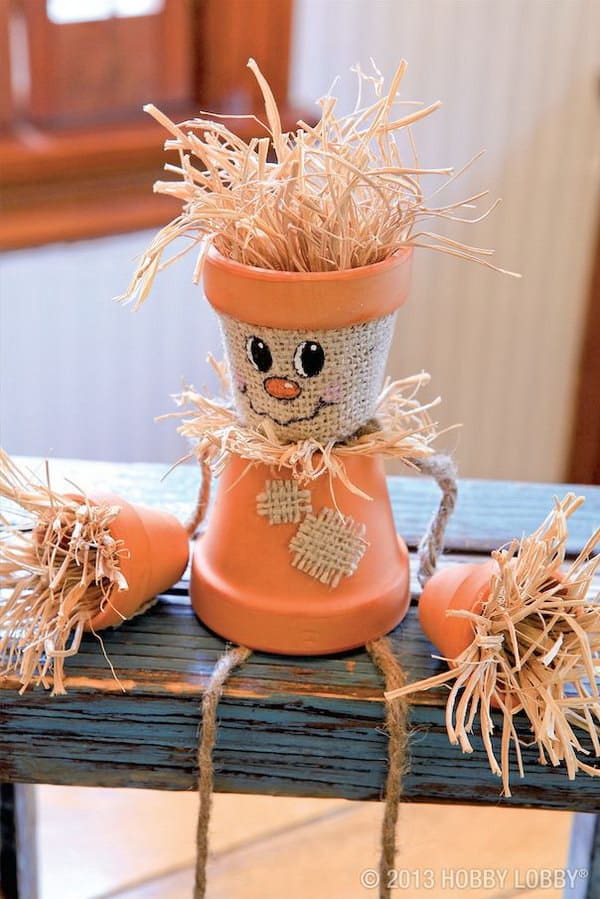
When you picture an adorable little straw scarecrow, does your mind’s eye wander to something smaller and more novelty than the real thing that sits out in your yard? Then maybe you’d prefer this cute decorative version that sits on the mantle! Hobby Lobby Projects shows you how to make it from little clay planting pots.
What if stuffing your scarecrow is the part of the DIY process you need the most help with, rather than dressing it or building a frame? In that case, we suggest you take a look at how Thrifty Northwestern Mom made this one! Their tutorial shows you how to give your scarecrow some bulk in a creative way using balloons.
Perhaps your best DIY skills lie in your ability to paint well by hand? In that case, you’re pretty much already prepared to made these adorable painted scarecrow mason jars featured on Thrifty Fun! We really like the idea of making these in preparation for Halloween since the faces are painted like the jack-o-lantern style of scarecrow we just showed you above, but you could also get creative and make the same idea but put your own spin on it by painting a classic scarecrow face instead if you wanted your piece to look less Halloween specific.
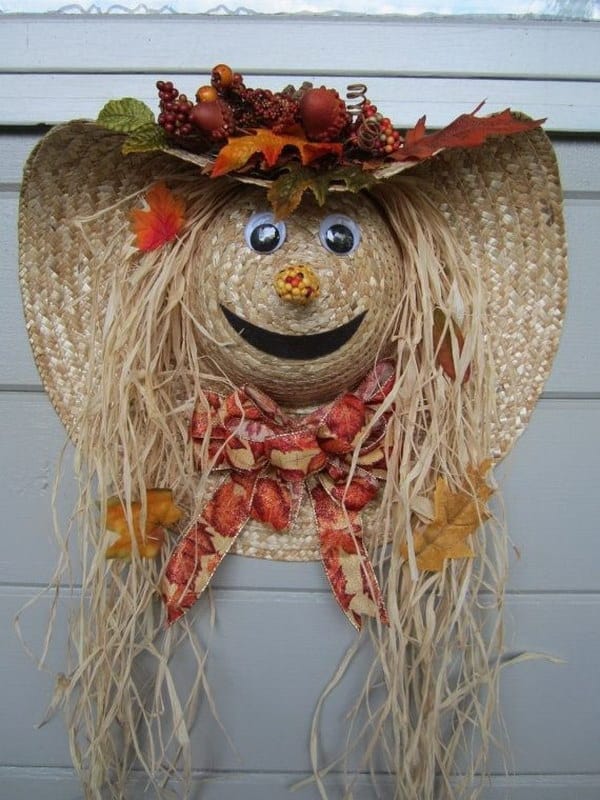
Some of our very favourite DIY pieces are ones that take something you want to upcycle and transform it into something else. We understand that that’s kind of the point of upcycling when it comes to function- here Just Imagine turned a sun hat into pretty décor- but we mean that we like the idea of making the new piece actually look like something specific. This tutorial shows you how to turn the hat into a wreath, but more specifically into a cute scarecrow wreath!
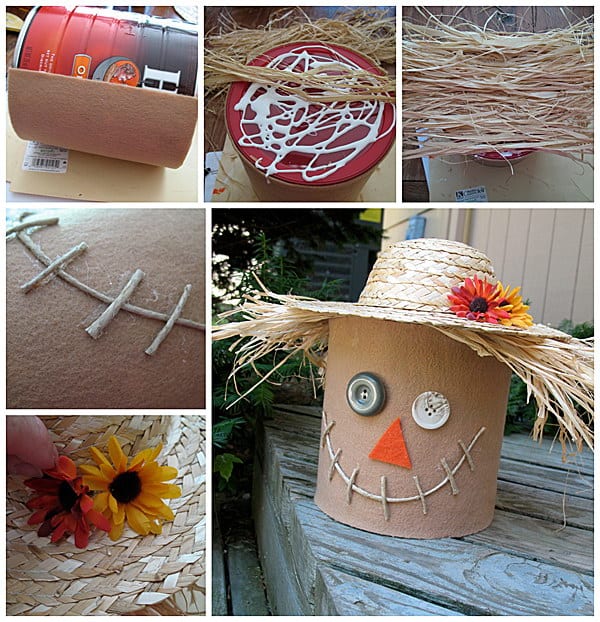
Are you still looking for fun ways to create scarecrow themed crafts with your kids, so you’re leaning more towards a little décor project rather than creating an entire actual scarecrow from scratch? In that case, we have a feeling you’ll appreciate this little scarecrow piece made from a simple emptied coffee tin. Crafts by Amanda shows you how to make it happen using hemp string, fake flowers, and some felt.
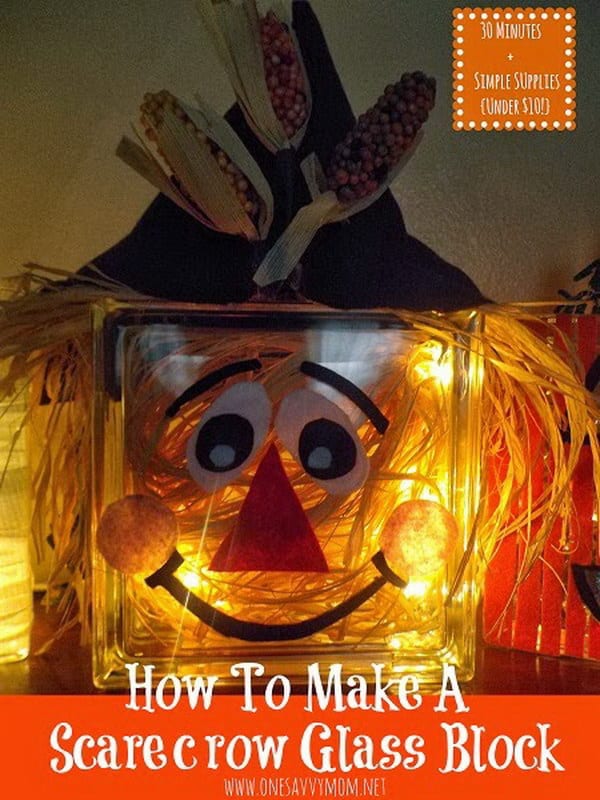
We love crafts and DIY projects that light up. No matter what the theme we’re writing about is for a post, we manage to sneak some type of lit version of the idea onto our lists more often than not. Scarecrows are no exception! In this tutorial, One Savvy Mom guides you through the process of turning the kind of glass box you’d put in a decorative door or garden wall into a little scarecrow themed night light.
While you’re turning everything else around you into an adorable scarecrow, why not turn your child into one while you’re at it? We know that Halloween is quite far away but, like we said, we’re total keeners when it comes to making things in advance. Besides, kids love playing dress up games and will wear just about any kind of costume any time of year! Check out how this cute but surprisingly simple kids’ scarecrow outfit was made on Costume Works.
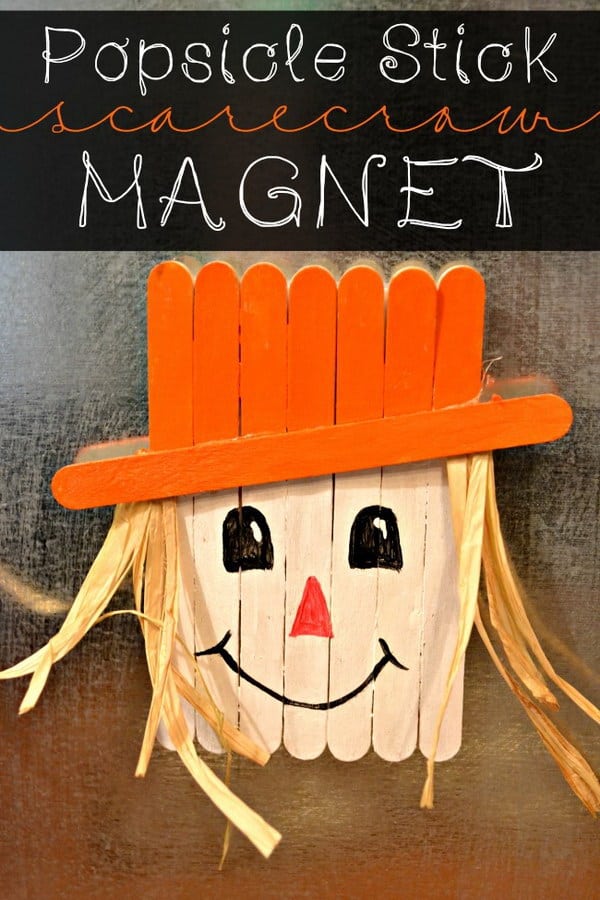
Just in case your kids are loving their scarecrow crafting time so much that you need to have a few more options up your sleeve, here’s one that uses a classic kids’ crafting staple: popsicle sticks! Check out how This Girl’s Life glued them together, painted a cute face on, and embellished the base with straw hair and even a little hat.
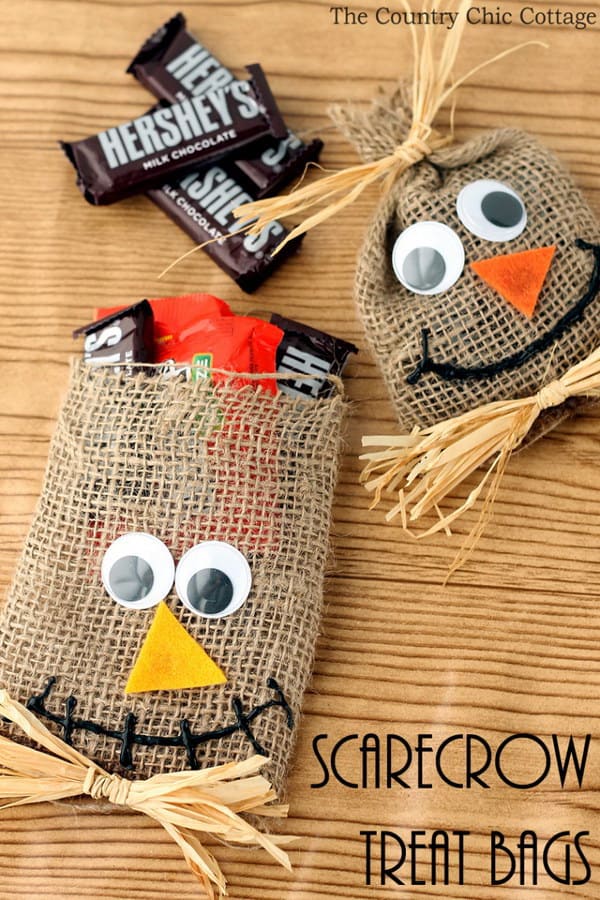
Are you a big fan of gifts and treats for your visitors no matter the season? Well, whether it’s actually fall and Halloween or whether you just happen to really love the cute country aesthetic of scarecrows, we highly recommend these novelty candy bags featured on Old Time Pottery. They’re made from burlap and faux straw and they’re another great thing to get your kids’ help with making!
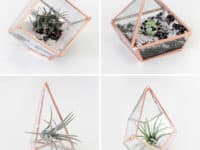
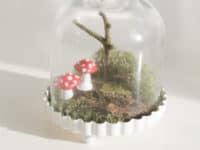
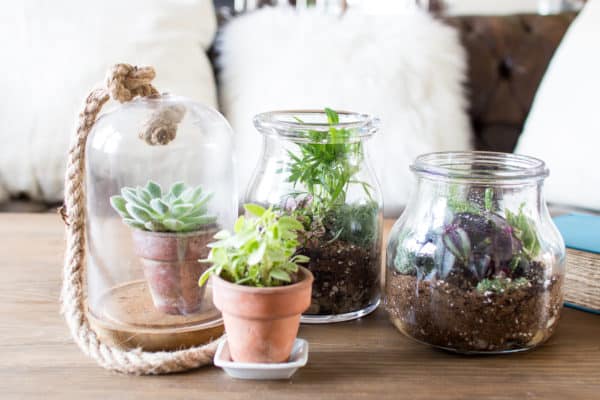
We are drawn to nature and like to bring it in our homes to make it feel more organic, so greenery is often a part of our living space. But as the home decor trends change, so does the idea of indoor gardening. Big flower pots on window sills can step aside, because terrariums have come to claim their rightful place! They are a beautiful and sophisticated way of decorating your home with greenery that won’t grow all over the place! Take a peek at these 12 DIY terrariums!
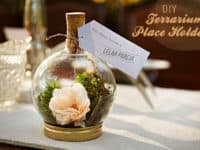
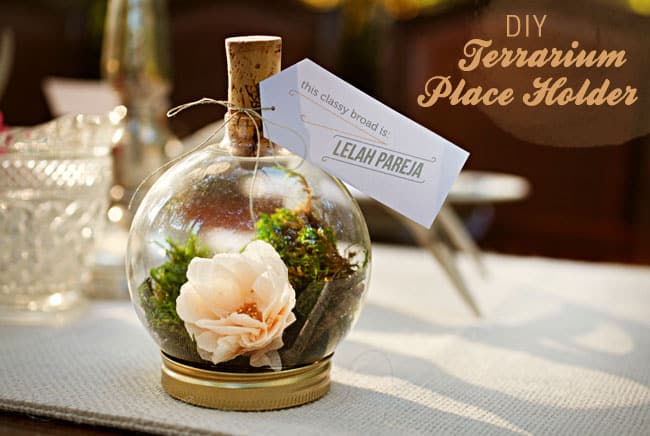
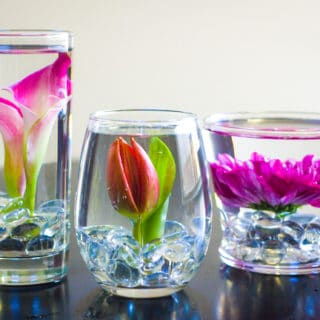
If you are a passionate event planner and your friends refer to you as the Gatsby of the group, surprise them by including a little terrarium in your next event and use it as a placeholder! You can make several of them for your most special people who will love getting something unique and unforgettable! Where do we get these epic ideas? Green Wedding Shoes, of course!
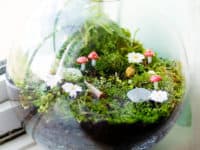
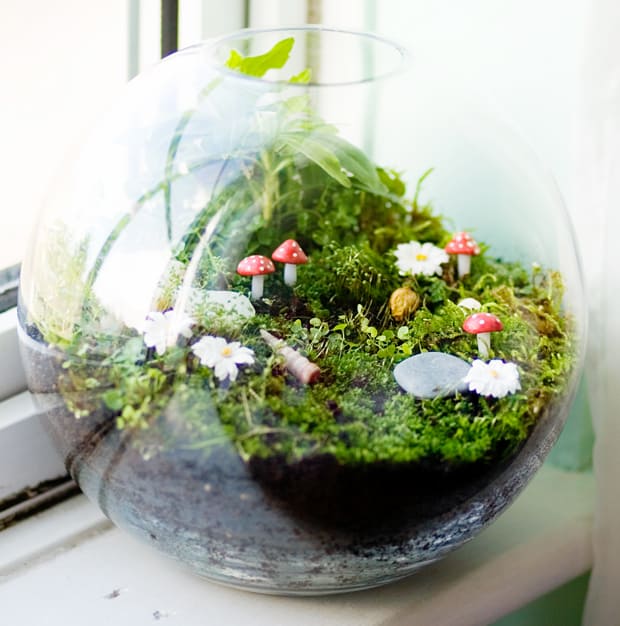
When you try new things, you either do them wholeheartedly or not at all! This terrarium holds an entire ecosystem and is much bigger in size than most others, so it’s important to find a good, well-lit place for it to stand where it can shine in all its beauty! See how CanTeen made it happen!
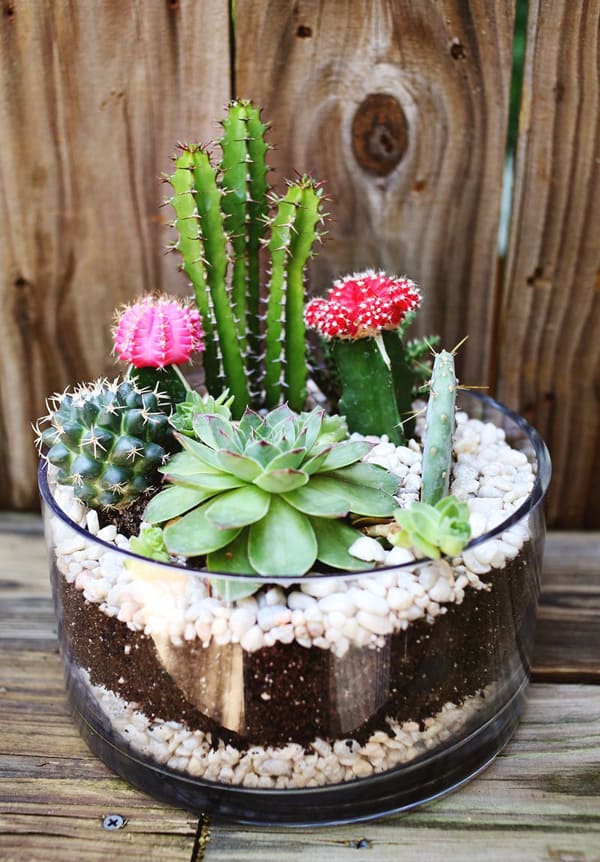
Cacti are easily our favorite plants – they are just so simple to maintain, they are ideal for busy people and anyone who forgets to water their plants because they don’t bark to remind you. Learn at Home my Design how to make your very own sustainable cactus terrarium!
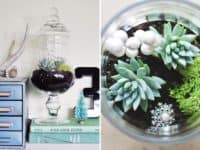
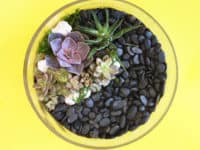
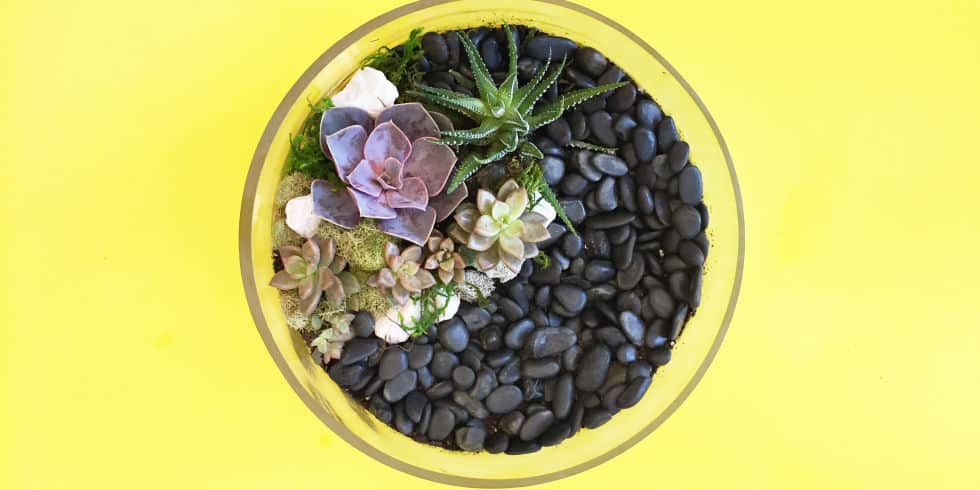
Succulents are almost a must-have in a classic minimalist modern home! They have a beautiful look and aren’t needy! This terrarium by Good Housekeeping will definitely awaken in you a big love of succulents, so roll up your sleeves and get to work!
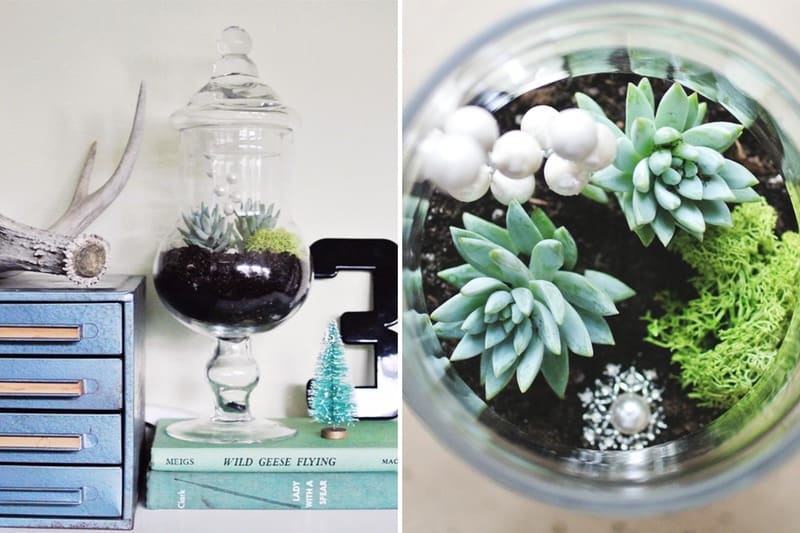
Your eight year old self would probably be very disappointed if they found out you are keeping plants in a candy jar, but maybe you can still treat yourself to a delicious dessert after you are finished decorating your beautiful living space with a candy jar terrarium inspired by Brit + Co!
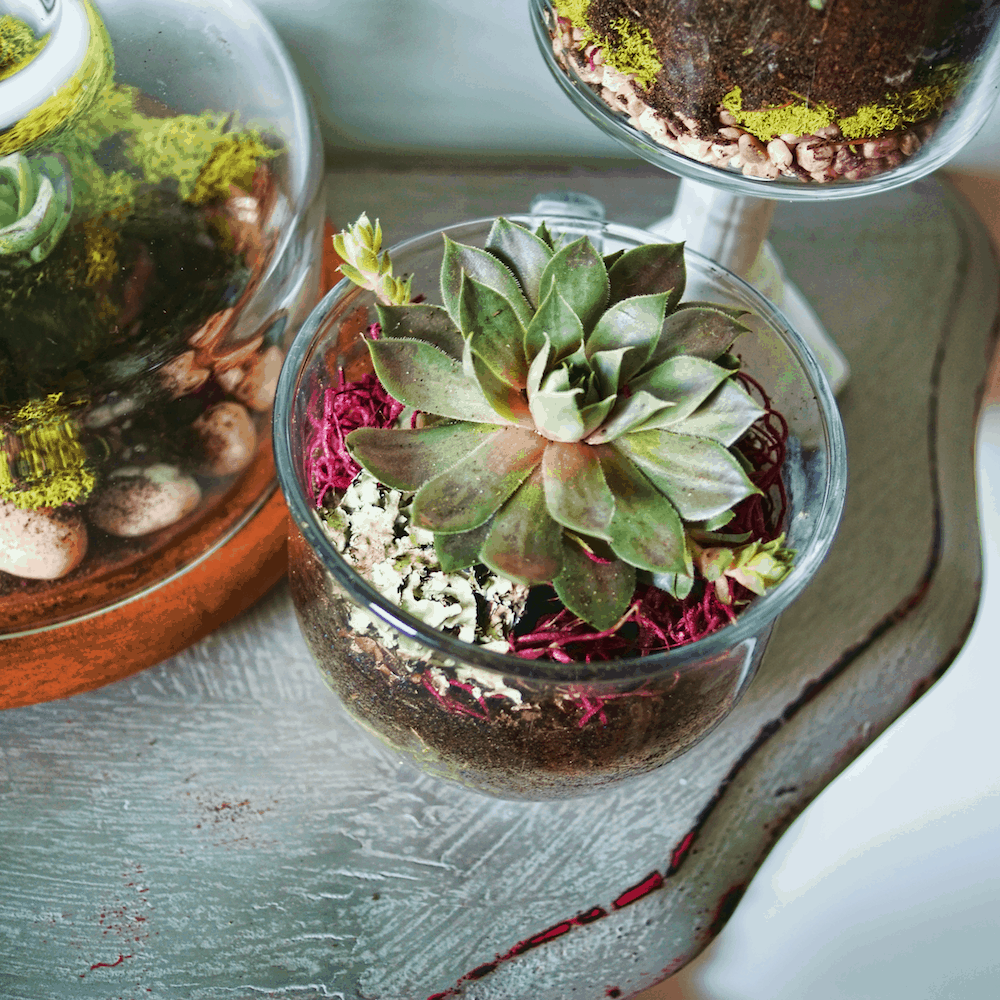
Love the concept of a terrarium but don’t like too much nature indoors? Opt for this tiny decorative glass terrarium that is incredibly chic and delicate, taking the decoration to a whole new level of miniature! Don’t worry about the tutorial, Why Don’t You Make Me happily shares it!
What do we always say? No excuses! Even if you are the busiest bee of the hive, you can clear an hour of your time and make this simple terrarium that won’t take more from you than 60 minutes! The clock is ticking, so head over to Saved by Love Creationsasap!
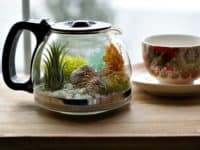
We love innovative ideas that make us gasp with surprise! A Charming Project shows us what a lovely decoration a coffee pot terrarium can be! Not only do you gain a cute terrarium, you also honor your coffee pot and repurpose it in the best way imaginable!
You want a terrarium, but you also want to keep things simple and minimalistic. Check out this bell jar terrarium by Ruffled! It has such an air of elegance, it seems like the ideal piece for a home where everything is always squeaky clean, polished and bright!
Don’t get too intimidated by all the fancy glass bowl terrariums you see on the internet. If that’s not your thing, don’t feel pressured! As Finding Silver Pennies will tell you, you can absolutely make the best terrariums in classic kitchen glass jars!
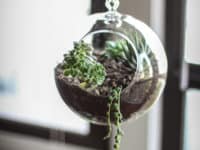
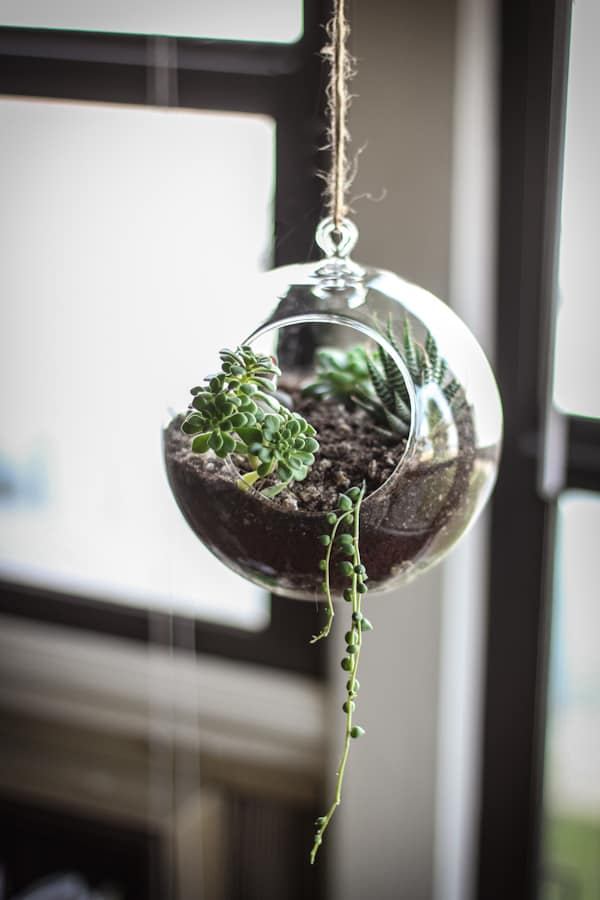
Try something different and hang your terrarium to give the room a dynamic natural element that feels like a little world captured in glass. Some people swear by wind chimes but you get to challenge them with a terrarium! Get a detailed tutorial at Adventures in Cooking!
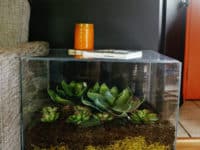
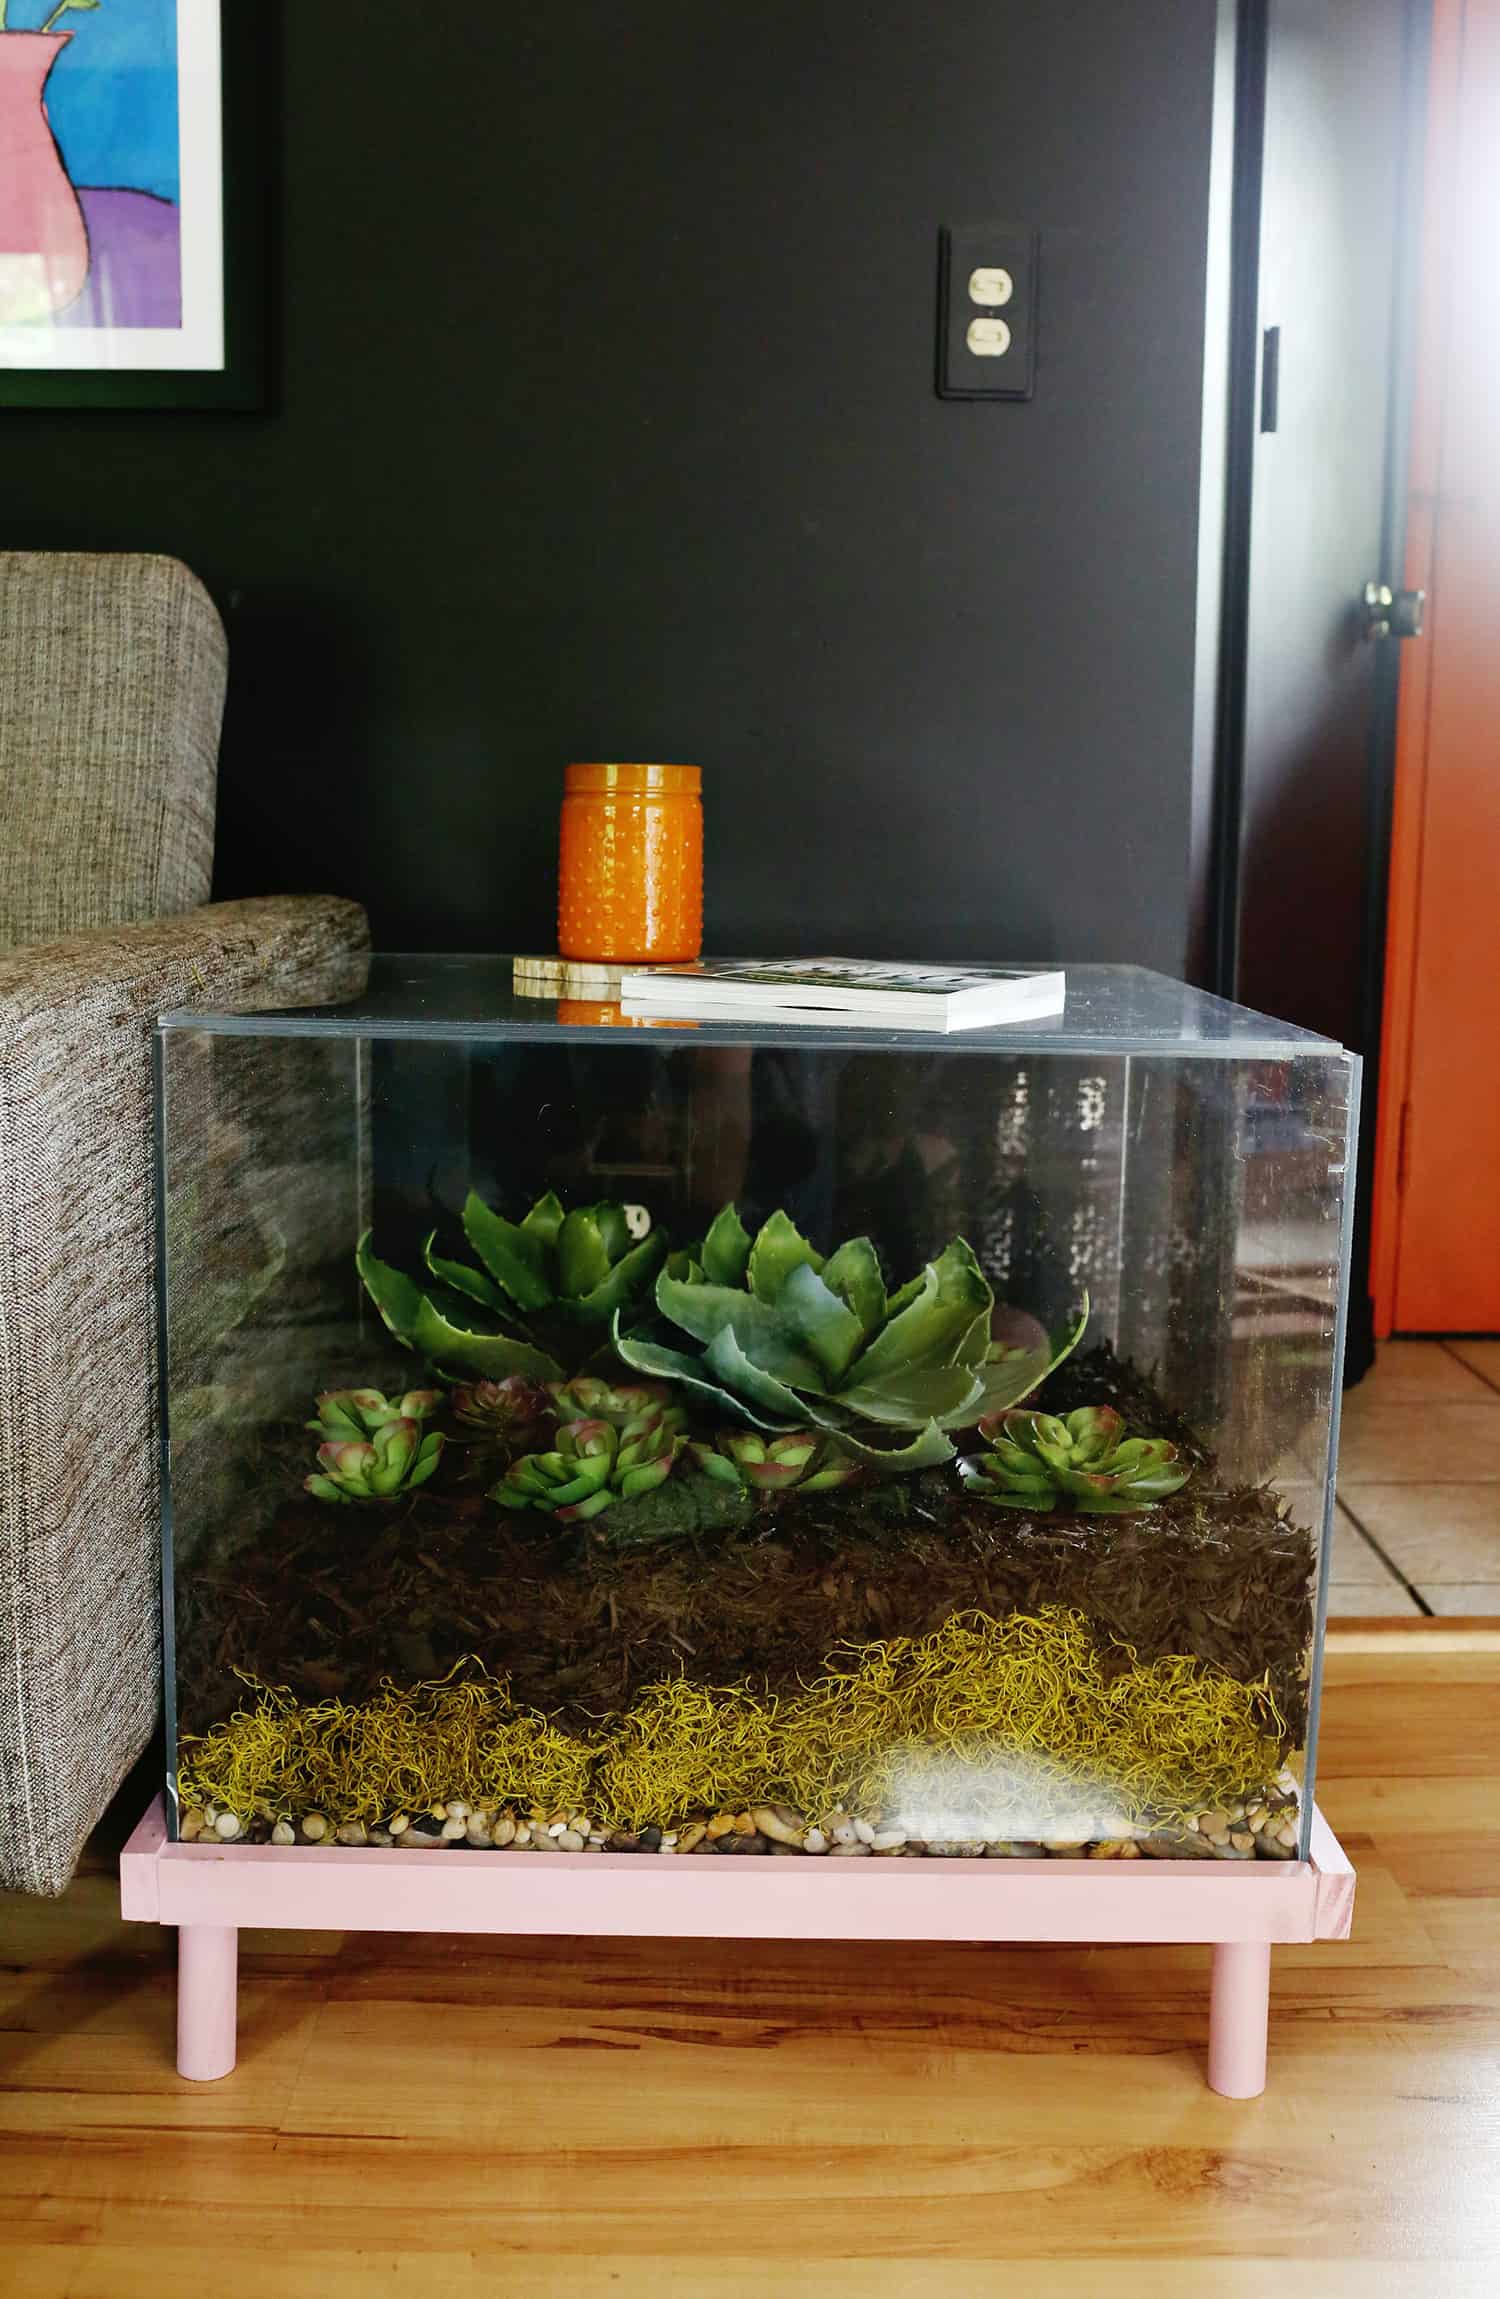
If you want to take your homemade terrarium game to the next level, A Beautiful Mess has the perfect project for you. Make a giant terrarium and turn it into a side table! That’s right, your modern terrarium can now double as furniture! Life is but a dream!
Be a good friend and share this roundup with all of your greenery-loving friends!
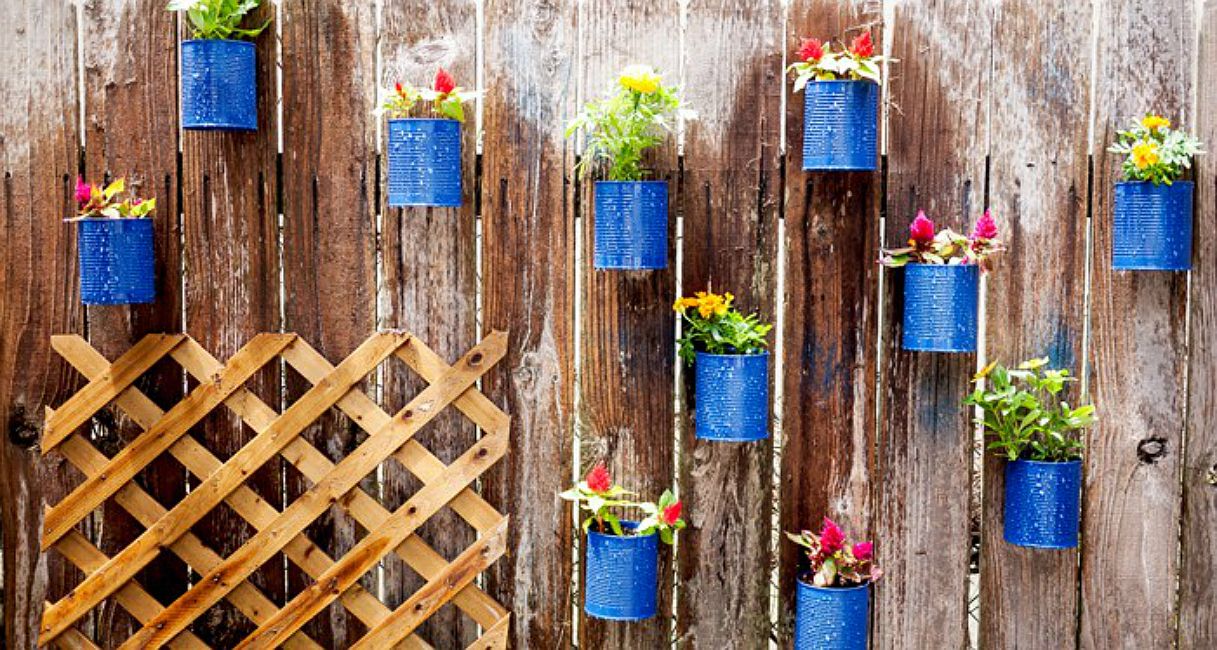
When you’re gardening, fresh ideas are always welcome! Each year is a new opportunity to try out different gardening styles and continue learning about the soil and what it can provide for us. It’s never too early to start looking for ideas; we have stumbled across some really amazing vertical gardens and we absolutely have to share them with you! Here are DIY vertical gardens for your very own dose of unconventional gardening!
If you want a vertical garden but don’t think you have much space to work with, this idea by Luna See will come as a relief! You can fit your greens within a simple frame and create an enchanting small garden! Succulents are very sustainable and therefore ideal for first-time gardeners!
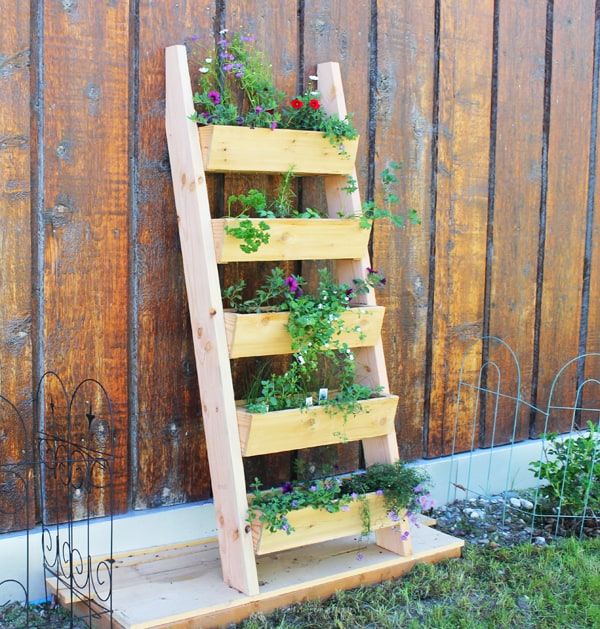
This vertical garden has no competition. It is simple and practical, suitable for any home, balcony or back yard. You can tell it’s a winner just by looking at it! According to Ana White it will only cost you 20$ to make, which is an incredible bargain considering its useful value! We give this one 10/10!
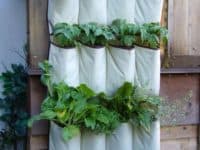
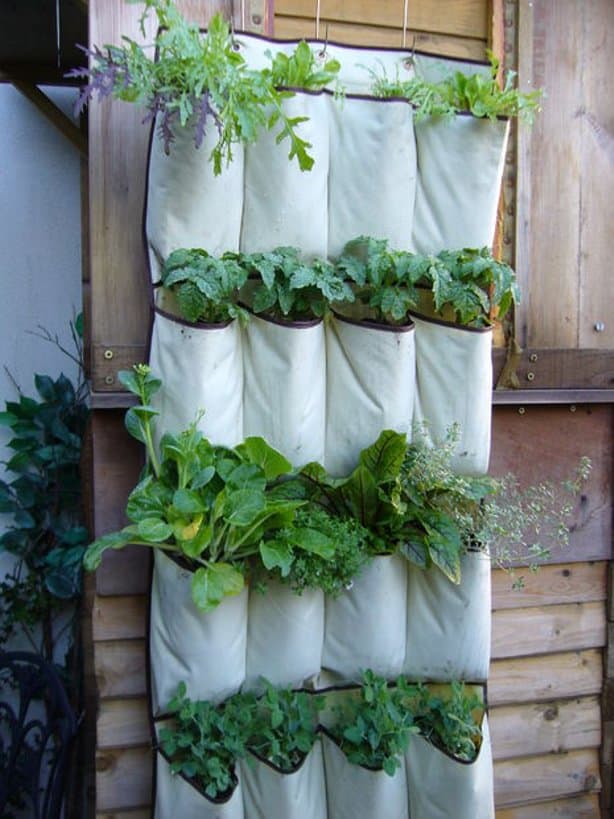
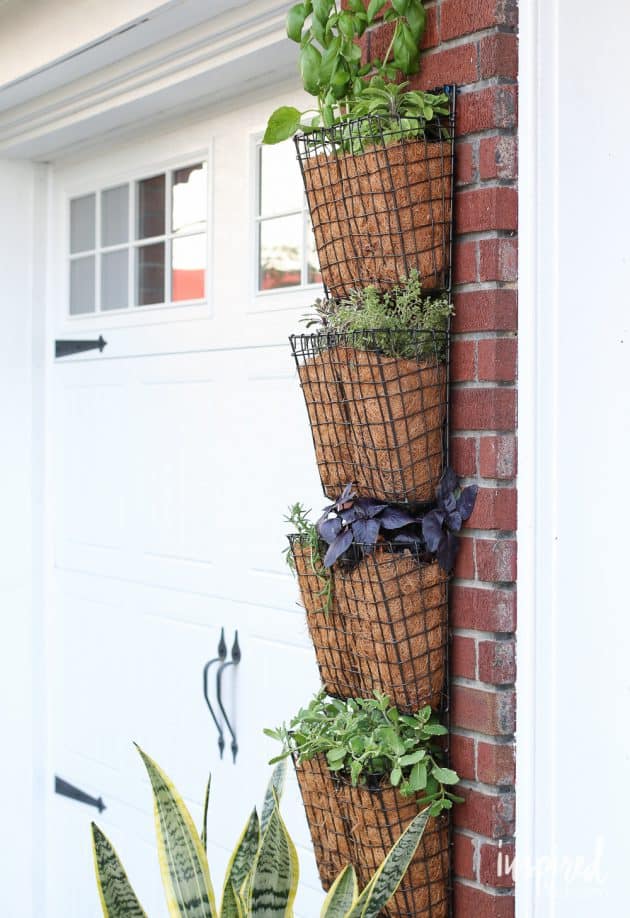
How to have your own herb garden but save on space? Make a vertical garden and organize your herbs into pockets! This is such a great life hack! It is an incredibly efficient, organized and neatly-looking way of gardening. Your grandma would be so proud! Find the how-to at Instructables!
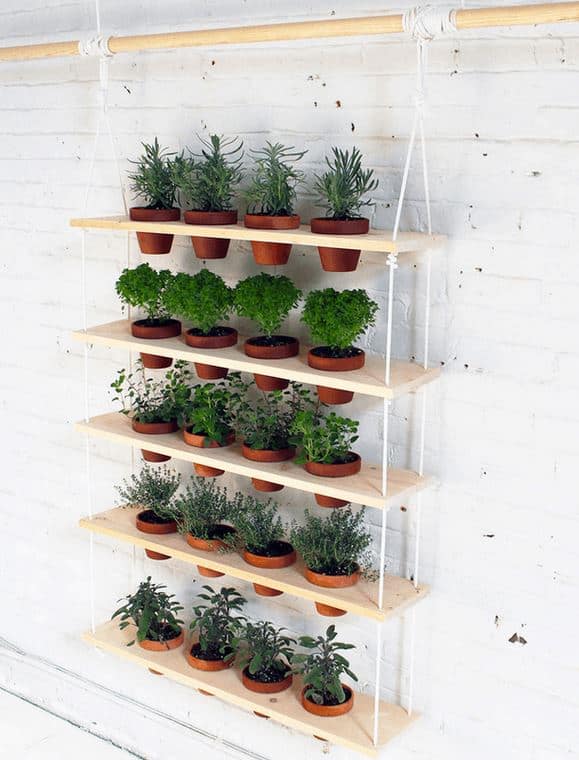
We’re loving the vibes of this hanging herb garden! If you’re wishing for some greens that you could keep indoors, this project is what you’re looking for! You can hang this garden just about anywhere you find handy (as long as there’s sunlight!) and you’ll always have your herbs at hand when you’re cooking! This great idea comes from Pioneer Settler!
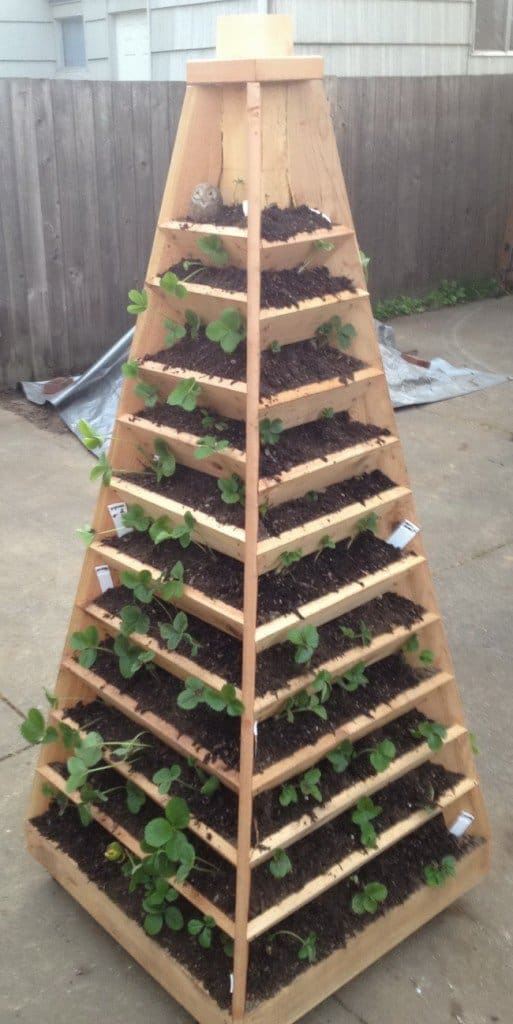
What a creative way to go about a vertical garden! Imagine how easier it must be working through it than if you spent all the time crouched at the ground! Your lower back and your plants will both love this pyramid arrangement, so hurry over to Remove and Replace and get the instructions!
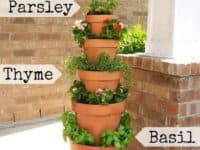
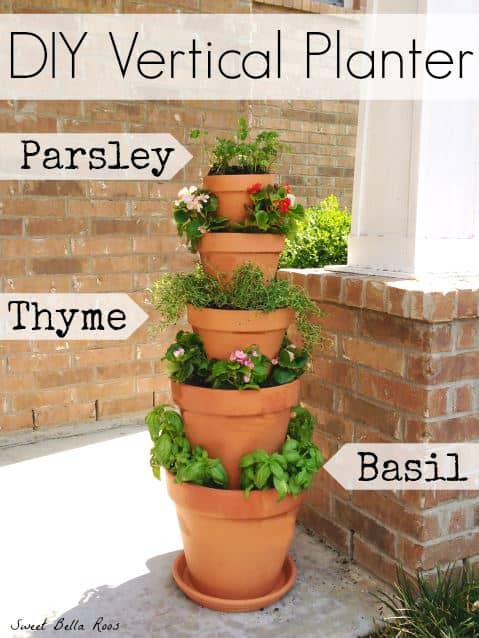
Got some terra cotta planters at hand? You can stack them up and make a fabulous looking vertical garden! This project may be incredibly simple, but it breeds amazing results! There’s nothing better than home grown greens – get your tutorial at Grace and Good Eats.
You don’t have to be a gardening enthusiast to fall in love with this vertical garden! It is very useful if you have toddlers or pets and want to keep some of the plants out of their reach. Not to mention the simple wooden design that proves just how beautiful minimalism can be! Find the detailed tutorial at Man Made.
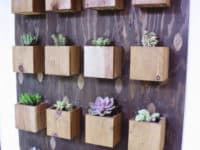
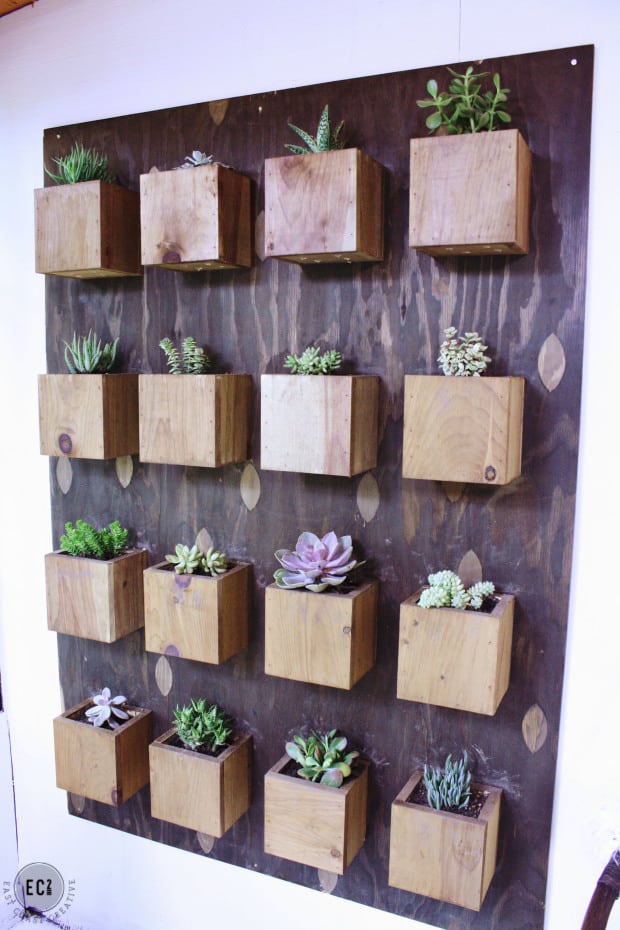
How unique is this garden?! The blocks are a really great way to make sure all of your plants have some personal space – yes, even they need that sometimes! With this garden, plants will always have a place in your home and your wall will look incredibly lively! East Coast Creative will show you how to make it!
If you can afford a cheap file organizer you can afford a stunning vertical garden. Don’t believe us? We’ll let Home Goods make their case with this lucrative vertical garden that is made from, you guessed it, a classic file organizer! Once again the day is saved by office supplies!
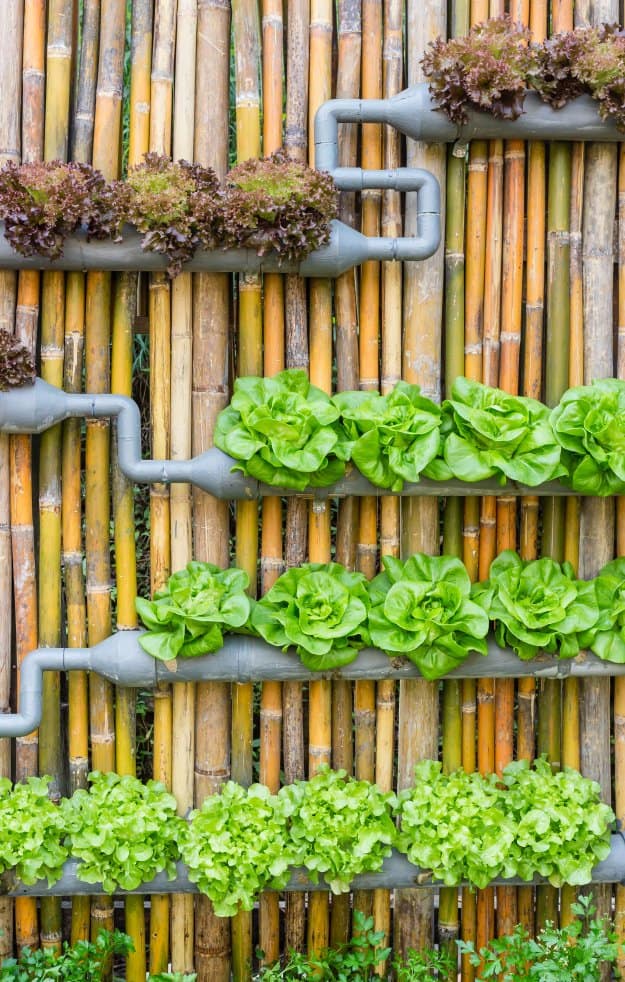
While it looks but subtle, once the greens start growing this pipe garden will be a real eye candy! By planting your greens into pipes you will save so much space and make even the dullest back yard look amazing! If you are nodding in enthusiasm, Pioneer Settler has the details!
The tempo of our life is faster than ever and it’s nearly impossible to find a person unaffected by stress. Between commuting to work, carpooling kids, making dinner and keeping the household in order, it’s difficult to find some peace and quiet. Zen gardens are known to help with that and this is an amazing opportunity to try them out yourself and see what happens! Start with these DIY Zen gardens and seek some inner peace!
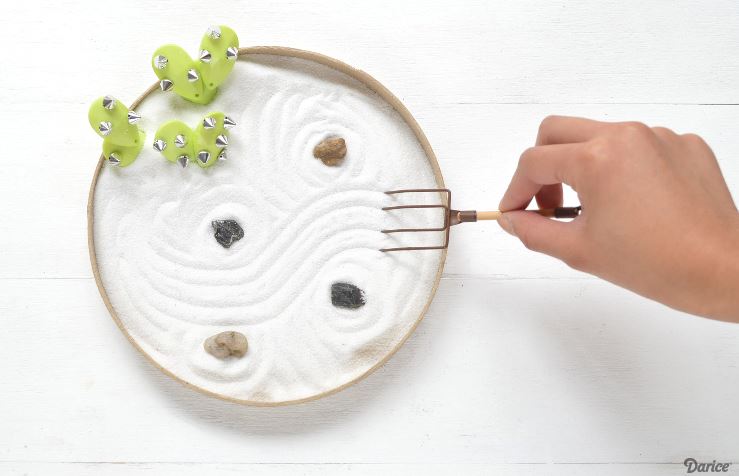
Zen Gardens don’t have to be boring or too traditional if that’s not your style. You can add something modern and edgy to it – these beaded cacti are a perfect example! They bring something energetic into the calmness. Live Craft Love will show you how to make this lovely garden!
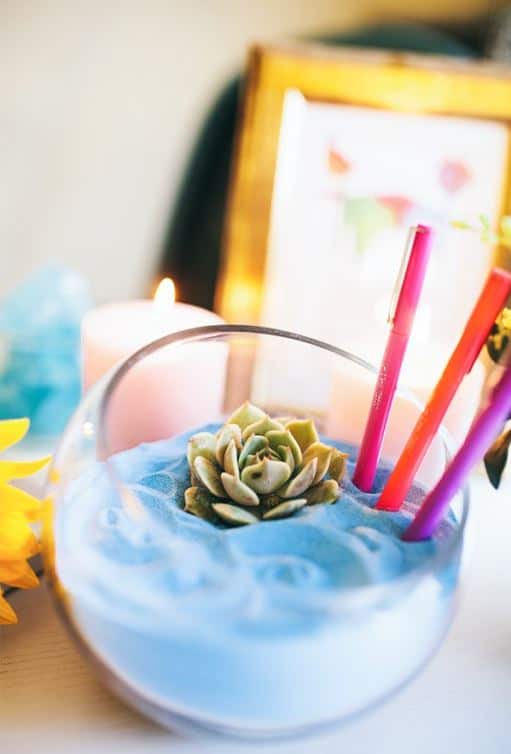
If your work environment is stressing you out, Elyanna Ivette may have something that could help you! It’s a Zen garden for your office! Its blue colors have a calming effect and will help you improve your focus! It also looks like a great addition to any workspace, just saying!
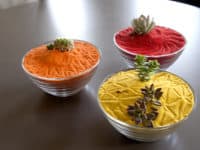
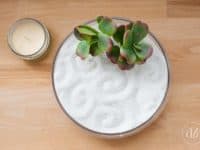
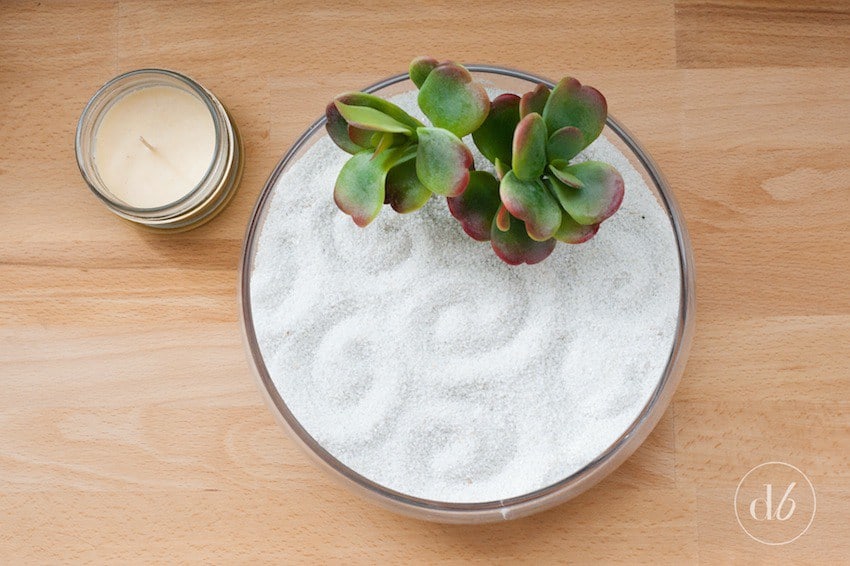
We love succulents! While they may be low maintenance, they will surely add some welcome greenery to your white and bright Zen garden while still keeping it minimalistic. This idea comes from Dwell Beautiful and we absolutely adore its clean and serene look!
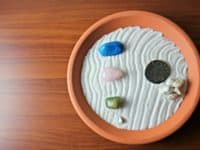
The whole point of Zen gardens, aside from having a calming effect, is to be convenient to your personal space. If you only have a small place on your table to fill, don’t worry; you can totally make a smaller version of a Zen garden. Nous Décor has some wonderful inspiration!
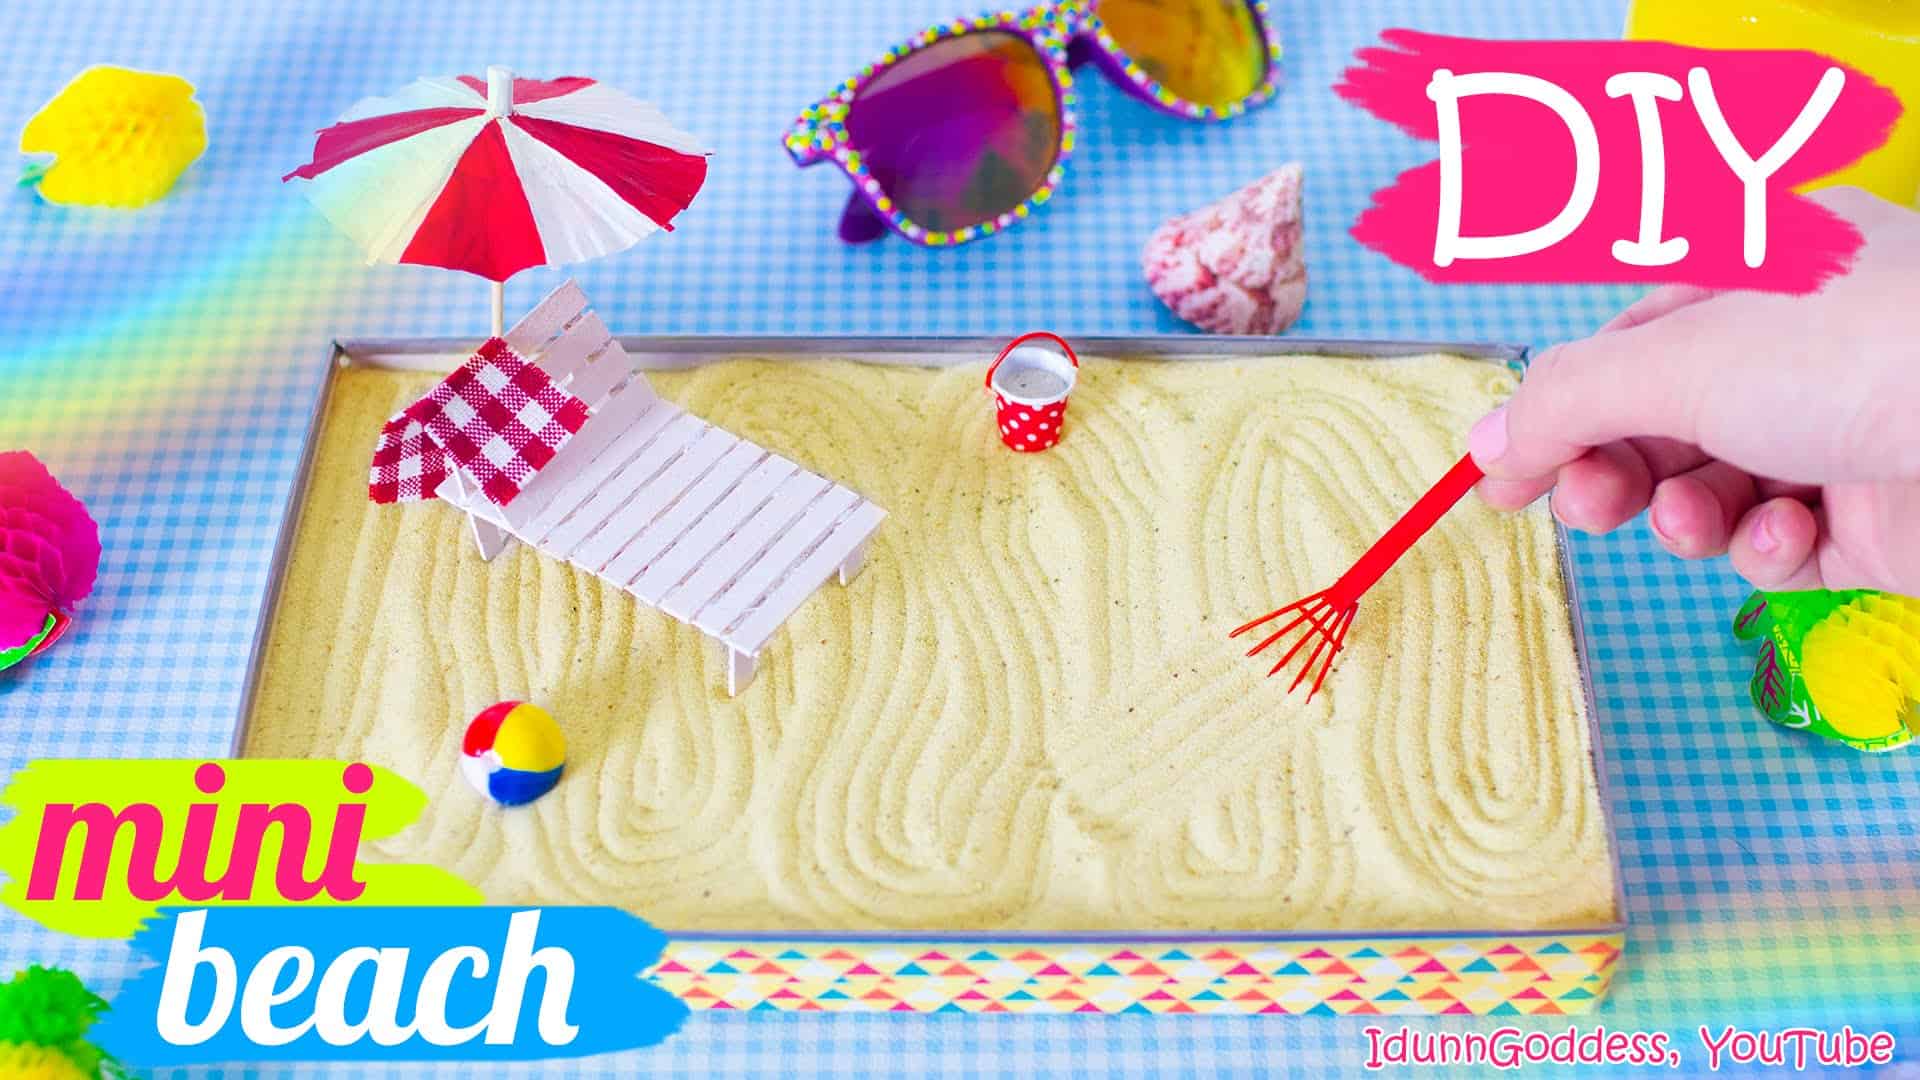
If you’re not feeling too spiritual and Zen-ish, but you’re still fascinated by the concept of a Zen garden and want to try one out, here’s a little twist on it! Why not play around and make it into a special setting that will feel relaxing to you? A mini beach is a great place to start! See the video tutorial by Idunn Goddess!
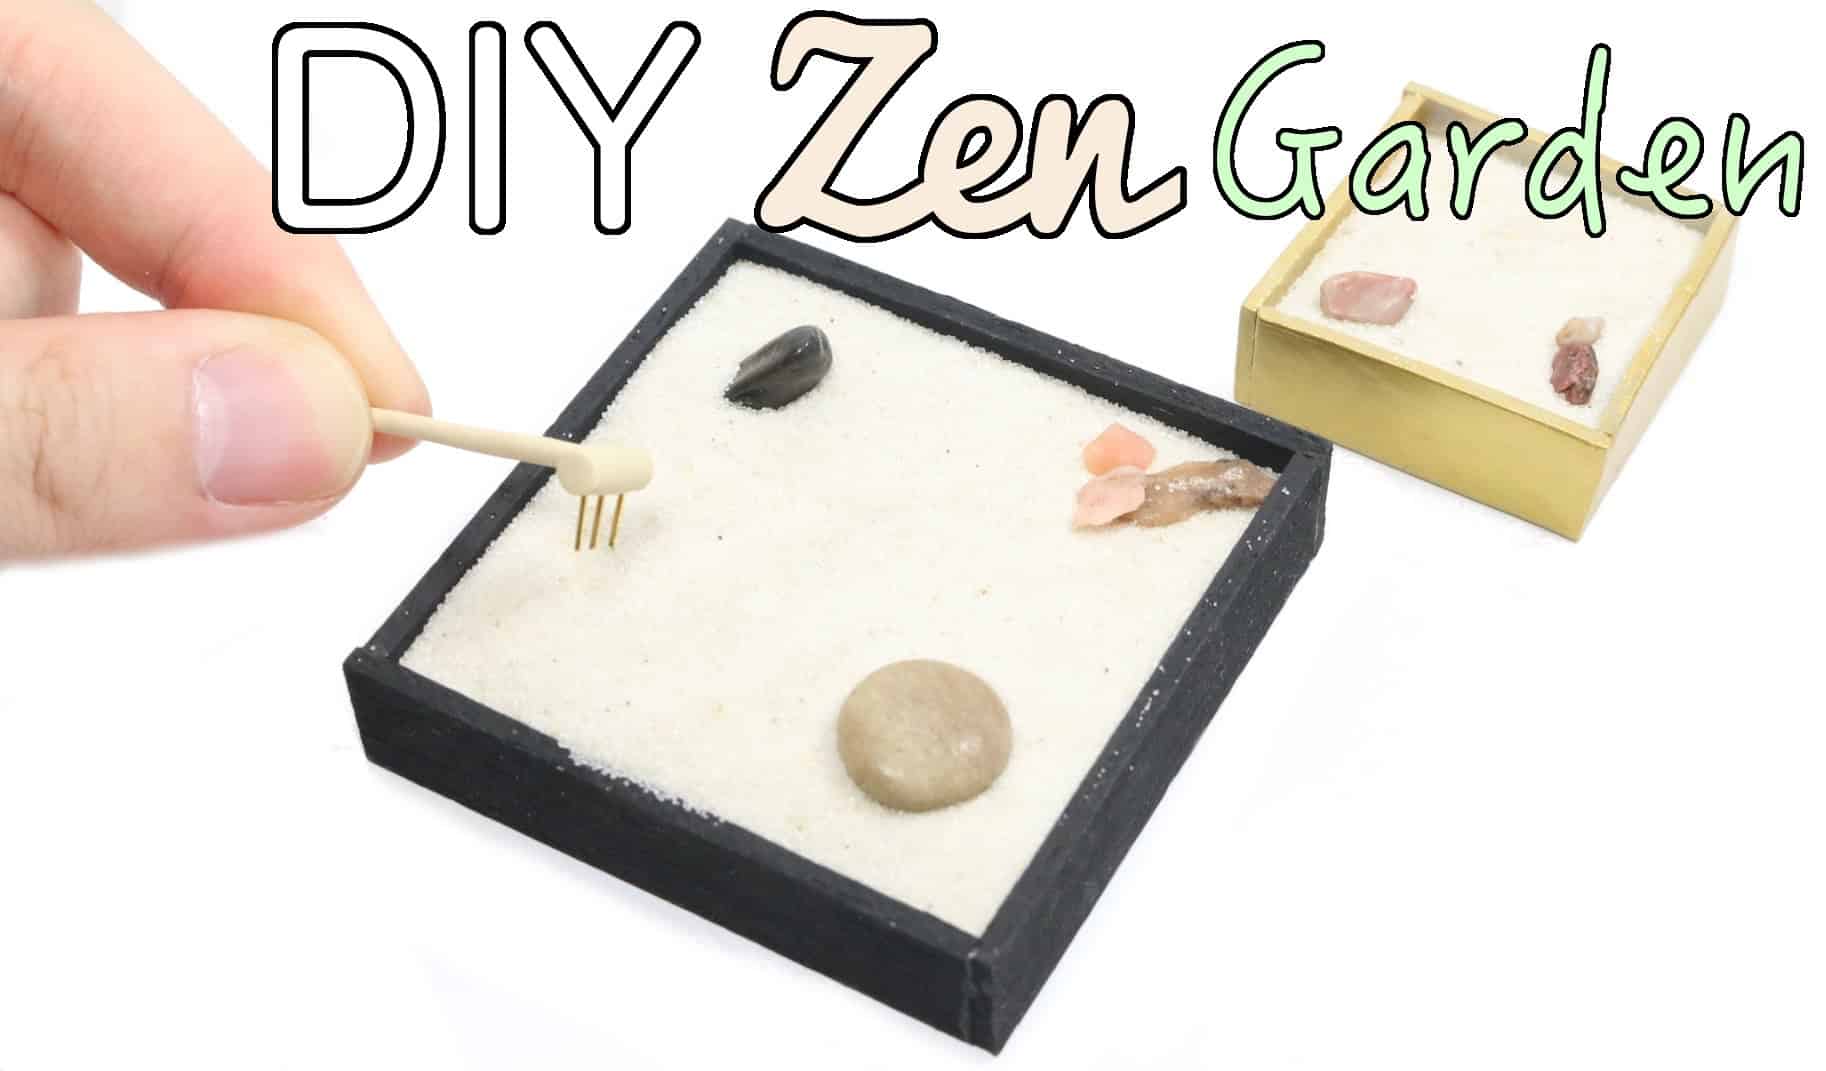
This small, square Zen garden will fit just about anywhere! Its size and shape are very convenient so you can place it on your office desk or living room coffee table and it won’t feel like it’s in the way! If anything, it will serve as a constant reminder to be more mindful and take a moment just for yourself. Polymomo Tea shows you how to make it!
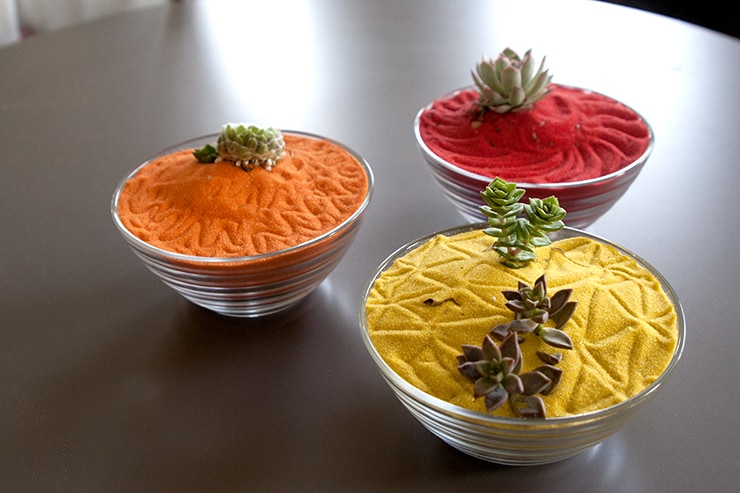
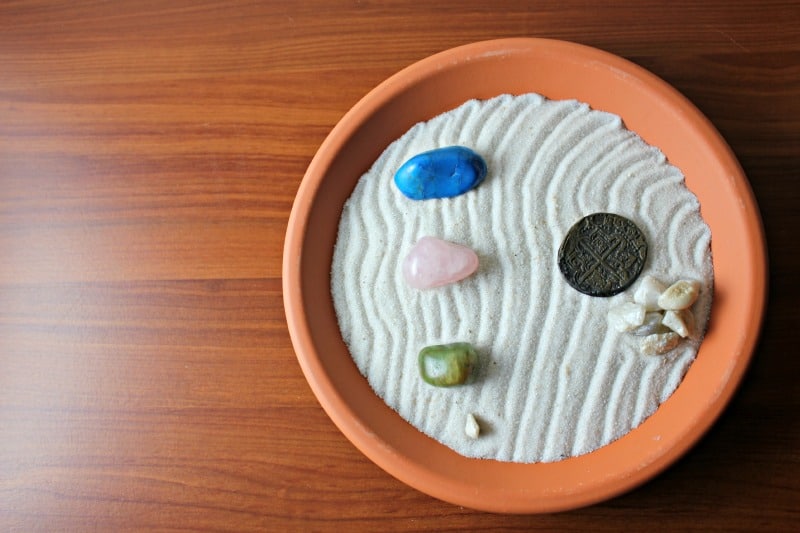
To give your Zen garden some extra powers, place in some crystals and stones! It’s entirely up to you which ones you will use, as you have all the freedom in the world! But you can still peek at Confessions of an Overworked Mom and find out how they made it happen!
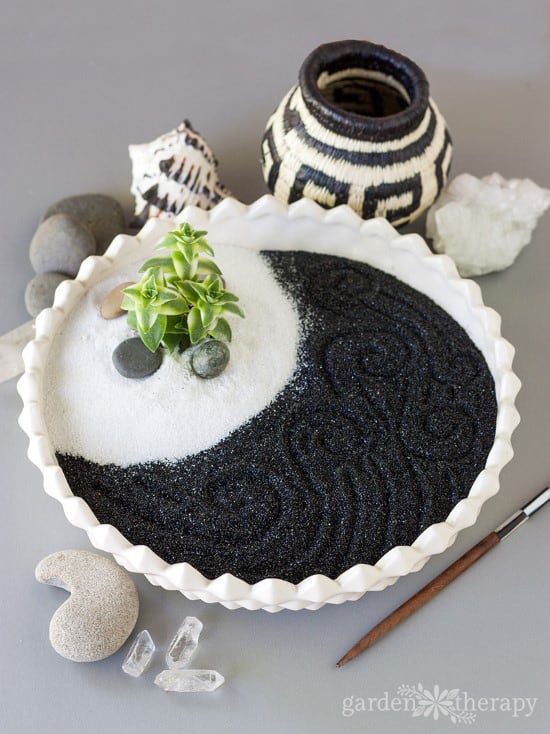
If you’re craving some yin yang vibes, this black and white Zen garden by Garden Therapy comes pretty close! Its peaceful effect is not to be underestimated! It will also look as a beautiful décor element in and of itself, so it’s an overall win!
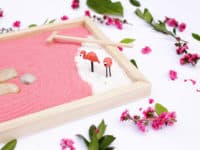
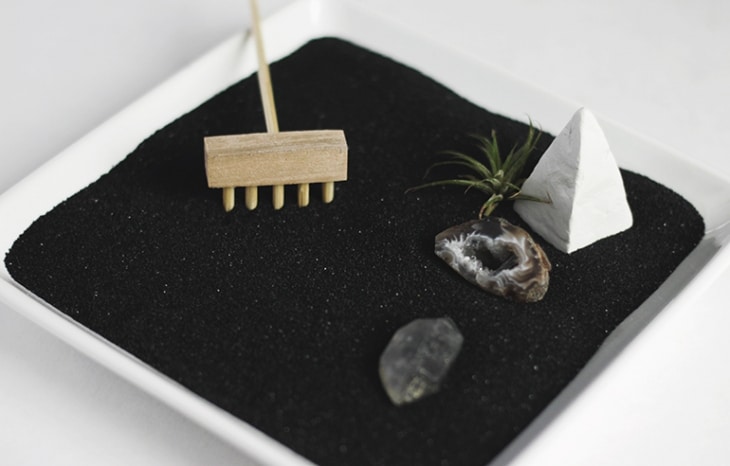
People are different and while some may find the white and bright colors super calming, others need the dark to relax their mind. If you’re the nocturnal type or just a lover of darker things, here’s a Zen garden for you to try! Find out more at The Merry Thought!
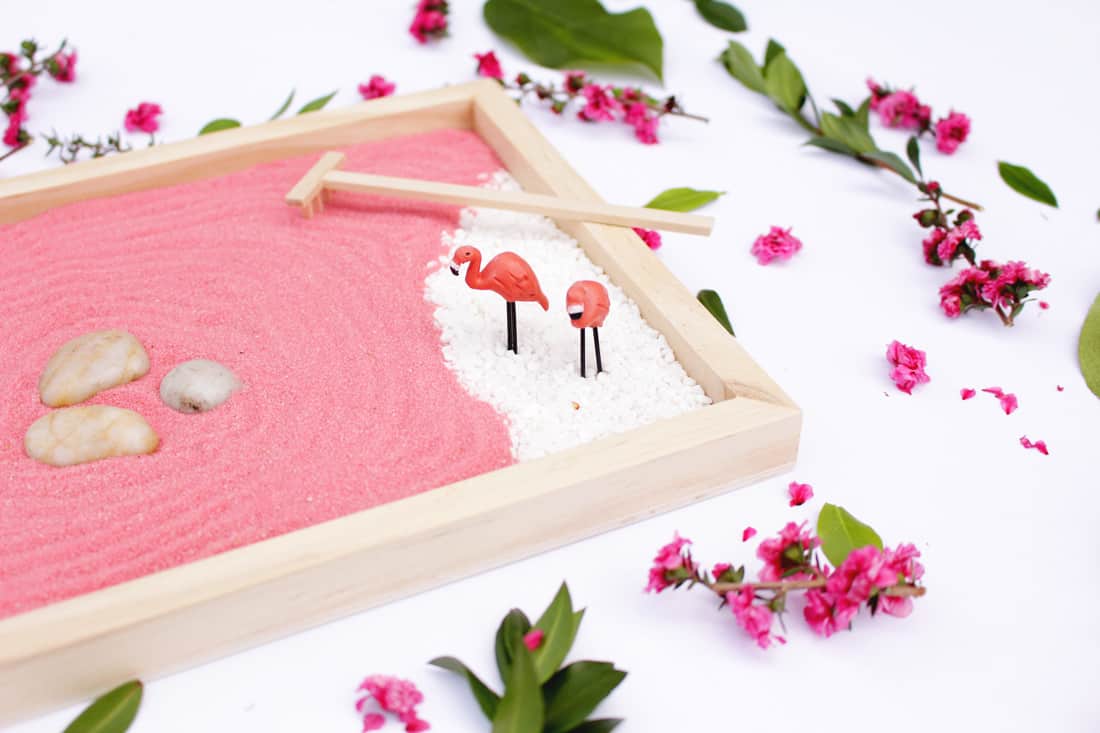
Every day should be Mother’s Day. Moms are the most loving souls, but easily the most tired ones too! Whether you are a mom yourself or just want to do something nice for your mother, this Zen garden by Brit + Co is a great way to bring some relaxation into any mom’s schedule! You know what they say; if momma ain’t happy, ain’t nobody happy!
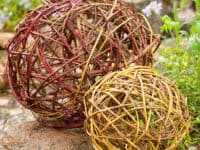
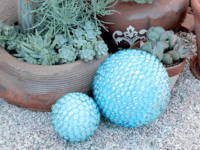
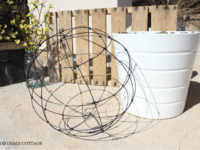
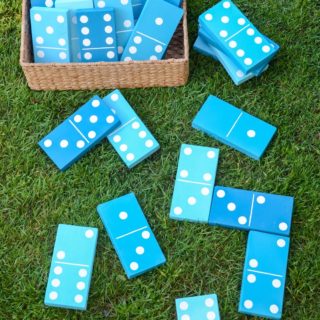
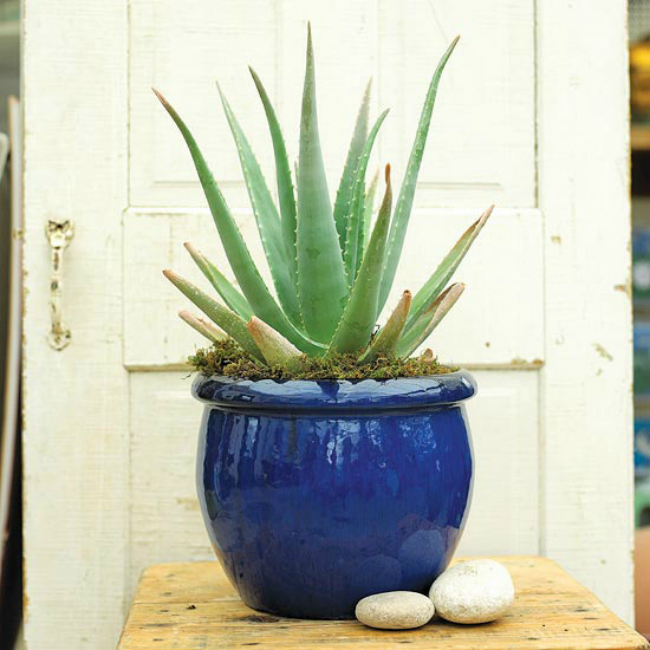
You don’t need to spend a lot of money to have a beautiful garden. These pretty DIY garden globes suit every design aesthetic and are surprisingly affordable to make.
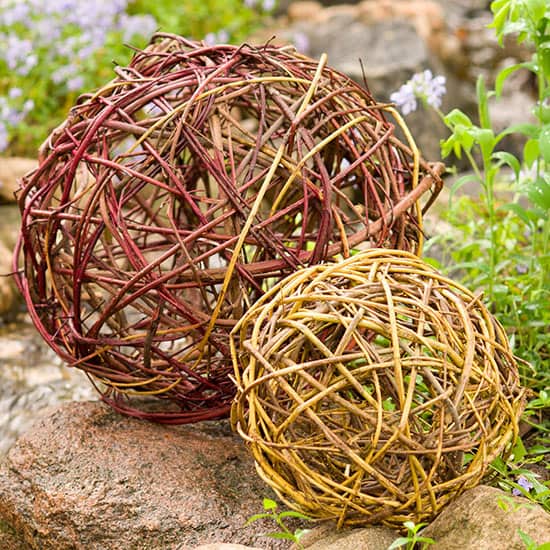
Prunings from ornamental shrubs such as dogwoods can be transformed into unique garden ornaments with a simple technique. Better Homes & Gardens has the tutorial.
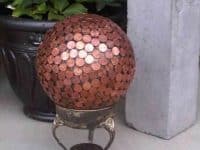
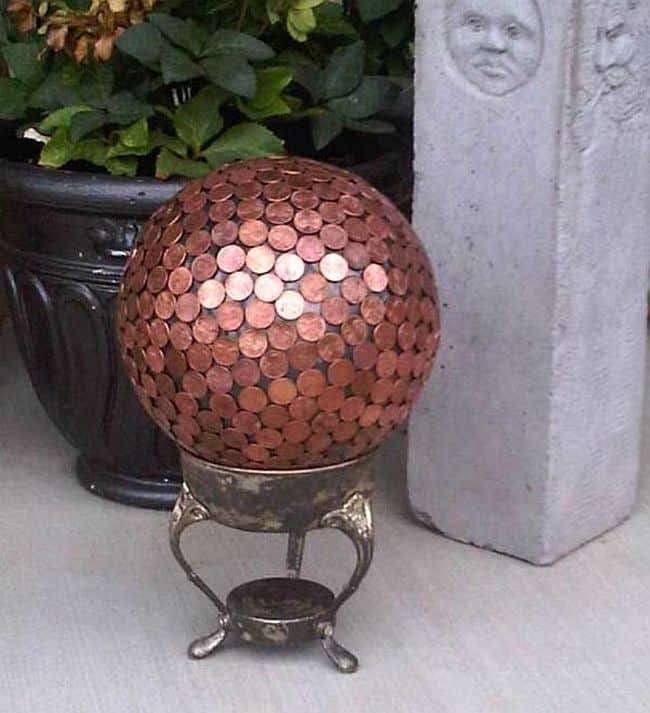
There’s not much you can buy for a penny, but put a bunch of them together and you can make this gorgeous garden globe. House of Hawthornes has the tutorial.
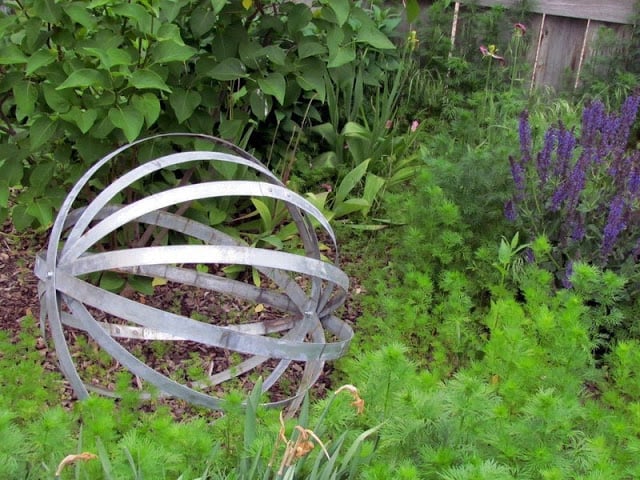
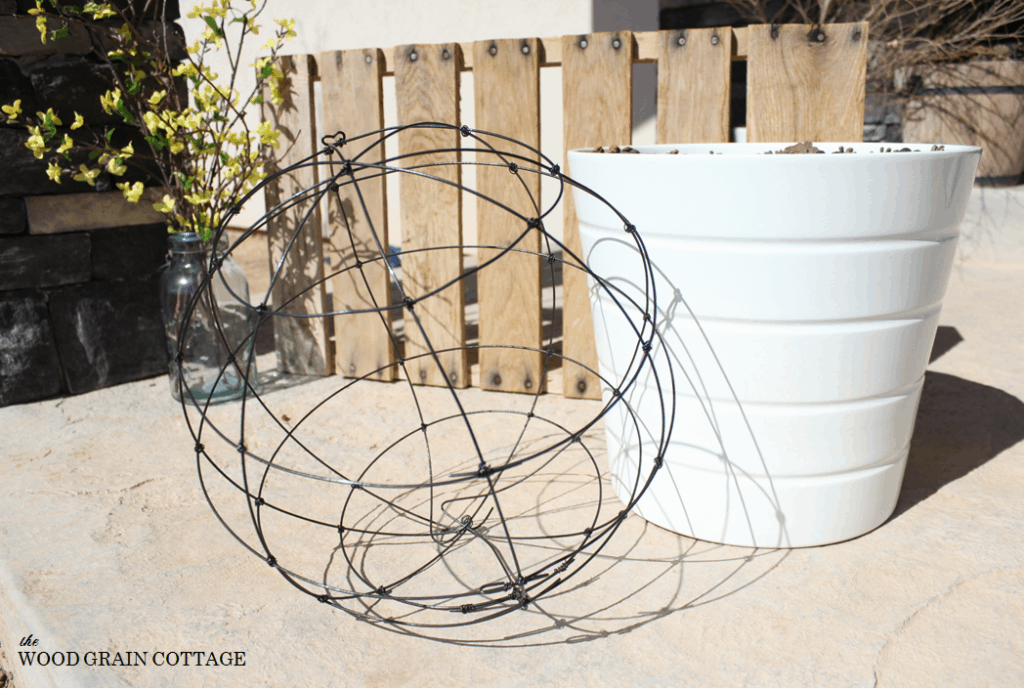
The Wood Grain Cottage has a tutorial for spray painted wire globes that add a minimalist feel to your garden. If you’d prefer a little more sparkle, try adding beads to the wire before assembly.
Are you obsessed with buying fingernail polish? If you have a drawer full of colors that don’t quite work for your mani-pedi, this project will put them to good use. Paint an old bowling ball with leftover fingernail polish, then add a clear protective coat for a gorgeous garden decoration. Visit GardenWeb to learn more.
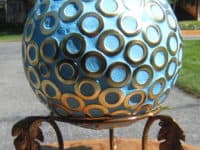
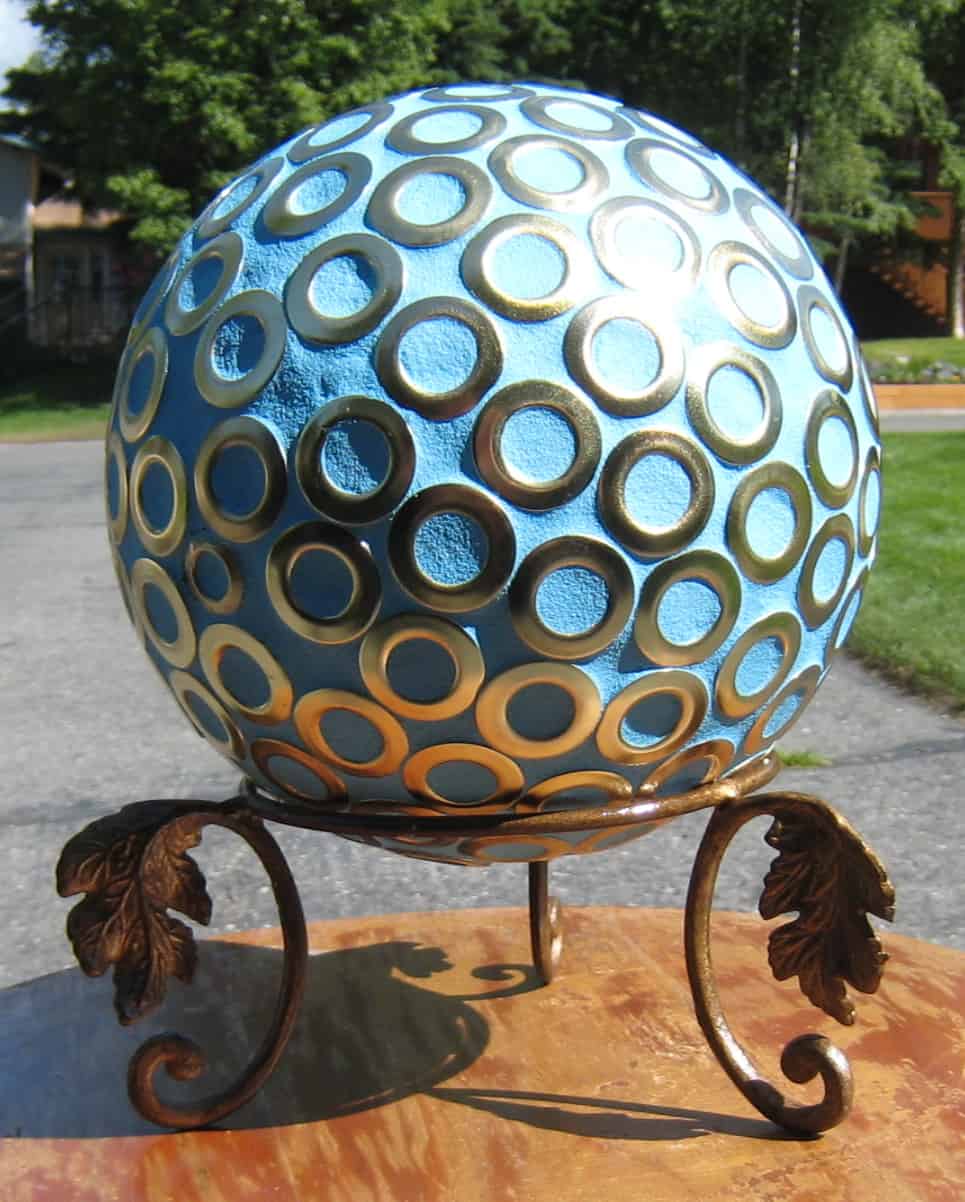
This unique garden globe is decorated with the grommets from upholstery fabric samples. The grout used in the project was painted with blue acrylic paint for color and weatherproofing. Learn more at WedeWorks.
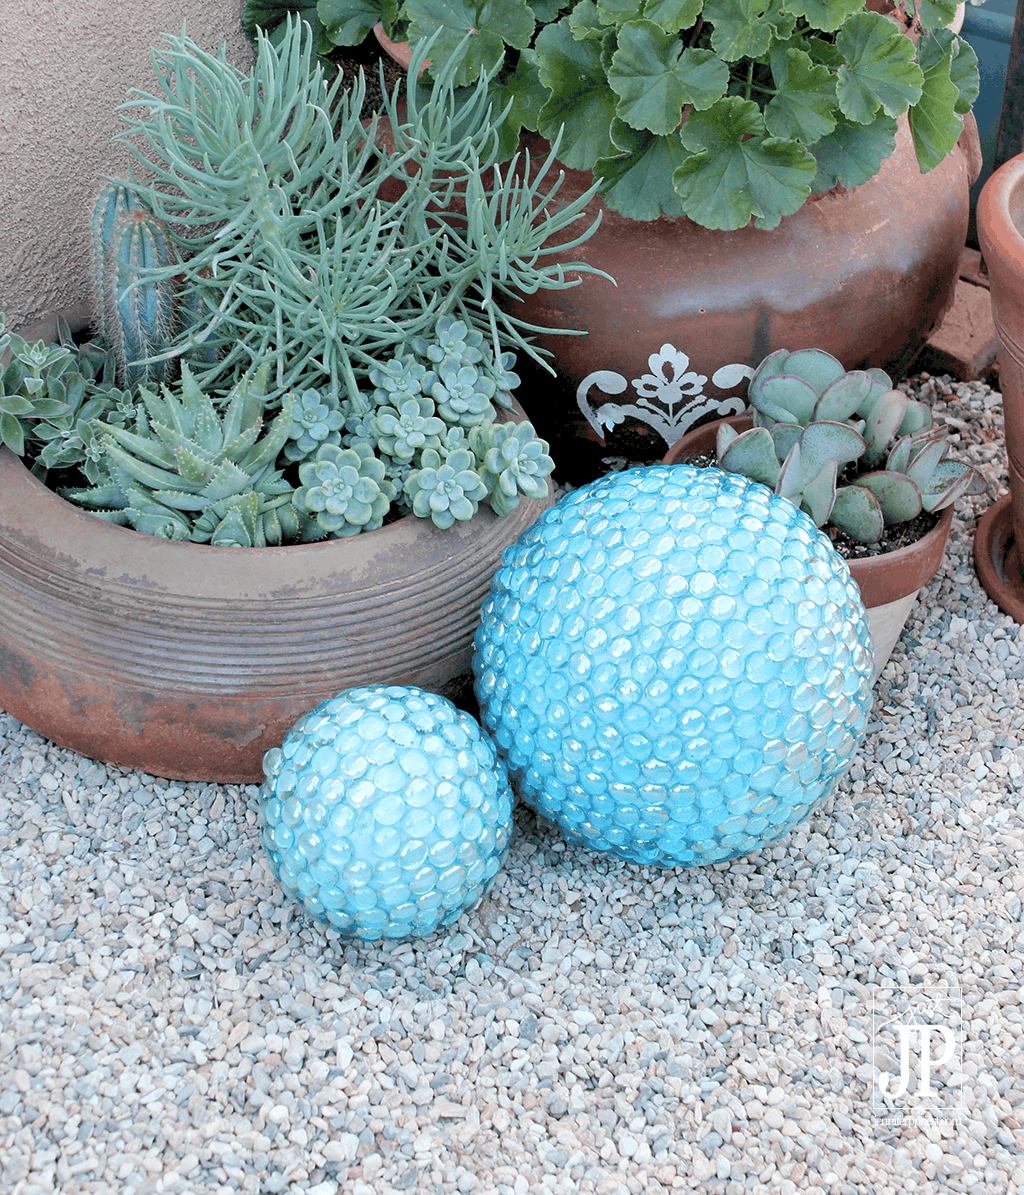
Metallic acrylic craft paint inside a plastic keepsake ball creates a pretty garden decoration that your kids can help you make. Visit Pink and Green Mama to learn more.
There’s nothing more relaxing than listening to the sound of running water while admiring your beautiful garden. If your budget doesn’t allow you to purchase a fountain, this roundup of affordable DIY projects gives you plenty of alternative options to consider.
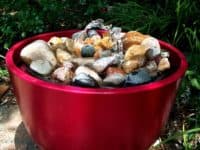
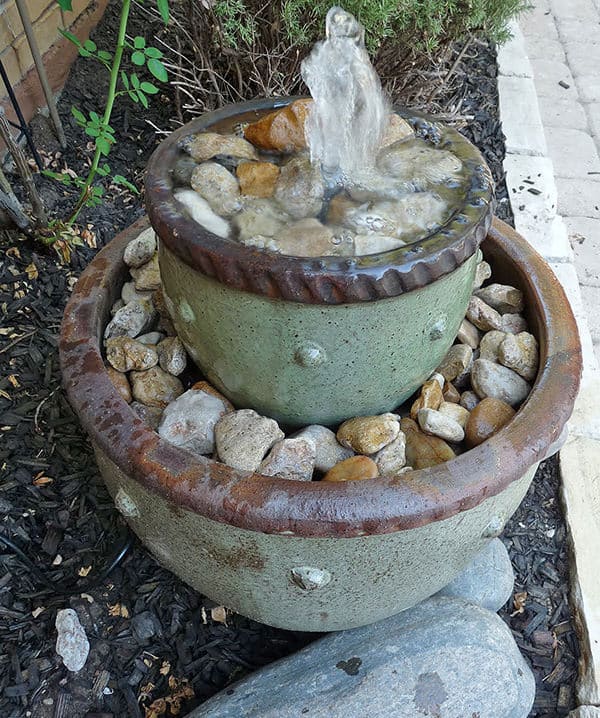
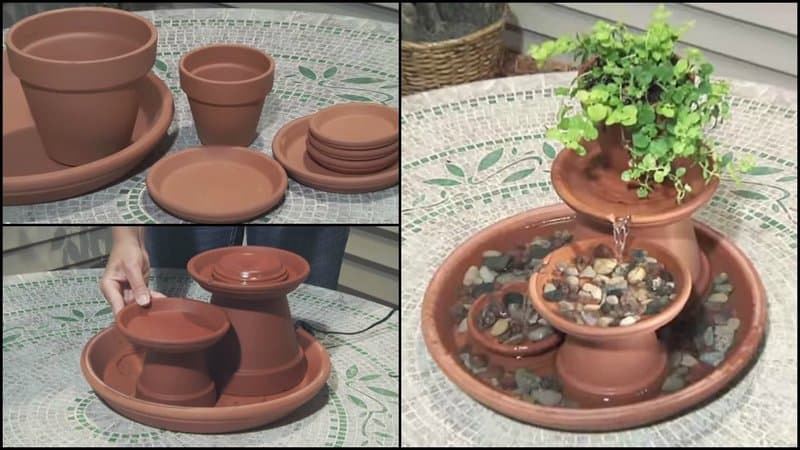
This soothing fountain is made from flower pots and river rocks, which makes it perfect for smaller spaces. The Happy Homebodies has the full tutorial.
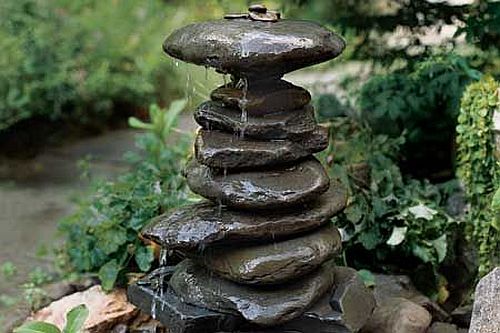
Instructables has a tutorial that explains how to make a garden fountain from any material you wish, although the stacked rocks they use in their example will give your home a touch of zen.
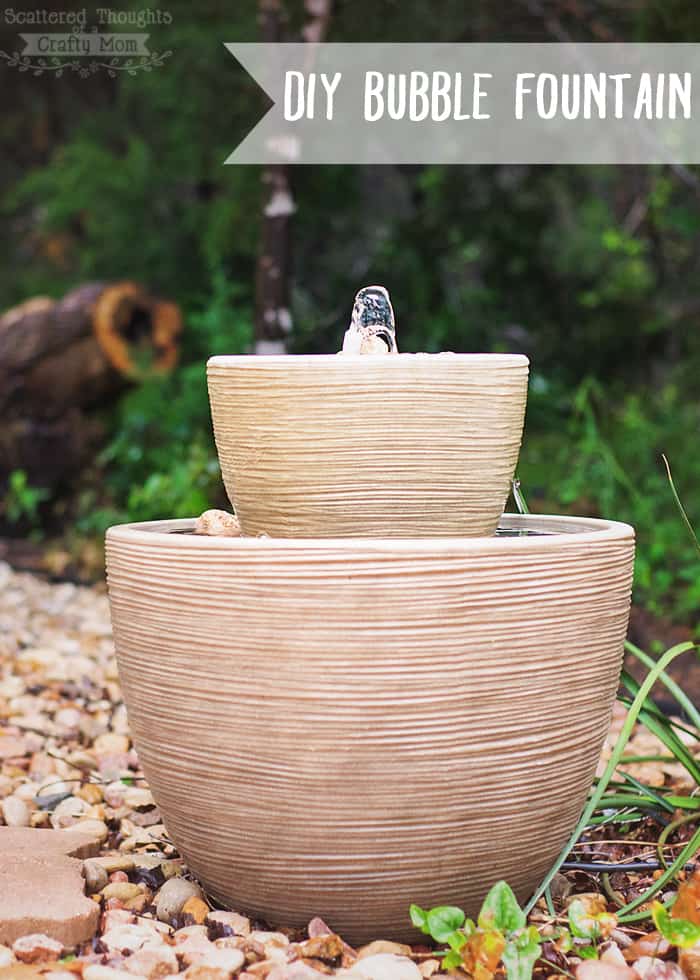
Does your ideal garden fountain feature lots of bubbles? If so, this design from Scattered Thoughts of a Crafty Mom is the perfect DIY project to add to your to-do list.
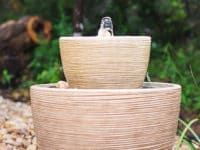
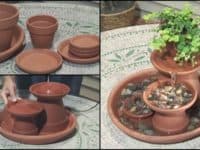
The Owner Builder Network suggests using terra cotta pots for a garden fountain with an earthy feel. Since terra cotta pots come in various sizes, this project is easily adapted to suit your personal needs.
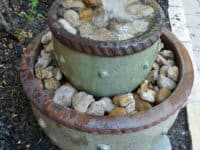
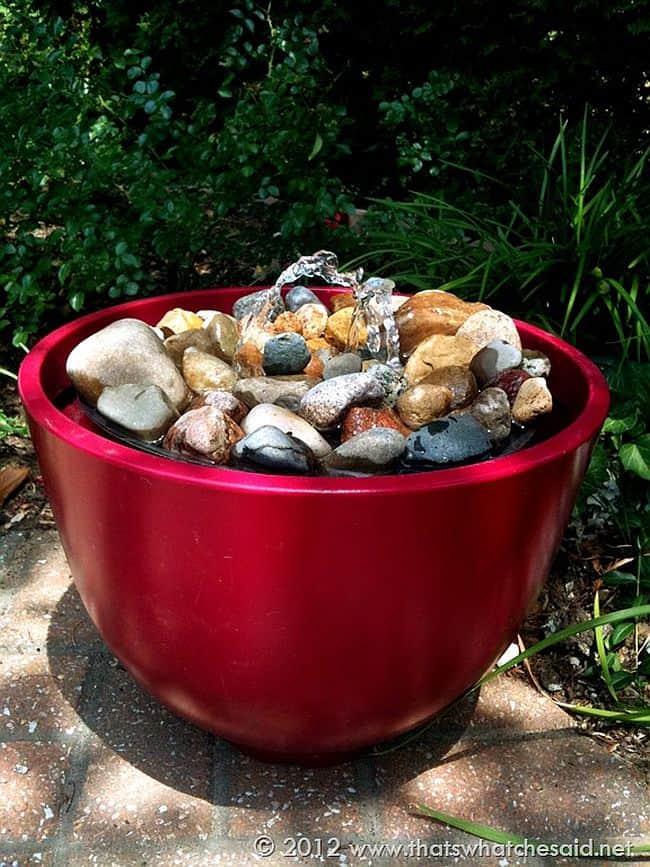
Arrange decorative rocks on the top of the large clay pot, then add a looping water feature for a fountain that’s infinitely soothing. Head over to That’s What Che Said to learn more.
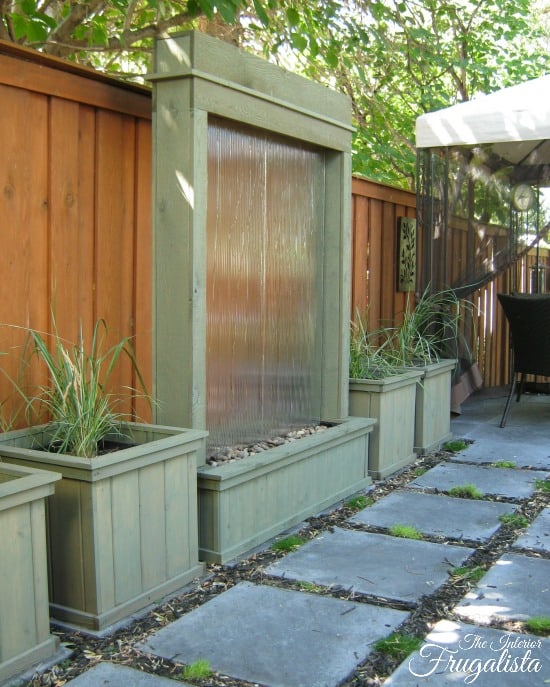
If you’re looking for something that makes a strong style statement, you can’t go wrong with a water wall. It’s dramatic enough that it will be the first thing visitors to your garden notice. Interior Frugalista explains how to complete this amazing DIY project.
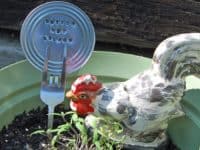
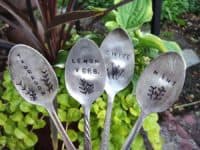
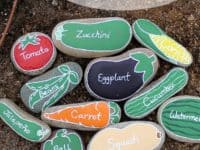
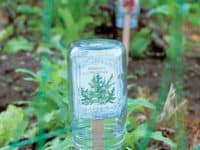
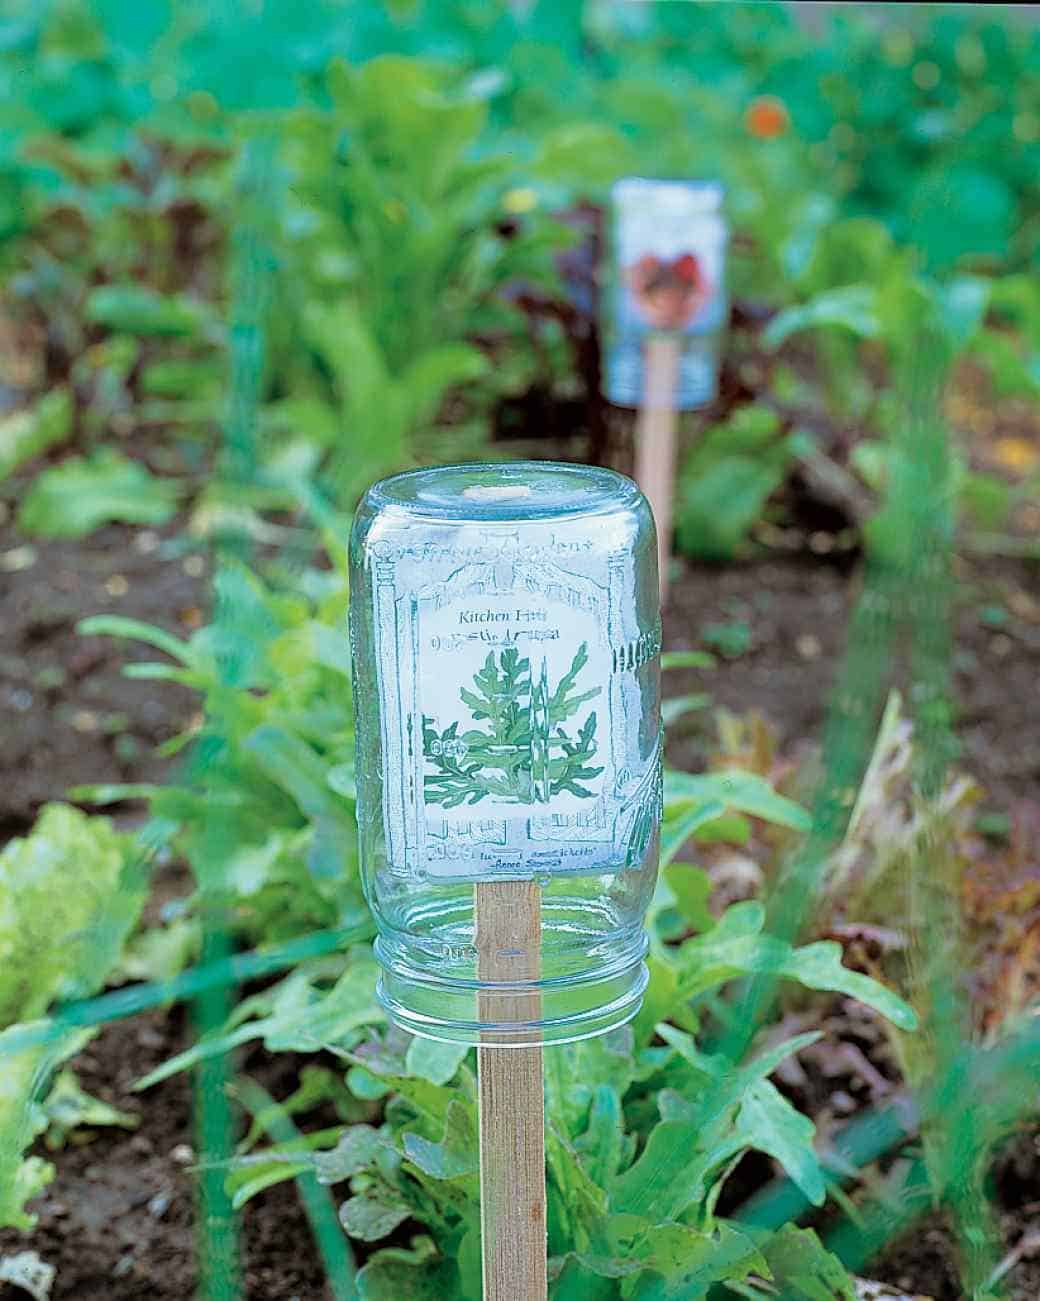
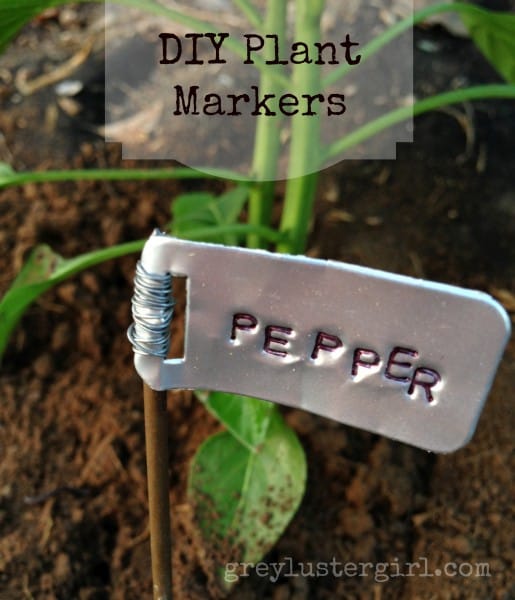
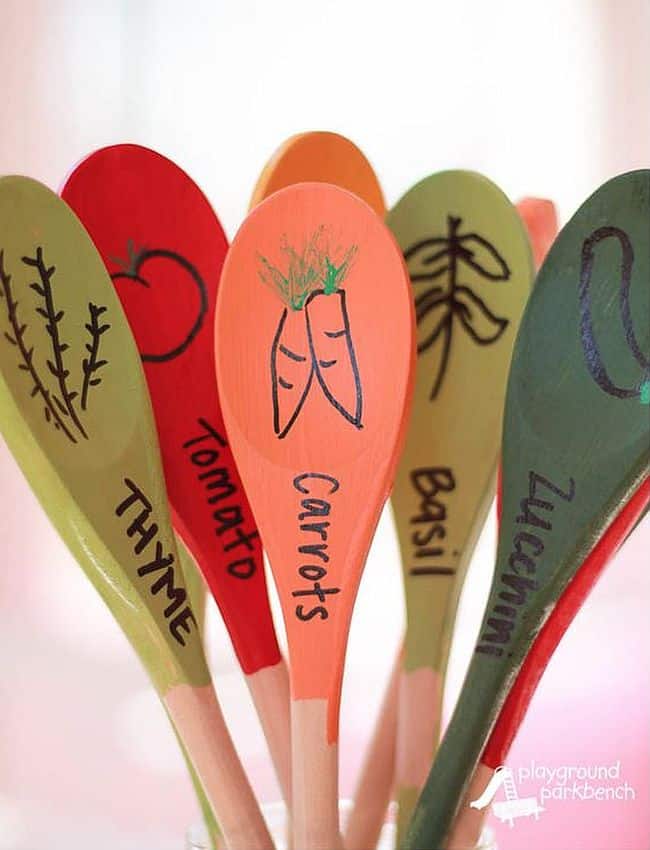
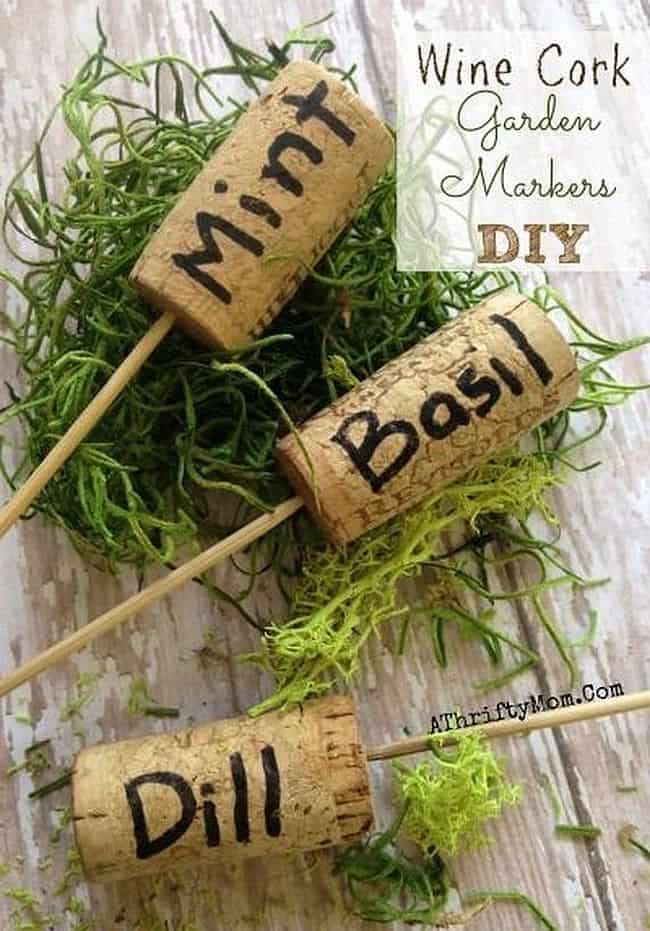
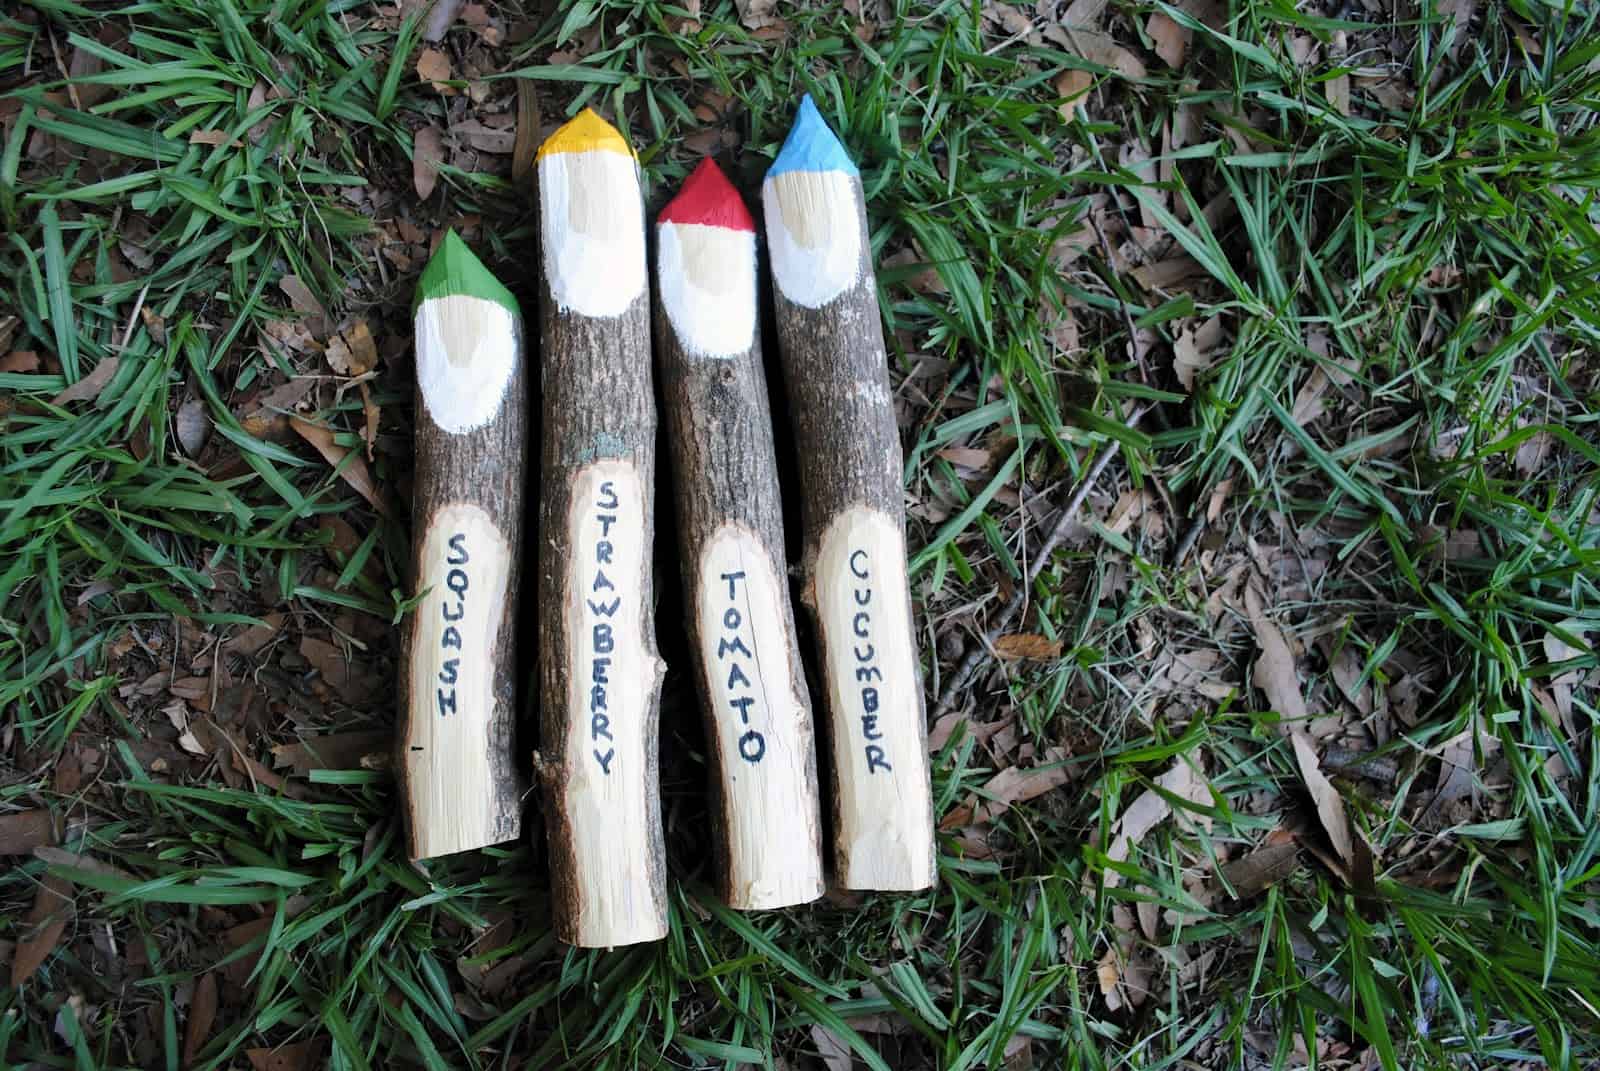
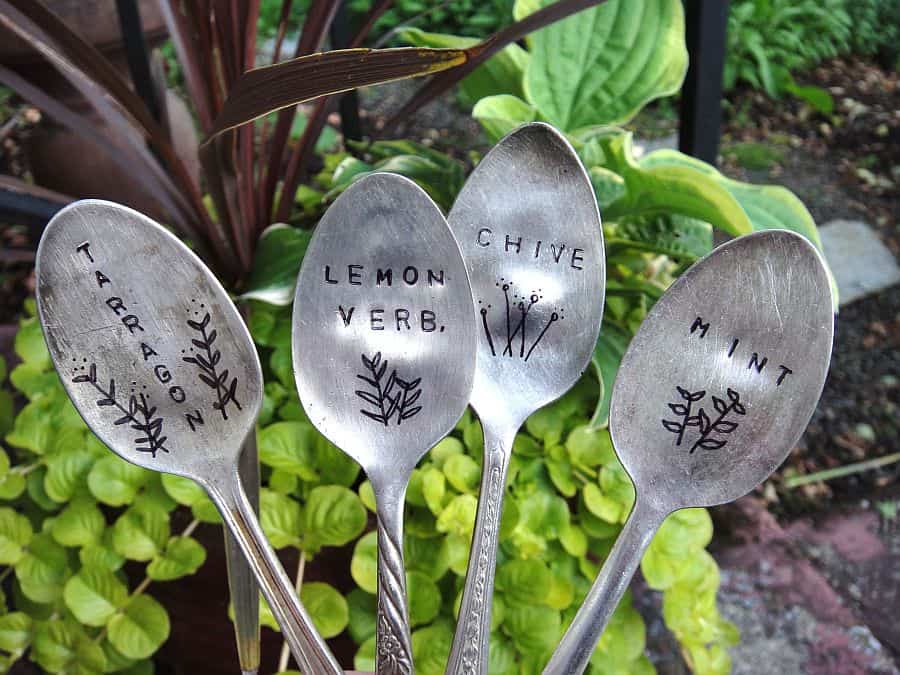
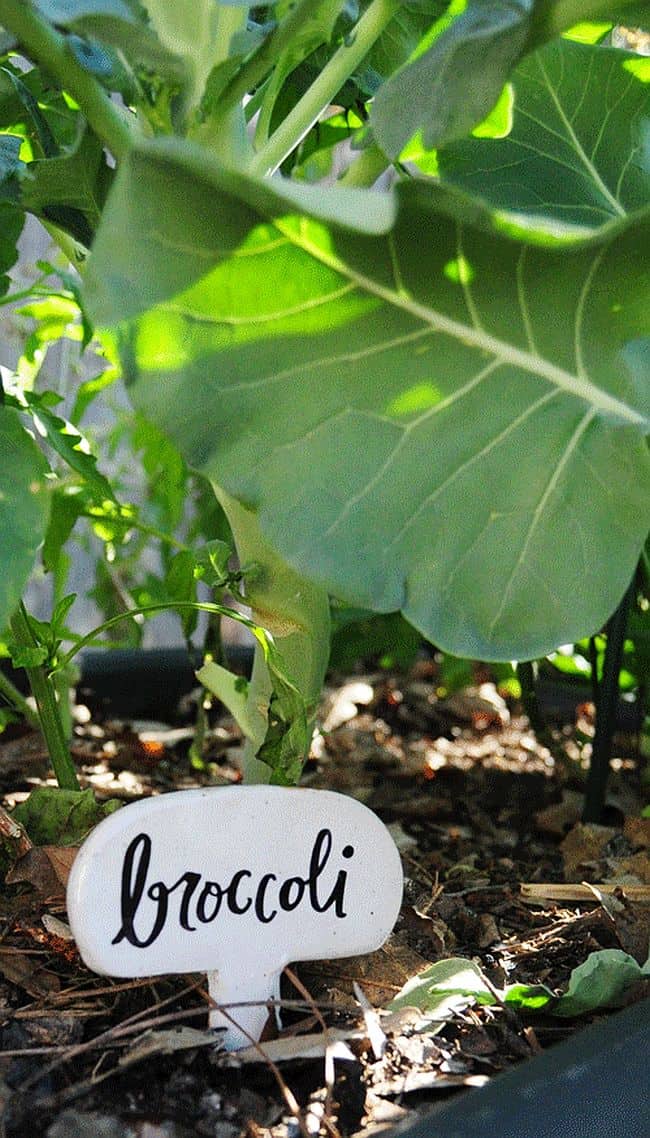
Whether you have a garden that covers half your backyard or a few potted herbs on your windowsill, these DIY garden markers offer a stylish yet practical way to label your plants.
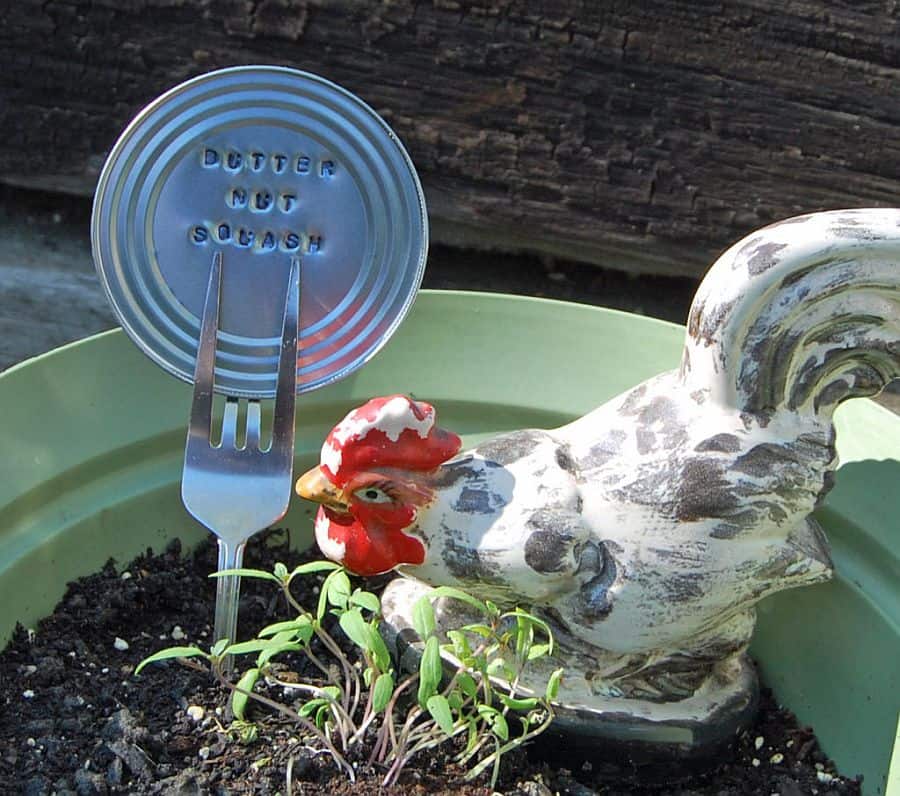
If you like the look of metal stamping, but want something a little sturdier than the soda can markers, this project is a good choice. Can lids are paired with old forks for decorative yet practical DIY garden markers. Learn more at Pin and Paper.
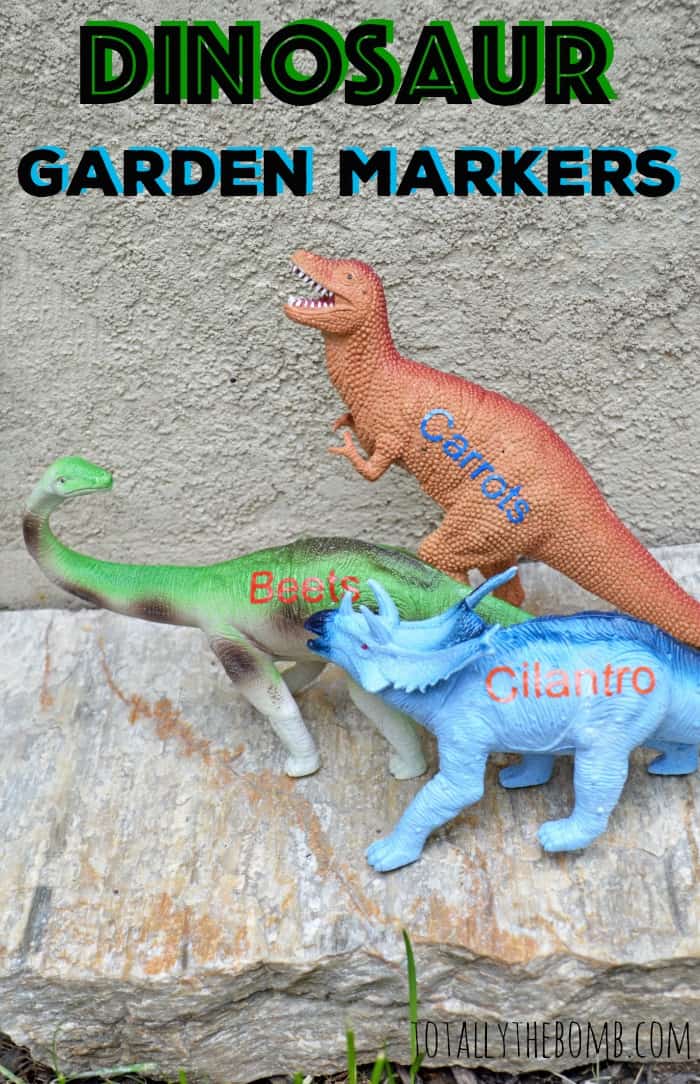
Put your child’s unwanted toys to good use by turning them into whimsical garden markers. This example uses dinosaurs, but horses, cows, or other animal figures would work as well. Totally the Bomb has the details.
If you pride yourself on your artistic skills, decorate river rocks with veggie graphics for eye-catching garden markers. West Valley Moms has the tutorial.
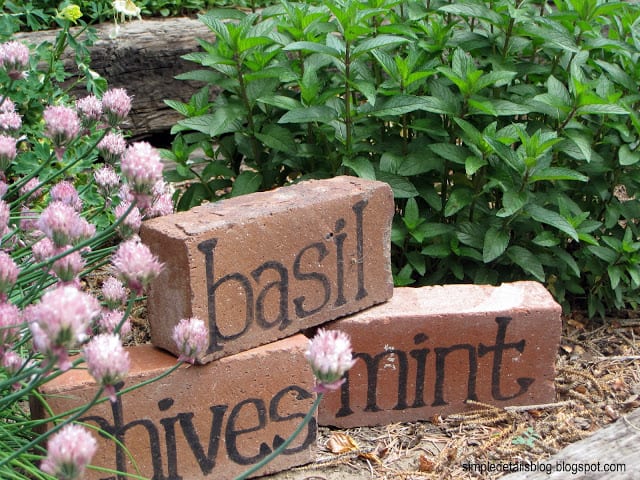
Flimsy garden markers might not last the entire season, but these painted bricks are a sturdy way to label your plants. Simple Details explains how to make them.
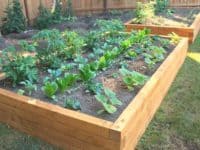
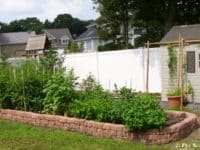
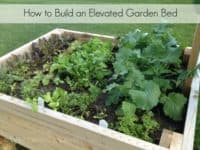
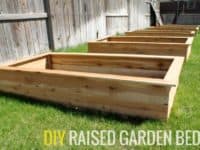
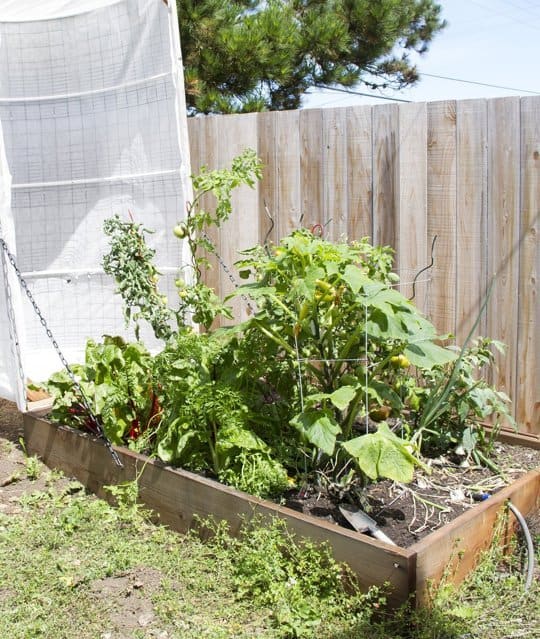
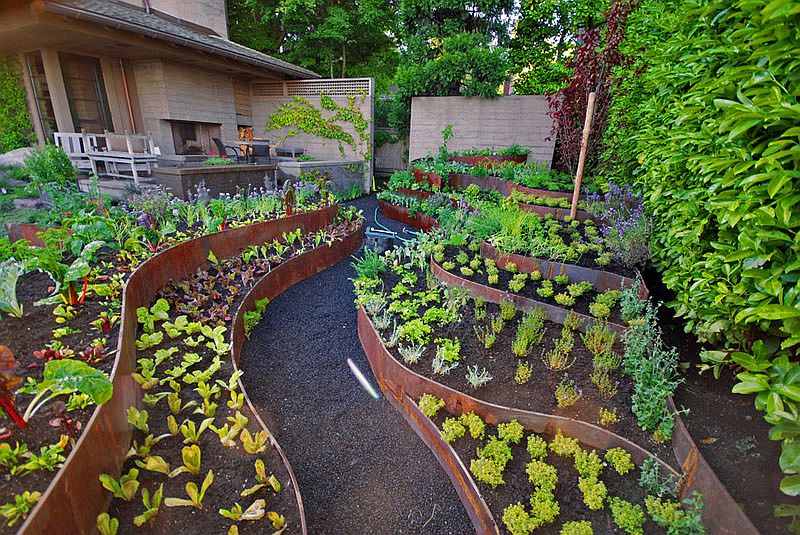
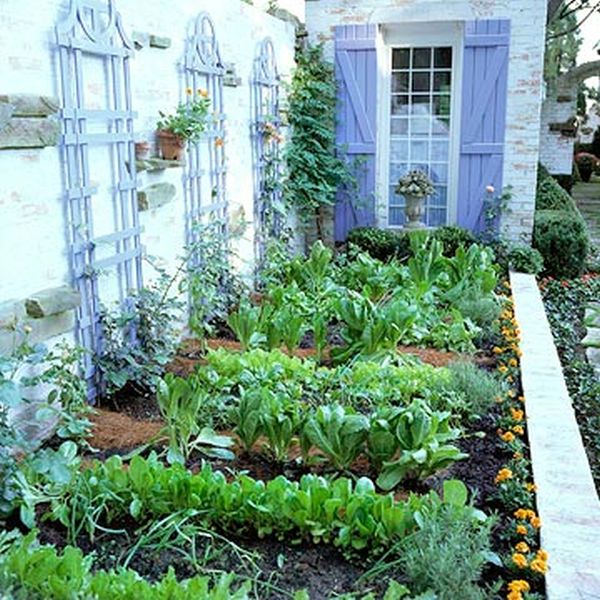
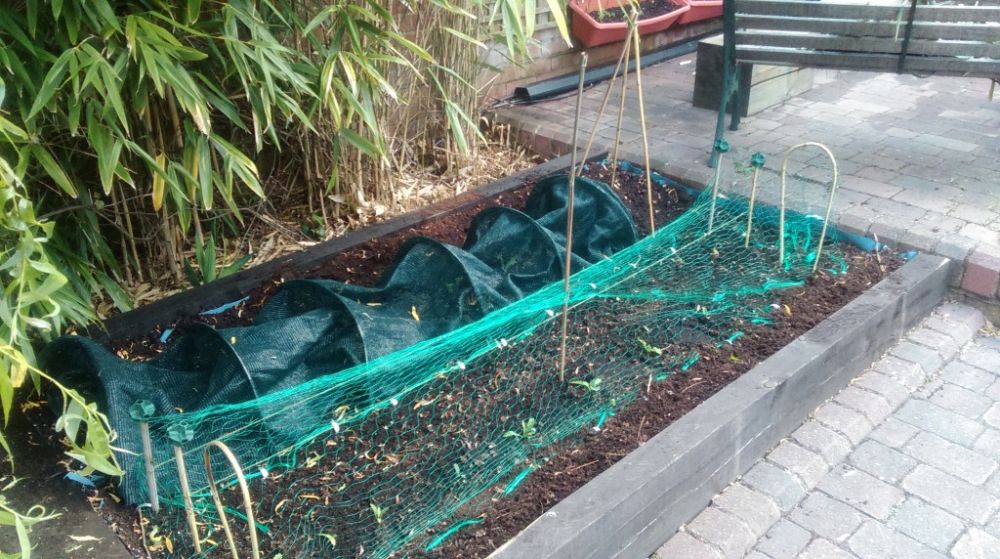
In the world of labels that are just trying to confuse us – organic, eco, bio, certified etc. – the only thing you can really trust are the vegetables that you grow yourself; they don’t need labels, because you know exactly how they were grown! On this note, if you have your own garden or are at least thinking about it, it really pays off to invest in some raised garden beds. Not only do they look neat and orderly, they also prevent snails and insects from attacking your produce!
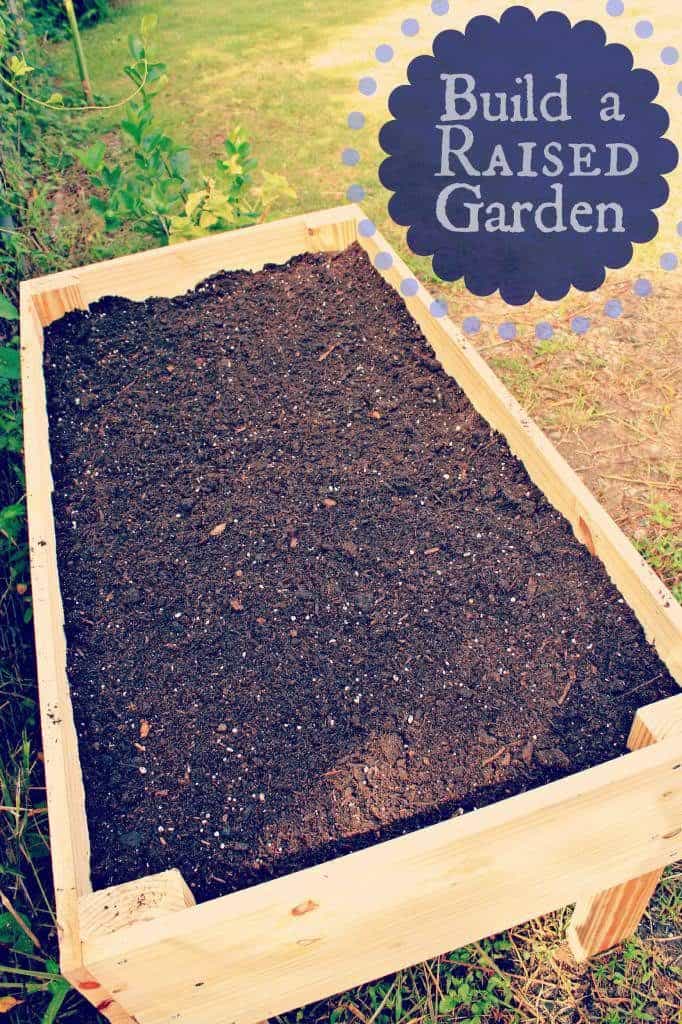
This garden bed, found at Apartment Therapy, has so many benefits! It comes with a removable cover that turns it into a little greenhouse when you need it. And when the weather is nice and warm, just open it up and let those plants do their photosynthesis thing!
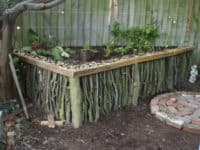
It’s time to pick up some firm branches and logs (maybe help the neighbors clean out their backyard or go on a productive stroll through the woods) and make a unique garden bed! Just follow the how-to at Instructables and soon you’ll be richer for a natural garden bed!
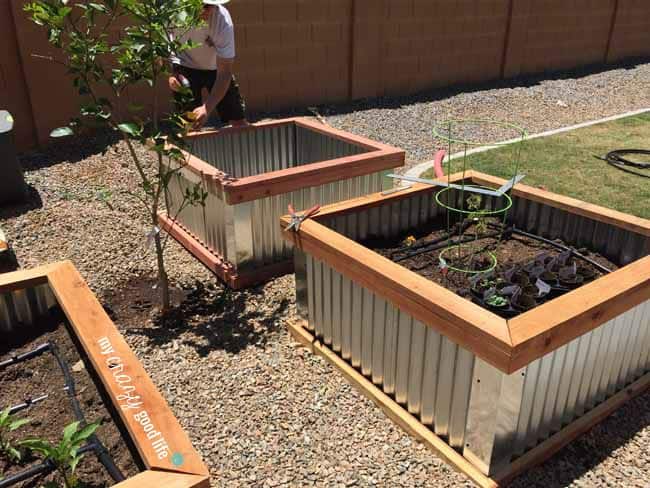
Who said gardening can’t be chic? Just look at these garden beds! You can’t deny that the corrugated metal gives them a modern touch. Plus, the entire garden looks super organized! If you like what you see, and surely you do, visit My Crazy Good Life to read the details.
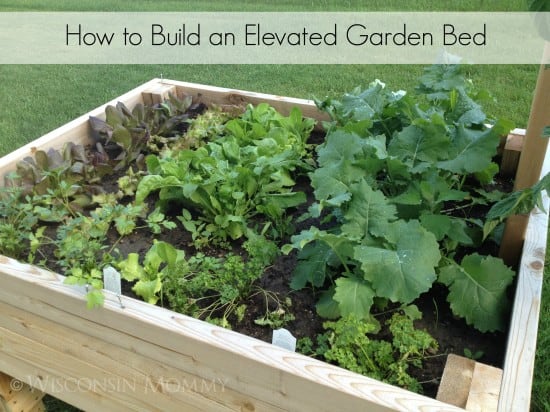
Enough with the snails eating your lettuce! How do they manage to climb up onto everything? It’s time to rebel! Wisconsin Mommy will show you how to quickly build a garden bed that’s completely raised from the ground – good luck to snails trying to conquer this one!
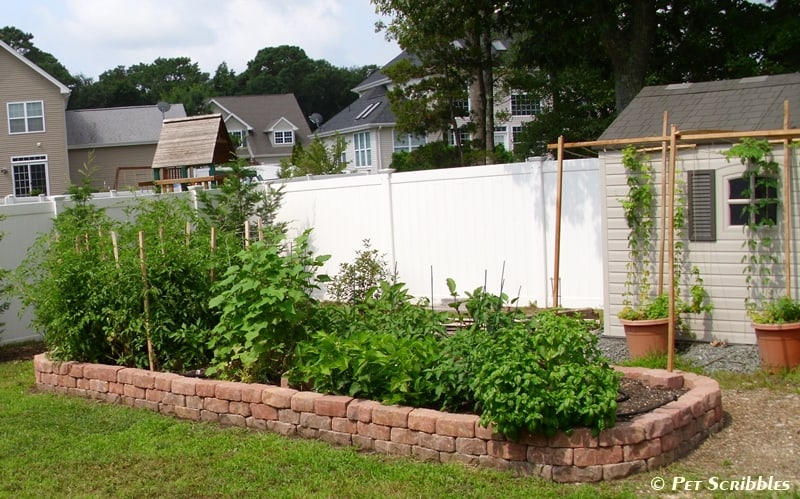
Stop saying one day to your ideas! If others can have it, so can you! Here’s a chance for you to make your very own cobblestone garden bed that is the stuff of dreams! Pet Scribbles guides you through the entire process!
This garden bed by Sea, Field and Tribe is very practical and absolutely perfect for those who want to grow something, but don’t have much space. You can relocate it, you can place it absolutely anywhere and you won’t even know it’s there until your greens start growing!
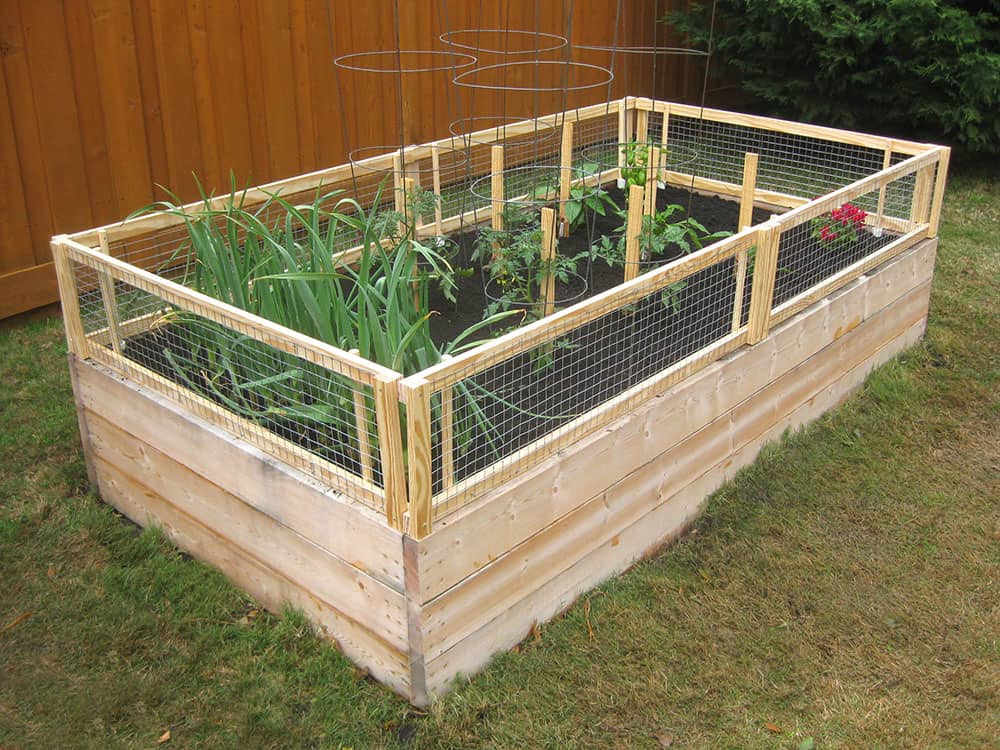
Not only will Vegetable Gardener teach you how to make a raised garden bed, they will also show you how to attach a removable pest gate as well! This way your vegetables will be protected from all sorts of animals, both curious and hungry!
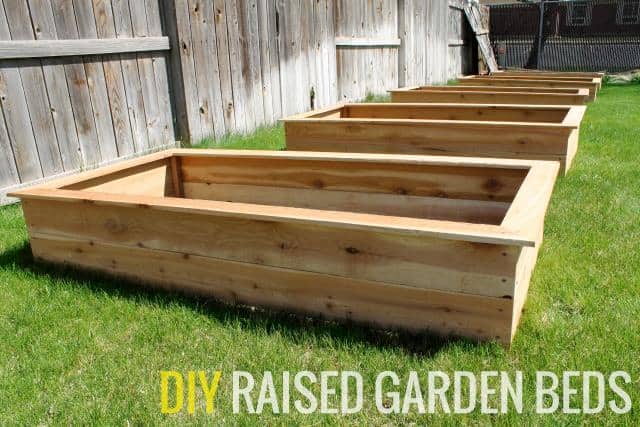
If you have a lot of space, this is the project you’ll want to give a try! These garden beds are so wide, you can really plant a whole variety of veggies and spices into them! Head over to eHow and follow the tutorial!
A simple, minimalistic look, spiced up with a little frame! You can leave them as they are, or you can paint them with some bright spring colors! Either way, visit Chris Loves Julia to read the details!
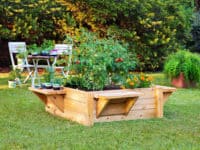
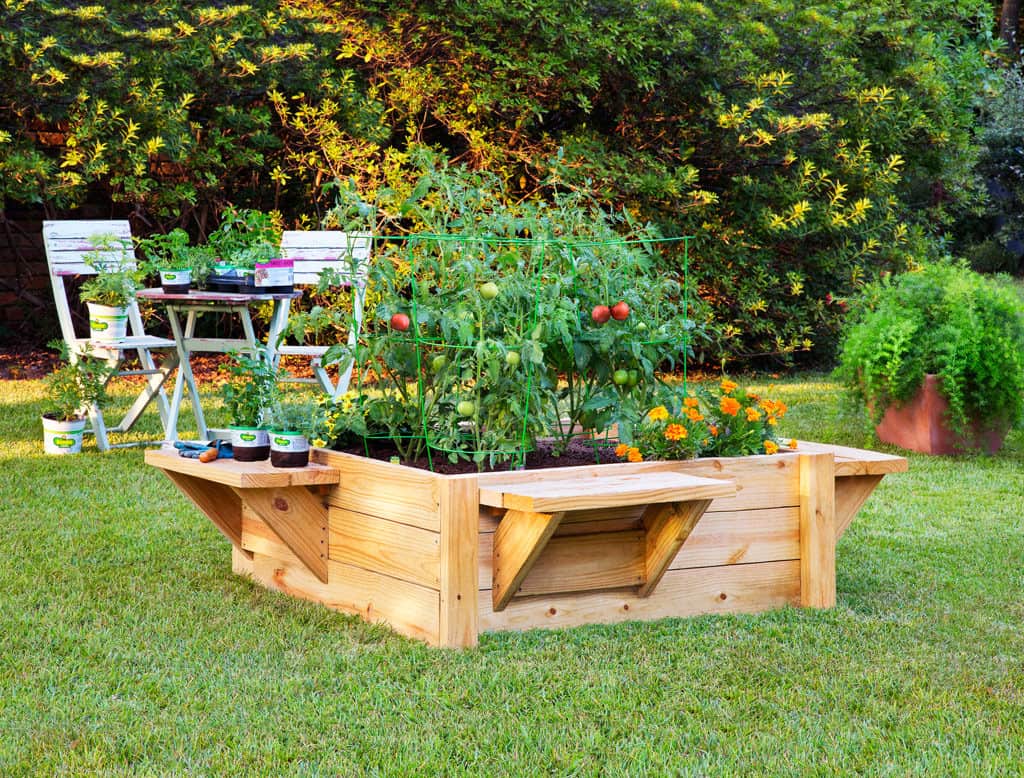
A garden bed with benches is the thing we’ve all been needing! You can use the benches to rest, sit your little kids up or just put garden tools on them so you always keep them at hand. This garden bed by Bonnie Plants really is as useful as it is beautiful.
Spring is nearly here, so why not put your creative thinking cap on and make something pretty for your garden? If you look around, there are plenty of things that you can use to make unique pots for your favorite flowers which bring some life back into your garden. Think outside the box with your DIY projects as you can transform anything into a garden pot with a hint of creativity and the inspiration on display below!
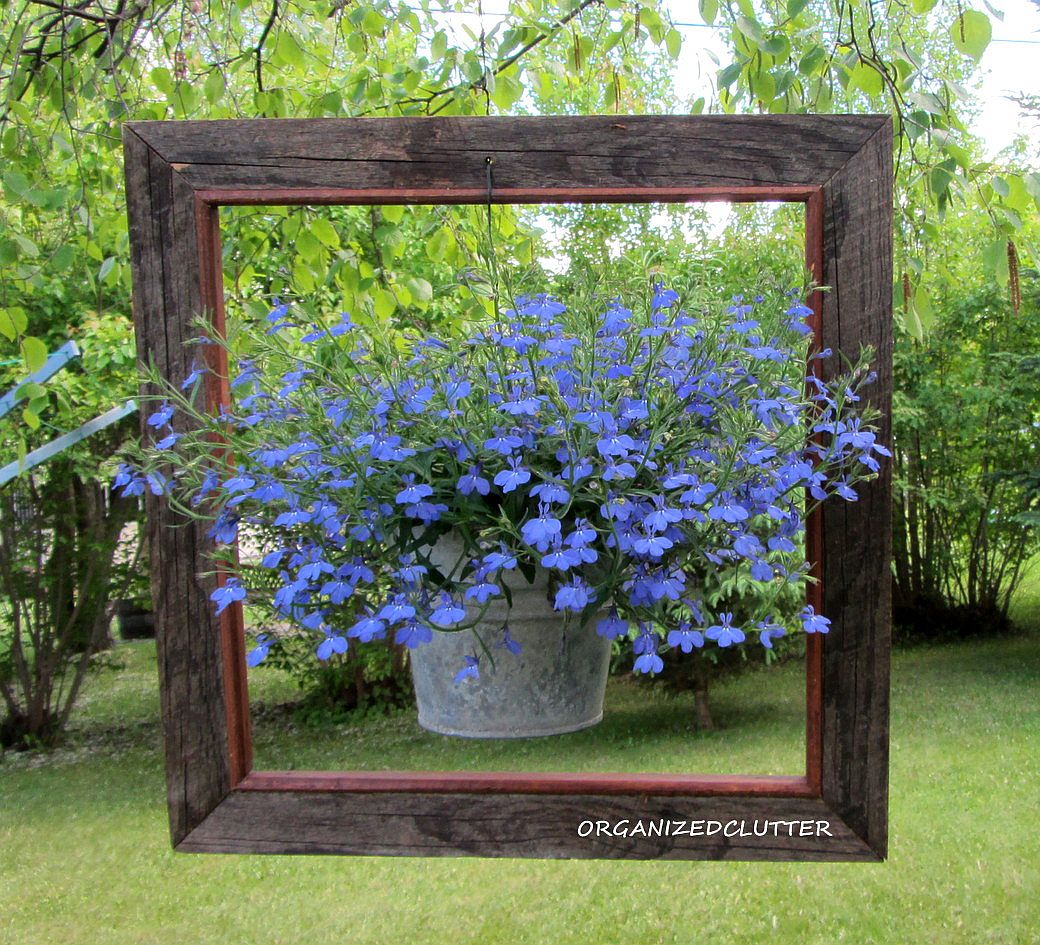
This puts a different spin on your garden pots. Use a frame to create a different perspective in your garden this spring. To make your own, check out Organized Clutter for more information.
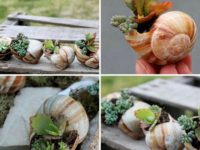
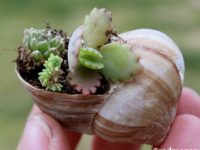
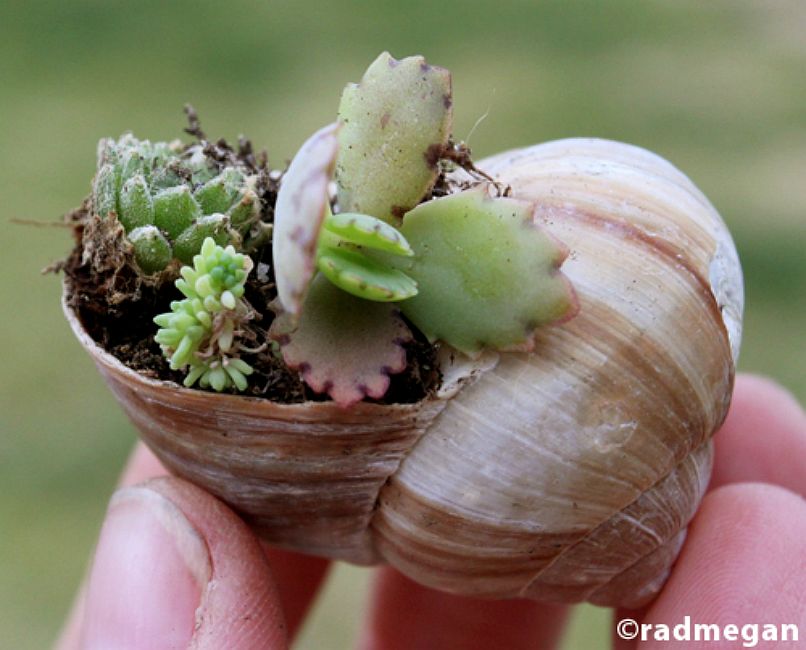
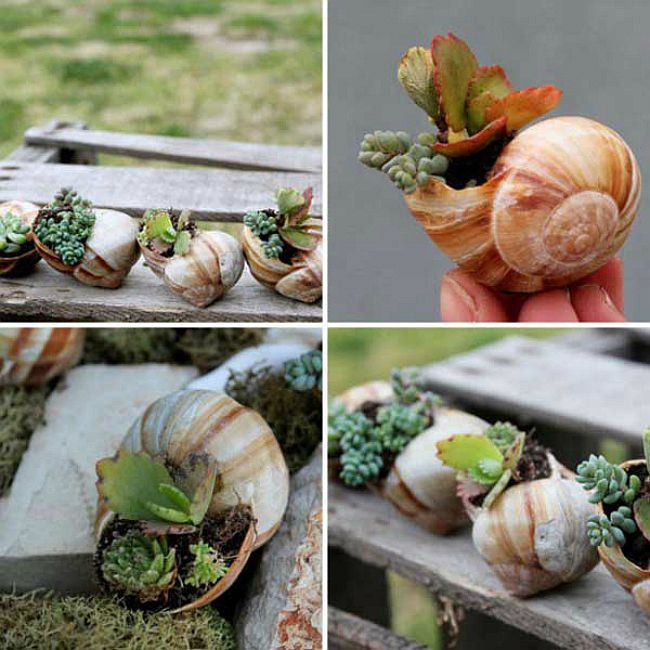
Rad Megan shows that if you look around you there are plenty of containers that you can use as plant pots and that’s certainly the case with empty snail shells.
Who remembers using floppy disks? Well if you have a stash hidden away why don’t you use them as small plant pots in your garden? Who knew these disks would come in handy again? Check out Brit for more information.
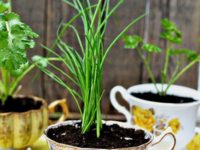
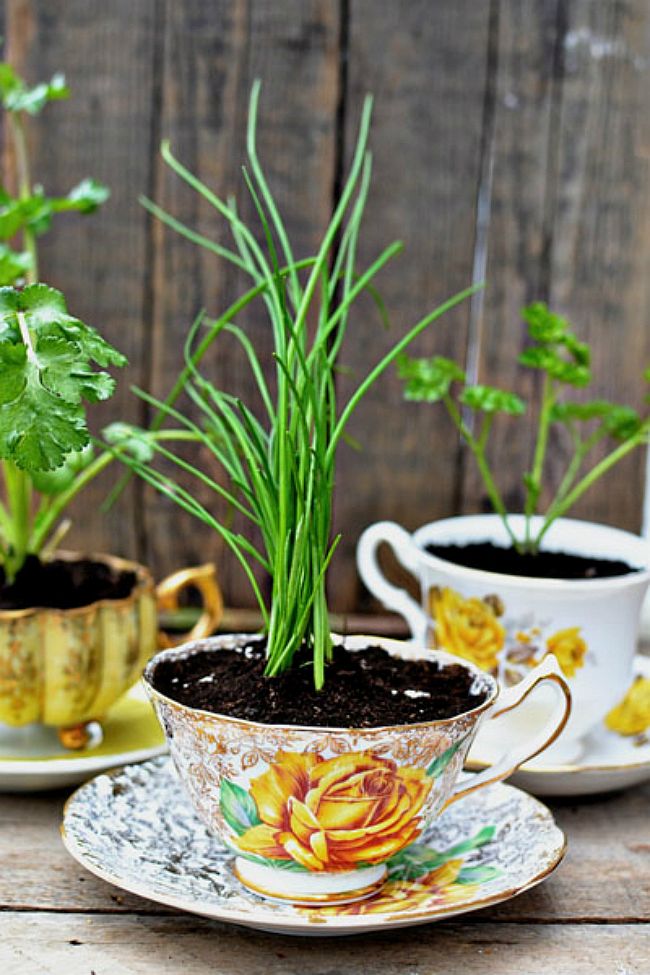
If you have a set of cups and saucers hanging around the house that you no longer use, you could transform them into mini plant pots for your herbs. This is what Intimate Weddings did and the finished product looks lovely. Try it out with yours.
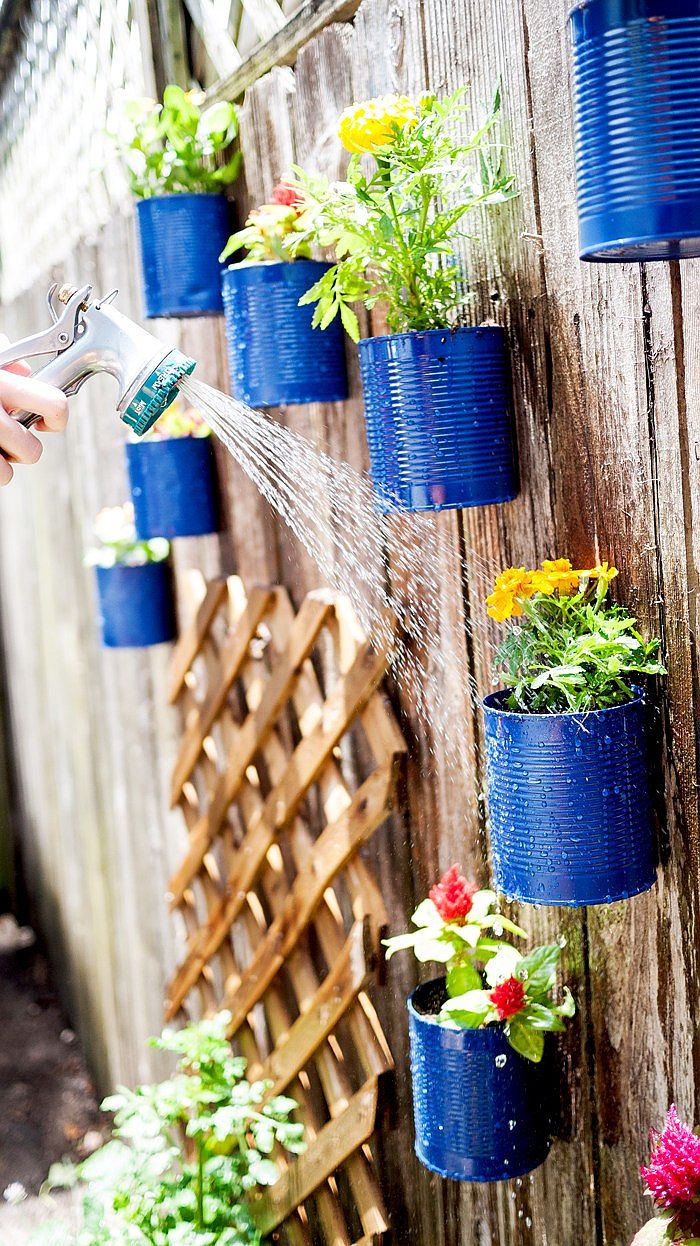
Who knew tin cans could be so versatile? Now, you can make mini plant pots out of them, which can then be easily attached to a garden fence, giving it a striking appearance. Check out the creation at Ciera Design to get some inspiration to make your own.
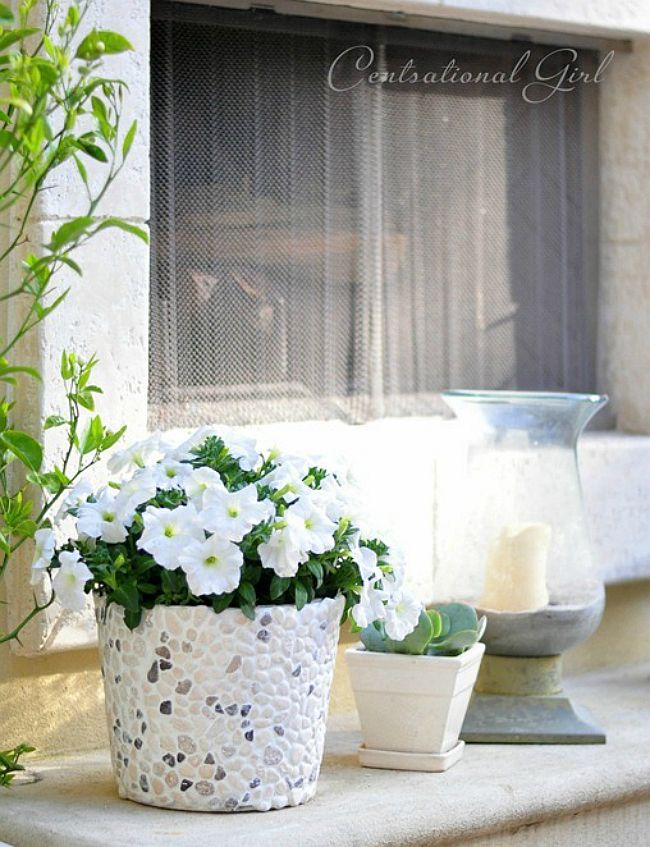
Transform a bucket into something beautiful by adding small rocks to it to make a pretty garden pot for your flowers. Check out Centsational Girl for more information on how to make your own rock bucket.
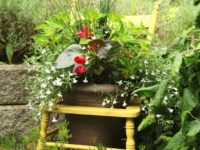
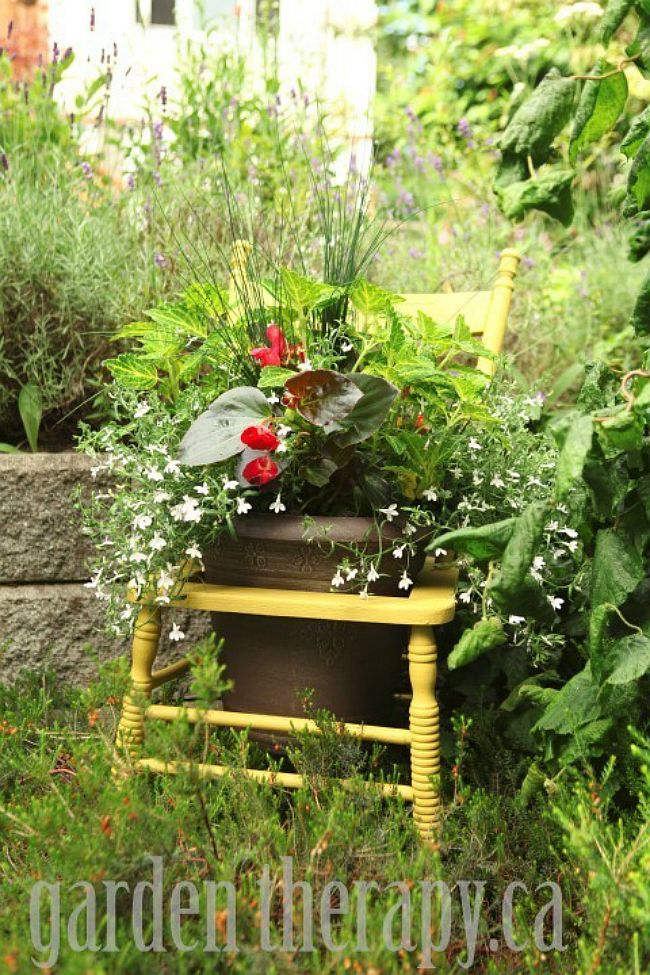
Transform an old chair into a chair pot by simply cutting out the seat section, so that you have a hole big enough for a plant pot to slot into. Once the flowers bloom it will look like the chair is your plant pot. For more information, check out Garden Therapy to make your own.
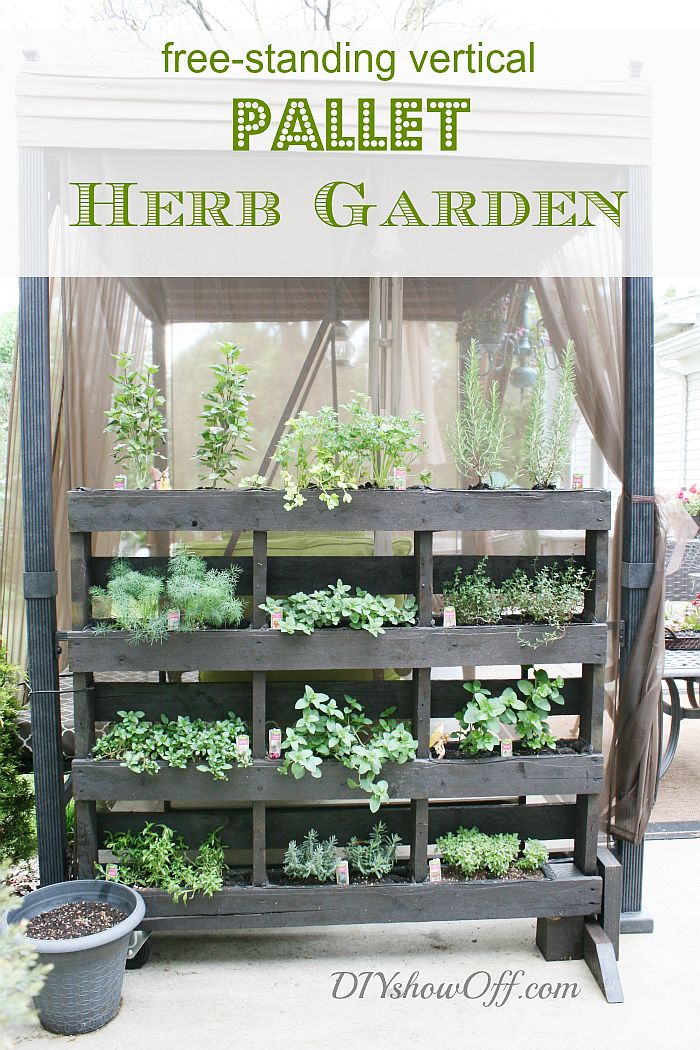
What better way to make use of a pallet then by turning it into your own herb garden? That’s exactly what DIY Show Off has done and they have created an eye-catching feature in the garden that easily holds plenty of your favourite herbs.
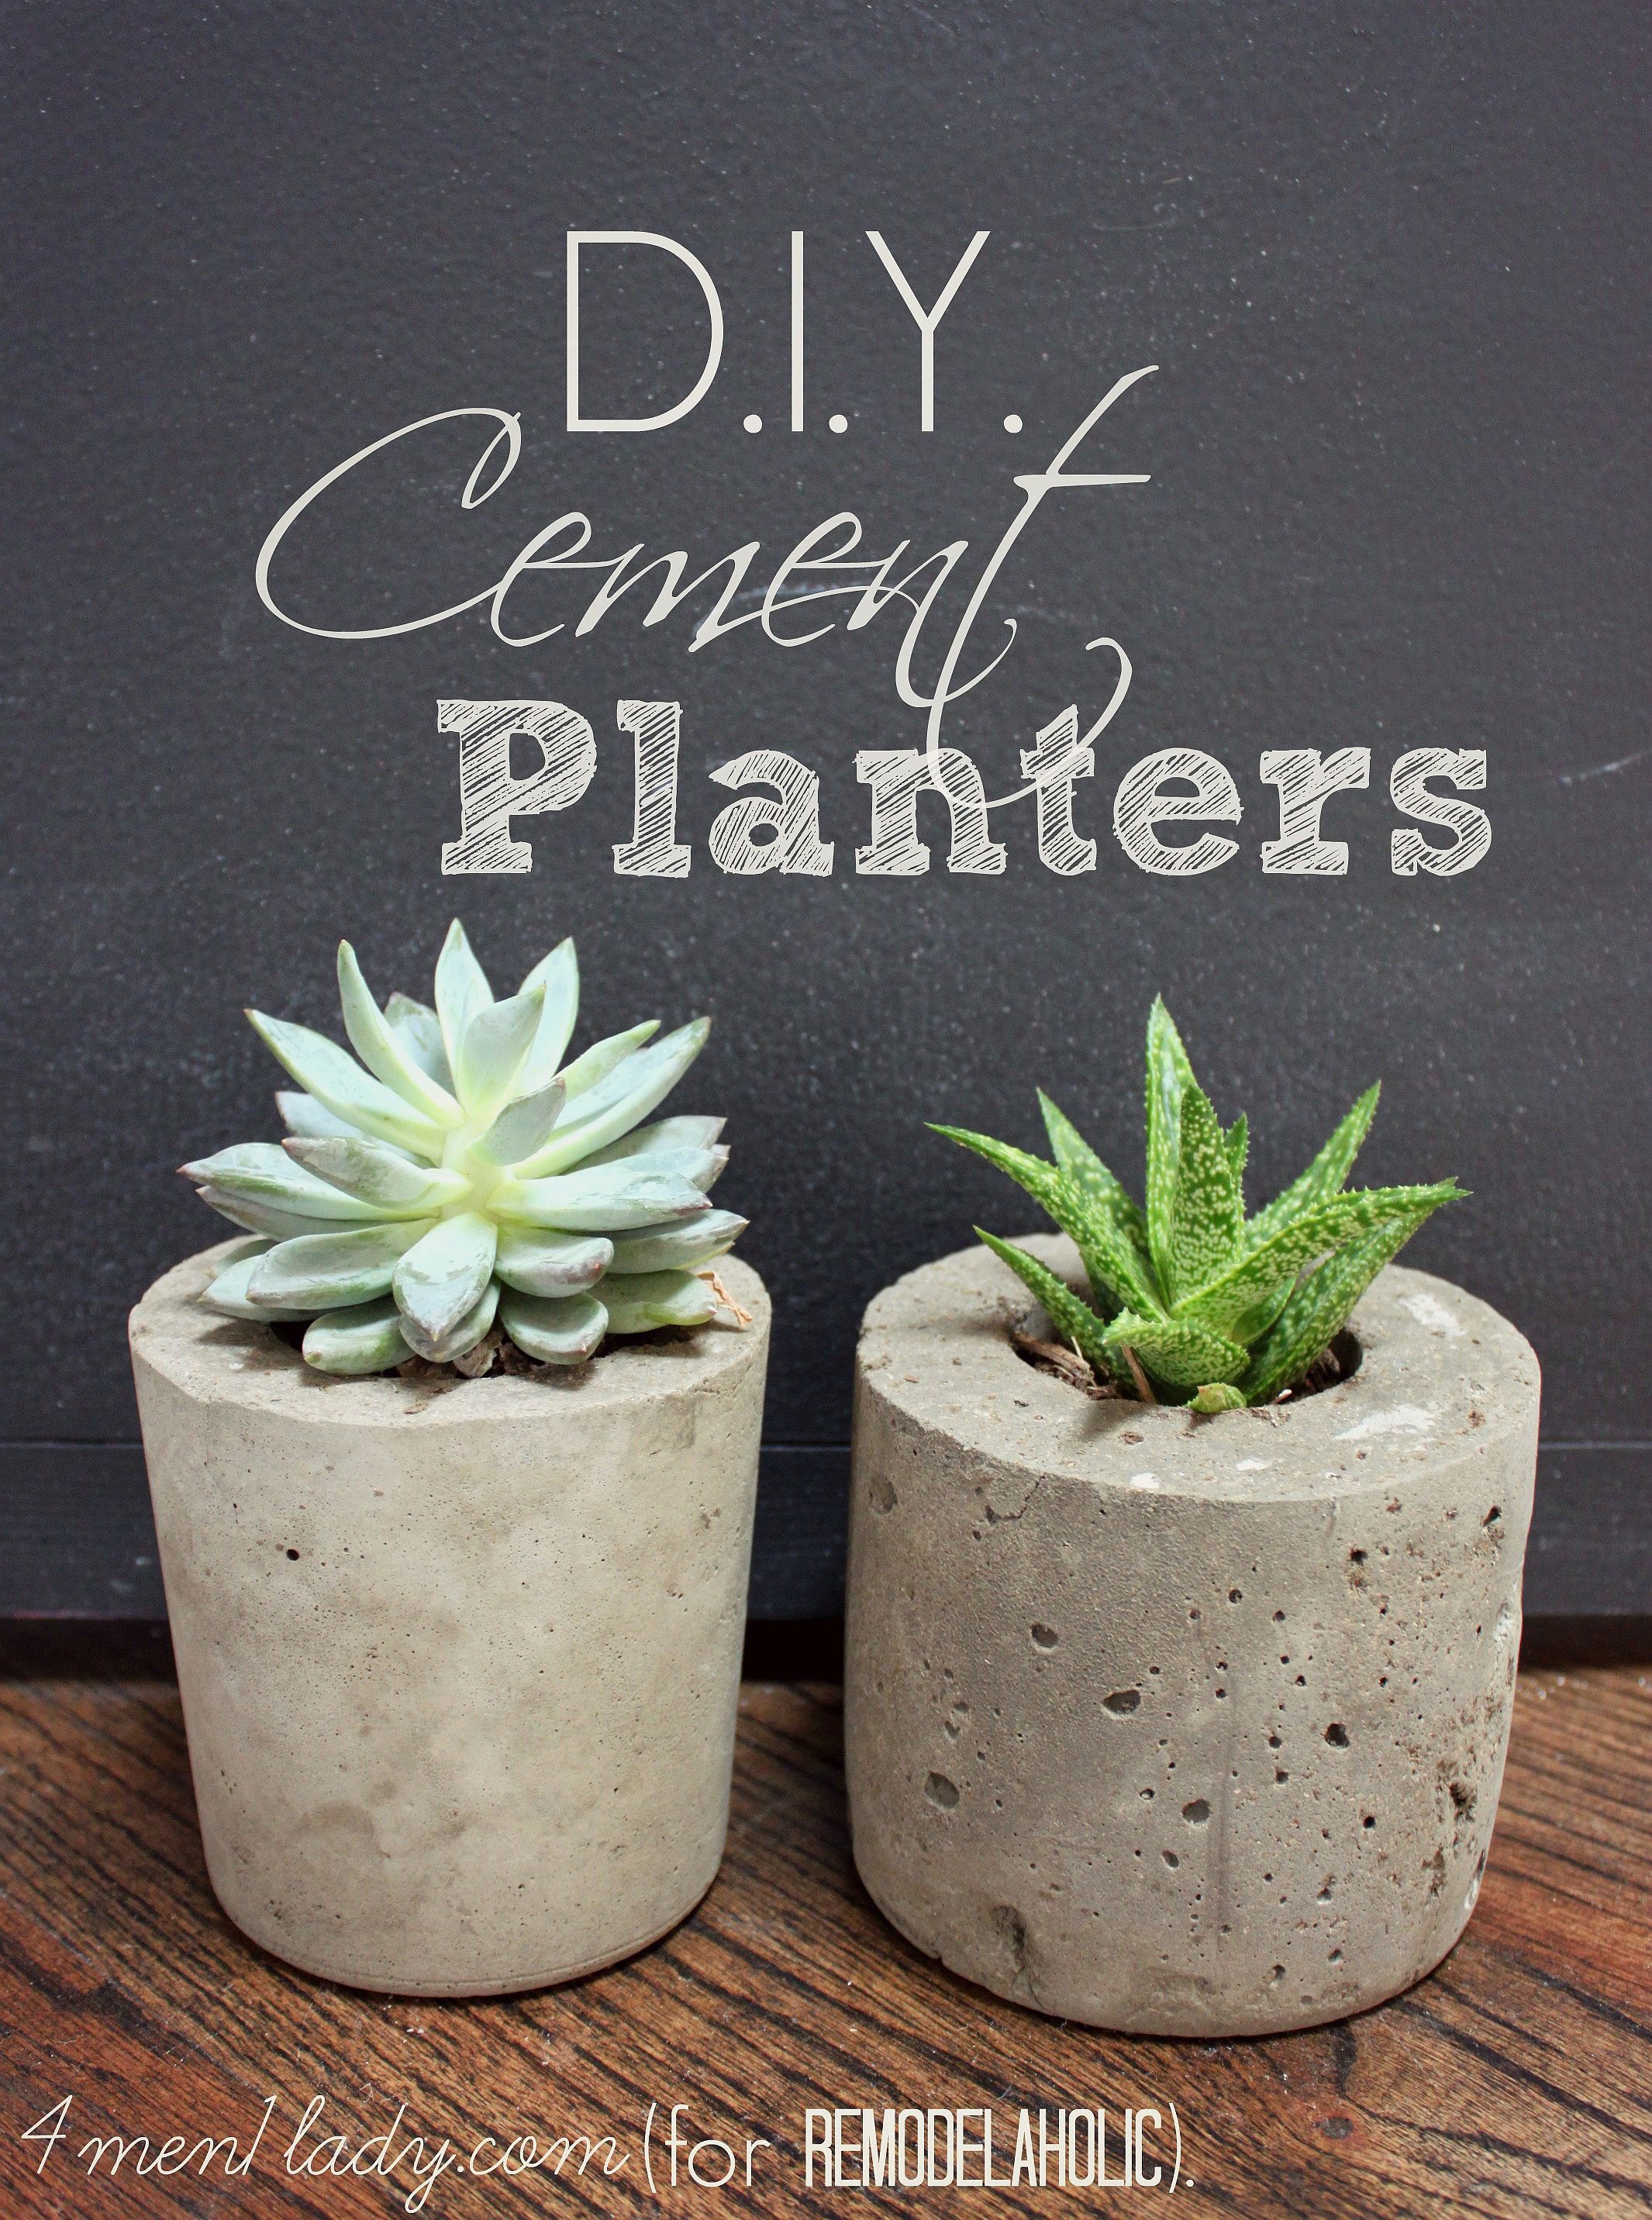
Cement planters are easy and fun to make for your garden and will last a long time, making them the perfect addition that need little maintenance even while prodly displaying your favorite flowers. To make your own, check out Remodelaholic for more information on how to create your own with the steps provided.
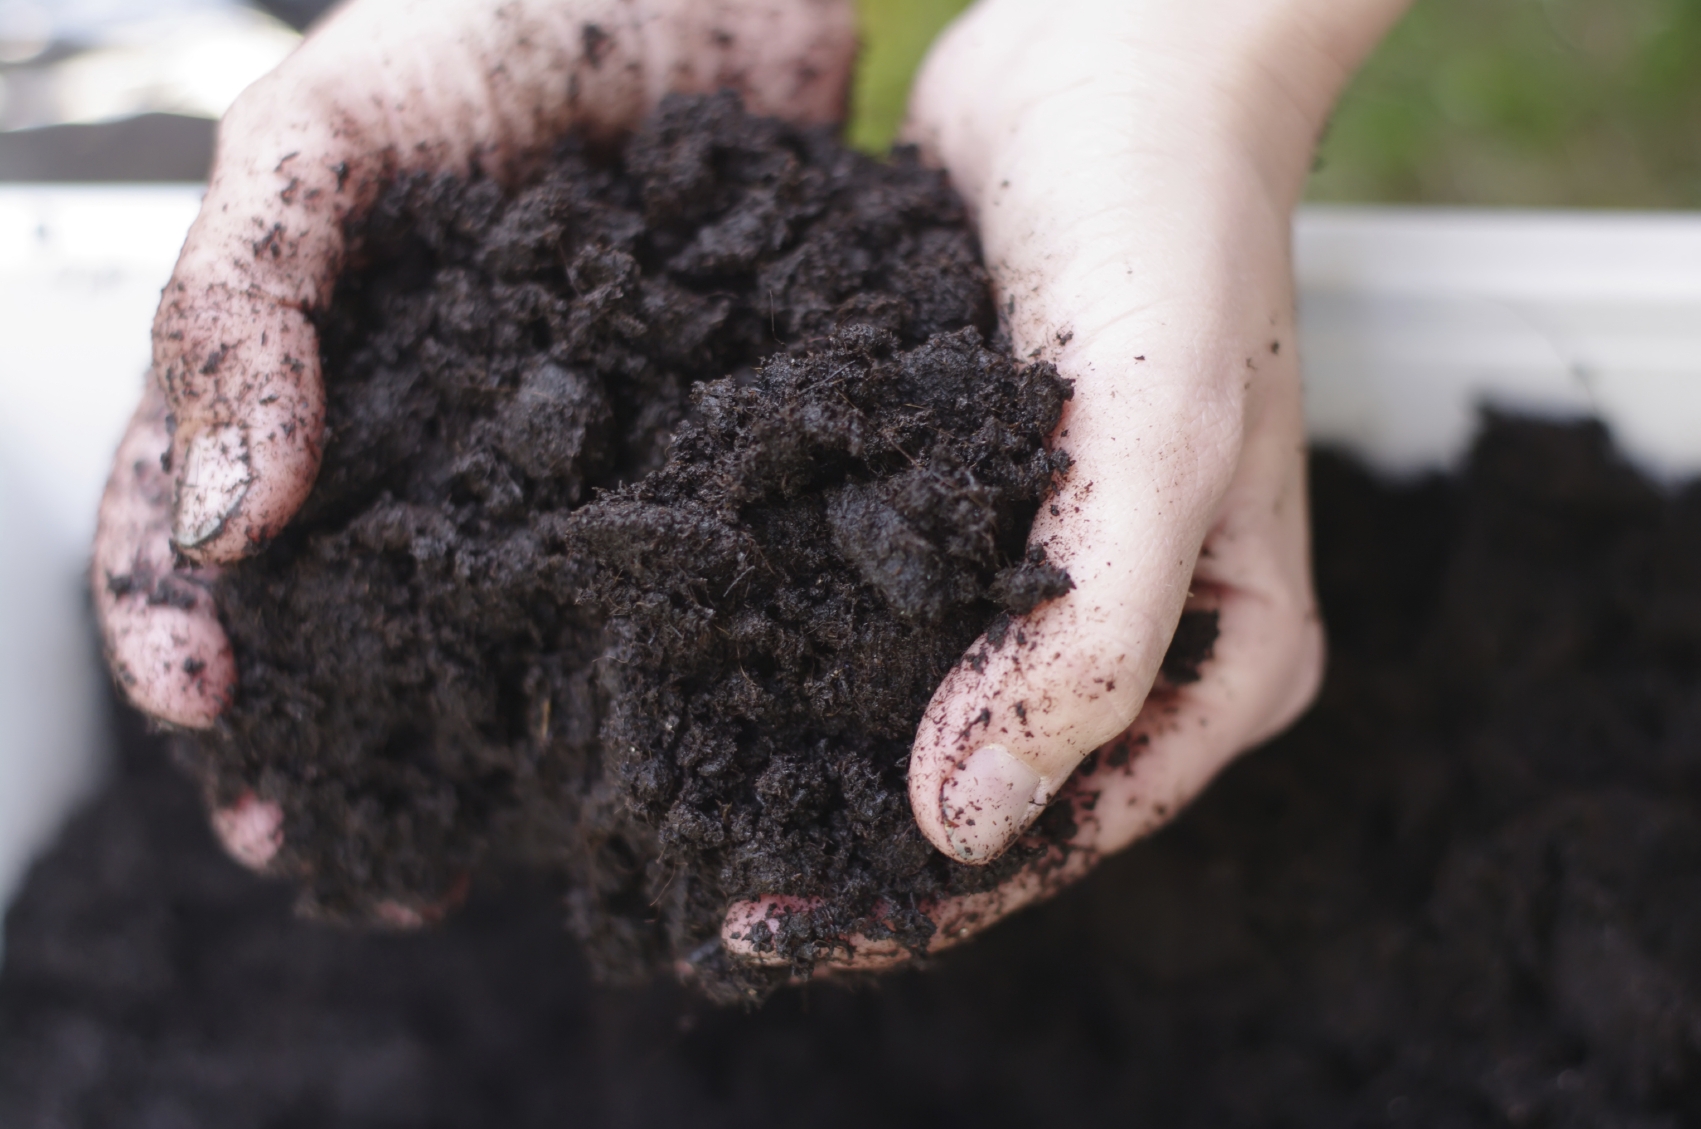
If you’re planning to get serious about your gardening it’s important that you get to know your soil type first. No matter how much work you put into your garden, all that time spent sowing your seeds, weeding, and tending to your plants could be in vain if the quality of your soil is not up to the job at hand. Check out our handy guide to give you the lowdown on soil types and how to make the most of them.
Clay soil feels lumpy and is sticky when wet and rock hard when dry. It is poor at draining and has few air spaces. In spring it will warm up, but it is heavy to cultivate. However, if the drainage for the soil is enhanced, then plants will flourish and grow as clay soil can be rich in nutrients. For more information, check out RHS for a list of plants that grow well in clay soil.
Sandy soil is gritty. It drains easily, dries out quickly, and is easy to work with. It warms up fast in spring, but tends to hold fewer nutrients as they are often washed away during wet weather. It requires organic amendments such as greensand, kelp meal, glacial rock dust, or other organic fertiliser blends. Mulching will also help to retain its moisture. Check out Gardening Know How for more information.
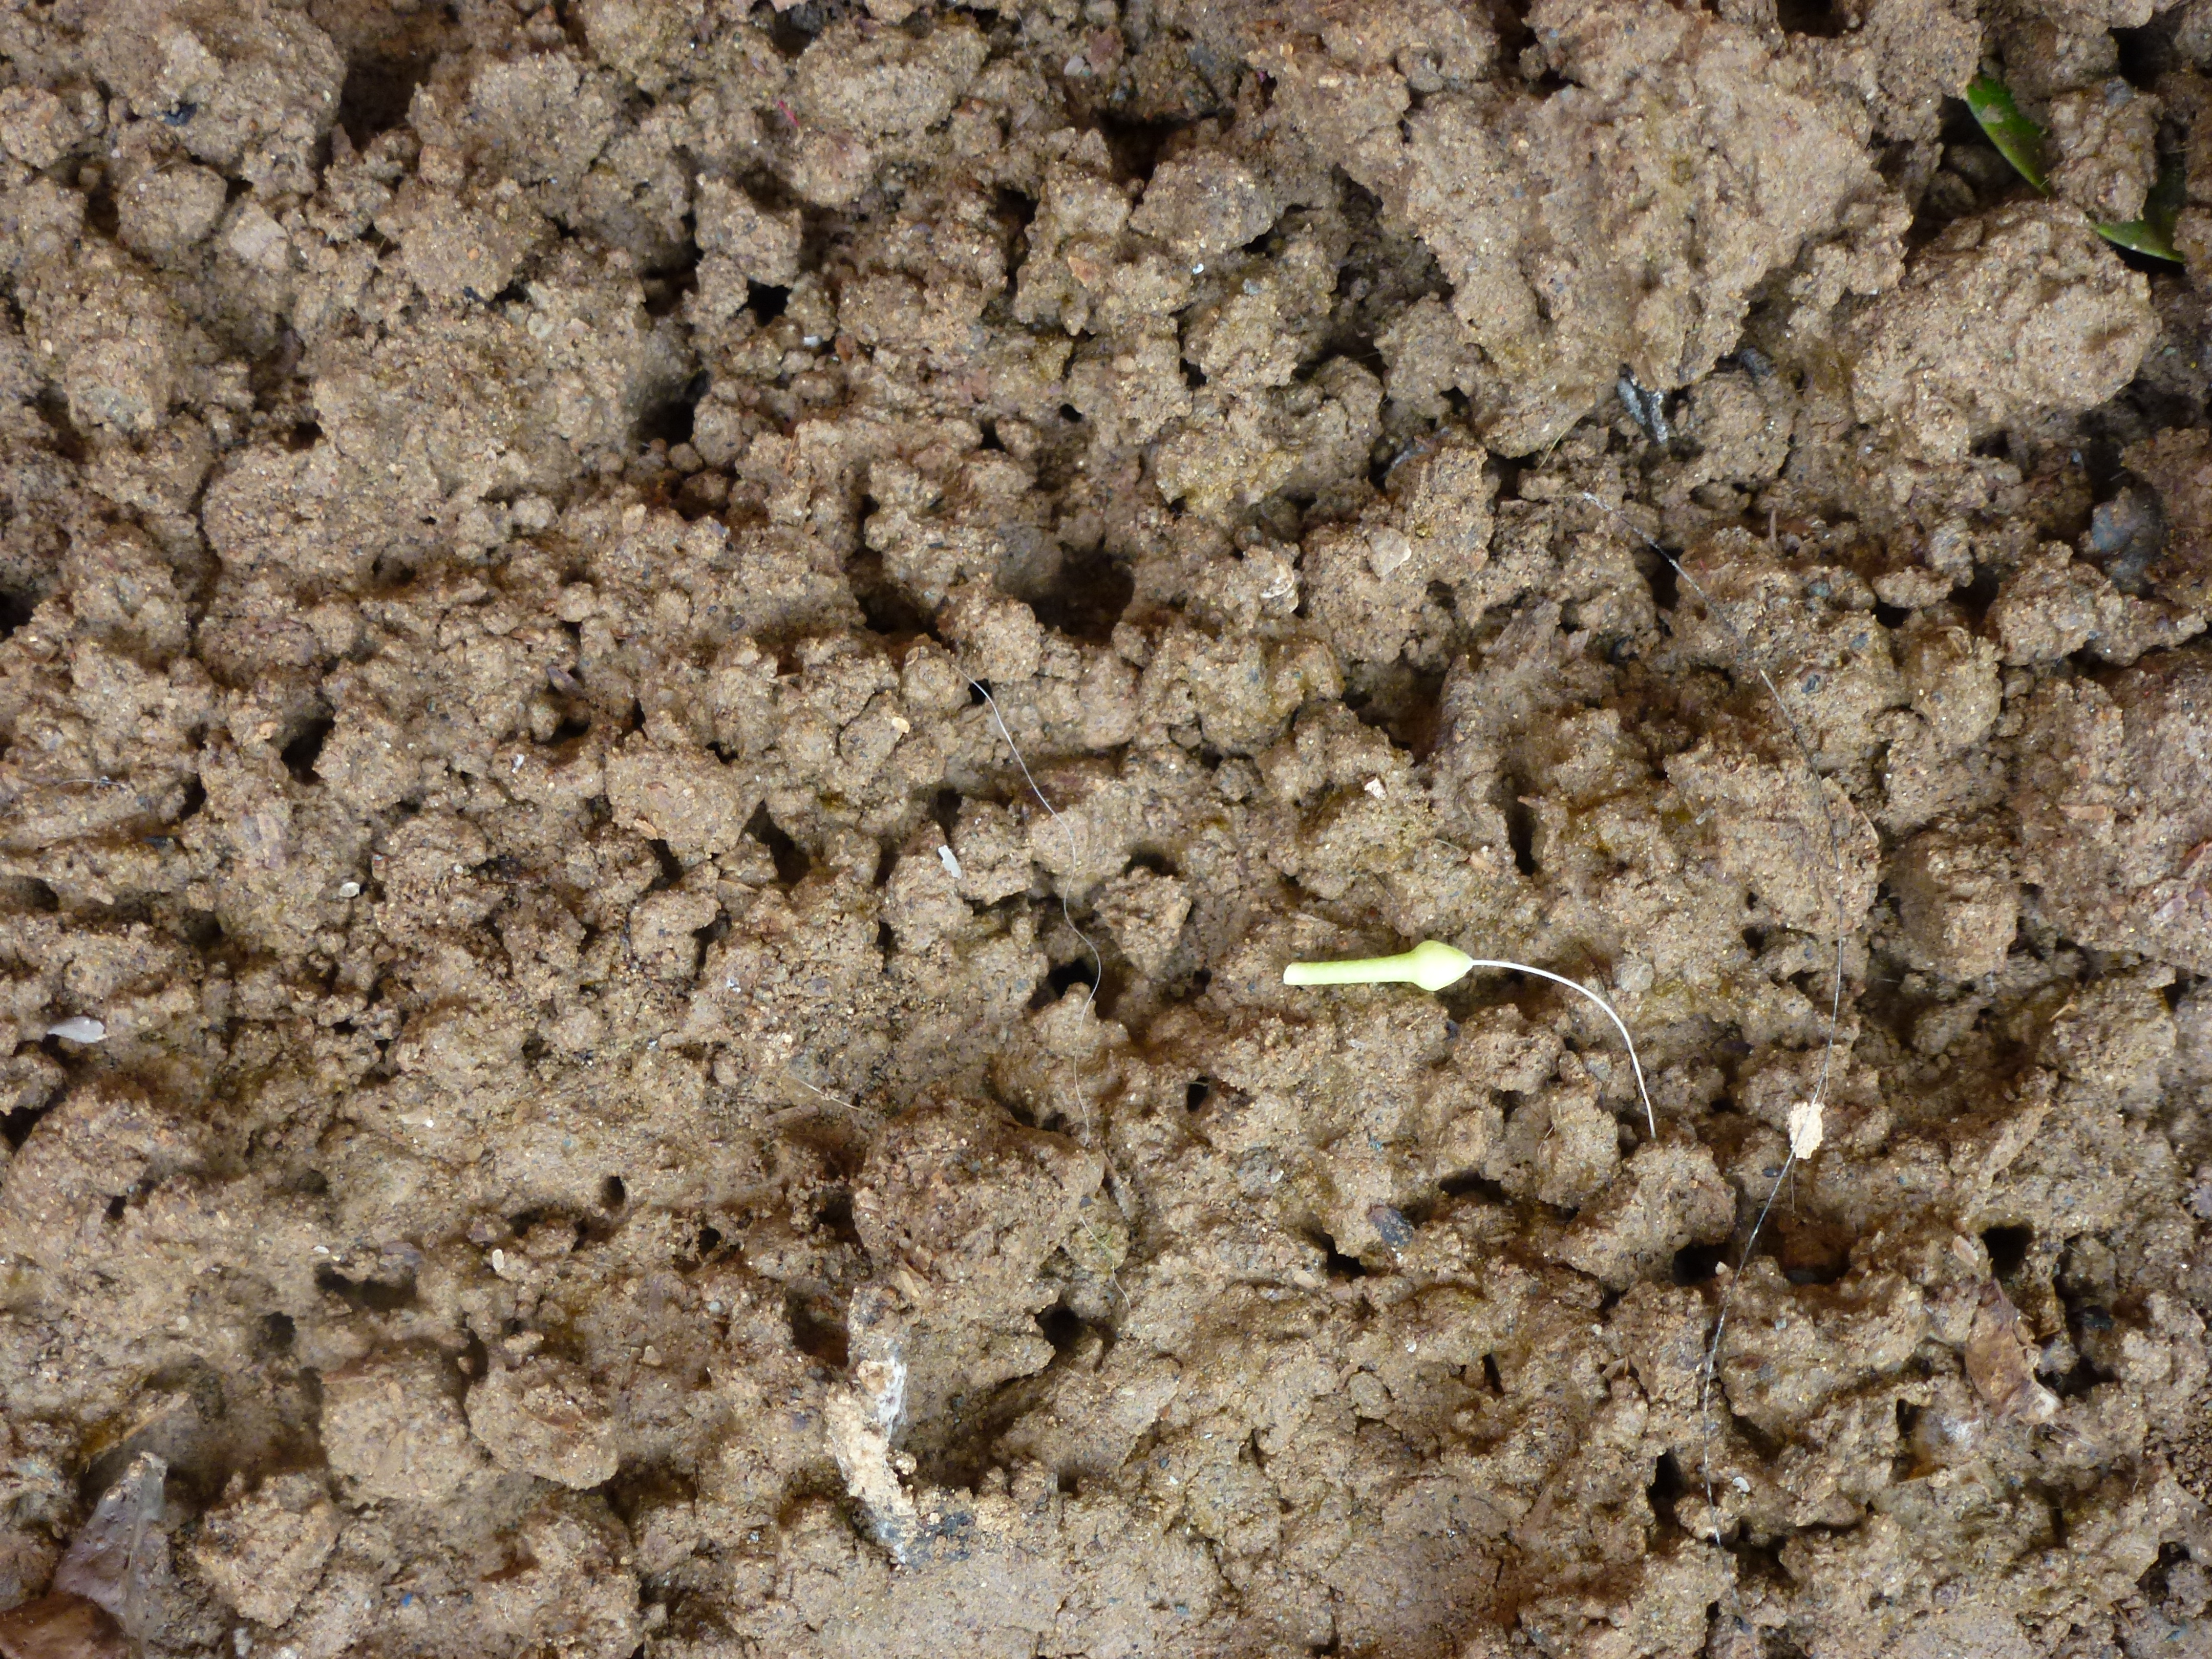
Silty soil feels soft. It’s great at holding moisture and is usually very rich in nutrients. The soil is easy to work with and can be compacted with little effort. If drainage is provided and managed this is a great soil for the garden. Mixing in organic matter can help to improve drainage and structure while also adding nutrients. For more information, check out Ag Verra.
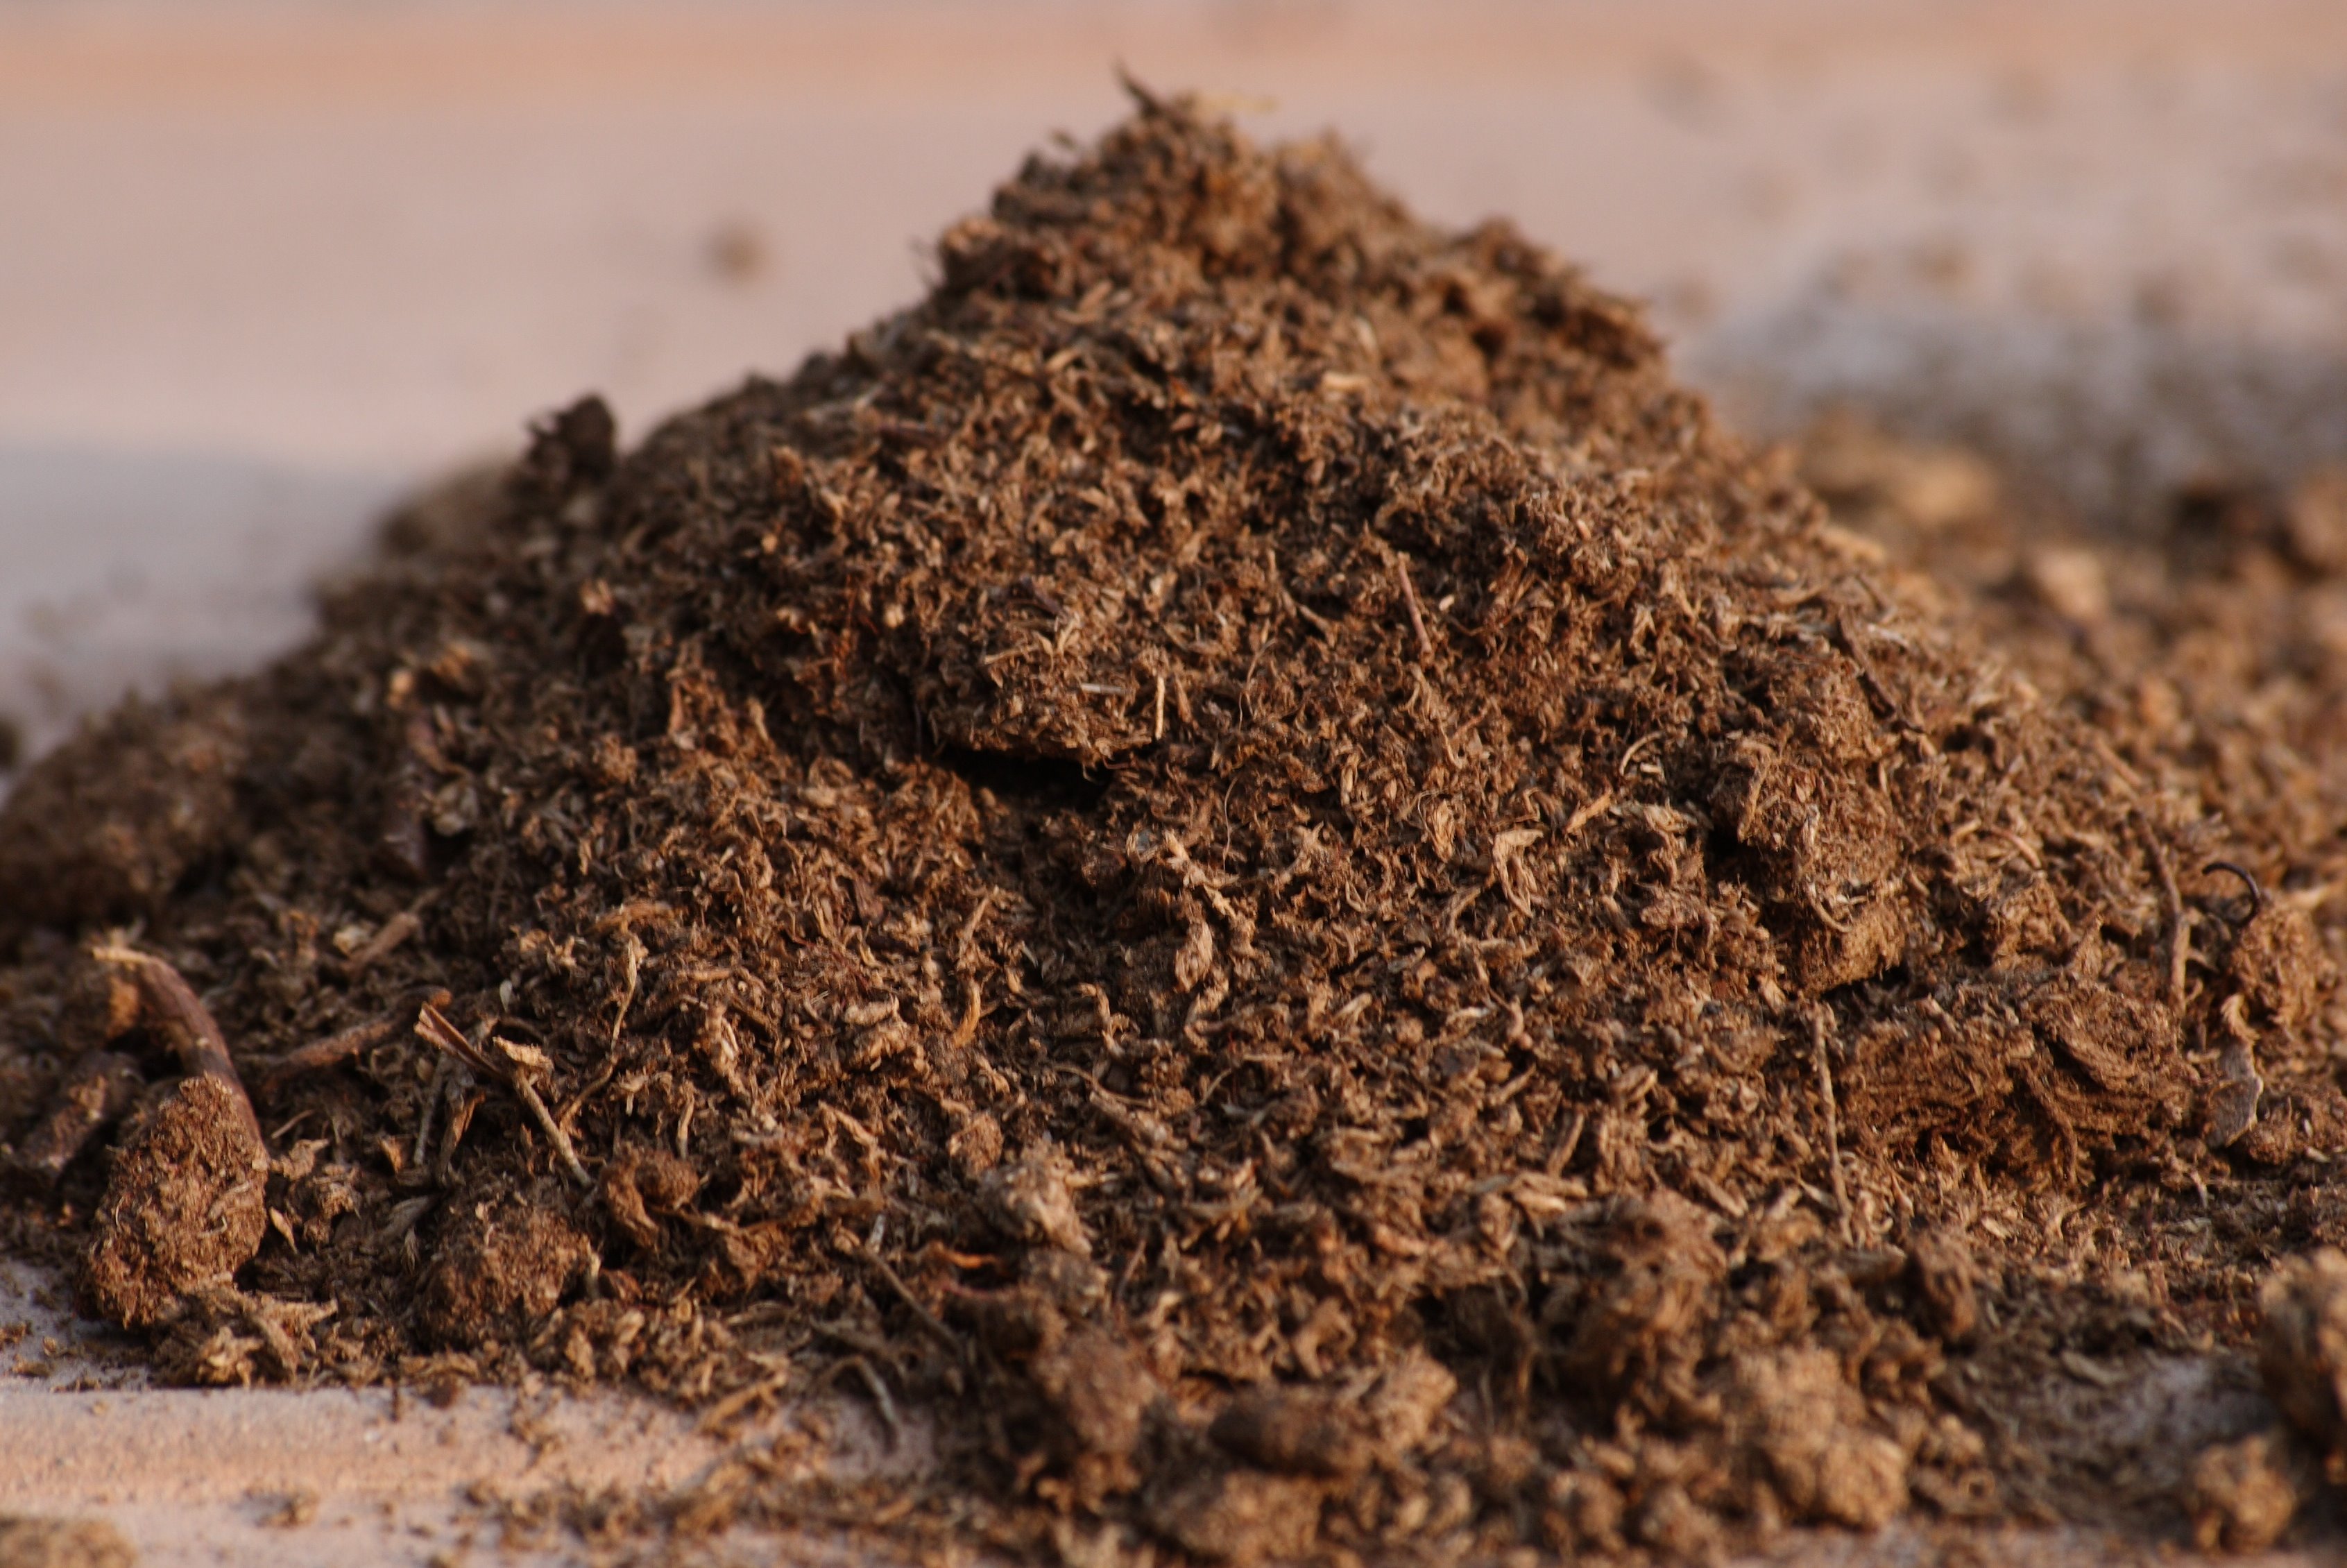
Peat soil is a darker soil that feels damp and spongy as a result of its higher levels of peat. As it is an acidic soil type it slows down decomposition, which leads to the soil having fewer nutrients. In spring, the soil heats up quickly and can retain a lot of water, which usually requires good drainage. This can be achieved by digging drainage channels. This soil type is great for growth when mixed with rich organic matter, compost, and lime, which helps to reduce the acidity. The pH in acidic soils can be raised by adding soil amendments such as glacial rock dust. For more information, check out Soil Net.
Chalky soil is larger grained and generally stonier compared to other soils. It is free draining and usually overlays chalk or limestone bedrock. It is alkaline in nature, which can often lead to stunted growth and yellowish leaves; however, this can be resolved by using the right fertiliser and balancing the pH levels. Check out The Gardener’s Almanac for more information.
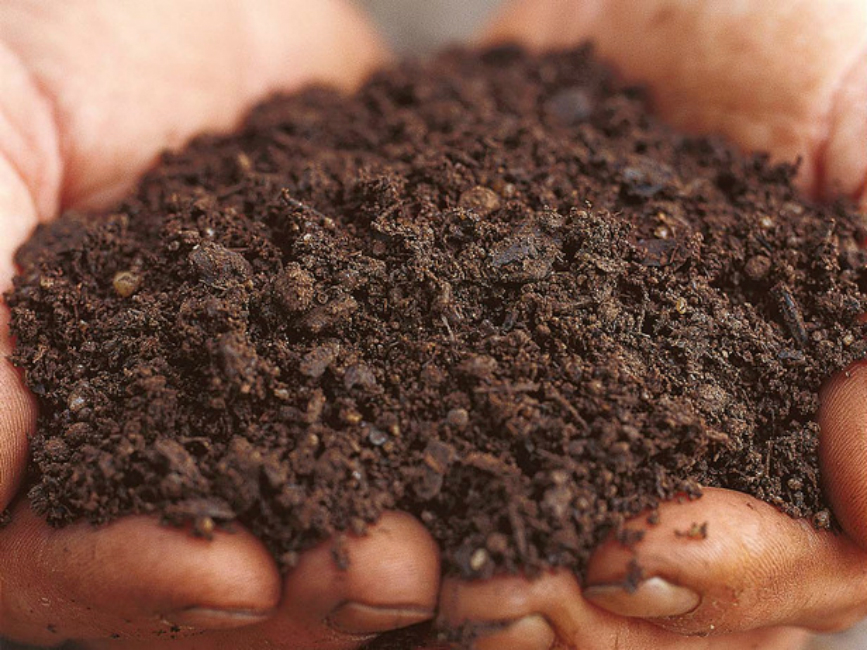
Loamy soil is a mix of sand, silt, and clay and feels fine-textured with a slight dampness. It is the ideal soil type for gardening as it has great structure, good drainage, holds its moisture, is full of nutrients, and is easily cultivated. Not only that, but is warms up quickly in spring and doesn’t dry out in the summer. This type of soil tends to be acidic and requires organic matter added to its regularly. For more information, check out Growing Anything.
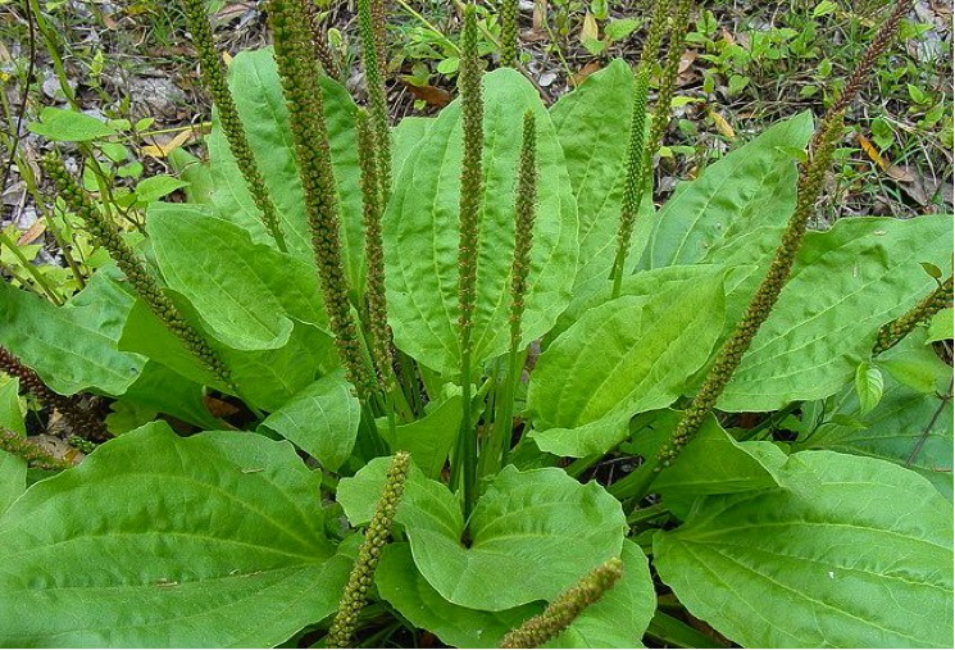
What is a weed?By definition, weeds are plants found in the wrong place as they take up vulnerable space, sunlight, water, and nutrients that may otherwise by used by important crops. However, what may be a weed to one person may not be to another. Of course, any type of weed regardless of what is it is a blight for all gardeners, but they don’t have to rob your garden of its beauty if you know what to look for and tackle them straight away. We’ve put together a handy list of weeds to watch out for.
The species of Taraxacum are tap-rooted, perennial, herbaceous plants, which are native to temperate areas of the Northern Hemisphere and will grow anywhere if given the chance.
Scientific name: Taraxacum officinale
Size: 12 inches tall, 6 – 16 inches wide.
Where it grows: Lawns and gardens in sun or shade.
Appearance: This common lawn weed has a strong taproot; leaves are deeply notched. Yellow flowers mature to puffballs.
Lawn Weed Control Tip: Mulch to prevent it in gardens; pull plants by hand or use a post-emergence herbicide in lawns.
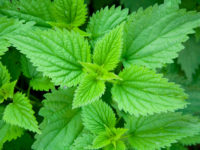
This handy weed is often used to tackle stinging nettle stings and has the ability to produce up to 40,000 seeds that can wait decades before sprouting.
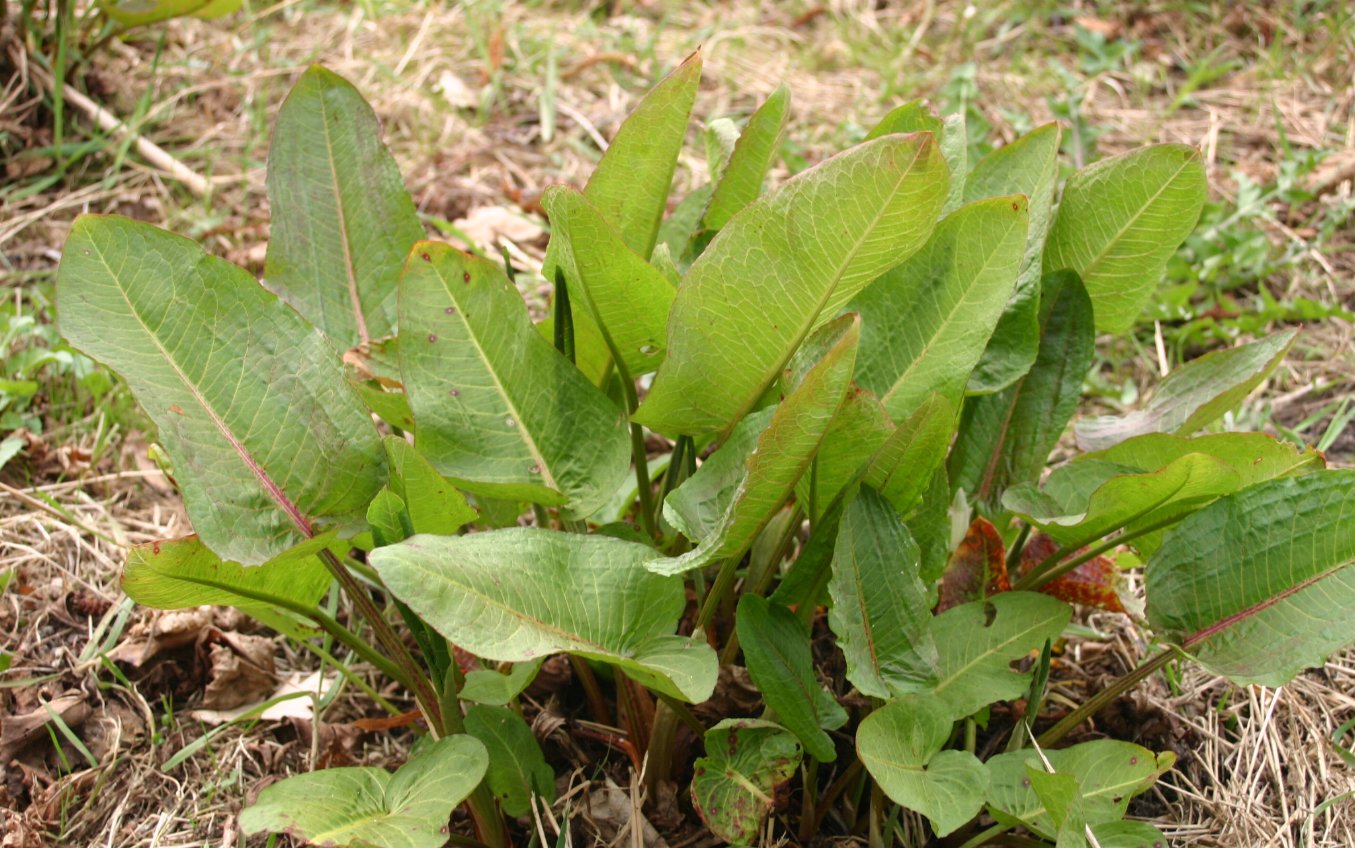
Scientific name: Rumex obtusifolius
Size: To 4 feet tall and 2 feet wide.
Where it grows: Landscape and garden areas in sun or shade.
Appearance: Produces large, wavy-edge leaves and large seed heads covered with brown seeds.
Control: Mulch to prevent it; pull and dig up plants or treat with a post-emergence herbicide.
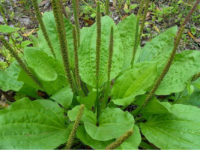
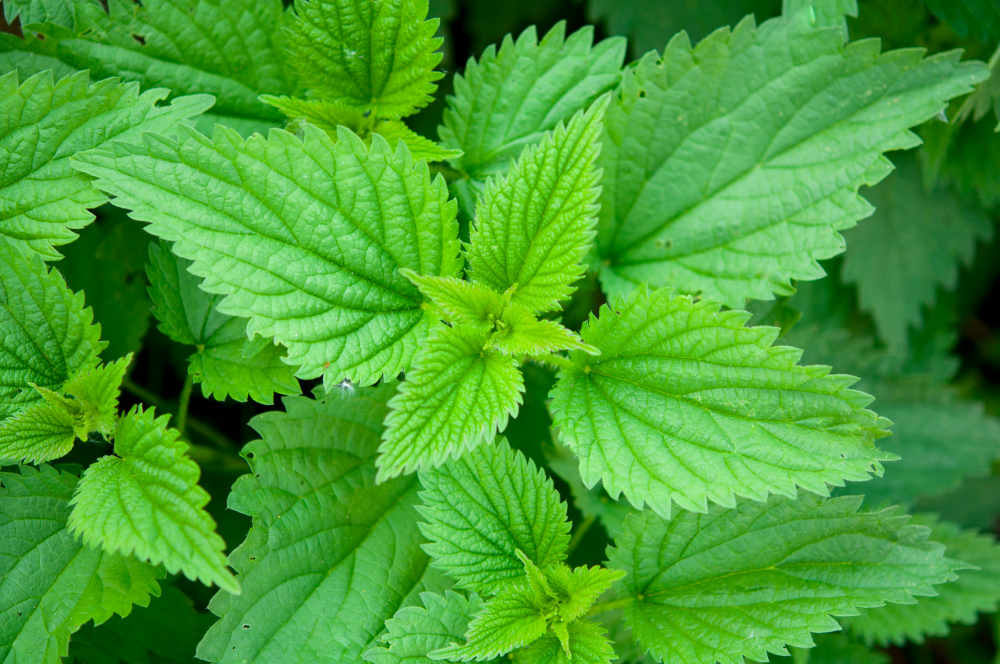
This well-known weed can be found growing throughout Europe and North America and is known for its stinging hairs which occur when toxins from the hairs have made contact with the skin.
Scientific name: Urtica dioica
Size: To 6 feet tall and 3 feet wide.
Where it grows: Garden areas with rich, moist soil.
Appearance: Sawtooth-edge leaves and yellowish flower clusters are covered with stinging hairs.
Control: Mulch to prevent it; dig out plants or treat with a post-emergence herbicide.
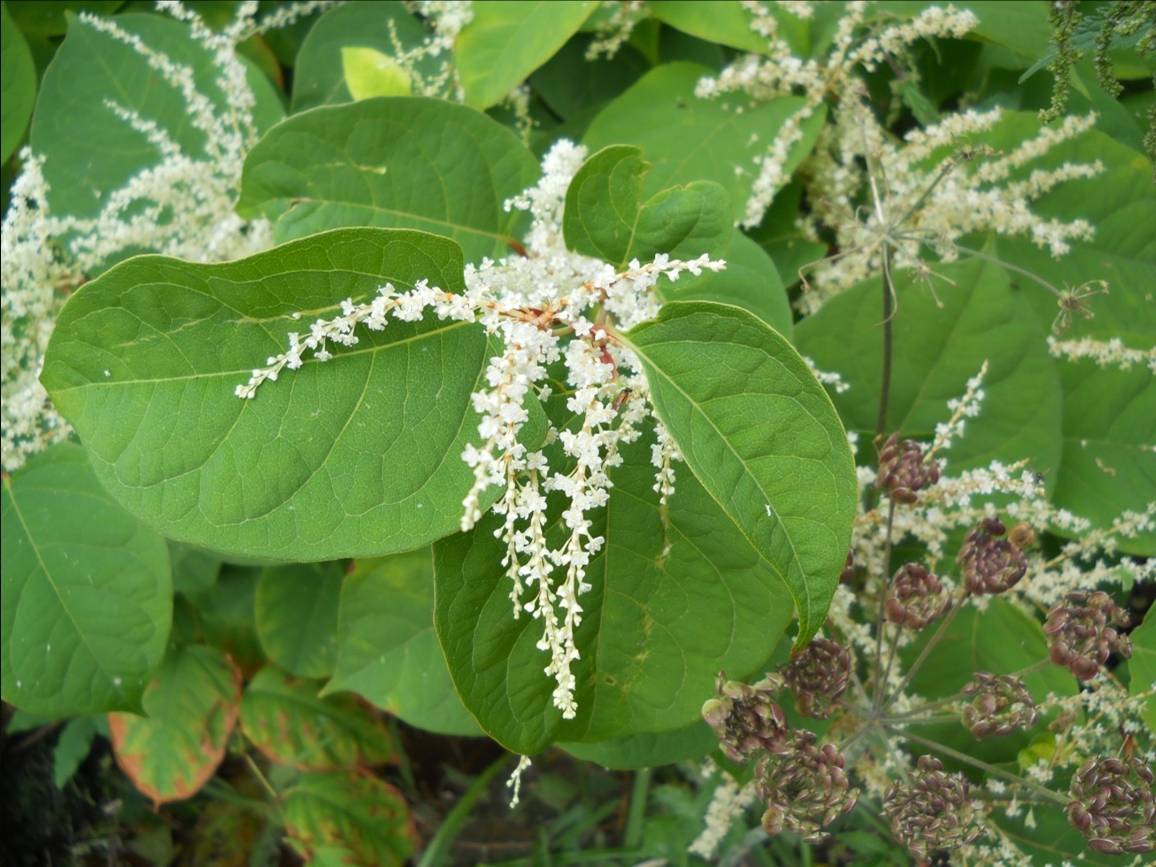
This is a thug in the weed world as it spread rapidly suppressing all other plant growth.
Scientific name: Fallopia japonica
Size: To 8 inches tall and 2 feet wide.
Where it grows: Sunny or partly shaded lawn, landscape, or garden areas.
Appearance: Groundcover with blue-green leaves sparsely appearing on long stems.
Control: Prevent it with a deep layer of mulch or apply a pre-emergence herbicide in spring. Once the plant grows, hand-pull or spot-treat it with an herbicide.
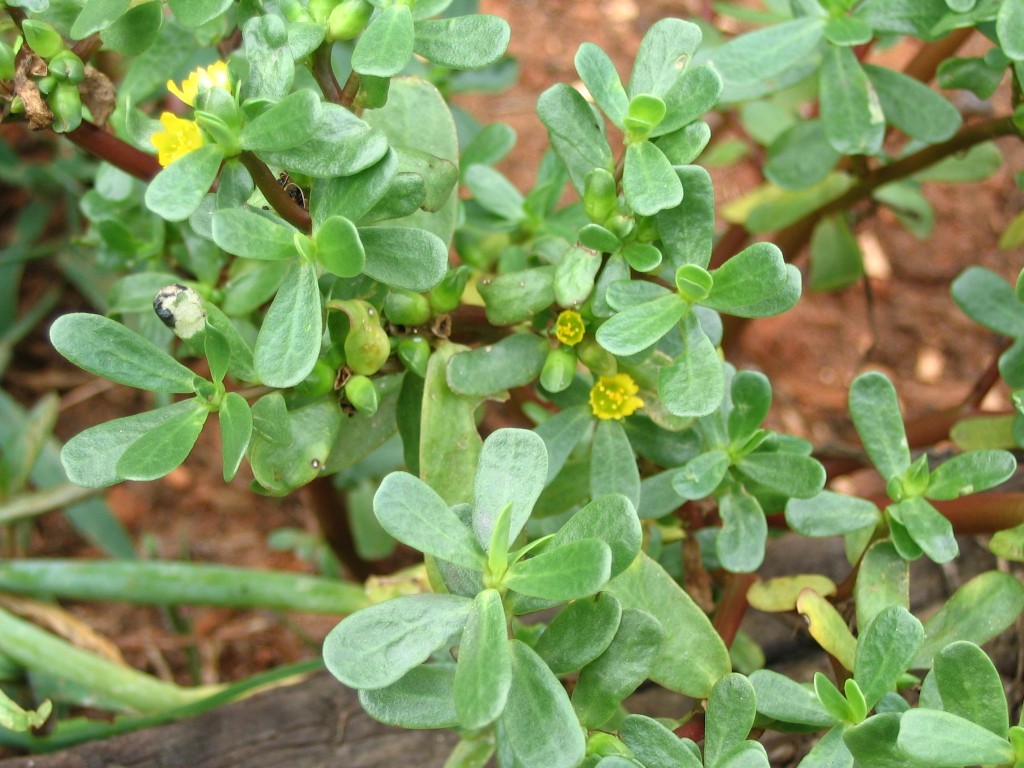
The purslane plant can be a difficult weed to control due to its multiple survival methods; however, it can be thwarted if you are familiar with it.
Scientific name: Portulaca oleracea
Size: To 6 inches tall and 2 feet wide.
Where it grows: Dry, sunny landscape and garden areas.
Appearance: Groundcover with fleshy, dark green leaves and small yellow flowers at the ends of the stems.
Control: Mulch to prevent it or use a pre-emergence herbicide in the spring; pull plants by hand or spot-treat with a nonselective post-emergence herbicide.
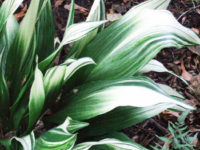
We’ve all been there. We’ve bought a plant or been given one as a gift, put it on the windowsill, watered it once and then forgotten about it. It’s only when we notice the yellowing leaves, dried soil and drooping mess of the plant that we realize we haven’t been taking as much care of it as we should have been. If you’re a forgetful gardener, but still love having plants in the home, we have the perfect list for you to go through where you are sure to find the ideal plant for your home.
Typically grown outdoors as bedding plants, geraniums (Pelargonium spp.) are the perfect houseplants to have as they flower all year once placed in a sunny window. Look out for varieties that come in red, white, pink, orange or multi-colored blooms for your home. Most types of geraniums do well if they miss a watering or two. Buy your own from Plants for Shade.
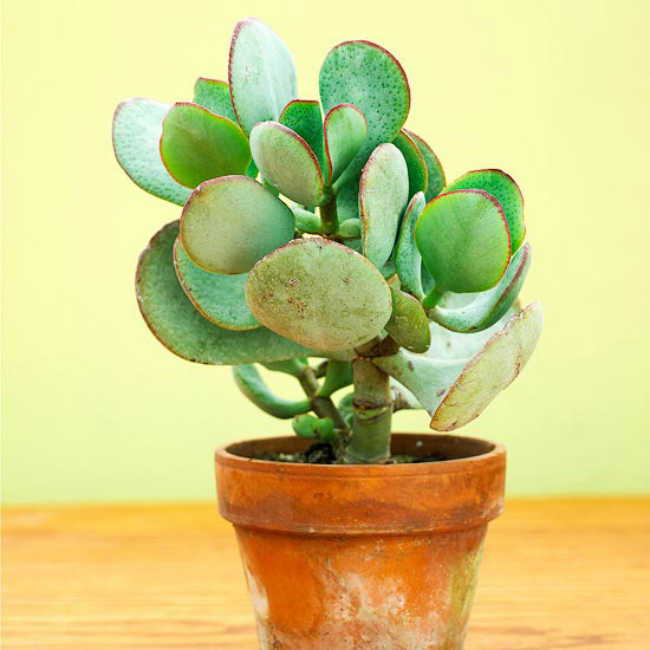
The silver jade plant (Crasula arborescens) is an easy household plant to maintain and is easy to recognise due to its silver green leaves that are often edged in reddish purple. Make sure to place it where it can receive maximum sunlight. Buy your own from Gardens4You.
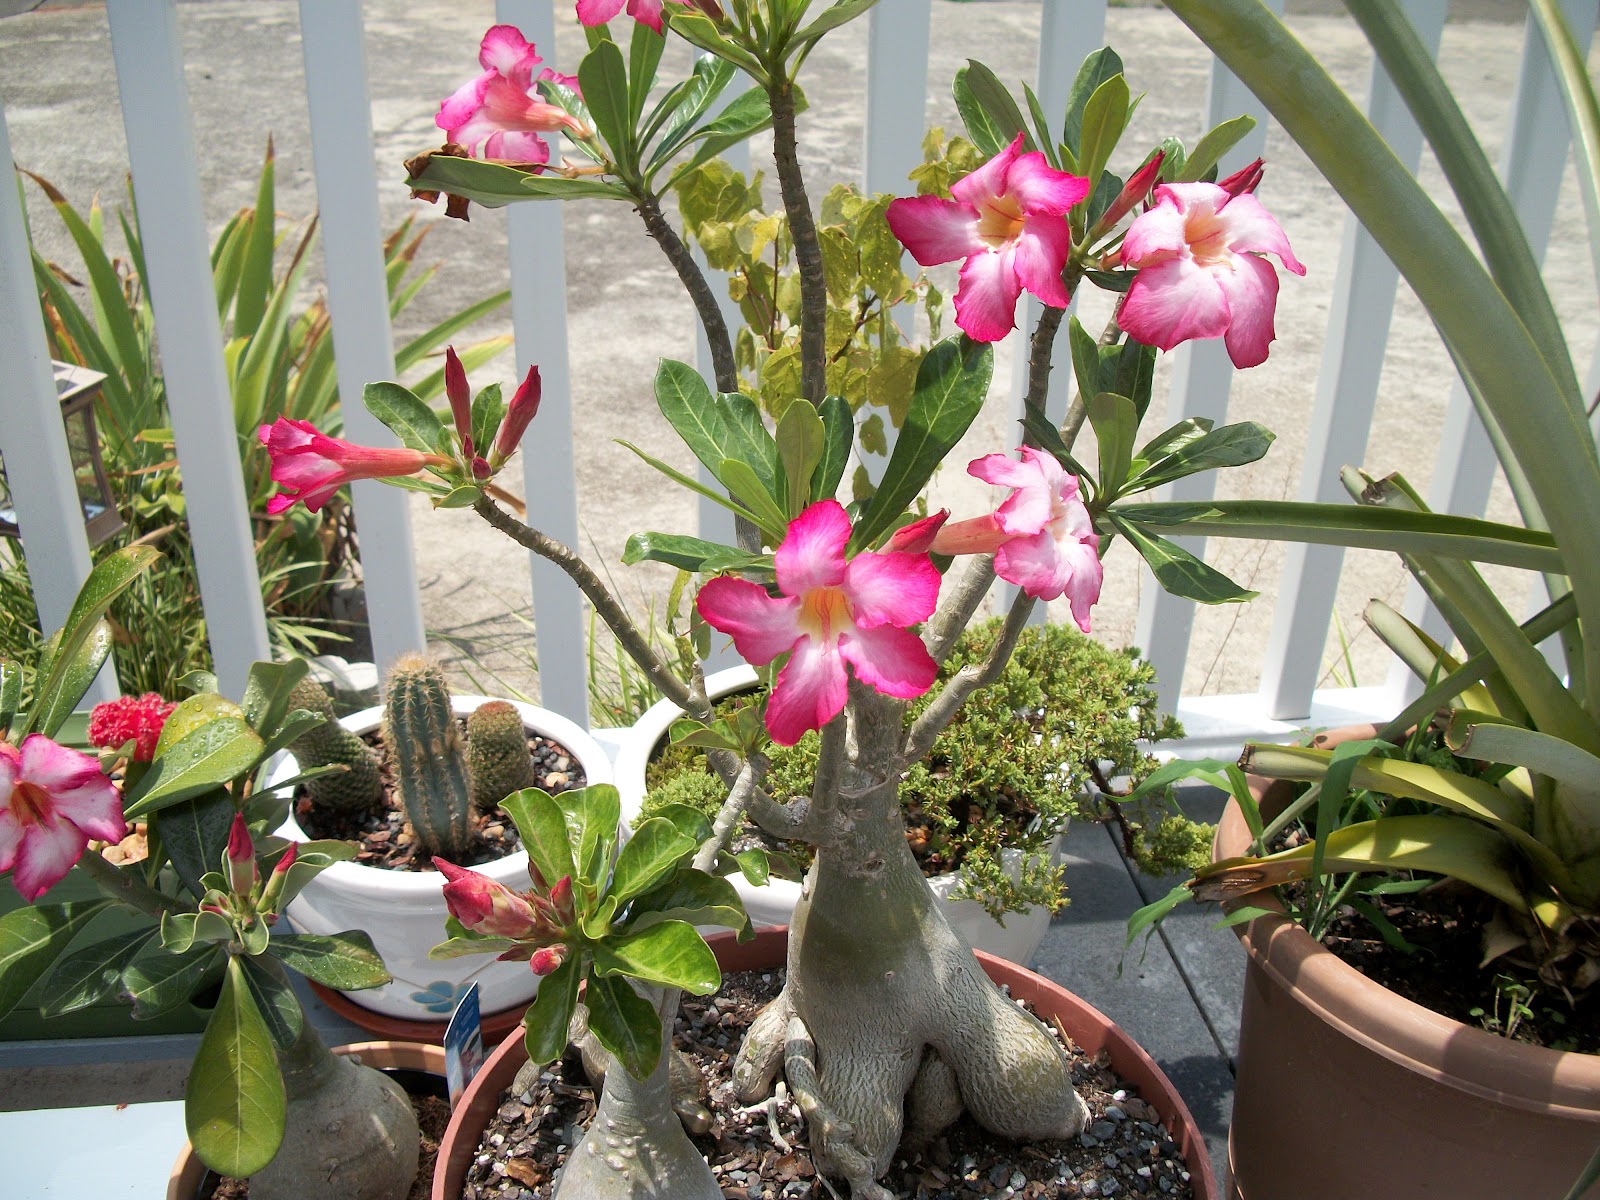
The spectacular desert rose (Adenium obesum) shows off its thick grey stems, leathery dark green leaves, and bold pink, red, or white petals in spring. It makes a lovely houseplant and requires a spot in full sunlight. Buy your own from Spalding Bulb.
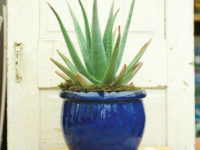
No list would be complete without aloe (Aloe Vera) added to it. This lovely spiky succulent with its toothed leaves and grey-green aloe has earned it a place in many households due to its ability to soothe skin and help burns heal. It’s also easy to grow. Buy your own from Victoriana Nursery.
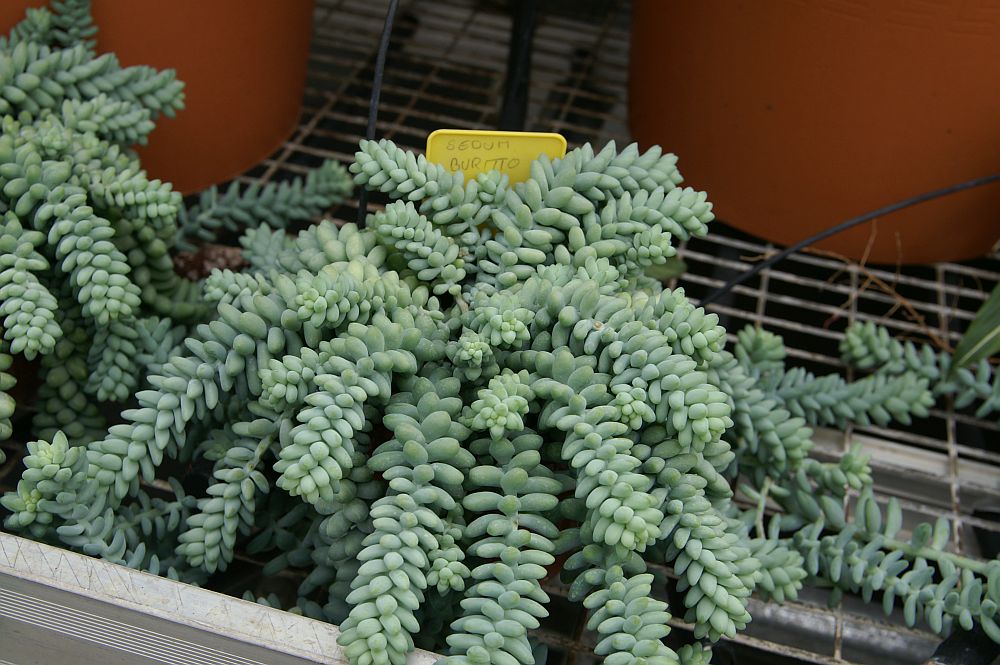
The distinctive burro’s tail (Sedum morganianum) bears succulent grey-green leaves that overlap on trailing stems. It is this that creates the tail-like effect. These make wonderful houseplants and are perfect for those who want a plant with little maintenance. Buy your own from Shoot Gardening.
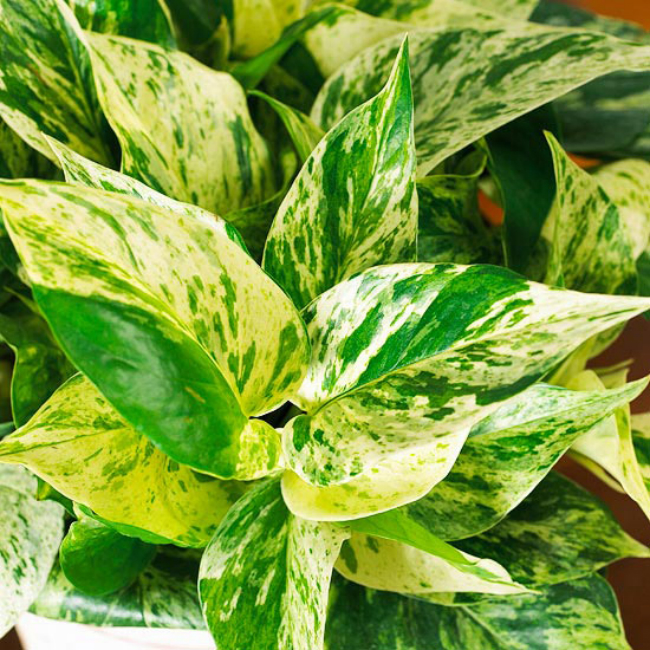
The pothos (Epipremnum trebie) is one of the most common houseplants in the home. It’s quick growing leaves tolerates low light levels and doesn’t mind drying out a bit too. Buy your own from Indoor Plants.
As the name would suggest of cast iron plant (Aspidistra elatior) it is almost indestructible, tolerating low levels of water, light and humidity. While it will tolerate neglect, if you give it a little TLC it will reward you with a lovely plant. Buy your own from House of Plants.
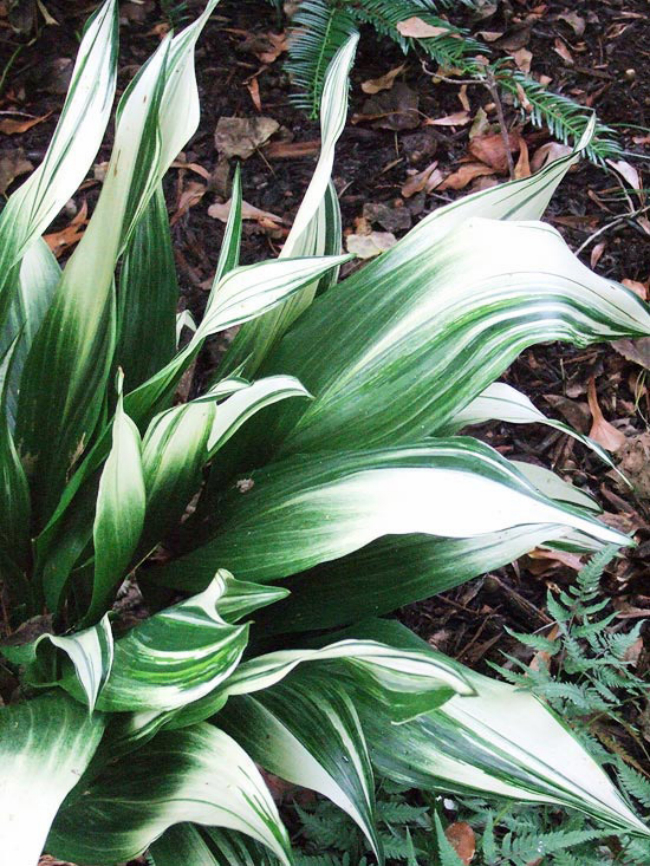
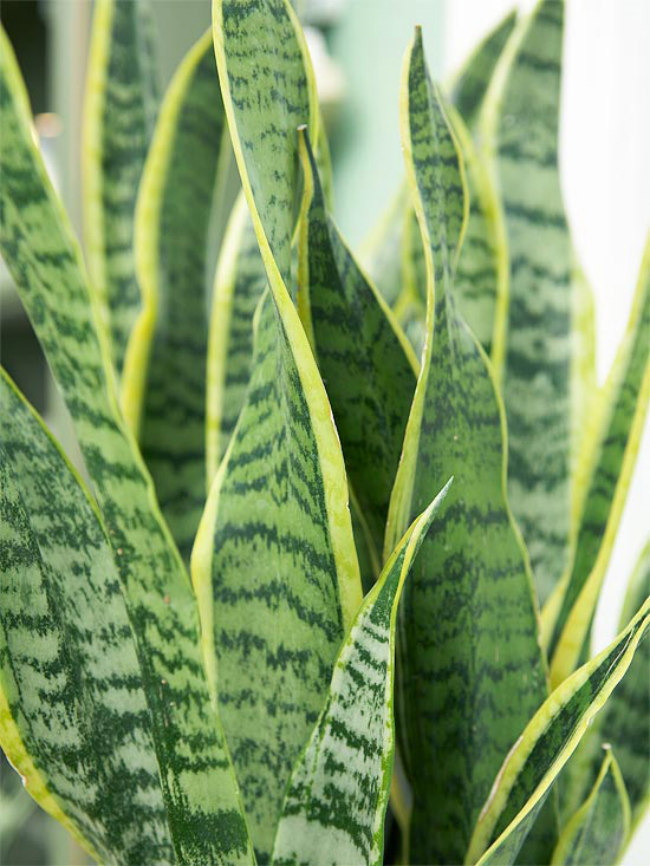
Native to Africa, snake plant (Sansevieria trifasciata) or what is also known as mother-in-law’s tongue has sword-like leaves which can be found with shades of silver, white or cream on them. Buy your own from House to Home.
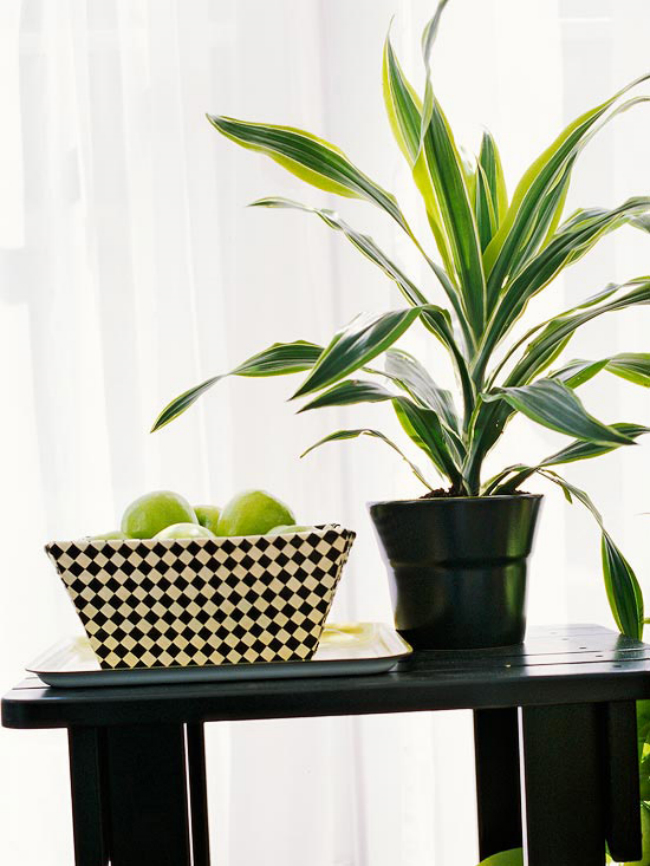
Also known as yucca or corn plant dracaena (Dracaena deremensis) is an easy going houseplant that tolerates a little neglect. Its colourful dark leaves bear bands of silver while it grows best in bright light. Buy your own from Funky Yukka.
The garden is the one place that many people escape to after a long day as the sun shines down. However, while it may be the perfect heaven it can also be the perfect spot to hide unsuspecting poisonous plants. We give the lowdown on what poisonous plants are out there and the affects they can cause if accidentally ingested.
This spring time flower can be found bursting through the ground in gardens once the weather starts getting warmer dazzling us with its bright yellow and white petals on long green stems. However, while this pretty flower may look unsuspecting it is actually poisonous.
Latin name:Narcissus
Poisonous parts: The whole plant of the daffodil is poisonous, especially the bulbs, so care should be taken particularly if you have animals such as dogs that enjoy digging the garden up. They contain two alkaloids, narcissine (lycorine) and galantamine in addition to the glycoside scillaine (scillitoxin).
Symptoms: If ingested they will mainly cause an upset stomach, nausea, diarrhoea, and vomiting. Symptoms usually start within 60 minutes and last around four hours.
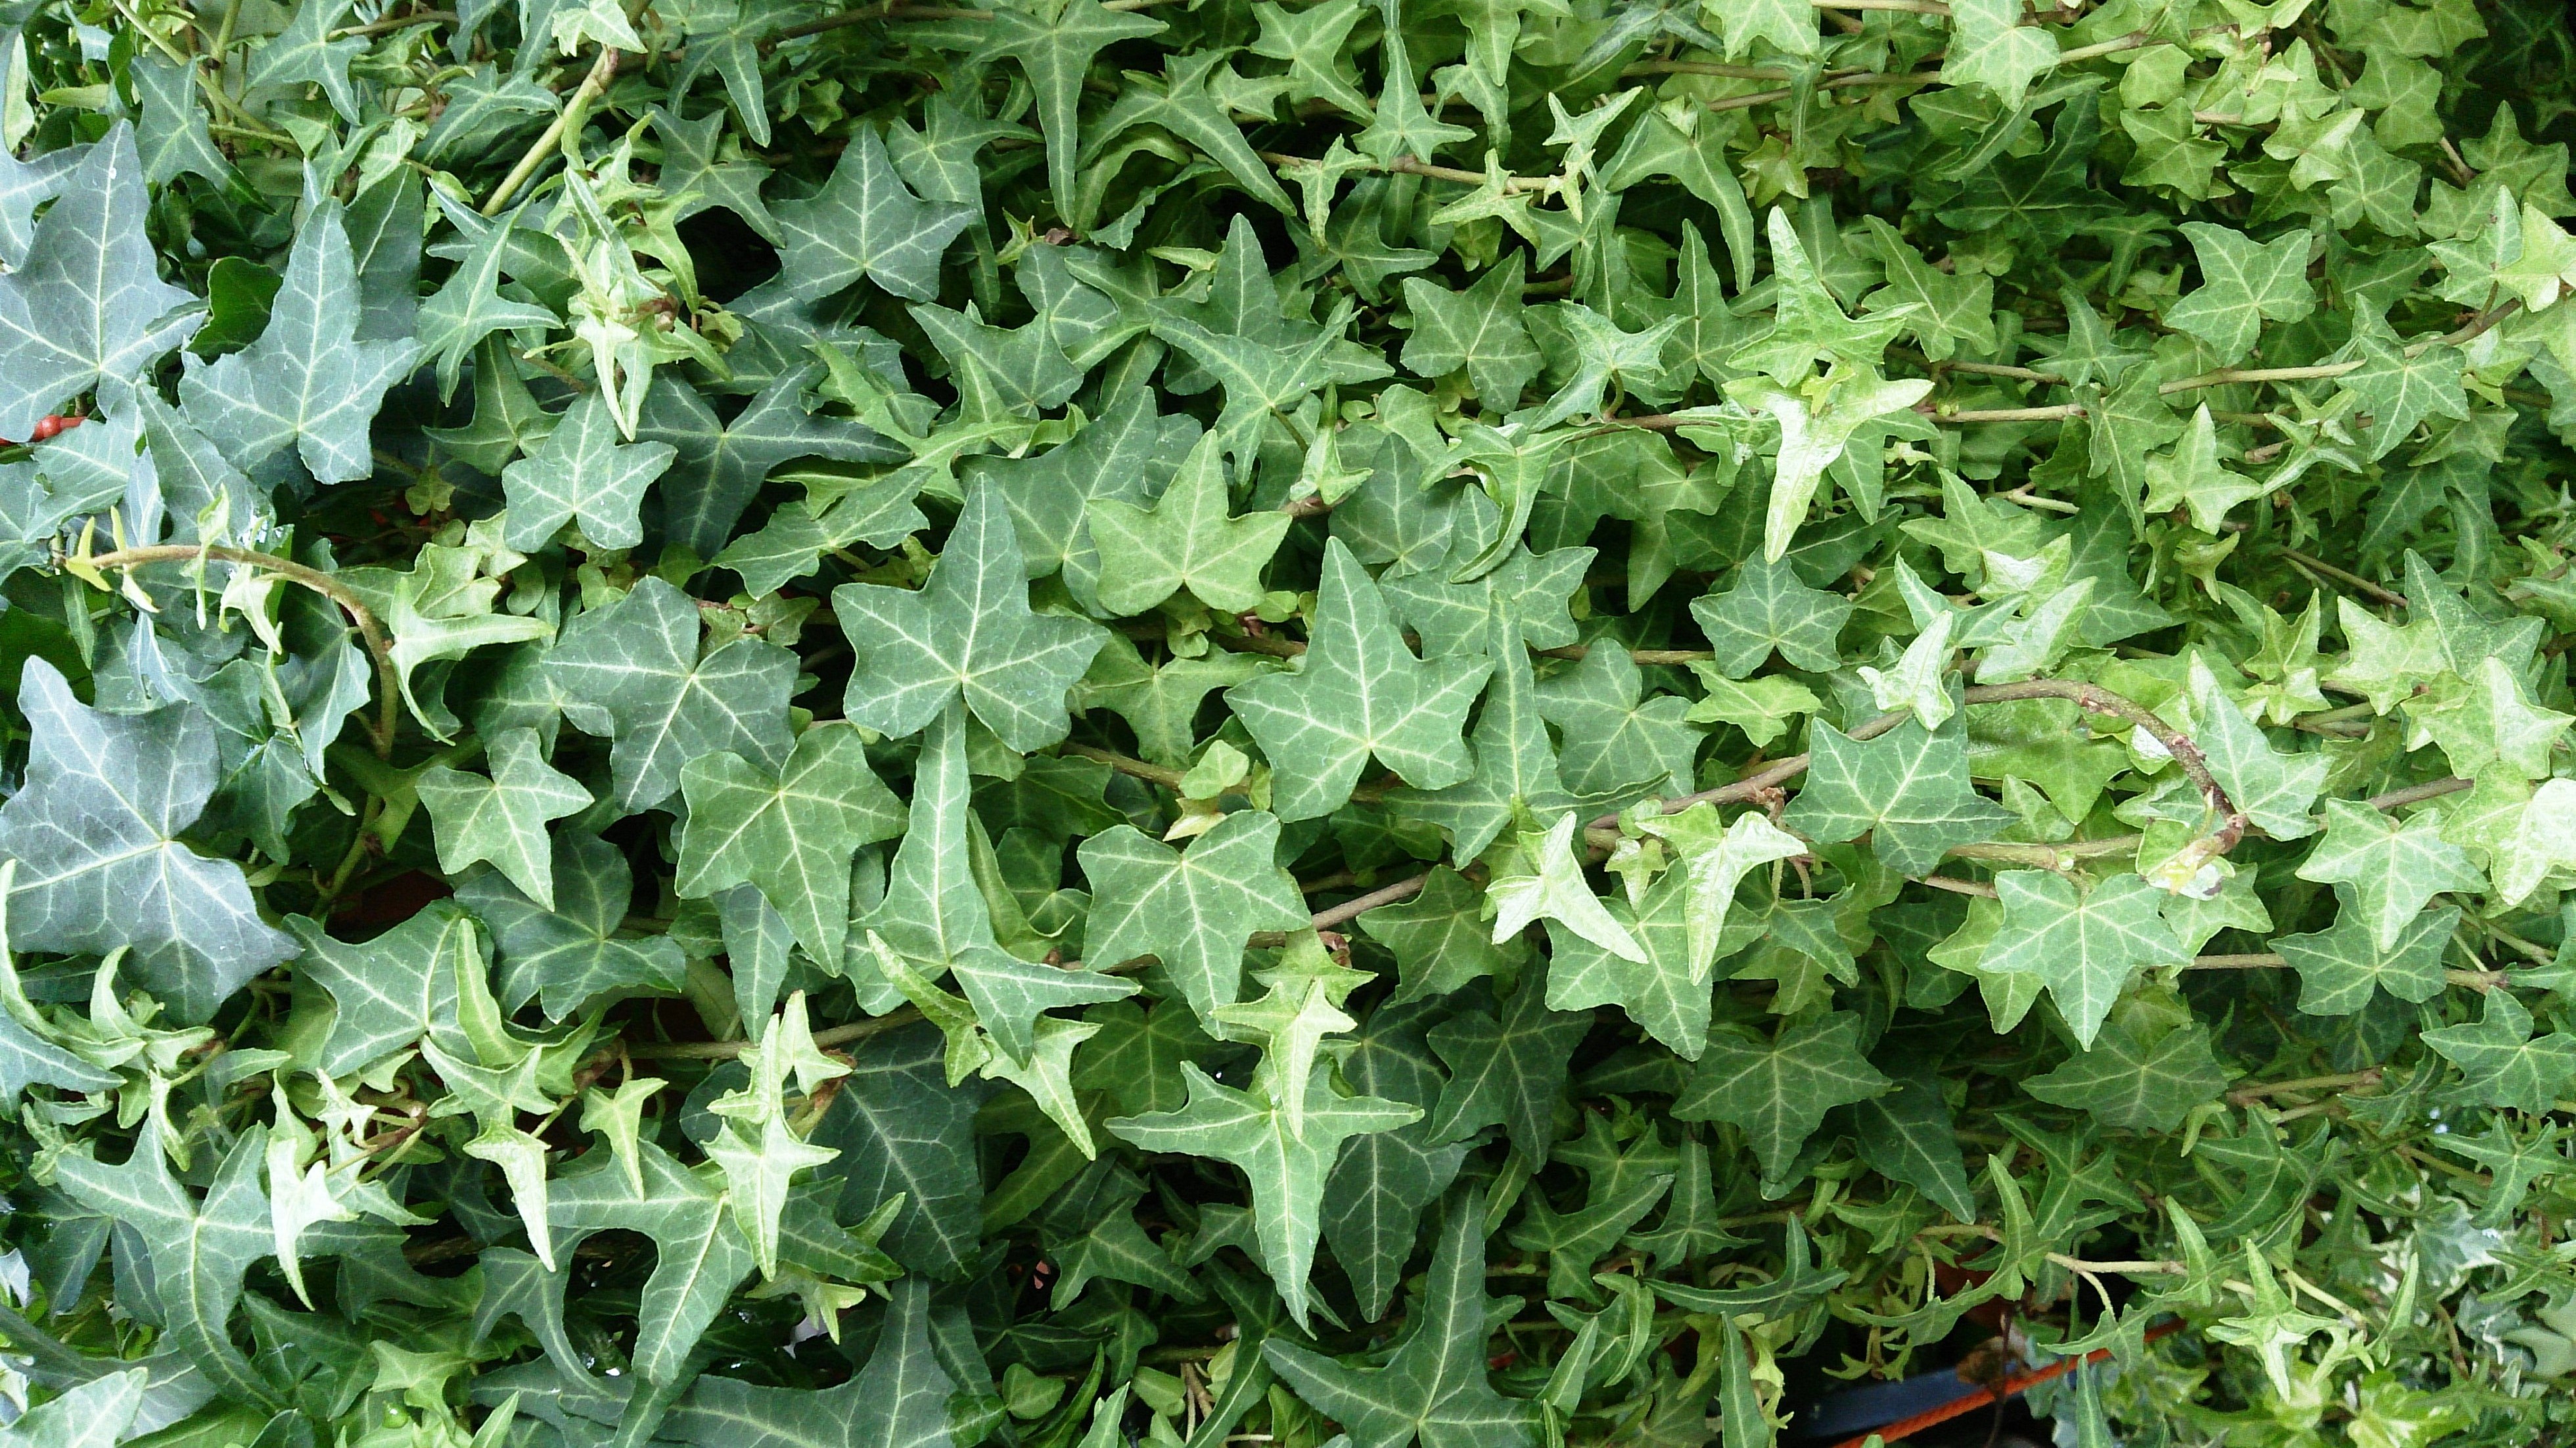
This ornamental creeping vine can be found all over Europe, Canada, and the United States. However, while this pleasant looking plant may not seem to have any unsuspecting characteristics it is in fact poisonous. The poisonous parts can be found in the plant’s leaves and berries, although contact with any part of the plant will result in getting English Ivy poisoning, which can be ranged from moderate to severe.
Latin name:Hedera helix
Poisonous parts: All of it.
Symptoms: It contains saponins and the digestion of the plant can result in hydrolysis and the production of toxic substances. It causes extensive rashes on the skin. The ingestion has emetic and purgative effects and is reported to cause laboured breathing, convulsions, and coma.
This pretty flower is often found growing in gardens as it produces a stunning display of drooping flowers on tall slender green stems during spring time. Of course, as with many unsuspecting flowers it is poisonous and can cause problems if ingested.
Latin name:Convallaria majalis
Poisonous parts: The flowers, fruits, and leaves are poisonous.
Symptoms: Large amounts of this flower would need to be ingested to cause poisoning symptoms such as blurred vision, excessive urination at night, diarrhoea, loss of appetite, upset stomach, vomiting or nausea, and irregular or slow heartbeat.
Although the stalks of this plant are widely eaten as a dessert the plant leaves are poisonous if eaten raw.
Latin name:Rheum rhabarbarum
Poisonous parts: The leaves.
Symptoms: Rhubard contains oxalic acid in the form of oxalates, which is widely believed to be the poison and takes place when a large amount of the leaves have been eaten raw. Breathing difficulty, burning in the mouth and throat, eye pain, kidney stones, stomach pain, vomiting, red coloured urine, diarrhoea, and coma.
These delightful looking flowers may be attractive to look at, but they can also be lethal if eaten too.
Latin name:Digitalis
Poisonous parts: All of it.
Symptoms: The ingestion of leave can cause oral and abdominal pain, nausea, vomiting, and diarrhoea. In severe cases, symptoms can include visual and perceptual disturbances and heart and kidney problems. It also produces a slowing of the heart which, is maintained, usually produces a massive heart attack as the heart struggles to supply sufficient oxygen to the brain.
Despite its bright colours that are often found in the garden this pretty flower can also be toxic is eaten.
Lain name:Tulipa gesneriana
Poisonous parts: The bulbs.
Symptoms: If ingested dizziness, vomiting, diarrhoea, extreme abdominal pain and excessive salivation may be experienced. Tulip bulb dermatitis occurs when a gardener handles tulip bulbs while not wearing gloves. Severe skin blistering can occur to sensitive individuals. The sufferer often experiences extreme itching, hives, and swelling.
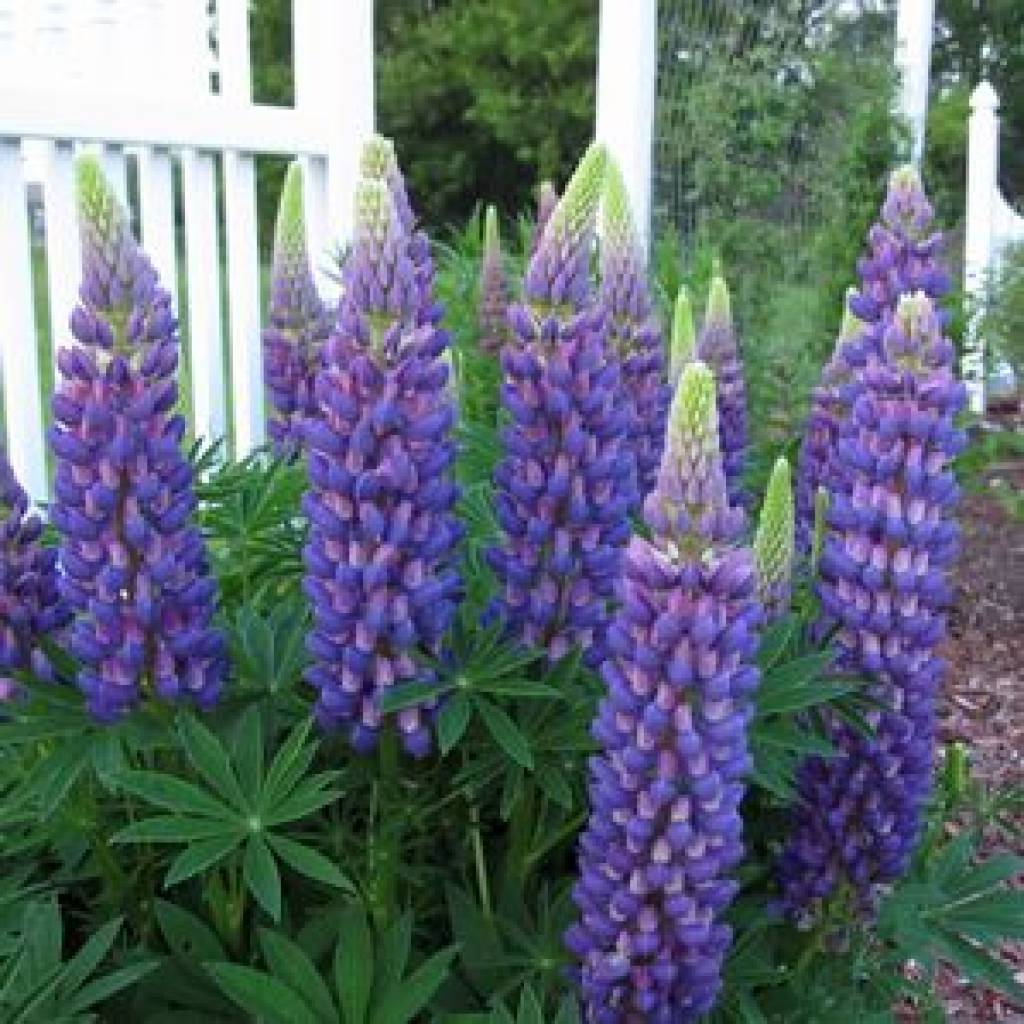
These tall and striking flowers make a great addition to any garden helping to attract pollinating insects such as bees, but they can also be toxic to the unsuspecting gardener.
Latin name:Lupinus
Poisonous parts: All parts of the plant. Lupinine, an alkaloid, is the offending substance in the plant, and can be concentrated in the seeds, making them the most dangerous. The pods can also contain high levels of the toxin. Lupinine is also found in the leaves and fruit.
Symptoms: These included dilated unresponsive pupils, blurry vision, confusion, slowed thought, and disorientation, flushed face and/or fever, palpitations, a high heart rate and blood pressure, tremors, difficulty with or slurred speech, un-coordination, dizziness, burning dry mouth, and stomach pain.
The popular house plant is incredibly pretty, but it is often said that the most pretty flowers can be the most toxic and that’s certainly true in this case.
Latin name:Iris
Poisonous parts: All parts of the plant as it contains glycosides, which are toxic.
Symptoms: These include gastroenteritis, stomach pain, nausea, vomiting, diarrhea, muscle spasms, and even paralysis in severe cases.
As winter slowly fades away to make room for spring we can start thinking about the warmer months ahead of us. It also means thinking about our gardens and once again transforming them into beautiful spaces for us to escape to. If you’re thinking about getting your garden ready for spring, but don’t know what to put in your garden at this time of the year, we have that sorted for you. All you have to do is pick your favorite flowers for a spring time garden.
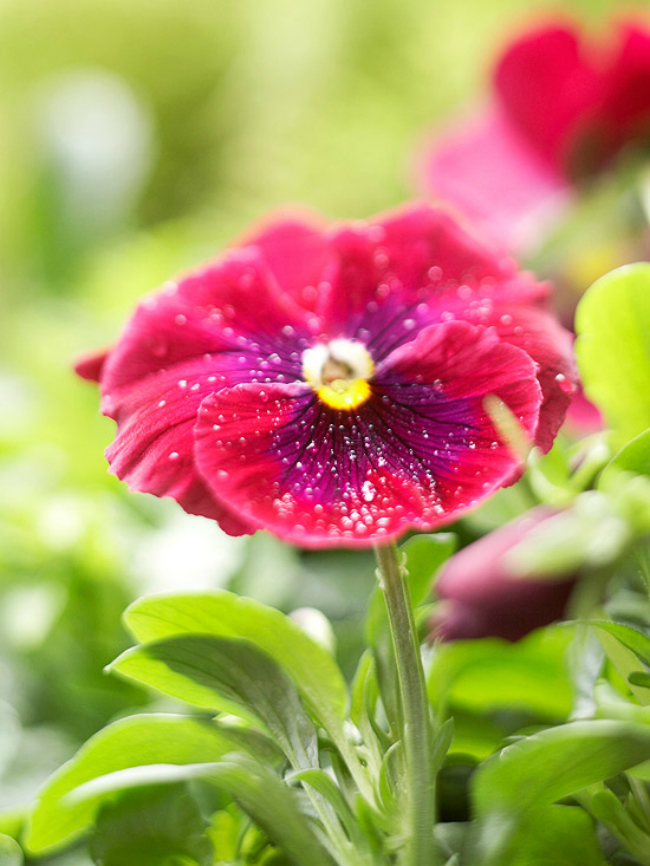
Pansy’s prefer growing in cool weather, so it’s the ideal plant for gardener’s to turn to when they want to grow flowers in containers and window boxes where they will provide a wealth of color in their upturned petals.
Latin name: Viola x wittrockiana
Conditions: Sun or part shade and moist, well-drained soil.
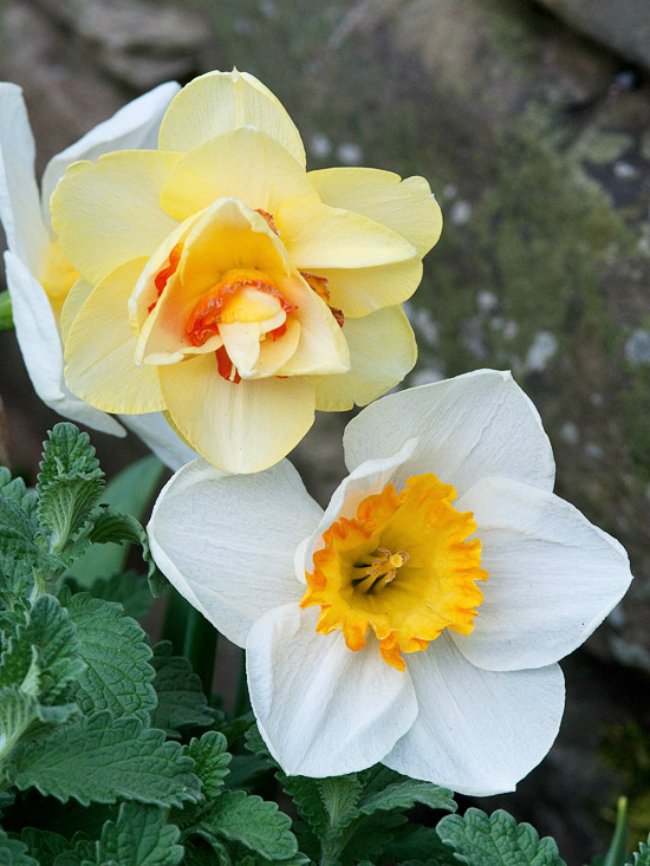
Spring time wouldn’t be the same if we didn’t see daffodils on the list. This bright, happy, spring time flower comes in a range of shapes and sizes, from trumpet to large and small cupped to double. Despite their pretty appearance they can produce harmful reactions if they are consumed, so they should be kept out of the way of animals.
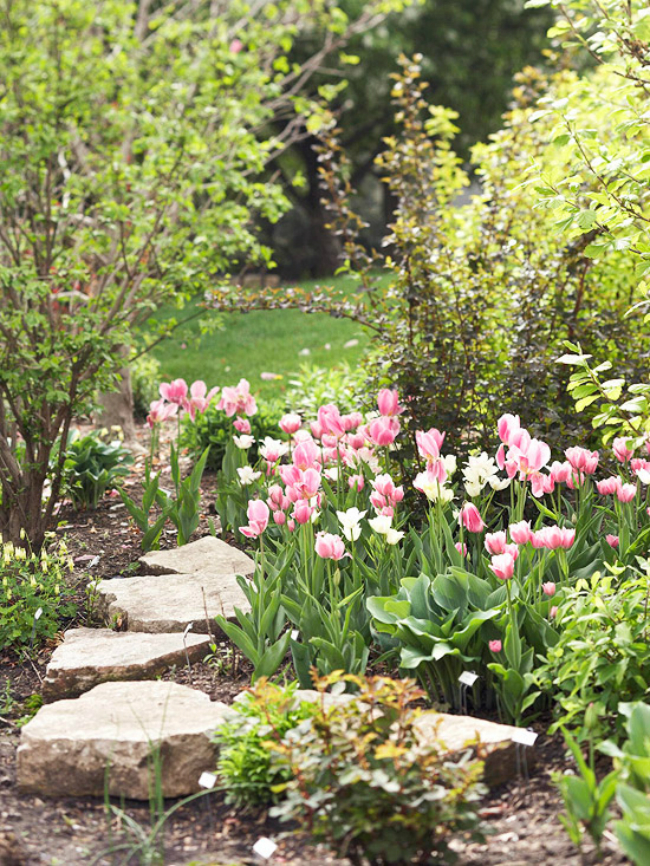
The tulip is a cheerful flower that is often seen in many gardens during spring time. With its array of colours on offer it’s no surprise this pretty flower makes an appearance year after year.
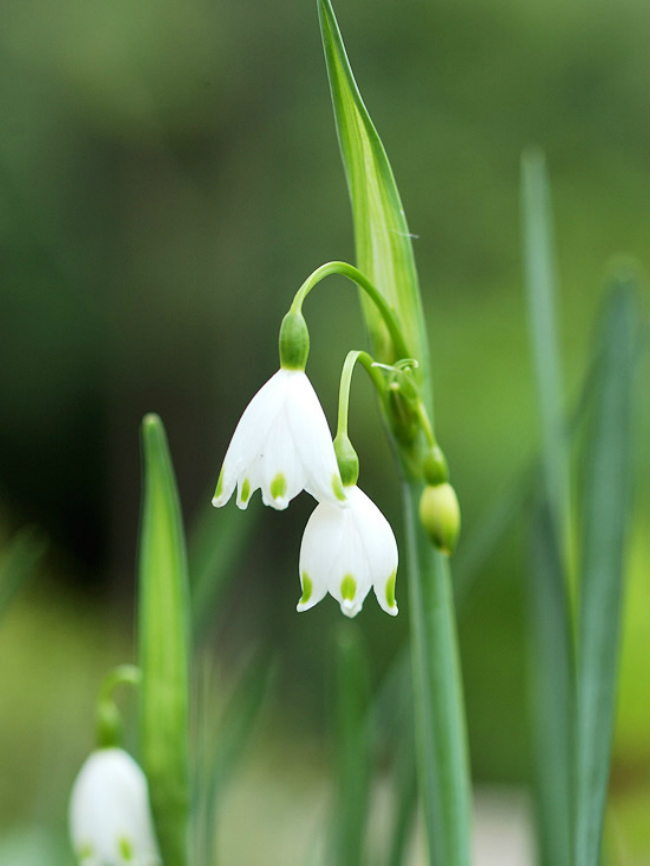
This beautiful drooping bell is easily distinguishable by its small blooms making it the perfect flower to have in your garden at spring time. When there are several of these flowers in a flowerbed they create the ideal focal point.
Latin name: Leucojum aestivum
Conditions: Full sun and well-drained soil.
Size: Up to 3 feet tall and 1 foot wide.
Zones: 4-9.
Buy Summer Snowflakes flowers here at Spalding Bulb.
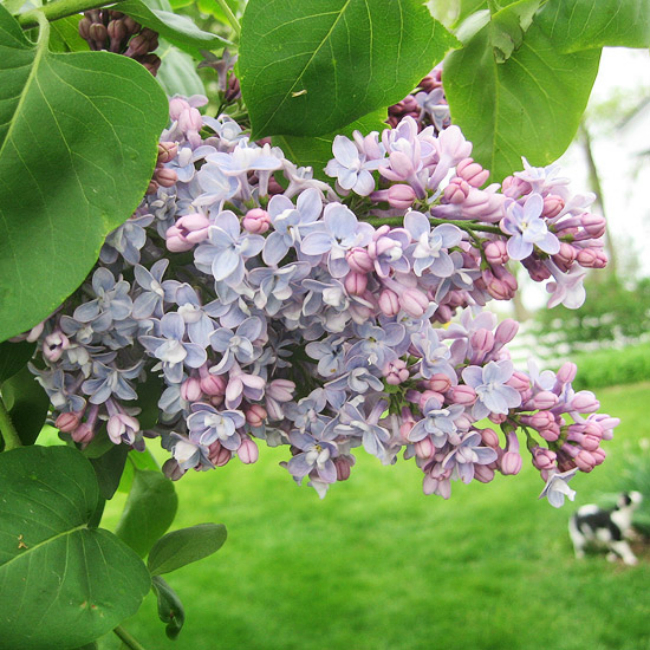
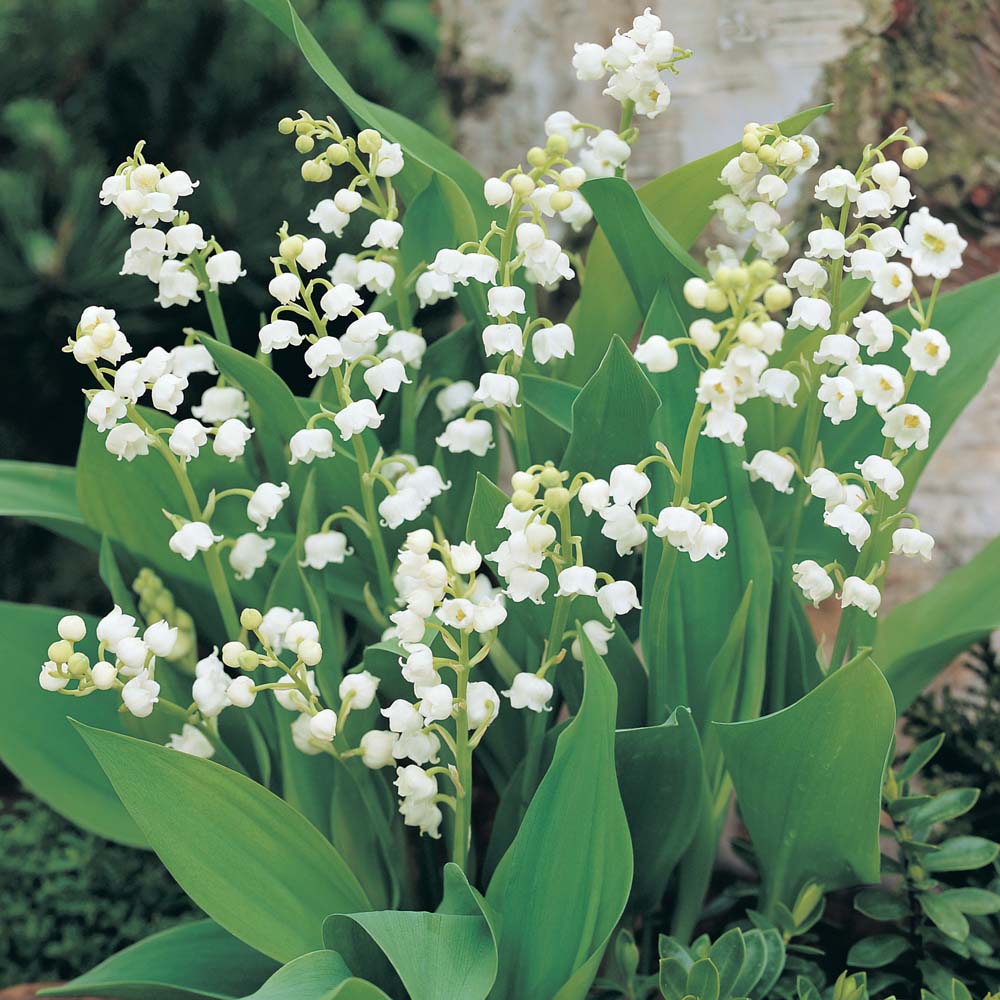
This delicate flower of snow-white, bell-shaped flowers has a powerful fragrant timeless smell that is set against a carpet of lush green foliage. It is a timeless classic that will look delightful at spring time in your garden. This is also a well-known poisonous plant and if ingested can affect the heart.
Latin name: Convallaria majalis
Conditions: Part shade in moist, well-drained soil.
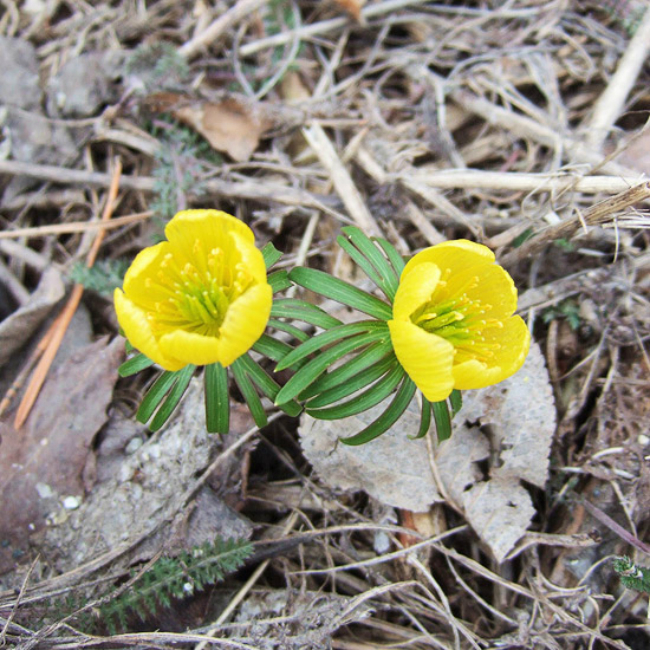
Once the snow has melted you can be sure to see Winter Aconite bursting through the soil to emerge in its full glory. Its growth time is limited as it dies back once the transition from spring to summer takes place, but its pretty, open blooms make it a show stopping flower for your spring garden.
Latin name: Eranthis cilicica
Conditions: Full sun and moist, well-drained soil.
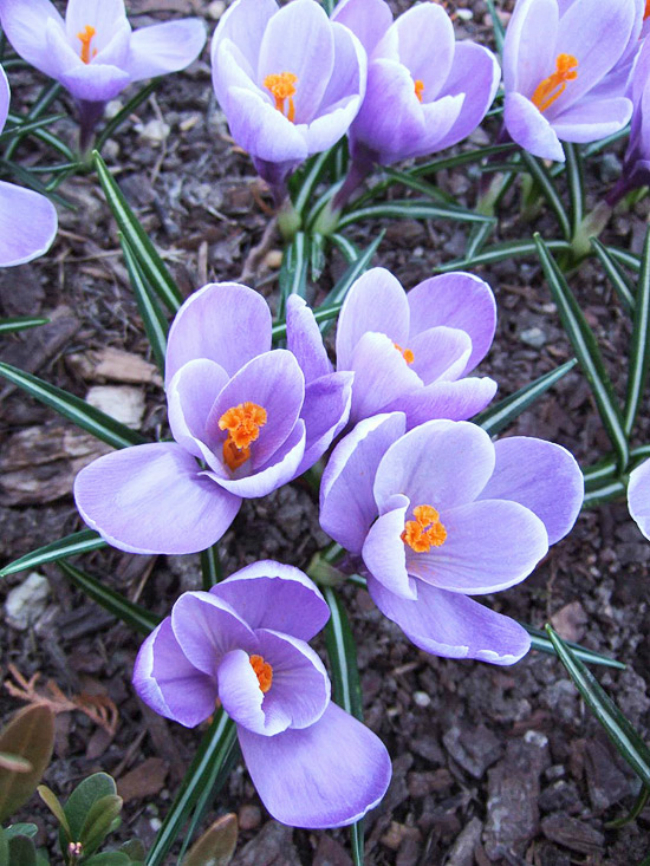
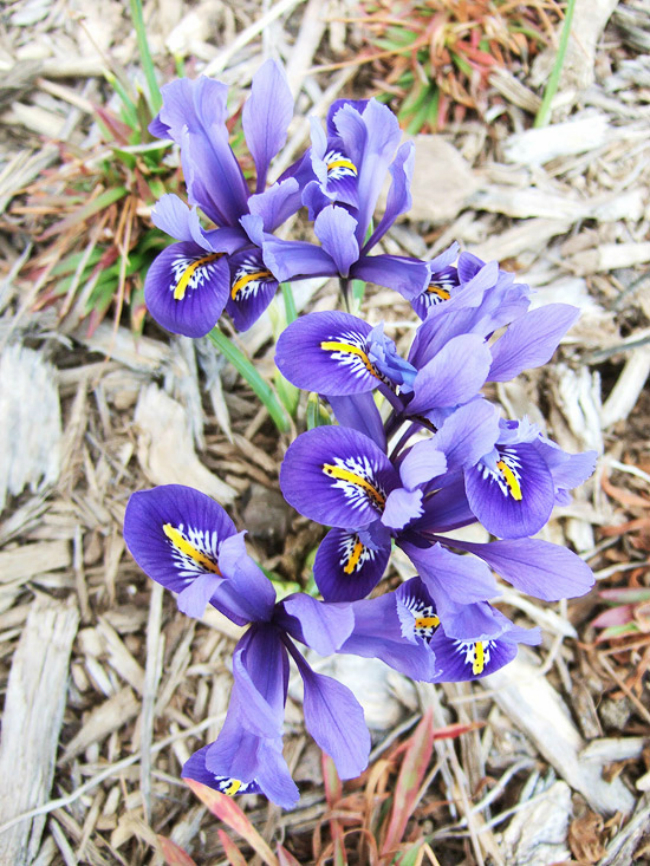
Iris flowers are as much a late winter bloomer as they are an early spring time flower making them a wonderful sight to see in the garden. They also make a welcome contrast to many of spring’s pastel petal colours that are often seen around this time of the year.
Latin name: Iris reticulata ‘Harmony’
Conditions: Full sun and moist, well-drained soil.
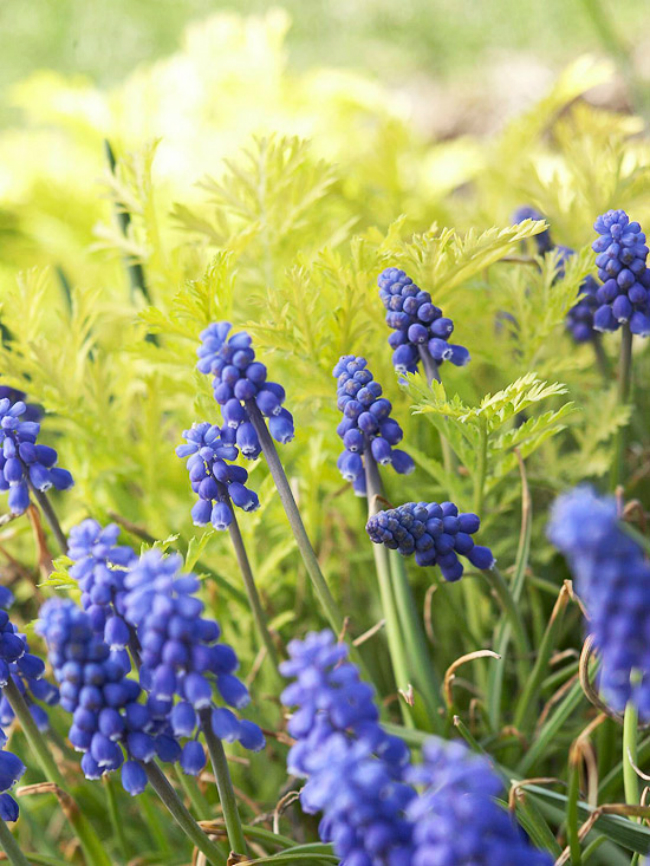
Grape hyacinth is a striking flower to have in a garden trumpeting the arrival of spring. Clustered flowers hang from sturdy stalks, resembling bundles of delicious grapes.
Latin name: Muscari armeniacum
Conditions: Full sun or part shade and well-drained soil.
Whether you sow your own plants or your buy them from a garden centre it’s up to you to make sure that they stay healthy and disease free throughout their life cycle. Whether you’re a green fingered gardener or just starting out with looking after your plants there are some handy tips that you can follow which will ensure your plants stay healthy.
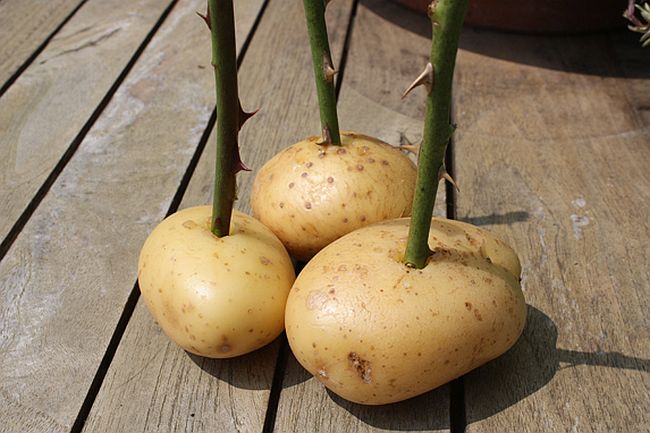
Did you know that roses love potatoes? Apparently the popular spud is perfect for helping maintain the stanch of roses in the ground. Simply make a small hole in a medium sized potato and push the end of the rose stem in. Then plant the rose with the potato in the ground and get ready for beautiful blooming array of petals. Simply go to Amateur Gardening to find out more.
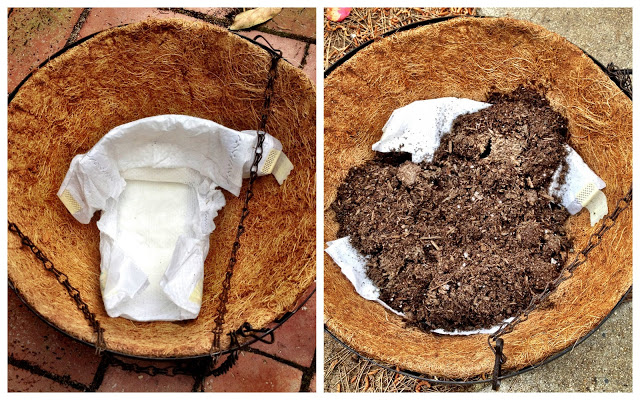
Yes, it doesn’t exactly fill me with joy, but if it helps my plants stay healthy I’m willing to try anything. Thankfully, though, the nappy doesn’t have to be dirty, so I guess that does make me feel better. By putting the nappy at the bottom of the potted plant container with soil on top this will help to retain water and will stop the annoying leaks. To find out more go to Sandpaper and Silly Putty.
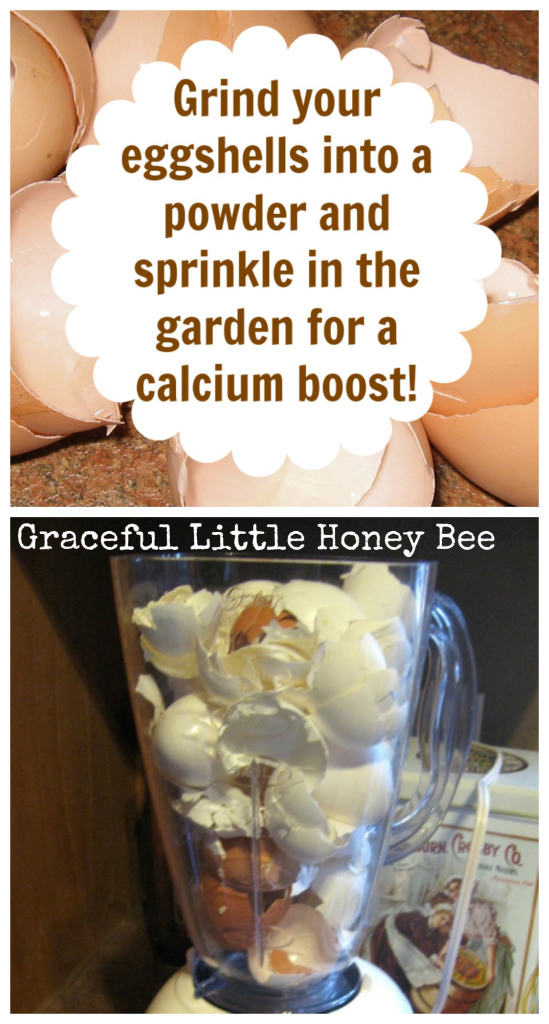
By grinding up eggshells into powder you can then sprinkle it on the ground around your plants for a lovely calcium boost. You can do this easily by simply using a blender. To find out more check out Graceful Little Honey Bee.
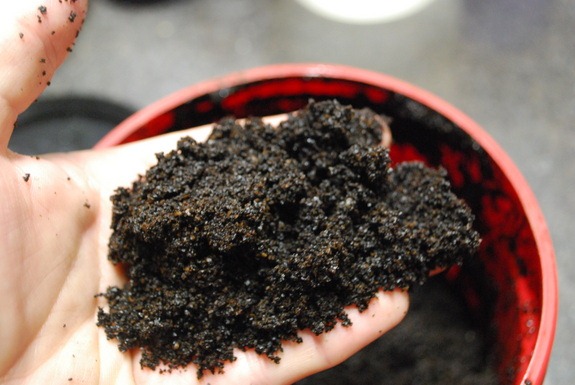
By using old coffee ground it acts as a great fertiliser as you will be providing vital nutrients to your plants and keep away unwanted pests at the same time. It is believed that pests such as rabbits and squirrels aren’t too fussed on coffee, which means more growing time for your plants. To find out more check out Eclipse Awning.
Weeds have the ability to get on a gardeners last nerve, but there are ways in which these returning pests can be dealt with. However, instead of buying weed killer, which can often be expensive and bad for the environment, why not make your own? You won’t need much. You only require white vinegar, table salt, and liquid dish soap. To find out more go to Grandmother Musings.
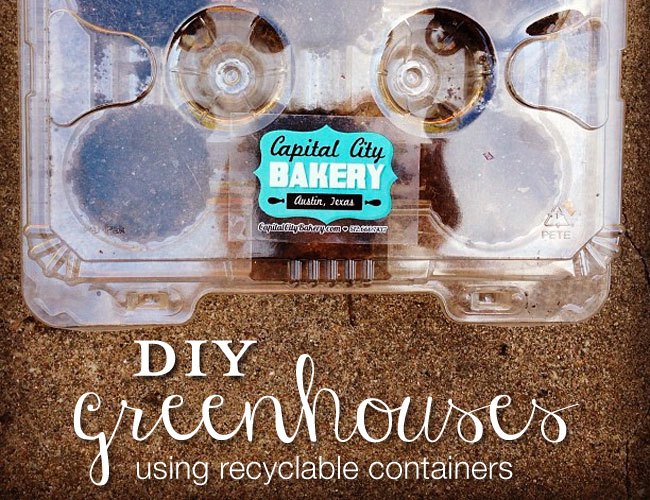
To get your seedlings off to a great start why not make a mini greenhouse for them. You can use a large milk jug, which will house your seeds perfectly. Place dirt, a little manure and your seeds in the milk jug and you’ll soon see little green shoots sprouting through. To find out more go to Five Spot Green Living.
In order to make sure that your plants receive the maximum amount of water without oversupplying them consider using a plastic bottle that has holes pushed into it. This way you can fill the water bottle up and the water will slowly seep through the soil giving the plants a thorough watering below the soil surface. To find out more check out You Grow Girl.
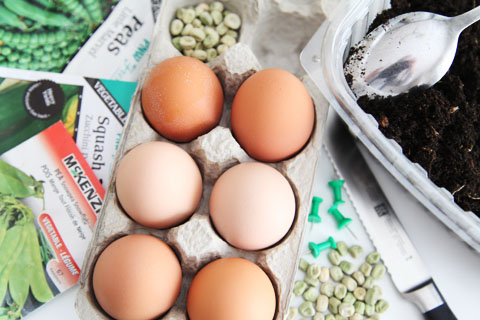
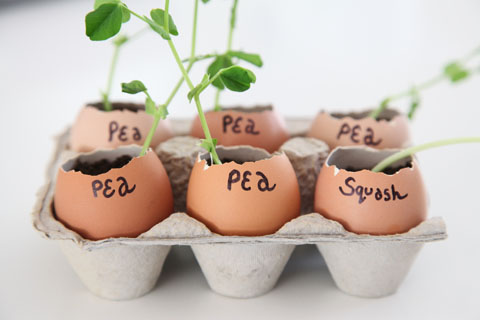
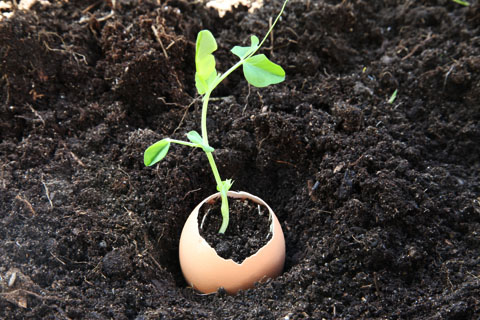
In order to give your seedlings the best chance consider growing them in eggshells. Smaller plants tend to be more fragile and need a little help to remain strong. To keep them upright put them in eggshells before sowing your seed. Once they are big enough you can then place them outside in the ground still in the eggshell. To find out more go to Squawk Fox.
Using Epsom salt is considered to be good for the ground due to the fact that it improves a plants blooming period and enhances colour. Made up of magnesium it allows the plants to take up vital nutrients such as nitrogen and phosphorus. To find out more go to Gardening Know How.
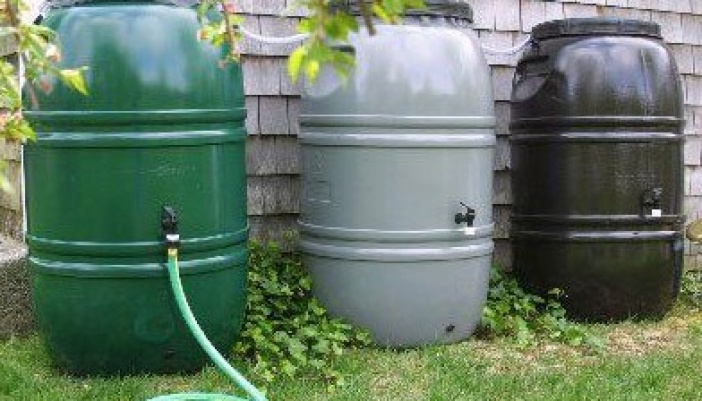
With water droughts coming and going particularly during the summer months it’s a good idea to always have a supply of rainwater on hand for your plants. Not only that, but rainwater holds more nutrients than tap water and is much better for the growth of your plants. To find out more go to Homemade by Momma.
Not everyone is lucky enough to have a garden they can utilise for their gardening needs, which is why so many people are turning to indoor gardening solutions to help them successfully bring the outside in. These clever designs will help gardeners to lay down their roots and produce a bit of flourish too, thanks to these unique design ideas.
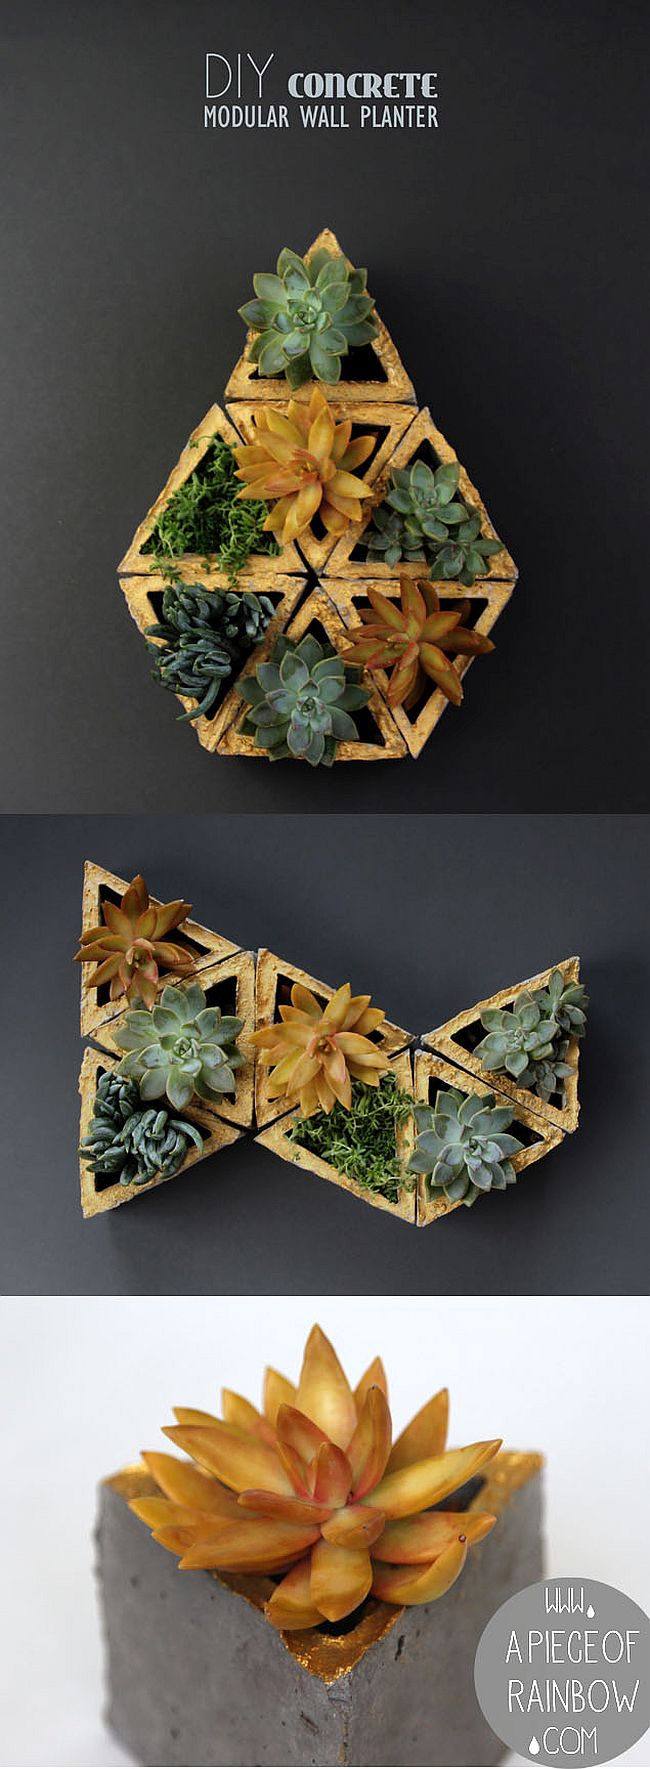
Fashion concrete into beautiful containers for plant life, which is sure to produce a work of art. These are simple to make and will last creating the perfect home for your favourite plants that is sure to give your home décor a unique look. Find out how to make yours at A Piece of Rainbow.
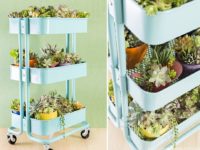
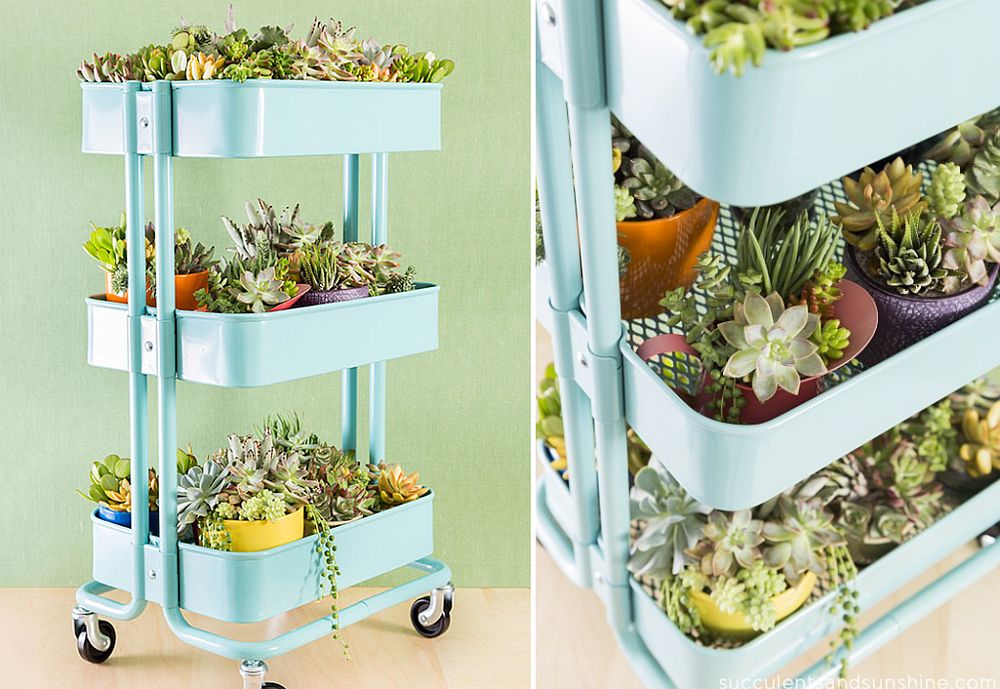
If I had a cart I would definitely be doing this idea for my home. If you don’t have much space to use up then a cart is the ideal solution and won’t leave you with wasted space. You can easily transform your cart in a rolling succulent display of pretty flowers and succulents. See how to make your own at Succulent and Sunshine.
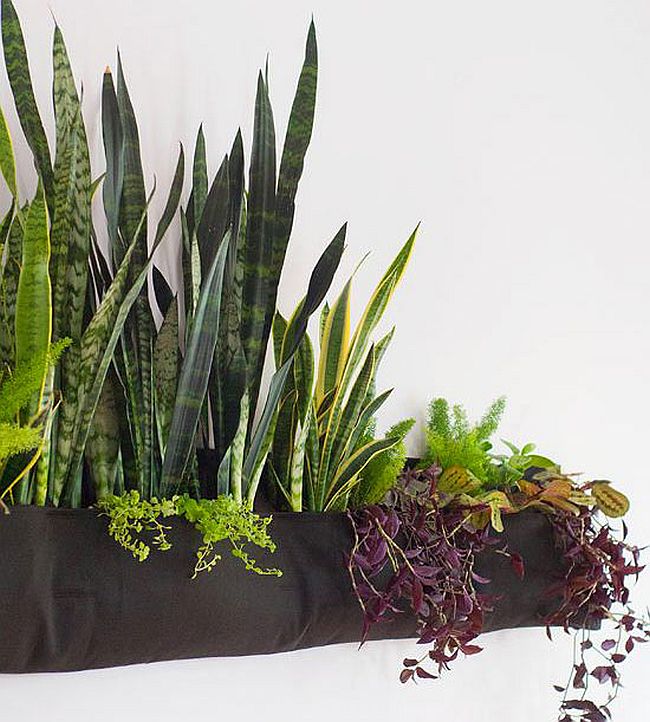
If you’re searching for a way to hold your own plants without them getting damaged by kids and pets then why not consider an indoor woolly pocket. This can easily be attached to a wall high enough to ensure a pleasurable view for those who visit your home. To find out how to make your own check out Yellow Brick Home.
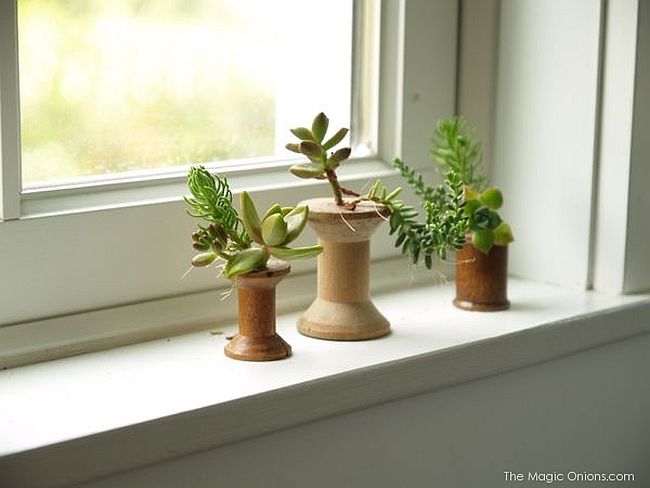
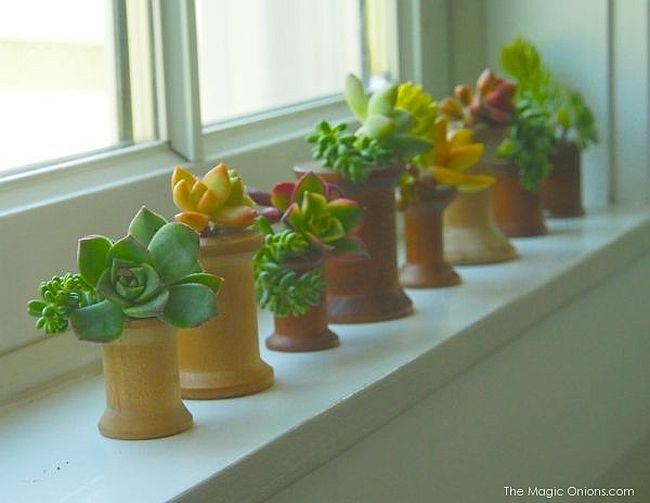
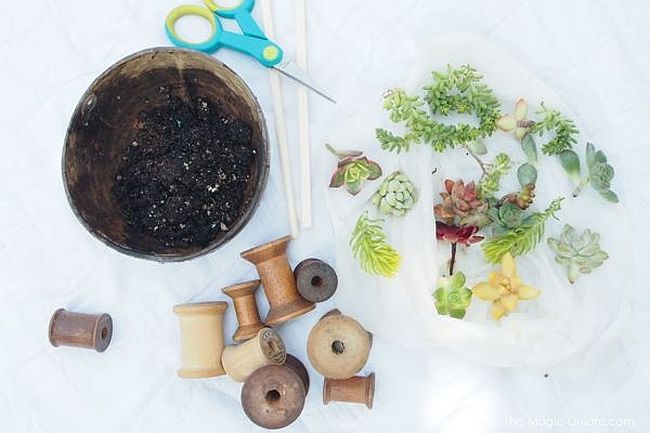
These adorable thread spool planters will be a joy to make and require very little work to produce them. They will make the perfect window display as they don’t take up much space and are surprisingly easy to maintain as succulents don’t require too much attention. Discover how to make your own display of thread spool planters at The Magic Onions.
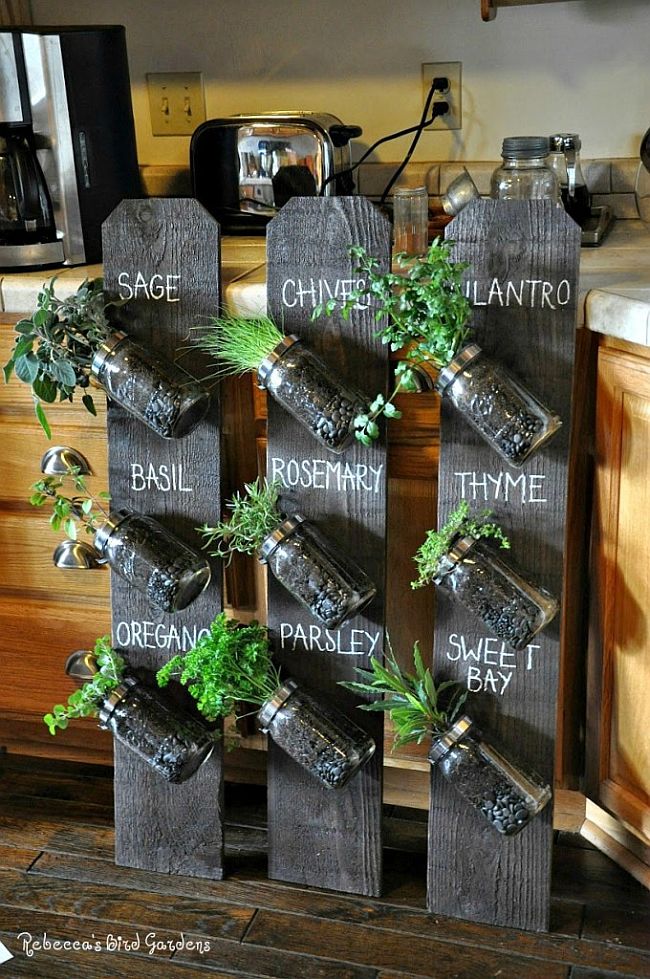
Glass jars are the ideal solutions to your indoor garden needs as they don’t take up too much space and make an attractive display too. Why not use those empty glass jars you have hidden in your cupboard and put them to good use with some of your favourite herbs? You can easily snip off the herbs you need to add some flavour to your next meal without having to go outside. Perfect! See how you can make your own display at Rebecca’s Bird Gardens.
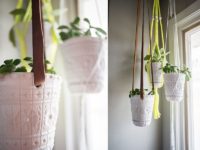
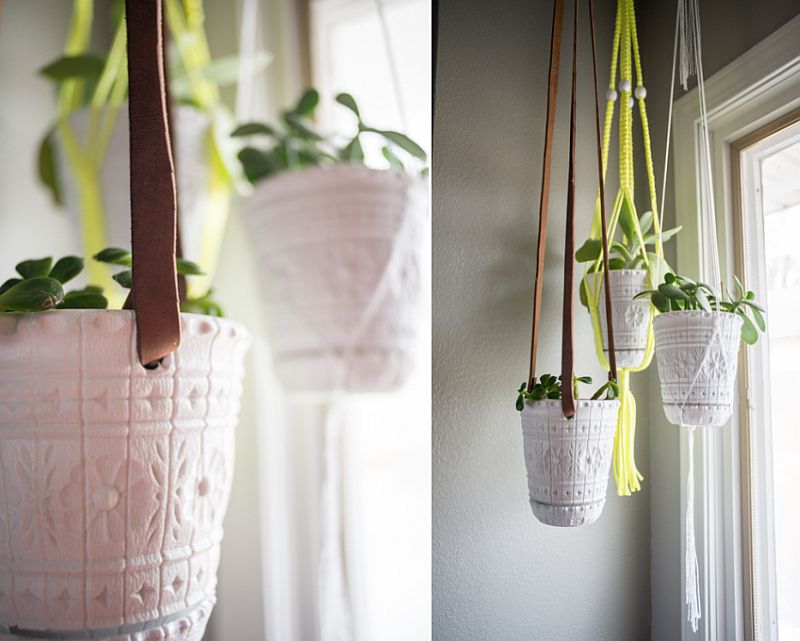
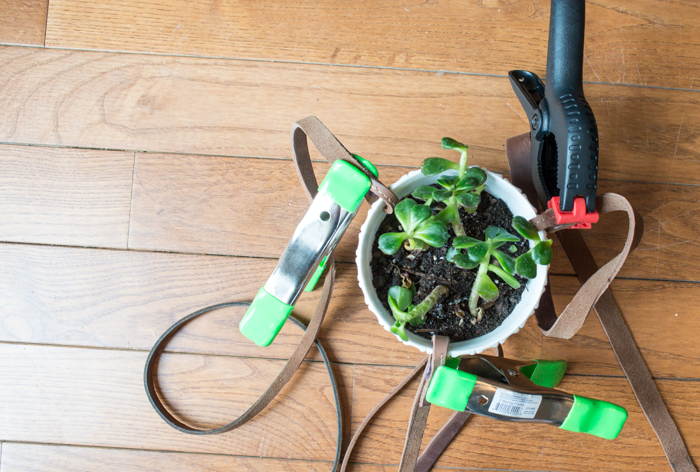
What better way to upcycle some old leather belts that you have hanging around then by using them to create a plant holder? These couldn’t be any simpler to make if you tried and are the ideal solution if you’re lacking floor space for more plants. After all, you can never have too many plants. To find out how to make your own leather plant holder check out Bigger than the Three of Us for a step-by-step guide.
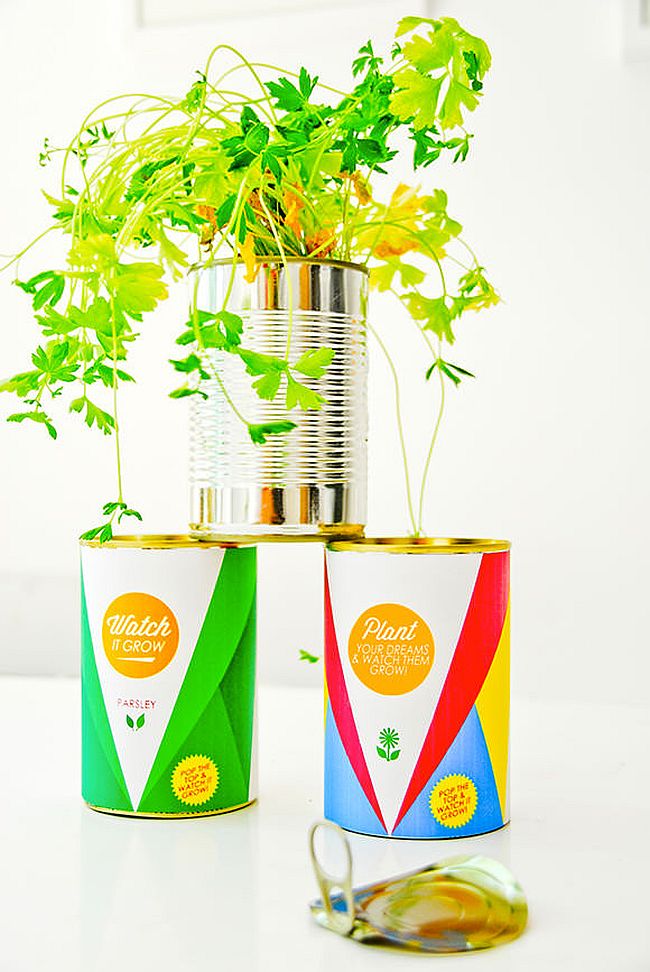
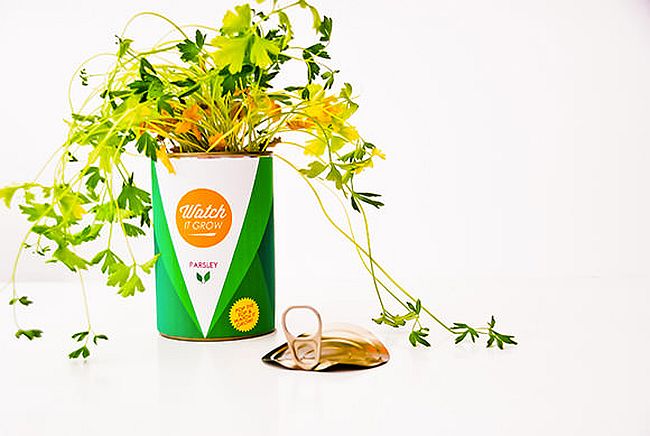
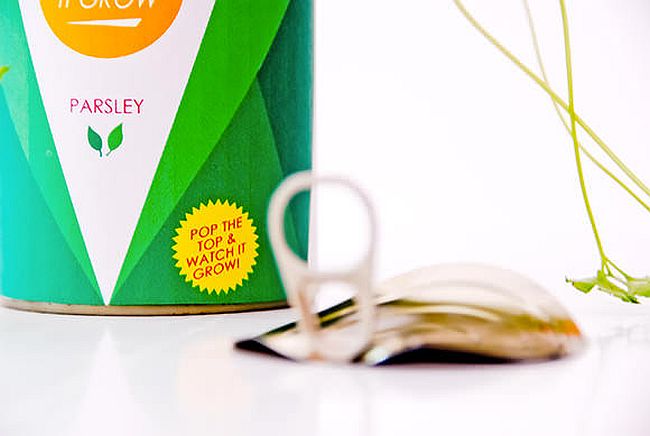
This upcycled tin can is the perfect gift for yourself or any of your green fingered friends or family. All that’s required on the recipient’s part is to simply pop the top, water and let it grow. You can also download a label which tells you what you’re growing. Find out how to make your own at Handmade Charlotte.
Starting a vegetable garden at home is a great way of saving money and enjoying the fruits of your labour with your children. There’s nothing more satisfying then harvesting your carrots, potatoes, peas, and lettuce knowing that you grew them all by yourself. Not only that, but you’ll often find that the varieties of fruit and veg that you grow yourself produce a better flavour than those you can buy at your local store.
What’s even better is that you can plant fruit and vegetables together to create the ideal companion plants. This way you can naturally ward off pests and diseases that might strike your crops without resorting to the use of pesticides.
So how does one go about starting their own vegetable garden?
Read on to find out.
To begin with when you’re deciding on what vegetables to sow, it’s best to start out small. Newbie gardeners often find themselves getting too excited at the beginning of the season and sow out more than they need. This means they tend to find themselves with more food then they need and end up wasting what they’ve spent many months tending to.
Before venturing out to buy all the vegetables you can find, take a look at how much your family eats when planning your vegetable garden. Bear in mind that vegetables such as tomatoes and peppers will keep providing you food throughout the season, so you may find that you don’t require too many of these plants. On the other hand, vegetables such as carrots, corn, and radishes only produce once, so you will need to plant these throughout the season to have a constant supply.
Once you know what it is you want to grow your next step is deciding on how much space you require to do it. It’s important to remember, though, that you should take into account the time you will have to tend to your crops. A large space is not required to begin with particularly, if you’re just starting out. If you decide to grow in containers you don’t even require a garden as a deck, balcony or even the side of a wall will provide sufficient space.
Now that you’ve decided on what you want to grow and the space you require you need to determine the perfect spot for your needs. There are three basic requirements for successful crop growing:
Full sun – most vegetables will require direct sunlight for around 6-8 hours each day to produce as much food as they can. If they don’t receive maximum sunlight they might be susceptible to disease and attacks from pests.
Plenty of water – most vegetables aren’t drought tolerant, so it’s vital that you give them enough water during dry periods to ensure they don’t die.
Good soil – success often starts with the soil, so it’s a good idea to pay attention to your soil before starting your vegetable garden. In most cases, vegetables tend to do best in soil that is moist, free draining and rich in organic matter such as peat or compost.
VIEW IN GALLERYThe best part about growing your own vegetables is when you get to harvest your food to eat. Many vegetables can be harvested at several stages. Lettuce, for example, can be picked as young as you like. Simply snip the leaves and it will continue to grow and produce more leaves.
The general rule to follow is that if it looks good enough to eat, it probably is.
Give it a try, you deserve it after all the hard work you’ve put into them.
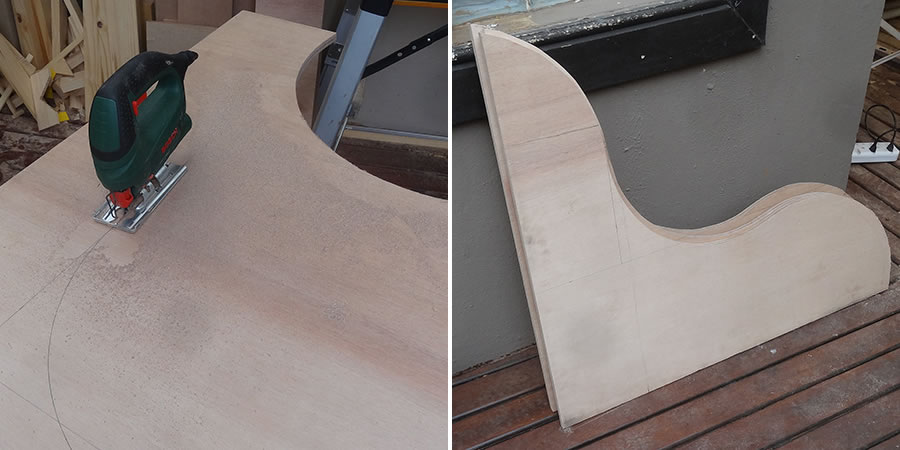
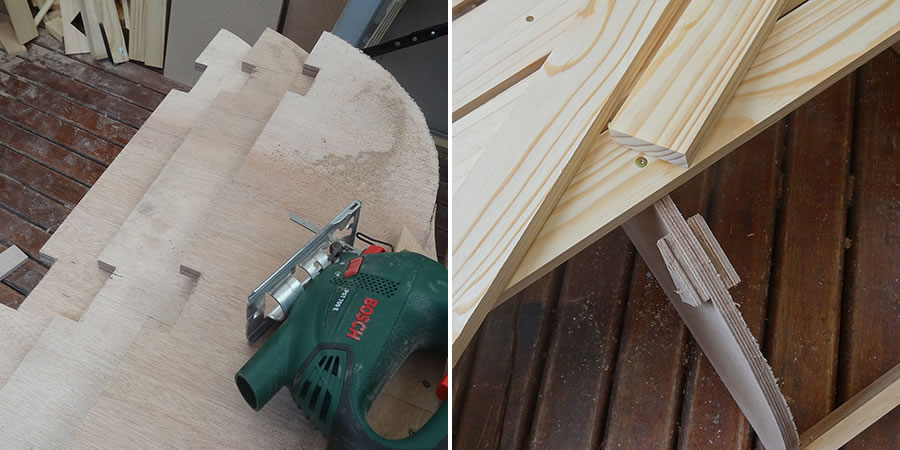
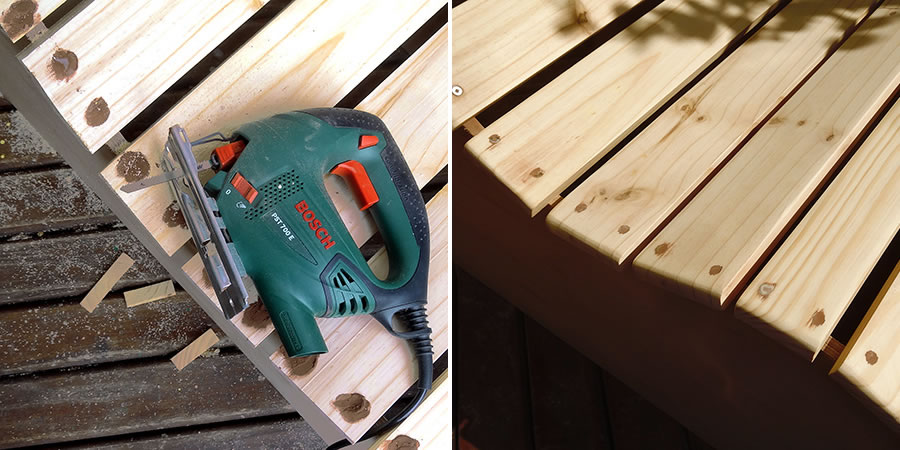
It will not be long before the colors of spring turn into the sights and sounds of a warm, enticing summer that will tempt you to spend more time outdoors. While some prefer the beach and others might just love hanging out on the pool deck, a fabulous love seat that lets you cozy up with someone dear is also a great choice. Why not make this even more special by crafting the slat garden love seat all on your own?
That’s right, making your own garden love seat is much easier than it sounds and if you have worked with wood before on smaller DIY projects, then this will seem like a really simple task. And if you do manage to get it right and use quality wood and take good care of this outdoor love seat, it will definitely last a decade or two!
Materials and Tools Used:
1 of 900 x 900mm 16mm marine plywood
7 of 20 x 94mm PAR pine – cut to 1040mm length
12 of 20 x 69mm PAR pine
3 cut to 1000mm length
9 cut to 1040mm length
5 x 50mm cut screws
Wood glue, Wood filler
Exterior sealer
Mineral turpentine
Drill / Driver plus assorted bits
Jigsaw and clean-cut blade
Orbital sander plus 60-, 120- and 240-grit sanding pads
You start off by cutting the sides and centre supports from plywood sheet (or any other hardwood you picked) and then move on to the center section. From here it is all about securing the supports and the planks that make up the seat to get the shape of the love seat. You can head over to Hometalk for a detailed step-by-step guide and additional resources that will ensure you have no difficulty in crafting this DIY slat love seat.
Finish it off with some sanding and a couple of coats of sealer and you have a gorgeous garden seating option that could the place for some awesome summer evenings!
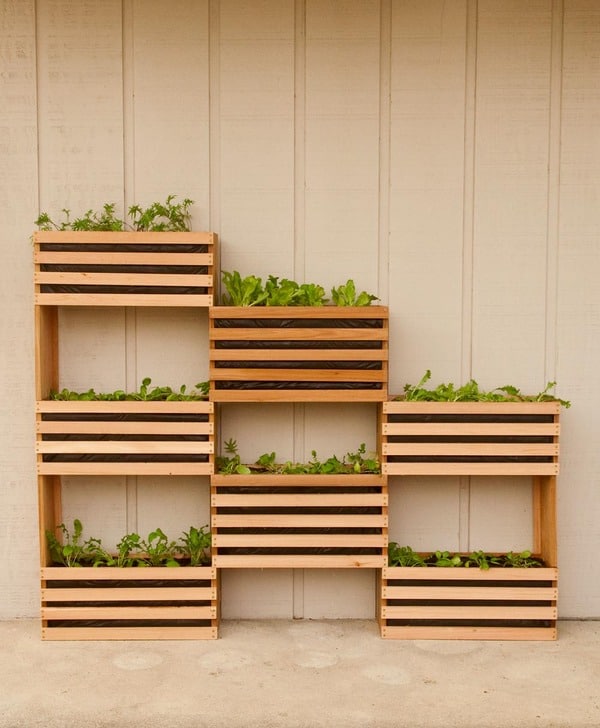
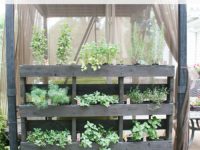
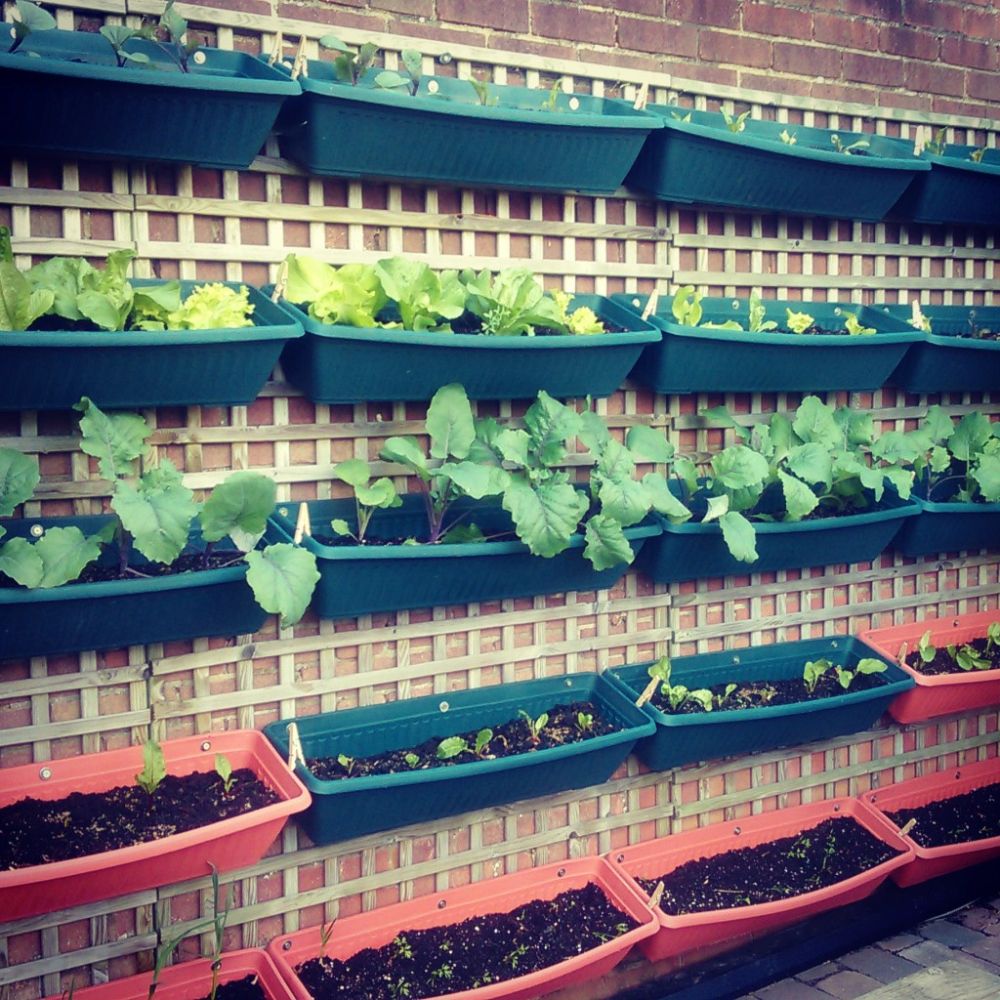
With winter now firmly behind us, some homeowners are busy tending to their revitalized garden and shaping it for warmer seasons ahead. But there are many others who do not have the joy of a lovely green garden due to obvious lack of space or being trapped in concrete, urban jungles. But the efficient DIY project showcased today brings a herb, vegetable or flower garden to even the tiniest of modern apartments and does so in captivating style.
Crafting your own DIY Vertical Vegetable Garden is one of the easiest and most aesthetic ways of adding greenery to your home without a whole lot of effort. Made using boxes of wood that are wall-mounted, this project needs minimal square footage even while cutting down your carbon footprint dramatically! Whether you just love some greenery, want to grow your own herbs and a few veggies or wish to live a healthier, more planet-friendly lifestyle, this vertical garden is the way to go.
Things You Need for the DIY Vertical Garden:
Miter or circular saw
Cordless drill and 1⁄8 inch drill bit
Staple gun and 1/2 electric cord staples
3x 8′ long cedar 1x8s
4x 8′ long cedar 1x3s
8x 8′ long cedar 1x2s
Hammer and Tape measure
Gloves, Safety glasses and dust mask
Pencil and Scissors
Tin snips or cutting pliers
Roll of wire hardware cloth, 1/2″ gap
Roll of weed blocker fabric
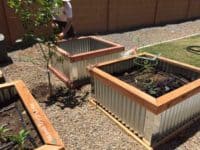
The project showcased here uses cedar to make the wooden boxes as it can withstand the wear and tear caused by the elements. You can obviously choose a different variety of wood in case your project takes up a sunny wall in the kitchen of the living room.
5 slats of wood make up the front and back of these larger, easy-to-craft boxes while the side panels use solid cedar. Shorter boxes can be crafted with just 4 slats instead of the 5. The bottom also uses cedar slats to account for drainage and proper aeration. Once you have your box ready, it is time to cover the bottom with the mesh and then use the weed blocker fabric for the two sides with slats and the bottom.
It is time to stack up the boxes as shown in the image above and you are good to go! You can head over to Man Made DIY for a more detail step-by-step set of instructions that will guide you through the process along with more project resources.
Feel free to share you results and your experiences with the DIY project along with us below. Good luck with your new, gorgeous green vertical garden!