Wonderful DIY Loom Knitted Fingerless Gloves and Scarf

fingerless-gloves-rainbow-loom-good

Last summer, my kids and I made many bracelets on Rainbow loom , we had much fun ! Do you know, you can make knitted scarf and gloves on the loom ?
The loom Knitting Patterns are simple and great for colder weather. Of cource, they are also fun to make that the kids can help, and they will be proud of themselves by making a scarf or gloves.

Please check the link below for the video tutorial , Pick up a loom to show off a warm knit scarf and gloves that you made yourself , have fun !

gloves-rainbow-loom-ggClick here for the video tutorial from Loomlove 

knitted-scarf-rainbow-loom-wonderfuldiy

Click here for the video tutorial from Loomlove 

make a beautiful scarf with a knitting loom

Make this Easy Loom Knitted Scarf — Check here

Wonderful DIY Finger Knitting scarf

finger knitting F
Finger-Knitted Scarf1
Finger-Knitted Scarf2
Finger-Knitted Scarf3
Finger-Knitted Scarf4
Finger-Knitted Scarf5
Finger-Knitted Scarf6
Finger-Knitted Scarf7
Finger-Knitted Scarf8
Finger-Knitted Scarf9
Finger-Knitted Scarf9-1
Finger-Knitted Scarf9-2
Finger-Knitted Scarf9-3
Finger-Knitted Scarf9-4
Finger-Knitted Scarf9-5
Finger-Knitted Scarf9-6
Finger-Knitted Scarf9-7
Finger-Knitted Scarf9-8
Finger-Knitted Scarf9-9
Finger-Knitted Scarf9-11
finger knitting scarf 000
Fashion Mode Styling Outfit DIY

YouTube video

Have you never knitted before ? Try this interesting finger knitting technique that requires very few materials and takes very little time. It requires no tools except for your hands.
Finger knitting is a great, productive way to spend your free time when you need something fun to do. When you’re finished, you’ll have a beautiful rope of yarn that you can use for lots of different things, such as scarf,key ring ropes, hair decorations, a belt, or even bag handles. And it’s so simple the whole family can join in!finger knitting 2

Wonderful DIY Colorful Finger Knitting Scarf

finger Scarf

YouTube video

Here is a great, productive way to spend your free time when you need something fun to do— Finger knitting scarf . Just follow the above video tutorial, you’ll get a beautiful scarf . It’s so simple the whole family can join in!

Wonderful DIY Finger Knitting Scarf

Finger Knitting scarf1 Finger Knitting scarf2 Finger Knitting scarf3 Finger Knitting scarf4 Finger Knitting scarf5 Finger Knitting scarf6

YouTube video

Finger knitting is a really good way of getting children interested in wool crafts, and it is very easy to learn. It also helps to improve a child’s dexterity and ability to concentrate. No extra implements are required, just fingers, the best tools in the world!
Finger Knitting scarf F

arm knitted scarf DIY F2

DIY arm-knitted-scarf-in-30-minutes

30 DIY Knitted Scarf Ideas That Will Have You Hooked From the First Stitch

A handmade scarf carries a presence that store-bought pieces rarely match. These 30 DIY knitted scarf ideas feature eye-catching textures, playful patterns, and thoughtful details that make each scarf feel personal, cozy, and impossible to overlook.

Collage of DIY Knitted Scarf Ideas

30 DIY Knitted Scarf Ideas That Turn Simple Yarn Into Cozy, Head-Turning Statement Pieces

Knitted scarves are having a major style moment in 2026, transforming basic yarn into textured pieces that feel warm, stylish, and effortlessly eye-catching. With the right stitches and color choices, even a simple scarf can become a standout accessory that elevates any outfit instantly.

This collection is packed with inspiring ideas ranging from chunky oversized knits and soft minimalist designs to bold color-block scarves and intricate patterned styles that look straight out of a boutique. Each project invites you to experiment with textures, stitches, and layering so your scarf ends up looking cozy, fashionable, and impossible not to notice.

1. Cable Knit Tie Scarf

This is the scarf equivalent of that effortlessly chic girl who “just threw something on” but somehow looks editorial. The sculpted cables twist like little knitted braids, and that loop-through tie detail? Instant Parisian energy. It frames the neck in such a flattering way that even your coziest coat suddenly feels styled, curated, and intentional.

Grab a worsted-weight wool or wool-blend yarn (anything with structure for those crisp cables) and 4.5 mm needles. Cast on 20 stitches, work a 6–8 stitch cable panel in the center (cross every 6 rows), and keep the edges in garter stitch so it lays flat. Knit to about 30 inches, then taper both ends by decreasing 1 stitch every other row until you get that sleek point. Add a 2-inch vertical slit (bind off a few stitches mid-row, cast back on next row) so one end slips through cleanly—yes, it’s as satisfying as it sounds.


2. Chunky Textured Neck Wrap

This one is pure cozy drama—in the best way. It’s plush, it’s sculptural, and it looks like something you’d wear while sipping a latte in a snowy window seat. The texture catches the light just enough to feel luxe without trying too hard. Honestly? It’s giving “soft life” energy.

Use chunky yarn (think wool or alpaca blend) with 6–7 mm needles. Cast on 18–22 stitches and alternate between knit and purl textures—try seed stitch or broken rib for that elevated feel. Knit until about 28 inches long, then start tapering by doing k2tog at the beginning and ssk at the end of every other row. Keep your tension slightly loose so it drapes instead of stiffens—trust me, that’s the secret sauce.


3. Sweet Scalloped Edge Scarf

This is straight out of a cottagecore daydream. Soft pink, delicate edges, and that “handmade with love” vibe that feels like it belongs in a basket next to fresh flowers. It’s romantic, it’s whimsical, and it somehow makes winter feel… gentle?

Use DK-weight yarn and 4 mm needles. Cast on 22 stitches and knit entirely in garter stitch for that squishy texture. Once you hit about 34–36 inches, bind off loosely. Then grab a 3.5 mm crochet hook and add a scalloped edge: slip stitch, chain 3, slip stitch into every second stitch along the border. Lightly block it so those scallops pop—because yes, details matter.


4. Ribbed Wraparound Scarf

This one is giving cool-girl layering with zero effort. The long, ribbed texture wraps and twists in the most satisfying way, like it was made for those “bundle up but make it fashion” days. It’s simple—but in that expensive minimalist way.

Use bulky yarn and 6 mm needles. Cast on 16 stitches and work in a 2×2 rib (k2, p2) for a stretchy, sculpted look. Knit until it’s a generous 55–60 inches so you can wrap it multiple ways. Slip the first stitch of every row for clean edges, and bind off loosely so it keeps that soft, flexible finish.


5. Gradient Cozy Knit Scarf

Okay but THIS—this is a whole color story. It fades from shade to shade like a sunset melting into dusk, and honestly, it does all the work for you. You’ll look like you spent hours planning it, but it’s just smart yarn choice. We love a low-effort slay.

Use a gradient yarn cake (aran weight works perfectly) with 5 mm needles. Cast on 24 stitches and knit in garter stitch the entire way—yes, it’s beginner-friendly and gorgeous. Let the colors shift naturally as you go. At around 50–55 inches, start decreasing every row for the last 6 inches to form that elegant tapered tip.


6. Two-Tone Statement Scarf

Bold, punchy, and impossible to ignore—this scarf is basically dopamine dressing in knit form. The color blocking is crisp, modern, and just a little playful. Throw it over neutrals and suddenly you’re that person with great style.

Use two contrasting worsted-weight yarns and 5 mm needles. Cast on 20 stitches and knit in garter stitch, switching colors every 10 rows for clean stripes. When you’re ready to finish, decrease 1 stitch at each edge every other row for about 5 inches to create those sharp ends. Weave in ends neatly (no cheating here!) so the color transitions stay bold and polished.


7. Classic Minimal Knit Scarf

This is your forever scarf. No trends, no fuss—just soft, clean, timeless goodness. It’s the kind of piece you reach for every single day because it goes with literally everything. Quiet luxury? Say less.

Use DK-weight merino wool and 4 mm needles. Cast on 26 stitches and knit every row (garter stitch) for that plush, cozy texture. Keep going until it hits about 60 inches. For an elevated finish, add i-cord edges or simply block it flat for that smooth, boutique-quality look.


8. Lace Detail Triangle Scarf

Light, airy, and just a little bit fancy—this scarf feels like it belongs at a slow brunch or tucked into a spring coat. The lace pattern adds that delicate, almost heirloom vibe while still being totally wearable.

Use fingering-weight yarn and 3.5 mm needles. Start with 3 stitches and increase every other row (yarn overs at each edge) to build the triangle shape. Incorporate a simple lace repeat (yo, k2tog) across the rows for that openwork design. Knit until the wingspan reaches about 50 inches, then bind off loosely so it doesn’t pucker.


9. Soft Mohair Cloud Scarf

This scarf is basically a whisper. It’s fluffy, weightless, and has that dreamy halo that makes everything feel soft and romantic. If “wrapped in a cloud” was a fashion category—this would win.

Use a mohair or mohair-blend yarn with 5 mm needles. Cast on 18 stitches and work in stockinette stitch for that smooth, drapey finish. Knit until about 65 inches for that long, floaty look. Steam block gently (don’t press!) to enhance the fluff without flattening the fibers.


10. Nordic Cable Knit Scarf

This one is straight-up cozy cabin fantasy. Think snow falling outside, oversized sweater, and this thick, cable-packed scarf wrapped snugly around your neck. It’s bold, textured, and unapologetically winter.

Use aran-weight wool and 5 mm needles. Cast on 28 stitches and create a central cable panel (about 10 stitches wide), framed by reverse stockinette for contrast. Twist the cables every 6–8 rows to build that rich texture. Knit to about 55 inches, then taper both ends with centered decreases so it finishes clean and symmetrical.


11. Minimal Tie Scarf with Clean Edges

This one is giving clean girl aesthetic meets cozy Sunday reset. The soft grey tone, the perfectly tapered ends, the neat little wrap—it’s minimal but somehow still makes a statement. Like… this is the scarf you wear when your life is (at least visually) together.

Use DK or light worsted yarn with 4–4.5 mm needles. Cast on 18–20 stitches and knit entirely in garter stitch for that textured, squishy feel. To get those sleek tapered ends, decrease 1 stitch at each side every other row for the last 5–6 inches. Add an i-cord edge (slip 3 stitches each row) for that super polished finish—tiny detail, huge upgrade.


12. Chic Contrast Edge Scarf

Oh this one? She’s quiet luxury with a twist. That creamy neutral base with a sharp contrast stripe feels designer-level chic—like something you’d casually drape over your shoulders while ordering an overpriced latte.

Use fingering or sport-weight yarn held double with 4 mm needles. Cast on 24 stitches and knit in stockinette stitch. About 1 inch from the edges, switch to a contrasting color and knit 4–6 rows for that crisp stripe detail. Keep edges neat by slipping the first stitch of every row, and block it flat so those lines stay chef’s kiss straight.


13. Skinny Ribbed Tie Scarf

This scarf is tiny but mighty. It’s giving effortless layering piece—the kind you throw on last minute and suddenly your outfit has depth, texture, and a little “who is she?” energy.

Use fingering-weight yarn and 3.5 mm needles. Cast on 12–14 stitches and work in 1×1 rib (k1, p1) for that stretchy, sculpted look. Knit until about 40 inches, then taper both ends with centered decreases (k2tog, slip-slip-knit). Keep it slim—this one is all about that delicate, barely-there vibe.


14. Pastel Gradient Dream Scarf

Tell me this doesn’t look like a soft spring sunset melted into yarn. The dreamy pastel shifts feel almost watercolor-like, and the texture keeps it cozy without losing that airy vibe. It’s basically Pinterest in scarf form.

Use a hand-dyed gradient yarn (DK weight) and 4 mm needles. Cast on 22 stitches and knit in garter stitch so the color changes stay the star. Knit to about 50 inches, then decrease at both ends every other row for the last 6 inches to get those soft, tapered tips.


15. Delicate Lace Triangle Scarf

This one is romantic but grown. The lace pattern feels intricate and airy, like something you’d wear on a crisp morning walk or layered over a wool coat for that soft, feminine touch.

Use fingering-weight wool and 3.5 mm needles. Start with 3 stitches and increase at both edges every other row using yarn overs. Work a repeating lace pattern (yo, k2tog, ssk) to build that open texture. Knit until the wingspan hits about 48–52 inches, then bind off loosely so it drapes like a dream.


16. Cozy Hooded Scarf Set

Okay but this is next-level cozy. A scarf and hood combo? We love a multitasking queen. It’s giving woodland walk, chilly mornings, and “I’m warm and stylish, thanks for asking.”

Use bulky yarn and 6–7 mm needles. Knit a long rectangular scarf (about 8 inches wide and 60 inches long) in garter stitch. For the hood, fold the top 12 inches in half and seam the back using mattress stitch. Optional: add i-cord ties or braided cords for extra charm.


17. Textured Pink Statement Scarf

This scarf is pure serotonin. The pink tones, the subtle texture, the soft fuzziness—it’s bold but still cozy. Basically, if happiness were knitted… this would be it.

Use a mix of mohair and wool (held together) with 5 mm needles. Cast on 24 stitches and alternate between stockinette and textured rows (like k1, p1 across every few rows). Knit to about 55 inches and block gently to let the texture bloom without flattening that fluffy halo.


18. Ribbed Mohair Tie Scarf

This one is sleek, soft, and just a little bit luxe. The ribbing gives it structure, while the mohair keeps it light and floaty. It’s the kind of piece that feels fancy without trying too hard.

Use lace-weight mohair held double with 4.5 mm needles. Cast on 16 stitches and work in 2×2 rib for a plush, stretchy finish. Knit until 45 inches, then taper ends with decreases every other row. Steam block lightly—don’t press!—to keep that airy softness intact.


19. Ruffled Edge Neck Scarf

This one is giving vintage romance with a little drama. The ruffled edges add movement and personality, turning a simple scarf into something that feels styled, feminine, and a little bit flirty.

Use DK-weight yarn and 4 mm needles. Cast on 18 stitches and knit in garter stitch. To create ruffles, increase 1 stitch at each edge every row for the last 4–5 inches, then bind off loosely so it flares out. You can even add a picot bind-off for extra frill—because why not go all in?


20. Classic Knotted Mini Scarf

Short, sweet, and ridiculously cute—this mini scarf is the ultimate finishing touch. It ties into a perfect little knot and instantly makes your outfit look styled (even if you’re just wearing a sweater and calling it a day).

Use worsted-weight yarn and 4.5 mm needles. Cast on 16 stitches and knit in garter stitch for about 30 inches. Keep edges clean by slipping the first stitch each row. No taper needed here—just tie it into a soft knot and adjust until it sits just right. Effortless and adorable.


21. Moss Stitch Keyhole Scarf

Okay THIS is the scarf that quietly steals the show. That rich olive tone plus the woven-looking texture? It’s giving “I just threw this on” but in the most put-together, earthy, Pinterest-core way. And the little keyhole detail? Functional and cute—obsessed.

Use DK-weight yarn and 4 mm circular needles. Cast on 28 stitches and work in moss stitch (k1, p1 alternating every row). After 10–12 inches, create the keyhole: knit 12 stitches, bind off 4, knit to end—then cast those 4 stitches back on in the next row. Continue straight, then taper both ends by decreasing 1 stitch each side every other row for the last 5 inches.


22. Ethereal Lace Ribbon Scarf

This one is straight-up fairycore fantasy. Light as air, slightly sheer, and delicately draped like something you’d wear while wandering through a meadow pretending you’re in a slow-motion film scene. It’s soft, romantic, and just a little magical.

Use lace-weight mohair or silk blend yarn with 3.5 mm needles. Cast on 20 stitches and work a simple lace repeat (yo, k2tog across rows) to create that open net texture. Knit until about 55 inches, then bind off loosely and gently block it wide using pins to really open up that dreamy lace pattern.


23. Floral Knit Triangle Scarf

Florals… but make them knitted and actually groundbreaking. The soft purple flower motifs popping against that earthy base? It’s giving cottagecore meets vintage heirloom, and honestly, it looks like something you’d pass down forever.

Use two contrasting DK yarns and 4 mm needles. Start with 3 stitches and increase at both edges every other row. Incorporate a stranded or duplicate stitch floral motif every 6–8 rows. Keep tension loose so the fabric doesn’t pucker, and finish with a garter stitch border (4 rows) for a clean, cozy edge.


24. Nordic Texture Wrap Scarf

This one feels like a crisp winter morning wrapped around your neck. The subtle eyelet rows mixed with garter texture? It’s minimal but has just enough detail to make people look twice. Scandinavian chic, but make it cozy.

Use sport-weight yarn and 4 mm needles. Cast on 30 stitches and knit in garter stitch, adding eyelet rows every 6th row (yo, k2tog across). Maintain the triangle shape by increasing 1 stitch at each edge every other row until desired width, then mirror decreases to taper.


25. Chunky Ribbed Triangle Scarf

Textured, chunky, and so satisfying. This is the kind of scarf that looks amazing mid-project and even better finished—those thick ribs give it structure while still feeling soft and wearable. Cozy but elevated.

Use worsted-weight yarn and 5 mm needles. Cast on 3 stitches and increase at the start of every row to form the triangle. Work in 2×2 rib (k2, p2), adjusting as stitches grow. Once you hit about 50–55 inches across, begin decreasing at the same rate to shape the opposite side.


26. Textured Pink Waffle Scarf

Tell me this doesn’t look like the coziest little cloud. That waffle texture is EVERYTHING—soft, squishy, and just begging to be touched. It’s playful, warm, and honestly feels like a hug in scarf form.

Use aran-weight yarn and 5 mm needles. Cast on 32 stitches and work a waffle stitch pattern (k1, p1 for 4 rows, then alternate knit/purl blocks). Increase at one edge every row to create the angled triangle shape. Keep edges neat with a slipped stitch border for that crisp finish.


27. Playful Pom-Pom Colorblock Scarf

This scarf is basically a serotonin boost you can wear. The bold coral red popping against those soft neutrals? Instant mood-lifter. And don’t even get me started on the pom-poms—chunky, bouncy, and just the right amount of extra. It’s giving “cozy but make it FUN,” like your scarf decided to have a personality (and honestly, we love that for it).

Use worsted-weight yarn in 3–4 colors (coral, taupe, cream, and grey are chef’s kiss) with 5 mm needles. Cast on 3 stitches and increase at one edge every row to create that long asymmetrical triangle shape. Work entirely in garter stitch, switching colors every 8–12 rows for that bold colorblock effect. Once your scarf reaches about 60–65 inches, bind off and create 2 large pom-poms using a pom-pom maker or by wrapping yarn around a 3-inch piece of cardboard ~60–70 times, tying tightly, and trimming evenly. Secure them firmly to each tip using a tapestry needle.


28. Cozy Lilac Keyhole Wrap

This one is soft girl autumn meets minimalist chic and I am completely here for it. That dusty lilac shade? Dreamy. The wide panel gives it that luxe, blanket-scarf vibe, while the sleek little pull-through slit keeps everything perfectly styled without constant adjusting (aka no scarf drama all day).

Grab a soft DK or light worsted yarn (about 200–250g total) and 4.5 mm needles. Cast on 32–36 stitches and work in garter stitch or a subtle broken rib (k1, p1 on RS, knit all on WS) for texture. After ~12 inches, create the keyhole by knitting 14 stitches, binding off 6, then finishing the row; on the next row, cast those 6 stitches back on. Continue straight for another 18–20 inches, then taper both ends by decreasing 1 stitch at each edge every other row for about 6 inches to get those clean, pointed finishes.


29. Classic Ribbed Tie Scarf

Simple? Yes. Boring? Absolutely not. This is that timeless, goes-with-everything piece you’ll reach for on repeat. Clean lines, soft texture, and that perfect little wrap detail—it’s understated perfection.

Use DK yarn and 4 mm needles. Cast on 18 stitches and knit in 1×1 rib for elasticity. Continue for about 40 inches, then taper ends by decreasing 1 stitch at each side every other row for 6 inches. Lightly steam block to smooth and define those ribs.


30. Chevron Knit Mini Scarf

Chevron but make it cozy-core chic. The subtle V pattern adds movement and texture without being too loud, and that soft pink tone? Instant heart-eyes. It’s delicate, detailed, and just a little bit fancy.

Use fingering-weight yarn and 3.75 mm needles. Cast on 21 stitches and work a chevron pattern (centered increases with kfb and decreases with k2tog/ssk). Knit until about 45 inches, keeping tension even so the pattern stays crisp. Block it flat to really show off those zig-zag lines.

30 *Awe-Inspiring* DIY Fingerprint Christmas Craft Ideas That Belong in a Holiday Catalog

A fingerprint becomes a festive masterpiece with just a dab of paint. These 30 DIY fingerprint Christmas craft ideas mixes easy steps with big holiday charm. Great for kids, classrooms, and memory-making moments.

collage of DIY Fingerprint Christmas Craft Idea

30 DIY Fingerprint Christmas Craft Ideas That Create Priceless Memories in 2025

Fingerprint crafts aren’t just “cute”, they’re chaotic, colorful, tiny-handed masterpieces that feel like Christmas magic splattered on paper. In 2025, parents everywhere are obsessed with turning those tiny fingertip smudges into full-blown holiday characters. Picture messy little paint dots suddenly becoming reindeer with goofy eyes, fingerprint lights looping across the page like a rainbow, mini snowmen stacked like a funny snow tower, and tree shapes made entirely from tiny dabs that look hilariously perfect in their imperfection. Suddenly, a plate of paint and a toddler’s hand turn into the most heart-melting craft session ever.

These 30 DIY fingerprint Christmas craft ideas are pure festive chaos in the best way. It’s fast, funny, wildly charming, and the kind of keepsake you’ll pull out years later and melt all over again. Get ready for unstoppable giggles, paint everywhere, and the cutest little Christmas artwork that practically sparkles with personality.


1. Fingerprint Reindeer Cards

These little reindeer look like they trotted straight out of a storybook and onto your card stash. Each one has that perfectly imperfect fingerprint charm that makes people stop, smile, and ask, “Wait… did you really make these?” It’s the kind of holiday craft that feels whimsical, warm, and oh-so-giftable.

To recreate the magic, grab brown watercolor or acrylic paint, a fine-tip black pen, and crisp white cards. Press your fingertip into brown paint and stamp once for the chubby body, then again for the head. Use the pen to sketch tiny antlers, skinny legs, and a miniature tail. Add spots with white paint and turn one into Rudolph with a red dot nose. Let dry for 10 minutes before stacking them into envelopes. Handmade holiday cuteness? Yes, please!


2. Family Fingerprint Reindeer Ornament

This ornament is pure Christmas nostalgia—each fingerprint transformed into a reindeer that represents a family member. It’s sweet, sentimental, and the exact kind of keepsake you’ll unwrap every year with a soft, happy sigh. Imagine the whole family pointing out their little reindeer faces on the tree.

Start with a wooden ornament base painted in a warm brown shade. Stamp each person’s fingertip in darker brown paint to form the reindeer heads. Once dry, add eyes, antlers, and noses with a detail brush (don’t forget the tiny red Rudolph moment!). Label each print with a fine-tip marker, seal the whole piece with clear varnish, and add red-and-white baker’s twine for hanging. Instant heirloom material!


3. Merry Christmas Fingerprint Plate

If your holiday table wants a showstopper, this fingerprint plate is it. Jolly red circles dance across the surface while tiny fingerprint reindeer peek around the edges. It looks like something from an artsy pottery studio—but it’s kid-powered, memory-filled, and 100% homemade.

Use a plain white ceramic plate and multi-surface acrylic paints. Stamp brown fingerprints around the rim, then paint antlers, eyes, and noses for each mini reindeer. Use red and green acrylic markers or brushes to write “Merry Christmas” across the top. Fingerprint dots form a heart in the center for an extra-sweet touch. To finish, bake the plate in a 300°F (150°C) oven for 30 minutes to set the design. Can you picture this serving cookies?


4. Fingerprint Christmas Birds & Penguins

Bright, goofy, and full of personality—these little fingerprint birds and penguins feel like a party on paper. Each tiny print morphs into a wide-eyed character wearing crowns, beaks, and winter charm. They make the cutest Christmas cards, gift tags, or classroom art ever.

Use washable kids’ paint and yellow cardstock to create a bold background. Stamp fingerprints in any color you like, then add googly eyes with school glue. Draw details—crowns, feet, beaks, wings, and even little penguin bellies—using fine-tip markers. Let everything dry for 5 minutes before turning them into tags or mini greeting cards. Crafting with maximum adorable energy? Approved.


5. Fingerprint Candy Cane Cards

These candy cane cards are the definition of simple-but-stunning. Bright red fingerprint polka dots mimic the classic candy cane stripes, and the whole thing looks like a kid-made treasure you’d proudly display on the fridge all season.

Cut candy cane shapes from white cardstock using scissors or a template. Pour red acrylic paint onto a palette and let little fingers stamp tidy dots in angled stripes across the cane. Add borders or handwritten messages with green or gold markers. Let dry for 10–15 minutes before taping onto gifts, framing as décor, or slipping into envelopes. It’s holiday crafting at its easiest.


6. Fingerprint Heart Couple Frame

This elegant heart keepsake mixes romance and craftiness in the prettiest way. It’s the kind of piece you give for Christmas, an anniversary, or even a winter wedding—because nothing says “we belong together” like matching fingerprint hearts in a gold frame.

Start with a wooden heart-shaped frame and glue small white heart cutouts onto it. Press fingerprints into red acrylic paint and stamp inside each tiny heart shape, forming crisp fingerprint hearts. Write names and the meaningful date using a gold gel pen. Finish with a layer of glossy Mod Podge for shimmer and durability. The result? A forever piece with sentimental sparkle.


7. Family Fingerprint Tree Ornament

This salt-dough tree ornament feels like Christmas tradition wrapped in flour and memories. Each family member adds their fingerprint to the clay tree, creating a rainbow of prints that becomes a time capsule for years to come.

Mix salt dough (1 cup flour, ½ cup salt, ½ cup water) and roll it to about ¼ inch thick. Use a cookie cutter to shape a Christmas tree. Before baking, press fingerprints around the tree like colorful ornaments. Bake at 200°F (95°C) for 2–3 hours until fully hardened. Once cool, paint each fingerprint a different bright color, outline the tree in green, and seal with varnish. Add a ribbon and watch it shine on the branch.


8. Fingerprint Fruit Art

Who says your winter crafts can’t feel tropical? These pineapple and strawberry fingerprint pieces bring happy summer energy to cold-weather days. They’re fun, bold, and perfect for kid decor or classroom walls.

Cut pineapple and strawberry shapes from white cardstock. Dip fingertips into yellow or red acrylic paint and stamp dots all over to fill the fruit. For the leafy tops, trace and cut handprints from green construction paper, layering them for texture. Glue the leaves to the top and let everything dry flat for 10 minutes. Suddenly your winter just got sweeter.


9. Fingerprint Christmas Lights Frame

This photo frame looks like a string of Christmas lights wrapped itself lovingly around your favorite picture. Each bulb is a bright fingerprint, making the whole frame feel joyful, handmade, and unbelievably cute.

Paint a wooden frame white and let it dry completely. Stamp fingerprints in alternating bright colors all around the border. Once the prints dry, outline each bulb in black marker, adding a little squiggle “cord” connecting them. Dot each bulb with white paint for highlight shine. Add the date at the bottom and pop in a cozy winter photo. Holiday magic? Absolutely.


10. Fingerprint Christmas Tree Ornament

This ornament is a tiny masterpiece—green fingerprint “branches,” shiny gem ornaments, and a huge red bow big enough to make Santa proud. It’s cheerful, charming, and totally tree-worthy.

Start with a wooden round painted white. Stamp green fingerprints in a triangle formation, beginning wide at the bottom and tapering upward like a classic evergreen. Add a brown trunk with acrylic paint, then glue a yellow foam star on top. Use tacky glue to place silver or clear gems around the tree for extra sparkle. Finish it off with a large red bow hot-glued at the top. Ready to steal the spotlight on your Christmas tree!


11. Fingerprint Christmas Tree Cards

These sweet little Christmas tree cards are the definition of handmade holiday magic. Each tree is built from layered green fingerprints that stack into the cutest mini evergreens, and you can almost imagine the giggles happening behind those tiny smudges of paint. It’s the kind of kid-made charm everyone keeps forever.

To make them, fold white cardstock into a card, then dip fingertips into green washable paint to create rows of prints in a triangle shape. Add a brown painted trunk and let it dry fully before decorating the tree with tiny stickers, sequins, or marker-drawn ornaments. A quick drying time and boom — festive, fridge-ready goodness.


12. Fingerprint Reindeer Family Keepsake Ornament

This personalized ornament is pure holiday heart — each little reindeer face is made from a family member’s fingerprint, turning a simple clay tag into a keepsake that sparks instant nostalgia. It’s sweet, sentimental, and totally tree-worthy.

Start with an air-dry clay oval or a ceramic blank, then press a fingertip into brown paint and stamp one print per family member. Once dry, add antlers, eyes, and glittery red noses using fine-tip paint markers. Punch holes, thread ribbon through the top, and write names beneath each deer so no memory ever gets misplaced.


13. Fingerprint Christmas Lights Printable

There’s something so joyful about these bright fingerprint light bulbs dancing across the page — it feels like holiday cheer in its simplest, sweetest form. Paired with a “Merry Christmas” greeting, it’s a frameable piece that lights up any wall.

Print a template with a string of bulbs, then use fingertips dipped in red and green paint to stamp each light along the line. Let everything dry before outlining each fingerprint with a thin black marker to mimic the bulb base. Slip it into a frame and you’ve got holiday décor that glows without plugging in a single wire.


14. Mini Fingerprint Reindeer Tile Ornaments

These tiny tile ornaments are the cutest little herd ever — each with a fingerprint reindeer front and center. They have that classic handmade-school-gift vibe but upgraded with clean lines and charming twine loops. Think: simple, sweet, and wonderfully giftable.

Use small ceramic tiles or craft wood squares and stamp a brown fingertip print near the center. Once the paint is dry, add twiggy antlers, eyes, and a bright red nose. Write names and the year with a fine paint pen, glue on a loop of baker’s twine, and watch these mini masterpieces become instant family favorites.


15. Fingerprint Christmas Photo Frames

These whimsical little frames turn kids’ art into something bright, bold, and totally mantle-worthy. The borders are dotted with colorful fingerprint holiday lights swirling around adorable photos, making every frame feel like a celebration.

Grab blank wooden frames and paint them white. Once dry, let kids dip their fingertips in multiple colors to dot fingerprints around the edges. After they dry, outline the lights with thin black swirly lines, glue in a photo, and seal with Mod Podge for shine. These make the cutest classroom or grandparent gifts.


16. Fingerprint Christmas Tree Salt Dough Ornaments

These chunky little salt dough ornaments look like handmade sugar cookies covered in bright holiday lights. Each tree shape is dotted with fingerprint “bulbs” that feel playful, colorful, and oh-so nostalgic.

Make salt dough using flour, salt, and warm water, then roll it to about a quarter inch thick and cut out tree shapes. Bake or air-dry, then use fingertips and bright acrylic paints to add colorful dots across the branches. Outline the lights with a thin black line, punch a ribbon hole before drying, and finish with a satin ribbon tie.


17. Fingerprint Christmas Wreath Cards

These red-and-green fingerprint wreaths pop beautifully against bright red cardstock and look like something straight out of a cheerful classroom craft day. They’re simple, bold, and guaranteed to earn a spot on the holiday bulletin board.

Cut white cardstock into a ring shape, then let kids stamp green fingerprints all around the circle. Add red thumbprint berries, glue a small red bow at the bottom, and mount the finished wreath onto red folded cardstock. Instant festive charm with almost zero fuss.


18. Fingerprint Wood Slice Ornaments

Wood slices plus fingerprints? It’s rustic holiday magic. Each ornament features a tiny winter scene — snowmen, reindeer, Christmas trees — all created from simple fingertip prints that look adorable against the natural wood grain.

Use pre-drilled wood slices and acrylic paint. Stamp white prints for snowmen, brown prints for reindeer, or green prints for trees. Add tiny hat details, antlers, eyes, or ornaments with a fine paintbrush. Thread twine through the top and write names and the year around the edge for perfect woodland keepsakes.


19. Fingerprint Reindeer Christmas Card

This sweet minimalist card is packed with charm — a whole herd of reindeer made entirely from little brown thumbprints. Each one gets a tiny face and antlers, creating a simple design that feels airy, modern, and delightfully handmade.

Stamp thumbprints across a blank white card using brown washable paint. Let dry, then use a fine marker to draw antlers and eyes, and add a tiny red nose with either paint or marker. Finish with a stamped or handwritten greeting underneath for a clean, Scandinavian-inspired Christmas card.


20. Fingerprint Candy Cane Gift Bags

Nothing says festive classroom fun like these kraft paper gift bags decorated with red and white fingerprint candy canes and topped with fluffy red bows. They’re bright, cheery, and perfect for little holiday treats.

Use small brown gift bags and lightly sketch a candy cane shape. Let kids dip fingers in red and white paint to stamp alternating dots along the curve. Once dry, add a big red tulle bow at the top using hot glue or double-sided tape. Load with goodies and get ready for big smiles.


21. Fingerprint Wood Slice Christmas Characters

These little wood slice ornaments feel like a whole Christmas village shrunk into tiny, adorable circles. With fingerprint snowmen, penguins, robins, candy canes, wreaths, and even reindeer, each slice turns into a miniature memory that feels handmade and heartfelt. They’re rustic, charming, and the perfect mix of simple and joyful.

To recreate them, grab pre-cut wood slices with twine-ready holes. Use fingertips dipped in acrylic paint to form the base shapes — white for snowmen, red for candy canes, brown for reindeer, and so on. Add details like eyes, antlers, wings, and wreath leaves with a fine brush. Seal with matte Mod Podge so they stay beautiful year after year.


22. Fingerprint Robin Family Art

This fingerprint robin family is the cutest little flock you’ve ever seen — each bird perched in a row like they’re posing for a festive classroom photo. The bright red fingerprints make the perfect round robin tummies, and the wiggly legs and googly eyes add that hilarious kid-charm no store-bought card can match.

Start with blank cardstock and dip fingertips in red paint to stamp the bird bodies. Let them dry before gluing on googly eyes and drawing simple stick legs and tiny beaks. You can arrange them in a line for a family portrait or create separate scenes for personalized holiday cards.


23. Glitter Pawprint Keepsake Ornament

This shimmering pawprint ornament is pure nostalgia — a glittery little circle honoring the furry friend who curls up under the tree every year. The pink sparkles, tiny bow, and perfect indentation make it look like something straight out of a boutique pet gift shop.

Press your pet’s paw gently into salt dough or air-dry clay, creating a clean impression. Once dry, paint the paw pads with sparkly pastel paint and outline optional accents with fine glitter glue. Add a ribbon loop before it sets, tie a bow at the top, and hang it proudly on the tree for the sweetest pet-friendly tradition.


24. Rainbow Fingerprint Bauble Card

This bright, rainbowy bauble card feels like an instant mood-lifter — cheerful pops of color hanging from delicate sketched strings, all centered above a simple handwritten “Merry Christmas.” It’s minimal, modern, and bursting with joy.

Use a clean sheet of cardstock and stamp fingerprints in a row using rainbow-colored paints. Once they dry, draw thin dangling strings with a fine black pen, adding tiny loops or bows at the top of each bauble. Finish with a handwritten greeting and let the card dry flat so the colors stay crisp.


25. Thumbprint Caterpillar Valentine-Inspired Holiday Idea

This charming thumb-buggy caterpillar is technically Valentine-themed, but the technique translates beautifully into holiday crafts. The row of fingerprint segments, happy face, and sweet little legs make it perfect for turning into Christmas cards, tags, or winter critter art.

Stamp a row of fingerprints in alternating colors, letting them overlap slightly to form the body. Add stick legs, antennae, and a cheerful face using a fine-tip marker. You can turn it festive by using red and green tones or even adding Santa hats or tiny scarves for a playful winter spin.


26. Fingerprint Snowman Gift Tags

These sweet fingerprint snowman tags feel like a cozy craft table moment — warm brown kraft paper, cheerful snowmen, and snowy white paint layered along the bottom. They instantly turn any gift into something homemade and special.

Press white fingerprints onto kraft tags to form stacked snowman bodies. Once dry, paint on hats, scarves, carrot noses, and little branch arms. Add a sweep of white paint along the bottom for snow, then punch a hole and tie string through. They’re perfect for teacher gifts, neighbor treats, or stocking surprises.


27. Fingerprint Robin Tree Ornament

This sweet ceramic tree ornament features two adorable fingerprint robins perched proudly in the center. The stitched-look border and handwritten names make it the kind of keepsake parents cherish for decades.

Use a ceramic or clay tree-shaped ornament and stamp red fingerprints for the robin tummies. Add wings, feet, and little faces with a thin brush. Write names and the year using a ceramic-safe pen. Finish by threading a bright ribbon through the hole and let it dry completely before hanging.


28. Fingerprint Christmas Lights Card

Bright little fingerprint bulbs wind across this card like a string of twinkly holiday lights, and the handwritten message below feels soft and personal. It’s exactly the kind of craft that’s fast enough for a classroom but cute enough for gifting.

Stamp fingerprints in warm-toned paints along a lightly penciled swirl. After drying, trace the string with a pen and add tiny bulb tops. Mount the artwork on a red frame of cardstock for extra pop, and write your greeting underneath in gold or black ink.


29. Fingerprint Snowy Scene Ornaments

These snowy blue ornaments look like miniature winter wonderlands — complete with fingerprint snowmen, textured snowy hills, and even tiny fingerprint Christmas trees. The soft blues and snowy layers make them feel dreamy and handmade.

Paint wooden shapes (circles or stars) in a soft winter blue, then add white fingerprint snowmen and green fingerprint trees. Build a snowbank at the bottom using textured white paint or air-dry clay. Add small hat and scarf details once dry, then attach twine for hanging.


30. Fingerprint Cherry Love Art

Fingerprint Cherry Love Art
@

Okay, it’s not Christmas-specific, but the technique is too adorable to skip — fingerprint cherries with handwritten phrases create the sweetest little art piece. With a slight holiday twist, it becomes a cute winter love note or stocking-stuffer print.

Stamp two red fingerprints together to form each cherry, then draw stems, leaves, and tiny hearts scattered around. Add your message with a fun pun or holiday greeting. Frame it for a cheerful touch or turn it into a card that spreads instant joy.

10 Cosy Scarfs and Beanies to Rock this Winter

As the winter season remains with us for a bit longer it’s important to stay wrapped up warm during those cold days outside, and what better way of doing that then with your own handmade scarf or beanie?

DIY Scarfs and Beanies to Make Yourself

Check out the selection we have for you, so you can avoid getting caught out in the cold this winter.

1. Orange Scarf

Scarf

This delightful knitted scarf is super easy to make and super soft when worn. The burnt orange looks great with denim and is sure to spice up your winter wardrobe this season. To make your own, check out Simone Anne for more information.

2. Infinity Buttoned Up Scarf

Scarf

Scarf

This design requires no sewing or knitting to make, so it’s perfect if you want to make a quick item that requires little work involved. All you need is a scarf you already have and some buttons and you’re ready to go. Check out P.S. Heart for more information.

3. Urban Jungle Slouchy Beanie

Beanie

Beanie

If you’ve always wanted to crochet yourself a beanie hat you should check out this lovely design by All About Ami. With the handy step-by-step guide you will have no trouble finishing a hat you can be proud of. Check it out and wear your hat with style the next time you go outside.

4. Knitted Beanie

Beanie

There is no greater accomplishment then knitting your own hat to keep your head warm. What better way to show off your achievement then to choose your own unique hat for when you’re heading outside? To make your own, check out Craft Foxes for more information.

5. Crochet Ear Warmer

Ear Warmer

Keep your ears nice and snug this winter with your very own handmade ear warmer. This crochet design won’t take long to make, so you’ll have warm ears in no time at all. To make your own, check out Grow Creative for more information.

6. Flannel Scarf

Scarf

For an easy sewing project to get your crafting skills off the ground check out this design by Spoonflower where you can make your own colourful flannel scarf.

7. Woollen Gloves

Gloves

Gloves

Your fingers can be subject to the cold as well, so keep them warm this winter by wrapping them up in your own handmade woollen gloves. To make your own, check out Maria Just Do It for your handy step-by-step guide.

8. Infinity Polka Dot Scarf

Scarf

For a scarf that has a vintage style to it, you should check out this design from Shrimp Salad Circus. This infinity scarf has been sewn together, but once finished will make quite an eye-catching piece of clothing that will look like it was store bought.

9. Messy Scarf

Scarf

Scarf

This beautifully messy and fun scarf from Neeka Knits is easy to knit up giving you a super chic look to your outfits. Wear it with style and you’ll be sure to receive plenty of compliments and requests to make some for your friends.

10. Cowl Capelet

Capelet

If you’re searching for something to throw over yourself when you’re out and about, why not make your own cowl capelet? This design from Fleece Fun is super easy to make and will keep those winter chills off you when you’re next out.

Parting Words

Do you have a favourite scarf or beannie on our list? We’d love to know what you’ll be working on next and maybe you get to hit us up with what came out of your crafty hands.

Also, let us know if you think there are other great projects we may have missed?

These Easy Finger Knitting Projects Are Perfect for Crafters of All Ages

Finger knitting is often taught to children because it’s a bit easier than manipulating knitting needles. But, this craft is also perfect for adults who need a quicker alternative to traditional knitting. Check out our roundup of fun finger knitting projects that people of all ages will love!

Love Wall Art

Love Wall ARt

If you’ve never tried finger knitting before, Housing a Forest has an easy to follow tutorial for beginners. When you’re finished, you can turn your knitting into pretty wall art for your home!

Finger Knit Jump Rope

skipping rope

Finger knit a new playground toy with this easy DIY skipping rope project. Complete instructions are at Hobby Craft.

Delicate Necklace

necklace

Make a new necklace to jazz up your favorite outfit using string and a few colorful beads.  CD Muckosky shows you how on her blog.

Chunky Finger Knit Necklace

chunky necklace

If you prefer the chunky look, Thanks, I Made It has a tutorial for a jersey fabric yarn necklace made with finger knitting and two brass plumbing couplings.

Colorful Bracelet

bracelet

Recycle an old t-shirt by turning it into a colorful finger knit bracelet. Vanessa Christenson has the tutorial on her blog.

Finger Knit Trivet

Finger Knit Trivet

Use natural cotton rope to make a pretty trivet for your kitchen. This project can be completed in about half an hour. Learn more at Flax and Twine.

Bath Mat

bath mat

Need a new bath mat? Try using fabric yarn to finger knit and weave one that that perfectly matches your room decor.  A Beautiful Mess explains how.

Chunky Ear Warmer

ear warmer

Don’t let the winter chill get you down! Simply Maggie has a fab video tutorial explaining how to make a finger knit ear warmer in the color of your choice in just 15 minutes.

Finger Knit Infinity Scarf

infinity scarf

Keep yourself warm or make a pretty gift for a friend with this easy finger knit infinity scarf pattern using bulky weight yarn. B.hooked Crochet has the full instructions.

Finger Knit Animal Ears

finger knit animal ears

If you’re searching for an adorable handmade baby shower gift, these finger knit animal ears certainly fit the bill.  The Kurtz Corner shows you how to make them in just 30 minutes.

Wonderful DIY Kids Finger Weaving

Finger-weaving-fun -wonderfuldiy

Finger weaving is fun ! This is a great boredom buster, travel-friendly craft — make your own bracelet, necklace, belt …just using your fingers ! It’s great for kids .You can buy just a bag of refill loops, and be well on your way to some finger weaving fun.

Finger weaving is a Native American art form used mostly to create belts, sashes, straps, and other similar items through a non-loom weaving process. We have featured finger knitted scarf project before , you will also like this new finger craft .Please check the link below for the tutorial shared by Chicacircle, learn how to finger weave to create some fun and colorful accessories. Have fun !

Finger-weaving-fun-with-kidsClick here for the finger-weaving-fun Tutorial

Finger Knitting scarf F

DIY finger-knitting-scarf — Check tutorial here

Wonderful DIY Finger Knitted Bracelet From Jersey T-shirt

Jersey-Finger-Knitted-Bracelets1Jersey-Finger-Knitted-Bracelets 2

YouTube video

Before we posted some finger knitting scarf projects, they are very fun crafts. Today we are sharing how to make finger knitting bracelet from jersey T-shirt. It’s  a super simple to make because you don’t even have to use your knitting needles. That’s right, you make these adorable bracelets on your fingers! Easy enough for the kids to try.! You can knit one in a few minutes once you master the basics and make other fashion accessories such as headband…with the same technology. Get crafty !

You will need:

Directions:

Jersey-Finger-Knitted-Bracelets F

Wonderful DIY Easy Loom Knitted Scarf

Knitting Loom scarf

Do you want to try a new kind of knitting? This article will guide you through it all !
This Knitting Loom Scarf Pattern is simple and great for colder weather. Pick up a loom to show off a warm knit scarf that you made yourself ?

What you will need:
– rectangular knitting loom;
– yarn needle;
– yarn;
– loom hook;
– crochet hook;
– scissors.

Lovin’ from the Oven –  How to use a Knitting Loom to make an Infinity Scarf

YouTube video
YouTube video

knitted-scarf-rainbow-loom-wonderfuldiy

Loom-knitted-fingerless-gloves-and-scarf — Check here

Of course, You can always check out our arm knitted scarf, finger knitterd scarf and others ,  enjoy !

arm knitted scarf DIY F2

DIY arm-knitted-scarf-in-30-minutes– Check here

19 DIY Weaving Loom Craft Ideas You’ll Want to Keep Building Row by Row

Weaving has a rhythm that’s both calming and visually rewarding once the patterns start forming. These DIY weaving loom craft ideas turn simple threads into richly textured pieces that feel layered, detailed, and impossible to look away from.

DIY Weaving Loom Craft Ideas That Will Inspire in 2026

Weaving loom crafts are exploding in popularity in 2026, transforming the most basic strands into bold, layered creations that instantly command attention. What starts as simple yarn quickly builds into rich, dimensional pieces that feel artistic, tactile, and seriously high-end.

Inside this collection, threads evolve into striking wall hangings, oversized woven art, intricate patterns, and sculptural designs that look straight out of a designer gallery. Every idea dares you to go bigger with texture, mix unexpected materials, and push creative boundaries so your final piece feels powerful, expressive, and completely unforgettable the moment it’s displayed.

1. Cozy Rainbow Mini Loom Wall Art

Tiny looms, big charm. This colorful mini weaving lineup feels like a gallery wall straight out of a boho dream warm wood tones, playful yarn tails, and that “I made this!” energy. It’s the kind of piece that makes any corner instantly feel curated and cozy.

Use small wooden looms (about 6×10 inches), cotton warp thread, and chunky yarn in 4–6 colors. Warp your loom tightly, then weave basic over-under rows, switching colors every 1–2 inches. Add fringe by tying 4-inch yarn pieces to the bottom edge. Finish by trimming evenly and hanging with twine or leather cord. Cute AND beginner-friendly yes, please!


2. Geometric Color Block Weaving

Bold shapes, clean lines, and those satisfying color transitions,this piece is basically modern art but make it yarn. The tassel accents add just enough drama to keep things playful instead of stiff.

Start with a 10×12 inch loom and neutral warp thread. Use wool yarn in 4 colors and weave triangular sections by gradually increasing/decreasing rows per color. Pack rows tightly with a comb or fork. Add tassels by looping 6-inch strands through the center and knotting. Trim edges neatly and mount on a wooden dowel. Can you picture this on your wall?


3. Pastel Patchwork Loom Textile

Soft, dreamy, and dripping in cozy-girl energy, this pastel patchwork weave feels like a warm hug turned into wall art. Each color block melts into the next with that perfectly imperfect handmade charm, giving off major “slow morning with coffee and sunshine” vibes. It’s delicate, soothing, and seriously aesthetic basically the textile version of a Pinterest mood board come to life.

Use a medium loom (12×16 inches) and divide your warp into 4 equal sections. Weave each block with different stitch styles (plain weave, soumak, rya knots) using pastel yarns. Keep each section about 4×4 inches. Switch textures for visual interest and beat rows firmly. Finish edges with fringe or tuck ends neatly. It’s giving soft aesthetic perfection.


4. Sunset Texture Wall Hanging

This piece is pure golden-hour magic, like capturing a glowing sunset and freezing it in yarn form. The layered textures and fiery color palette create a rich, dimensional look that instantly warms up any space. It’s bold without being loud, artsy without trying too hard basically the kind of statement piece that makes people go, “Wait… you MADE that?”

Use thick wool roving, boucle yarn, and standard yarn on a 12×18 inch loom. Start with flat weave rows, then add rya knots (6–8 inch strands) for texture. Layer colors from light to dark. Use a wooden stick or driftwood as your hanger and attach warp loops evenly spaced. Let the fringe hang wild for that artsy finish.


5. Coastal Driftwood Weaving

Beachy, breezy, and effortlessly cool, this weaving feels like it belongs in a sunlit seaside cottage with linen curtains blowing in the wind. The combination of driftwood and soft, ocean-inspired fibers gives it that perfectly undone, natural look that screams relaxed coastal chic. It’s the kind of piece that makes your space feel lighter just by existing.

Attach warp thread to a 10–12 inch piece of driftwood. Use cotton yarn, jute, and wool in ocean tones. Incorporate found elements like shells or fabric scraps by weaving them into rows. Use loose tension for a relaxed look. Finish with uneven fringe lengths for that “just washed ashore” vibe.


6. Chunky Texture Loom Piece

This one is all about bold texture and tactile drama, the kind of weaving that practically begs to be touched. With oversized yarn, deep dimension, and a mix of playful knots, it turns a simple loom into a full-on statement piece. Think cozy meets edgy, like your favorite chunky sweater… but make it wall décor.

Set up a small loom (8×10 inches) and use super bulky yarn, wool roving, and braided cord. Alternate plain weave with rya knots and looped textures. Keep sections uneven for a more organic look. Use a weaving needle for tighter areas and fingers for chunky parts. Trim selectively to highlight dimension.


7. Cloud Puff Weaving Board

Light, airy, and straight-up whimsical, this cloud-inspired weaving feels like a tiny sky you can hang on your wall. The soft puff textures float across the surface like little dreamy clouds, making it perfect for nurseries, cozy corners, or anyone who loves that gentle, calming aesthetic. It’s cute, creative, and just a little magical.

Use a flat weaving board or cardboard loom (cut notches ½ inch apart). Warp with cotton thread, then create “clouds” by wrapping wool roving into loops and securing with a simple over-under weave row. Space them out across a light blue yarn background. Keep tension loose so the puffs stay airy.


8. Nautical Mini Weaving Set

Tiny in size but overflowing with personality, these nautical mini weavings feel like little snapshots of seaside adventures. From charming lighthouse details to ocean-inspired colors, each piece tells its own story in the cutest, most compact way possible. They’re playful, detailed, and totally irresistible for shelf styling or gifting.

Use a small loom (6×8 inches) and fine yarn. Sketch your design lightly (like a lighthouse shape), then color-block weave using tight, compact rows. Add details with embroidery stitches after weaving. Finish with short fringe and mount on mini dowels. Perfect for gifting or shelf styling!


9. Neutral Boho Fringe Hanging

Calm, grounded, and effortlessly stylish, this neutral-toned weaving brings all the soft boho vibes without overwhelming your space. The gentle palette and flowing fringe create a serene, organic look that pairs beautifully with plants, wood accents, and cozy textures. It’s minimal but in that “I totally have my life together” kind of way.

Warp a 10×14 inch loom and use neutral yarns (cotton, wool, linen). Focus on texture: plain weave top, then add looped rows and chunky knots in the middle. Attach long fringe (8–10 inches) at the bottom using lark’s head knots. Comb fringe out for a softer look. So serene, right?


10. Layered Fringe Statement Weave

Big, bold, and absolutely dripping in texture, this layered fringe weaving is the definition of a showstopper. The cascading yarn, mixed fibers, and dramatic length variations create a rich, high-end look that instantly elevates any wall. It’s giving gallery piece, it’s giving artisan luxury it’s giving “everyone’s asking where you bought it.”

Use a larger loom (14×20 inches) and combine multiple yarn types: chunky wool, thin cotton, and textured blends. Build layers by alternating woven rows with attached fringe sections (cut strands 6–12 inches long). Secure fringe with half hitch knots for durability. Hang from a thick wooden dowel for that gallery-ready finish. Obsessed already?


11. Pastel Braided Texture Weaving

Soft, romantic, and straight out of a cottagecore daydream, this pastel weaving is giving delicate florals meets cozy texture heaven. The twisted yarn details and dreamy pink-and-mint palette feel like something you’d spot in the prettiest handmade boutique sweet, calming, and just a little bit magical. It’s the kind of piece that makes you want to slow down and create something beautiful with your hands.

Use a small wooden loom (around 8×10 inches) with cotton warp thread. Choose bulky yarn in blush pink and mint green, plus a thinner accent yarn. Alternate plain weave rows with twisted or braided sections by looping yarn around groups of warp threads. Use a weaving needle for tighter areas and your fingers for chunky textures. Keep edges slightly organic, then trim or leave loops for extra charm.


12. Modern Hoop Weaving Art

Minimal, sculptural, and effortlessly chic, this circular weaving turns a simple embroidery hoop into a statement art piece. The abstract shapes and soft neutral tones feel like a blend of modern art and cozy textile design—perfect for that clean, curated wall aesthetic everyone’s pinning right now.

Use a large embroidery hoop (10–14 inches) and stretch warp thread tightly across. Fill sections with different textures: punch needle, looped yarn, and tight woven blocks using wool and cotton yarn. Create abstract shapes by changing colors and stitch styles. Secure ends at the back with knots or fabric glue, then hang directly from the hoop clasp.


13. Classic Striped Loom Rug

Bright, bold, and full of retro energy, this striped loom project feels like a throwback in the best way possible. The warm reds, oranges, and yellows create a cheerful, sunshiney vibe that instantly lifts any room hello happy handmade décor moment.

Use a large floor loom or wide tabletop loom. Warp with strong cotton thread and weave using medium-weight yarn in alternating stripe colors (each stripe about 1–2 inches tall). Keep tension even and pack rows tightly with a shuttle and beater. Finish edges with knotted fringe about 3–4 inches long. Perfect as a mini rug or table runner!


14. Beginner-Friendly Color Block Weave

Simple, satisfying, and oh-so-pretty, this beginner weave proves you don’t need fancy techniques to make something stunning. The bold color contrast and clean pattern give it that “I totally meant to make it look this good” vibe even if it’s your first try.

Set up a basic loom with evenly spaced warp threads. Use two contrasting yarn colors (like pink and navy) and alternate rows using a plain weave. For texture, try skipping warp threads occasionally to create a dotted effect. Keep rows consistent and trim fringe evenly once removed from the loom.


15. Soft Neutral Texture Sampler

 Soft Neutral Texture Sampler

This piece is like a texture playground in the most calming, neutral palette think cozy layers of cream, beige, and soft blues all blending together effortlessly. It’s subtle, sophisticated, and full of those little details that make you look twice.

Use a medium loom and experiment with multiple stitches: plain weave, soumak, loops, and rya knots. Stick to neutral yarns (cotton, wool, linen) and vary thickness for depth. Work in horizontal sections about 1–2 inches tall, switching textures often. Keep tension balanced and secure ends tightly at the back.


16. Patchwork Loom Blanket Panel

This weaving feels like a cozy quilt reimagined in yarn form patches of color woven together into a soft, structured design that’s both modern and nostalgic. It’s the kind of project that looks intricate but comes together piece by piece.

Use a larger loom and divide your warp into sections for a grid layout. Weave each block separately using different colors (blues, purples, neutrals) and simple plain weave. Each square can be about 4×4 inches. Keep edges clean and consistent, then finish with tight knots or hem stitching.


17. Statement Floor Loom Textile

Big loom energy. This large-scale weaving is all about commitment and craftsmanship, with long warp threads and a rich, continuous flow of color that feels almost hypnotic. It’s the kind of piece that turns weaving into a full-on experience.

Use a floor loom with extended warp length. Choose a single color family (like deep reds or browns) and weave continuous rows using a shuttle. Maintain even tension and consistent rhythm. This works beautifully as a scarf, shawl, or textile panel once complete.


18. Abstract Landscape Weaving

Moody, artsy, and a little bit retro-filtered, this weaving looks like a dreamy landscape painted in yarn. The layered colors and horizontal shapes give it that abstract, storytelling vibe like a sunset you can touch.

Use a tabletop loom and warp with dark thread for contrast. Weave horizontal color blocks using 3–4 yarn shades. Create uneven edges by stopping rows midway and starting new colors. Blend sections slightly for a gradient effect. Add fringe or tassels at the bottom for movement.


19. Woven Statement Necklace

Okay but THIS,this is weaving turned wearable art. Bold, intricate, and packed with color and texture, this necklace is basically a mini tapestry you can take out into the world. It’s giving artisan, it’s giving one-of-a-kind, it’s giving main character energy.

Use a small bead loom or handheld frame. Combine embroidery thread, fine yarn, and beads. Weave tightly using a needle, building geometric patterns section by section. Attach backing fabric for stability, then add a cord or chain for wearing. Finish with secure knots and optional bead fringe for extra drama.

30 DIY Yarn Pom Pom Craft Ideas That Work So Well It Feels Almost Too Easy

“Soft, fluffy pom poms add a texture that instantly makes crafts more interesting. These 30 DIY yarn pom pom craft ideas highlight playful combinations and creative designs that bring depth, color, and charm into every project.”

Collage of  DIY Yarn Pom Pom Craft Ideas

DIY Yarn Pom Pom Craft Ideas People Are Loving in 2026

Yarn pom poms are having a huge creative moment in 2026, transforming basic strands of yarn into fluffy, vibrant pieces that instantly bring energy to any project. With just a few wraps and trims, simple yarn can explode into soft, bouncy creations that feel fun, bold, and impossible to ignore.

Inside this collection, pom poms turn into everything from cheerful garlands and cozy décor accents to playful wall art, cute accessories, and statement pieces bursting with color. Every idea pushes you to mix shades, layer textures, and go all-in on creativity so your final crafts feel lively, eye-catching, and full of personality.

1. Colorful Pom Pom Statement Wreath

This is maximalist magic at its finest layer upon layer of vibrant pom poms ქმing a bold, texture-packed wreath that screams personality. It’s like confetti decided to settle down and become home décor, and honestly? Obsessed.

Start with a 10–12 inch foam or wire wreath base and make 40–60 pom poms using a pom pom maker (mix sizes from 1–3 inches for dimension). Use chunky yarn in bright, mixed colors and trim evenly. Attach with hot glue, packing tightly so no base shows. Add a yarn tassel at the bottom by wrapping yarn around a 6-inch cardboard, tying, and trimming. Instant dopamine décor yes please!


2. Pom Pom Surprise Creatures

Pom Pom Surprise Creatures

These goofy little fluffballs are pure joy googly eyes, wild colors, and quirky personalities make them perfect for kids (or let’s be real… us too). Tiny chaos, but make it adorable.

Use pre-made or DIY pom poms (1–2 inches), then hot glue on googly eyes, mini pom poms, pipe cleaners, and felt shapes for ears or feet. For surprise toys, glue them onto plastic egg shells. Use tacky glue for smaller pieces to avoid melting. Let dry 20 minutes before play. Warning: you’ll want to make a whole squad.


3. Heart-Shaped Pom Pom Wreath

Soft, cozy, and Valentine’s-ready this heart wreath mixes fluffy texture with a romantic color palette that feels both playful and chic. It’s basically a hug… but on your wall.

Bend a wire hanger into a heart shape or use a pre-made frame. Create ~50 pom poms in red, teal, and white (about 2 inches each). Tie or hot glue them onto the frame, alternating colors evenly. Fluff and trim for uniform shape. Add ribbon for hanging. Cue the compliments!


4. Cozy Pom Pom Mushrooms

These woodland cuties are giving cottagecore dreams soft, squishy mushrooms that look straight out of a fairy forest. Perfect for fall décor or whimsical shelves.

Make two pom poms per mushroom: one cream (1.5 inches) for the stem and one larger (2–2.5 inches) for the cap. Trim the cap flatter on the bottom. Glue together with hot glue. Add white felt dots or yarn knots for detail. Let set 15 minutes. Group them in clusters for that enchanted forest vibe.


5. Halloween Pom Pom Garland

Spooky but make it soft this pom pom garland brings Halloween vibes with zero scares and maximum cuteness. Think ghosts, pumpkins, and fuzzy spiders dancing across your wall.

String twine or cotton cord (4–6 feet long). Attach pom poms using hot glue or by tying yarn tails. Create shapes: black pom pom + pipe cleaner legs = spider; white tassel + pom pom head = ghost; orange pom pom + green yarn loop = pumpkin. Space evenly and hang. Boo-tiful, right?


6. Pom Pom Christmas Tree Décor

Fluffy, festive, and seriously eye-catching this pom pom tree is a whole moment. It’s like snow-covered branches got a colorful glow-up.

Use a foam cone (10–12 inches tall) and hot glue pom poms in layers, starting from the bottom. Use green yarn for base layers, then mix in white and multicolor for texture. Add mini ornaments or beads with glue. Top with a cardboard star covered in glitter. Let dry fully before displaying. Holiday centerpiece = handled.


7. Pom Pom Tassel Keychains

Bright, bold, and perfect for accessorizing these keychains are giving “cute bag charm energy” in the best way. Mix textures, colors, and tassels for that handmade-but-polished look.

Create 2–3 small pom poms (1–1.5 inches) and one tassel (wrap yarn around a 4-inch card, tie, cut ends). Attach to a jump ring or lobster clasp using strong thread or jewelry wire. Add beads for extra flair. Secure knots with a dab of glue. Clip it on and go!


8. Flamingo Pom Pom Hooks

Okay but HOW cute are these? Fluffy pom pom bodies with pipe cleaner legs turned into wall hooks functional décor just got a major glow-up.

Wrap pink yarn around a fork or pom pom maker to create a dense pom pom (about 2 inches). Shape slightly oval. Use pink pipe cleaners to form legs and hook shape, inserting into the pom pom center with glue. Add beads for eyes. Mount onto a wall hook base or adhesive hook. Cute and useful!


9. Pom Pom Acorn Ornaments

Tiny, colorful, and perfect for fall these acorn ornaments mix natural textures with playful pops of color. Autumn, but make it fun-sized.

Use real or faux acorn caps. Glue a small pom pom (1 inch) inside each cap using hot glue. Attach a loop of gold string or twine for hanging. Optional: seal caps with clear varnish for durability. Hang on branches or your tree. Cozy season unlocked!


10. Pom Pom Holiday Shelf Set

This whole setup? A vibe. From mini pom pom trees to wreaths and even a fluffy Santa hat this is holiday styling with a handmade twist.

Create mini cone trees using foam cones (6–8 inches) and green pom poms. For the wreath, glue neutral-toned pom poms onto a small ring base. Make a Santa hat by wrapping red yarn around a cone and adding white pom pom trim. Use hot glue throughout and let cure fully. Style together on a shelf for instant festive magic!


11. Pom Pom Dragon Cuties

These tiny pom pom dragons are serving full fantasy-core with their fluffy bodies, mini horns, and expressive little faces like pocket-sized guardians for your desk. Cute with a hint of mythical sass? We’re in love.

Make a dense 2–2.5 inch pom pom using green or yellow yarn. Trim into a slightly oval shape. Cut tiny horns, ears, and wings from felt (about 0.5–1 inch pieces), then hot glue them in place. Add bead eyes, a small felt snout, and embroidery thread for brows and whiskers. Let dry 15 minutes and display your magical duo—instant charm!


12. Pom Pom Character Holiday Wreath

This wreath is basically a holiday party in fluff for each pom pom turned into a sweet little character, all gathered around a jingly bell centerpiece. Whimsical, festive, and ridiculously adorable.

Create 8–10 pom poms (2–3 inches each) in different colors. Use felt scraps and fabric paint to add simple faces (dots for eyes, tiny stitched mouths). Glue onto a small wreath base (8–10 inches). Attach a mini bell at the top with ribbon and hot glue. Let set fully before hanging your door just got way cuter.


13. Pom Pom Ice Cream Garland

Sweet treats but make them yarn this garland looks like a pastel ice cream dream strung across your wall. Perfect for summer parties, kids’ rooms, or just because life needs more sprinkles.

Form mini cones using cardstock cut into 3-inch semicircles and glued into cones. Make 1-inch pom poms in soft pastel shades for “scoops.” Glue one pom pom on top of each cone. String them onto baker’s twine (4–5 feet) using a needle or glue. Space evenly and hang zero melting, all the cute.


14. Pom Pom Popsicle Sticks

Fluffy popsicles that look good enough to eat (but please don’t) these are bold, textured, and totally Instagram-worthy. Summer décor just got a fuzzy upgrade.

Wrap yarn around a 2×3 inch cardboard to create rectangular pom shapes, tying tightly in the center. Trim into a popsicle shape (flat sides, rounded top). Glue onto wooden craft sticks using hot glue. Mix colors for layered effects. Let dry 10 minutes display in jars or gift as quirky décor!


15. Pom Pom Rainbow Wall Hanging

This piece is pure cozy-meets-color therapy fluffy cloud tops with cascading rainbow yarn strands that instantly brighten any corner. It’s like a happy mood, but DIY.

Make 10–15 small white and gray pom poms (1–1.5 inches) for clouds. Attach them to a wooden dowel or directly onto wall hooks using hot glue. Cut yarn strands in rainbow colors (12–18 inches long) and tie or glue underneath each cloud. Comb strands for a straight finish. Hang and admire your color explosion!


16. Neutral Pom Pom Basket Garland

Minimalist but make it cozy this neutral-toned pom pom garland draped over a woven basket is the definition of effortless chic. Texture lovers, this one’s calling your name.

Make 6–8 pom poms (2–3 inches) using cream, black, and speckled yarn. Tie onto thick twine or rope, spacing about 4–6 inches apart. Secure knots tightly and trim tails. Wrap or drape around baskets, shelves, or mirrors. Simple, stylish, and oh-so-pinteresty.


17. Pom Pom Caterpillar Craft

This wiggly little caterpillar is pure kid-core fun bright colors, googly eyes, and that playful “boopable” energy. It’s giving rainy-day craft perfection.

Glue 6–8 small pom poms (1 inch each) in a line using tacky glue. Attach onto a popsicle stick base for stability. Add googly eyes to the front pom and pipe cleaner antennae (cut to 2 inches, bend slightly). Let dry 20–30 minutes before play. Warning: giggles guaranteed.


18. Pom Pom Penguin Plushies

These tiny penguins are winter magic in fluff form round, soft, and bundled in little scarves. Holiday décor or handmade gifts? Either way, they’re stealing the show.

Make one white pom pom (2 inches) and one smaller black pom pom (1.5 inches). Trim slightly flat where they connect, then glue together. Add black felt wings, orange felt beak/feet (cut into tiny triangles/ovals), and a fleece strip scarf (½ x 4 inches). Let set fully hello, cozy cuteness!


19. Pom Pom Flower Hoop Wreath

A modern floral moment with a fluffy twist this hoop wreath mixes felt flowers and soft pom poms for a fresh, cheerful vibe that works year-round.

Use a 6–8 inch embroidery hoop as your base. Create 3–5 pom poms (1.5–2 inches) and felt flowers (layered circles or spiral roses). Attach everything to one side of the hoop using hot glue, layering for depth. Add ribbon for hanging. It’s giving handmade boutique energy.


20. Pom Pom Cherry Keychains

These cherry keychains are the definition of cute overload tiny pom pom “fruit” with leafy details that instantly upgrade your bag game. Sweet, simple, and totally giftable.

Make two small red or pink pom poms (1–1.5 inches). Attach to a keyring using thin leather cord or strong thread, leaving about 1 inch between them. Cut leaf shapes from green felt (about 1 inch long) and glue near the top. Secure knots with glue. Clip on and show off your fruity flair!


21. Pom Pom Monster Party Wreath

This wreath is pure chaotic-cute energyeach pom pom turned into a silly little monster with googly eyes, fangs, and wild personalities. It’s like a rainbow monster meetup right on your wall.

Make 6–8 medium pom poms (2–3 inches) in bright colors. Cut eyes, teeth, and tiny tongues from craft foam or felt (½–1 inch pieces), then glue them on with hot glue. Attach each pom pom to a small foam wreath base using strong glue or wire. Add striped paper straws sticking outward for extra fun flair. Let dry fully instant party vibe!


22. Peachy Pom Pom Keychains

Soft, fluffy, and giving pastel aesthetic goals, these peach pom pom keychains are the cutest little accessory upgrade. They look like tiny fuzzy fruits you’d find in a dreamy boutique.

Create a 2-inch pom pom using peach-toned yarn (blend light pink + cream for dimension). Trim slightly oval. Cut 2 small leaf shapes (about 1 inch) from green felt and glue on top. Attach a metal keyring using sturdy thread or thin wire through the center. Secure with a knot + dab of glue clip it and go!


23. Pom Pom Citrus Keychains

Bright, zesty, and sunshine-ready these citrus pom poms are basically summer in accessory form. Lemon, orange, or lime… why choose just one?

Make 1.5–2 inch pom poms in yellow or orange yarn. Trim into a slightly oval fruit shape. Cut white felt petals (¾ inch) and layer to mimic citrus blossoms, then glue to the top. Attach to a keyring using embroidery thread looped through the center. Optional: add a tiny green felt leaf for extra freshness!


24. Mini Pom Pom Forest Trees

These tiny trees are minimalist magic soft, sculpted pom poms perched on cork trunks that look straight out of a Scandinavian winter scene. Cozy décor lovers, assemble.

Create dense pom poms (2–3 inches) in green, white, or gray yarn. Trim into cone/tree shapes using sharp scissors. Hot glue each onto a wine cork or wooden peg base. Let set for 10 minutes. Cluster 3–5 together on a tray or shelf for that chic woodland vibe.


25. Pom Pom Gnome Ornaments

Tiny gnomes with fluffy beards and pointy hats? Stop it’s too cute. These ornaments bring instant cozy Christmas charm with barely any effort.

Make a 1.5–2 inch white pom pom for the beard. Cut a felt triangle (3–4 inches tall) for the hat and glue into a cone. Attach the hat over the pom pom with hot glue. Add a small wooden bead or felt ball for the nose under the hat brim. Glue a loop of twine at the top for hanging holiday perfection!


26. Pom Pom Snowman Ornament

This little snowman is basically winter happiness wrapped in fluff round, squishy, and rocking a tiny scarf. Your tree just found its new star.

Make two white pom poms (2 inches + 1.5 inches). Glue them together vertically. Add felt pieces for scarf (½ x 4 inches), carrot nose, and tiny feet. Use black beads or paint for eyes and buttons. Let dry 20 minutes before hanging with string.


27. Pom Pom Gift Wrap Toppers

Why settle for basic bows when you can top gifts with fluffy, colorful pom poms? It’s giving boutique wrapping without the boutique price tag.

Make small pom poms (1–1.5 inches) in coordinating colors. Attach them to wrapped gifts using twine, ribbon, or hot glue. For extra flair, bundle 2–3 pom poms together or add tassels. Keep spacing neat and let glue set your presents just became décor.


28. Pom Pom Party Crackers

These DIY party crackers are festive, fun, and just a little extra (in the best way). The pom pom detail makes them feel totally custom and celebration-ready.

Roll kraft paper into 6–8 inch tubes and tie both ends with ribbon or twine. Add a small pom pom (1 inch) to the center using glue or string. Decorate with stickers, paint, or washi tape. Fill with tiny treats before sealing. Party table = instantly upgraded.


29. Pom Pom Turtle Craft

These turtles are the definition of kid-friendly cute soft pom pom shells with paper flippers that make them look ready to swim right off your table.

Make a large green pom pom (2–3 inches). Cut turtle shapes (head + flippers) from green cardstock (about 4–5 inches wide total). Glue pom pom onto the center as the shell. Add drawn details and googly eyes. Let dry fully before playtime hello, tiny turtle squad!


30. Pom Pom Handprint Turtle

This one’s extra special a mix of keepsake and craft. That handprint base makes it personal, while the pom pom shell adds the cutest 3D texture. Memory-making moment? Absolutely.

Trace a child’s hand on green paper and cut it out (fingers = legs + head). Glue small green pom poms (½–1 inch) onto the palm area to form the shell. Add a googly eye and draw details with marker. Let dry 15 minutes cute, sentimental, and fridge-worthy!

27 DIY Cotton Ball Craft Ideas That Make Simple Supplies Feel Surprisingly Creative

Cotton ball crafts bring a soft, cheerful energy that’s hard to resist. These 27 DIY cotton ball craft ideas feature fun designs and creative ideas. Every project feels light, playful, and full of life.

Collage of DIY Cotton Ball Craft Ideas

DIY Cotton Ball Craft Ideas You’ll be Stunned Watching in 2026

Cotton ball crafts are having a fun creative surge in 2026, transforming the simplest, softest material into playful projects bursting with texture and charm. With their light, fluffy feel, cotton balls can quickly become clouds, animals, snow scenes, and imaginative creations that instantly grab attention.

Inside this collection, cotton balls come to life in everything from cute character crafts and weather-themed projects to textured art, seasonal décor, and kid-friendly creations that spark creativity. Every idea encourages you to layer, shape, and mix materials so your final crafts feel soft, lively, and irresistibly fun to make and display.


1. Fluffy Sheep Scene Art

This one is pure storybook magic—think puffy little sheep grazing under a sunshiney sky with butterflies fluttering by. The cotton balls create that irresistibly soft, cloud-like texture that makes the whole scene feel cozy and alive. Kids will love building their own fluffy farm friend.

Start with a white sheet of cardstock (8×10 works great) and lightly sketch a sheep outline. Glue on 1-inch cotton balls using school glue or a low-temp hot glue gun for faster sticking. Add paper cutouts for grass, sun, and flowers using colored craft foam or construction paper. Finish by outlining the face with a black marker and letting everything dry for 10–15 minutes. So cute, right?


2. Cotton Ball Puppy Silhouette

Okay but HOW adorable is this fluffy little pup? It’s giving cozy storytime vibes meets artsy keepsake—especially perfect if you pair it with a favorite dog-themed book. Bonus: it doubles as a sweet name craft!

Trace or print a simple dog silhouette onto a 5×7 or 8×10 piece of colored cardstock. Fill the shape with pulled-apart cotton balls (slightly stretched for a more “fur-like” look) using liquid glue. Press gently to keep the edges defined. Let dry completely (about 20 minutes), then write your pup’s name with a marker or gel pen at the top. Instant bookshelf decor—yes, please!


3. Cotton Ball Clothespin Paint Stamps

Messy play but make it genius. These DIY paint dabbers turn ordinary cotton balls into the cutest little stamping tools—perfect for polka dots, clouds, or textured art that screams “mini Picasso at work.”

Clip a cotton ball into the end of a wooden clothespin and dip it into washable paint poured into small glass jars or bowls. Use thicker tempera paint for bold color payoff. Let kids stamp onto paper, creating patterns or filling shapes. Swap colors easily by making multiple clips. Pro tip: cover surfaces—this one gets joyfully messy!


4. Rain Cloud Cotton Ball Mobile

Dreamy, whimsical, and just a tiny bit educational—this rain cloud craft turns cotton balls into the fluffiest cloud ever, complete with dangling “raindrops” made from handprints. It’s basically nursery décor gold.

Cut a cloud shape from cardboard (about 10–12 inches wide) and hot glue cotton balls across the surface until full. Punch 3–4 holes along the bottom and tie 8–10 inch strands of blue yarn. Attach cut-out paper raindrops or painted handprints to the ends. Hang with string or adhesive hooks and admire your tiny weather masterpiece!


5. Santa Beard Keepsake Ornament

Holiday crafting just got a glow-up. This Santa ornament is equal parts festive and sentimental, with a fluffy cotton ball beard and a sweet photo in the center—hello, memory-maker!

Cut a Santa face/hat shape from red cardstock (roughly 6–8 inches tall) and glue a small circular photo in the middle. Attach a ribbon loop at the top for hanging. Use hot glue to layer cotton balls along the bottom half to create a full beard. Add a mini pom-pom for the hat tip and tie a bow for extra flair. Tree-ready in under 30 minutes—iconic.


6. Classic Cotton Ball Sheep Craft

This is the OG preschool craft—but with a glow-up. Big googly eyes, chunky cotton texture, and bold shapes make this sheep pop right off the page in the cutest way possible.

Cut a sheep body base from white paper and a head/legs from black construction paper. Glue the pieces onto a colored background (green works perfectly). Add cotton balls to the body using school glue, spacing them tightly for that fluffy look. Stick on googly eyes and draw a tiny smile with a marker. Let dry flat for 15–20 minutes. Farm vibes achieved!


7. Window Sheep Suncatcher

A sheep… but make it window décor. This airy, light-catching version uses cotton balls inside a cut-out frame, creating a soft, glowing effect when sunlight hits. It’s giving cozy cottagecore energy.

Cut a sheep outline from cardstock, then cut out the center body section. Tape or glue a piece of clear contact paper or mesh behind the opening. Stick cotton balls onto the sticky side or glue lightly in place. Add paper legs and a drawn face, then hang on a window using tape or suction hooks. Watch it glow all afternoon—obsessed!


8.

These fluffy little bunny faces are basically Easter cuteness overload—soft, round, and topped with those iconic pink ears that instantly scream springtime. The colorful pipe cleaner whiskers add such a playful twist, giving each bunny its own quirky personality. Honestly, they look like they hopped straight out of a pastel dream.

Cut a 4–5 inch circle from white cardstock for the base, then glue cotton balls tightly across the surface using school glue (or tacky glue if you want a stronger hold). Attach paper ears (white with smaller pink inner pieces), stick on googly eyes, and glue a small pink triangle nose in the center. Cut pipe cleaners into 3–4 inch pieces for whiskers and glue them under the nose. Let everything dry for about 15 minutes before displaying your bunny crew!


9. Cotton Ball Penguin Craft

This chubby little penguin is bringing all the cozy winter vibes with its fluffy belly and bold black-and-white contrast. It’s simple, sweet, and just the right mix of texture and shape to keep little hands totally engaged. And those tiny orange feet? Absolutely irresistible.

Cut an oval body from black construction paper (around 6–8 inches tall). Glue cotton balls in the center area for the belly, placing them close together so there are no gaps. Add paper or sticker eyes, a small orange triangle beak, and two orange feet cut from cardstock. Use school glue and press gently to secure, then let dry flat for 15–20 minutes. Your mini penguin is ready to waddle into display mode!


10. Mixed Media Snowman Art

This isn’t just a craft—it’s a full-on mini art project. With painted jar lids, real twigs, and fluffy cotton “snow,” it has that layered, textured look that feels extra creative and a little bit magical. It’s the kind of piece kids will be proud to show off.

Start by gluing three recycled jar lids vertically onto an 8×10 piece of cardstock using hot glue or strong craft glue. Paint the lids white and let them dry completely (about 20–30 minutes). Add cotton balls along the bottom edge for snow, glue on twig arms, and use raisins, buttons, or small paper circles for facial features and buttons. Finish with a paper or painted hat for extra charm. It’s giving winter wonderland energy!


11. Cotton Ball Animal Duo

Why stop at one when you can make two? This adorable duo—featuring a fluffy sheep and a bundled penguin—turns craft time into a full-on creative session. It’s perfect for mixing textures and letting kids explore different animal shapes in one go.

Use 5×7 or larger cardstock as your base. For the sheep, glue cotton balls into a rounded body and add a paper face and legs using darker cardstock. For the penguin, cut a black body shape and layer cotton balls in the center for the belly. Add fun extras like hats, scarves, or drawn details with markers. Let dry for about 15–20 minutes. Double the crafts, double the fun!


12. Classic Cotton Ball Santa

 Classic Cotton Ball Santa

This Santa is serving timeless holiday vibes with that fluffy beard and bright red hat. It’s simple, nostalgic, and exactly the kind of craft that makes you want to turn on holiday music and sip something cozy.

Cut a rounded face shape from beige or light peach cardstock and a triangle hat from red paper (about 5–7 inches tall total). Glue cotton balls along the bottom half for a full beard and add a strip across the hat for trim. Stick on googly eyes and a red pom-pom nose, then top the hat with a cotton ball. Use tacky glue for better hold and let dry for 20 minutes. Instant festive favorite!


13. Cotton Ball Snowman Faces

These snowmen are all about personality—each one comes out a little different, which honestly makes them even cuter. Big fluffy faces, tiny hats, and silly expressions turn this into a craft that’s as fun to make as it is to display.

Cut snowman head shapes from white cardstock (around 5–6 inches). Cover the face area with cotton balls using school glue, pressing them close together for a full look. Add black paper circles for eyes and a dotted smile, plus an orange triangle nose. Top with a paper hat or even a mini felt piece for texture. Let dry for 15–20 minutes and admire your snowman squad!


14. Cotton Ball Bunny Outline Art

This one is minimal but seriously charming—a clean bunny outline brought to life with soft cotton texture. It’s the kind of craft that looks effortlessly cute and totally Pinterest-worthy.

Draw or print a bunny outline onto pastel cardstock (8×10 works beautifully). Glue cotton balls along the outline, spacing them evenly to “trace” the shape—this keeps it neat and visually satisfying. Add paper ears, googly eyes, and draw whiskers with a fine-tip black marker. Use liquid glue for precision and let dry for about 15 minutes. Simple, stylish, and oh-so-sweet!


15. Cotton Ball Ghost Decorations

Spooky season, but make it soft and adorable. These fluffy little ghosts are more cute than creepy, with their textured cotton bodies and playful expressions. Perfect for kid-friendly Halloween décor!

Cut ghost shapes from white cardstock (around 5–6 inches tall). Stretch cotton balls slightly and glue them across the surface for a wispy, “floaty” effect. Add foam or paper eyes and mouths to create different expressions—happy, surprised, or silly. Punch a hole at the top and thread twine for hanging. Let dry 15–20 minutes. Boo-tiful, right?


16. Hanging Cotton Ball Snowmen Garland

This garland is basically a parade of tiny snowmen, and yes—it’s as cute as it sounds. Bright hats, fluffy bodies, and cheerful colors make it the ultimate winter decoration for walls, windows, or even a classroom.

Stack 2–3 cotton balls per snowman using hot glue for a sturdy hold. Add felt or paper hats, pipe cleaner arms, and sticker or paper buttons. Attach each snowman to a लंब piece of yarn or string, spacing them about 3–4 inches apart. Keep each hanging strand around 6–8 inches long for balance. Hang it up and let the winter magic begin!

17. Cotton Ball Rain Cloud Art

Soft clouds, falling raindrops, and bright little flowers—this craft feels like a cheerful spring day captured on paper. It’s colorful, textured, and perfect for mixing painting with crafting.

Glue a cluster of cotton balls at the top of blue cardstock to form a fluffy cloud. Use blue paint to add raindrops underneath—fingerprints, cotton swabs, or small brushes all work beautifully. Decorate the bottom with foam flower stickers or hand-cut paper blooms and green stems. Let everything dry for 10–15 minutes. Can you picture this brightening up your fridge?


18. Cotton Ball Spooky Ghost Scene

This fluffy little ghost is serving cute-not-creepy Halloween vibes with its soft blue tint and those googly eyes that instantly bring it to life. Paired with a glittery crescent moon and tiny bat accents, the whole scene feels like a gentle, kid-friendly take on spooky season—more cozy than creepy, and totally display-worthy.

Draw or print a simple ghost shape onto white cardstock (around 6–8 inches tall). Lightly tint cotton balls using diluted blue watercolor or washable paint, then let them air dry for about 10–15 minutes before gluing them down. Use school glue to layer the cotton for a puffy effect, then add googly eyes. Finish by decorating the background with foam stickers or cutouts like a moon and bat. Let everything dry flat for about 20 minutes. Halloween magic, but make it soft and sweet!


19. Cotton Ball Ice Cream Cone

This one is basically a sugar rush in craft form—fluffy cotton “scoops” stacked high with bright pops of color that look almost good enough to eat. It’s playful, a little messy, and totally irresistible for kids who love bold, colorful projects.

Cut a triangle cone shape from tan or light brown cardstock (about 5–6 inches tall). Glue cotton balls on top in layers to mimic scoops of ice cream, stacking them slightly overlapping. Use washable markers or drop diluted paint directly onto the cotton balls to create colorful “flavors”—let the colors softly bleed for a fun tie-dye effect. Allow 15–20 minutes to dry completely. Sweet, simple, and guaranteed to make you smile!


20. Cotton Ball Santa & Snowman Cards

These festive little cards are bursting with holiday cheer—think glittery backgrounds, fluffy cotton textures, and those classic red-and-white details that instantly make everything feel warm and cozy. They’re perfect for gifting or adding a handmade touch to your seasonal décor.

Start with 5×7 cardstock as your base and layer on glitter foam sheets or colored paper for a bold background. For Santa, add a red triangle hat and create a cotton ball beard across the lower half. For the snowman, stack cotton balls into a body shape and add details like a pom-pom nose, paper eyes, and twig arms. Use tacky glue for durability and let everything dry for about 20 minutes. Handmade holiday cards? Yes, please!


21. Paper Plate Cotton Ball Bear

This bear face is big, fluffy, and full of personality—those oversized eyes and soft cotton texture make it feel like a cuddly plush brought to life on a plate. It’s bold, simple, and perfect for little hands to explore textures.

Use a standard 9-inch paper plate as your base and spread school glue across the center. Press stretched cotton balls onto the glue, filling the middle area for a soft, cloud-like face. Cut out ears, eyes, and a snout from white and black cardstock, then glue them on top once the cotton is slightly set. Add details like a nose and freckles with a marker. Let dry for 20 minutes. Instant teddy bear vibes!


22. Cotton Ball Rain Cloud Mobile

This dreamy hanging cloud is giving total nursery-core energy—soft, airy, and gently swaying with oversized raindrops that dangle below. It’s simple but so visually calming, like a tiny piece of the sky indoors.

Cut a cloud shape from cardboard (about 10–12 inches wide) and cover it completely with cotton balls using hot glue for a secure hold. Punch 4–5 evenly spaced holes along the bottom edge and tie pieces of white or blue string (8–10 inches long). Attach paper raindrops at the ends using glue or tape. Hang it from the ceiling or wall and let it gently move—can you picture this in a cozy little corner?


23. Cotton Ball Bunny Face Craft

This bunny is all about soft textures and sweet simplicity, with fluffy cotton cheeks that give it that extra “aww” factor. It’s a perfect go-to for spring crafts or Easter-themed fun.

Print or draw a bunny face onto pastel cardstock (around 8×10). Glue cotton balls across the cheeks and forehead to add dimension and texture, pressing them gently into place. Add facial details using markers or paper cutouts—think bright eyes, a pink nose, and delicate whiskers. Let dry for about 15 minutes. Soft, sweet, and totally fridge-worthy!


24. 3D Cotton Ball Snowmen

These tiny snowmen are giving full-on winter charm—they’re soft, squishy, and actually stand up on their own, which makes them feel more like mini decorations than just crafts. Perfect for desks, shelves, or seasonal displays.

Stack 2–3 cotton balls vertically per snowman and secure them with hot glue for stability. Add small paper circles for eyes and buttons, plus a tiny orange triangle for the carrot nose. Wrap thin yarn around the neck for a scarf and glue on a felt or pom-pom hat if you’re feeling extra. Let set for about 10 minutes. Mini snowman squad, coming right up!


25. Fluffy Penguin Winter Craft

This penguin is extra fluffy and full of personality, with its rounded cotton belly popping beautifully against the dark background. It’s simple, bold, and super satisfying to assemble.

Cut a large oval body from black cardstock (around 7–9 inches tall). Fill the center area with cotton balls using school glue, placing them tightly together for a full, plush look. Add paper eyes, an orange triangle beak, and matching feet. Press everything gently into place and allow 15–20 minutes to dry. Your penguin is officially ready to waddle into winter!


26. Cotton Ball Rainbow Cloud Craft

Fluffy cloud meets rainbow explosion—this one is bright, cheerful, and seriously eye-catching. The colorful craft sticks add such a fun, modern twist that makes the whole piece pop.

Glue a cluster of cotton balls together to form a cloud shape (about 6–8 inches wide), using hot glue or tacky glue for strength. Attach popsicle sticks underneath in rainbow order (red, orange, yellow, green, blue, purple), spacing them evenly. For extra stability, glue the entire piece onto cardstock. Let dry for 15 minutes. It’s basically happiness you can hang up!


27. Cotton Ball Polar Bear Art

This polar bear is peak cozy-cute with its perfectly placed cotton balls creating a soft, fluffy body that practically invites you to touch it. The cool-toned background makes it feel like a peaceful little Arctic scene.

Draw or print a bear outline onto light blue cardstock (8×10 works great). Fill the body with cotton balls using school glue, placing them close together for a neat, full texture. Add googly eyes and a black paper nose, then draw a simple smile with a marker. Let dry flat for 15–20 minutes. Can you picture this as part of a winter craft wall?

37 DIY Greeting Card Ideas Filled With Creative Designs That Make Every Message Feel Extra Special

Handmade greeting cards add a personal touch that store-bought versions simply can’t match. These 37 DIY greeting card ideas highlight eye-catching layouts, charming embellishments, and creative techniques that make every card feel special. Each design turns a small gesture into something truly memorable.

Collage of DIY Greeting Card Ideas

37 DIY Greeting Card Ideas That Turn Simple Paper Into Heartfelt Surprises in 2026

Opening a handmade greeting card always feels a little more special, especially when simple paper turns into something thoughtful and personal. A few creative folds, playful colors, and tiny decorative details can suddenly make a card feel memorable.

This collection moves from pop-up designs and watercolor touches to layered paper art, textured elements, and cheerful illustrated cards. Each idea invites creativity, helping you craft greetings that feel meaningful, charming, and genuinely delightful to give.

1. Storybook Adventure Animal Card

This card is pure fairytale energy a sweet little crew of woodland animals dressed for adventure, sailing off into imagination-land. With soft ink-blended skies, tiny stars, and layered die-cut characters, it feels like a mini storybook scene tucked into an envelope. Honestly… who wouldn’t smile opening this?

Start with an A2 kraft or tan cardstock base (4.25 x 5.5 in). Blend warm beige or light brown ink around the edges using a blending brush. Die-cut animals (fox, bunny, raccoon) from colored cardstock using character dies, then add tiny accessories like hats or flags. Use foam adhesive squares to pop up the animals and the little boat. Add white gel pen dots for stars and dimension, then stamp a curved sentiment banner like “May Your Day Be Filled With Adventure.” Storytime, but make it paper craft!


2. Elegant Unicorn Dream Card

Minimal but magical this dreamy unicorn card looks like it stepped straight out of a fairytale stationery shop. The embossed background swirls add texture while the floral crown and silver horn bring just the right amount of sparkle. Soft, classy, and totally enchanting.

Use a white A2 card base and emboss a 4 x 5.25 in panel with a swirl or floral embossing folder. Die-cut a simple unicorn face shape from white cardstock, plus ears and a spiral horn from silver glitter cardstock. Create tiny flowers using mini flower punches or dies from pastel cardstock (about 0.5–0.75 in each). Layer the flowers across the unicorn’s forehead with liquid craft glue and add mint or teal cardstock leaves. Finish with black vinyl or stamped eyelashes and mount with foam tape.


3. Slimline Paper Flower Bouquet Card

This one feels like gifting a tiny paper bouquet colorful blooms popping right off a soft pastel background. The vertical layout gives it that chic boutique-card vibe, perfect for birthdays, thank-yous, or congrats moments. Flower lovers will absolutely swoon over this one.

Cut a slimline card base (8.5 x 3.5 in folded). Add a 7.75 x 2.75 in pastel cardstock panel. Die-cut flower petals from colored cardstock (approx. 1–1.5 in wide) and curl the edges slightly using a bone folder. Cut thin 1/8 in green cardstock strips for stems and arrange them like a bouquet, gluing the stems first with craft glue. Layer petals using foam dots to create dimension. Add a small stamped sentiment strip (about 2.5 x 0.75 in) across the stems.


4. Bright Lemon Zest Card

Sunshine in card form! The layered lemons and delicate blossoms make this design feel fresh, vibrant, and straight out of a summer garden party. The gingham accent at the bottom adds a farmhouse-cute twist that makes the whole card pop.

Start with a white 5 x 5 in card base. Add a yellow gingham strip (5 x 1.5 in) along the bottom using double-sided tape. Die-cut lemons from bright yellow cardstock and blend orange ink lightly at the edges for depth. Cut leaves from green cardstock and small blossoms from pale pink or white. Arrange them in a branch cluster and adhere with foam tape. Splatter black acrylic paint using a small brush for texture, then add a layered sentiment like “You’re the Best.”


5. Sweet Easter Bunny Cards

Soft pastel bunnies hopping across textured backgrounds? Yes please! These Easter cards feel delicate and charming, perfect for spring greetings or little Easter basket surprises. The embossed details and gentle pink tones make them extra adorable.

Create an A2 card base and attach a 4 x 5.25 in pastel panel embossed with a floral embossing folder. Die-cut bunny shapes from pink or white cardstock and emboss them using a decorative bunny die or embossing plate. Layer the bunny slightly off-center with foam adhesive. Add a small stamped banner sentiment like “Happy Easter.” Finish with enamel dots or tiny pearls for subtle embellishment.


6. Teddy Birthday Gift Scene Card

This layered circle card feels like opening a tiny birthday present before the real one! With stacked gift boxes, balloons, and an adorable teddy, it has that cozy handmade charm that makes birthdays feel extra special.

Start with a circular card base about 5.5 in diameter using thick cardstock. Add a slightly smaller scalloped circle layer (around 5 in). Die-cut a window-style present box from white cardstock and glue patterned paper behind the openings. Create gift boxes with small squares of patterned paper (1–1.5 in each). Stamp or print a teddy bear image, color it with alcohol markers, and fussy-cut. Attach everything with foam tape and add a balloon die-cut plus an embossed “Happy Birthday” sentiment banner.


7. Spring Flower Basket Hello Card

This card looks like a tiny spring picnic! A soft pastel basket overflowing with cheerful flowers instantly makes the whole design feel fresh, friendly, and totally Pinterest-perfect. Honestly, it’s the kind of card you’d want to display on your desk.

Use a white A2 card base and layer a stitched rectangle panel (4 x 5.25 in). Die-cut a basket from light blue cardstock and lightly ink the edges for dimension. Create small flowers using layered flower dies (0.75–1 in) from coral, peach, and pink cardstock. Add tiny pearl beads or enamel dots for centers. Arrange the flowers inside the basket with leaves cut from green cardstock, glue them down with liquid adhesive, then add a banner sentiment like “Hello.”


8. Simple Birthday Candle Card

Bold, graphic, and super beginner-friendly this candle card proves that simple shapes can still look amazing. The black background makes the colorful candles glow like a mini birthday party on paper.

Cut a 5 x 5 in black cardstock card base. Draw or trace a large circle in the center with a white gel pen for the frame. Cut candle shapes from bright cardstock (about 0.5 x 2–3 in strips). Glue them vertically with a glue stick. Cut small flame shapes from orange and yellow paper and layer them. Use a white gel pen to add dots for stars and hand-letter “Happy Birthday” in the center.


9. Layered Birthday Cake Card

This card is a total celebration moment layers of patterns, textures, and a cute cake centerpiece stacked like the perfect paper party. The mix of stripes, polka dots, and ribbon gives it that scrapbook-meets-cardmaking charm.

Start with a turquoise A2 card base and add an embossed panel using a dot embossing folder. Layer three rectangles of patterned paper (about 4 x 5 in, 3 x 4 in, and 2.5 x 3.5 in). Tie a thin ribbon vertically around one layer before gluing it down. Stamp or die-cut a cake image and color it with markers. Mount the cake panel with foam squares and finish with a bold “Happy Birthday” sentiment strip.


10. Elegant Get Well Floral Card

Soft mint tones, delicate layered petals, and a graceful “get well” script this card feels soothing and thoughtful, exactly the vibe you want for sending a little comfort. The translucent vellum petals add such dreamy dimension.

Create a mint cardstock base (5 x 7 in). Add a stitched rectangle layer from white cardstock and emboss it with a circular pattern folder. Die-cut large flower petals from yellow cardstock and additional petals from vellum. Layer 4–5 petals per flower, securing them with strong liquid glue. Add textured cardstock circles for the centers and attach green cardstock leaves. Stamp or heat-emboss a “Get Well” sentiment on vellum or clear acetate and adhere with tiny glue dots behind the flowers.


11. Floral Shaker Birthday Card

This card is basically a tiny party in an envelope! The shaker window filled with glittery sequins and confetti sparkles every time you move it, while the layered flowers and soft purple tones make it feel elegant instead of over-the-top. It’s playful, dimensional, and totally irresistible for birthdays.

Start with a white A2 card base (4.25 x 5.5 in) and attach a striped patterned paper panel cut to 4 x 5.25 in. Die-cut a decorative frame window from white cardstock and another matching layer from purple cardstock. Place acetate behind the window and create a shaker pocket using 3 mm foam tape around the edges. Fill with sequins or confetti before sealing with a pink cardstock backing. Add layered flower die-cuts from lavender and plum cardstock, small leaves from sage green paper, and stamp “happy birthday” beneath the shaker using purple ink.


12. Watercolor Floral Smile Card

Soft watercolor blooms paired with a bold checkerboard background? Instant handmade charm. The dreamy petals feel painted straight from a garden sketchbook, while the textured ribbon and layered sentiment give the card a boutique stationery vibe.

Use a white A2 card base and attach a stamped grid background panel (4 x 5.25 in). Create a checkerboard by cutting 1.25 in squares from teal cardstock and gluing them alternately on a scalloped-edge white panel. Stamp floral images on watercolor paper and paint with diluted pink and peach watercolor paints, letting them dry for about 10 minutes. Cut them out, arrange over the checkerboard, and add foam tape for dimension. Wrap a 3/4 in pink ribbon across the center and glue a sentiment strip reading “sending smiles” on top.


13. Sunflower Butterfly Layer Card

Bright, bold, and totally sunshine-core This layered sunflower card pops with vibrant yellow petals and a flutter of tiny butterflies that feel like they’re dancing right off the page. It’s cheerful, uplifting, and perfect for a sweet message.

Create a square card base (5 x 5 in) using yellow cardstock. Add a 4.5 x 4.5 in light gray panel on top. Cut sunflower petals from yellow cardstock (about 1.5–2 in long) and slightly curve them with your fingers. Layer them around a black scalloped circle center (1.25 in). Punch or die-cut small butterfly shapes from yellow cardstock and glue them in a scattered swirl pattern. Hand-letter or stamp “You’re my sunshine” beneath the flower using black ink.


14. Minimalist Painted Poppy Card

Sometimes simple hits the hardest. This artistic poppy card feels like a mini painting bold red blooms floating delicately on tall, sketchy stems. It’s elegant, modern, and beautifully understated.

Use thick white watercolor cardstock folded into a 5 x 7 in card. Paint poppy flowers using diluted red watercolor paint, letting the pigment naturally pool for soft texture. Once dry, draw thin stems with a black fineliner pen or paintbrush. Add tiny gold paint dots in the flower centers for detail. Let the card dry completely (around 15 minutes) before writing a message inside.


15. Crochet Flower Bouquet Card

A card that’s part crochet project? Absolutely adorable. The textured yarn flowers create a stunning bouquet effect that feels cozy, handmade, and full of heart perfect for Mother’s Day or heartfelt thank-you notes.

Start with a white A2 card base. Crochet small flowers using cotton yarn with a 2.5–3 mm hook (basic 5-petal flower pattern works best). Make 6–8 mini flowers in soft pastel shades. Attach them to the card using strong craft glue or double-sided tape. Add crocheted stems using green chain stitches or glue thin yarn pieces as stems. Tie the bouquet with a narrow satin ribbon bow and stamp “Happy Mother’s Day” underneath.


16. Rustic Dried Flower Kraft Card

This one feels straight out of a cozy craft studio rustic kraft paper, delicate dried flowers, and a simple wooden stick detail that makes the whole design feel earthy and organic. It’s minimal, natural, and beautifully unique.

Use a kraft cardstock base (5 x 7 in). Glue a flat wooden craft stick horizontally about 2.5 in from the bottom. Arrange small dried flowers or pressed botanicals vertically behind the stick so they look like stems in a holder. Secure them with clear craft glue. Add white paint splatter using a small brush for texture. Hand-letter or stamp a sentiment like “Congratulations” in white gel pen near the bottom.


17. Elegant Christmas Tree Layer Card

This holiday card looks like it came straight from a fancy Christmas stationery set. Layered die-cut branches form a dimensional tree decorated with bows, pearls, and a soft pastel palette that feels chic and festive.

Use an A2 card base and add a decorative doily-style die-cut layer (around 4 x 5 in). Cut a rectangle panel (3 x 4.25 in) from muted blue cardstock and attach it with foam tape. Die-cut tree branches from two shades of green cardstock and layer them into a triangular tree shape. Add pink bow die-cuts and pearl embellishments as ornaments. Stamp “Peace on Earth” on a small banner strip and glue across the center.


18. Garden Gate Floral Card

This dreamy garden scene feels like peeking through a gate into a secret flower garden. Layered blossoms, tiny butterflies, and leafy greenery create such beautiful depth it’s basically a mini paper landscape.

Start with a white A2 card base and attach a pale blue background panel blended with soft blue ink for a sky effect. Die-cut an arched window frame and a small white picket fence from white cardstock. Cut multiple flowers from purple and pink cardstock (about 0.5–1 in each) and add yellow circle centers. Arrange leaves and flowers around the fence base using foam tape for dimension. Glue small butterfly die-cuts above the garden.


19. Pressed Flower Bouquet Card

Real flowers on a card? Instant wow factor. The pressed blooms create a delicate bouquet that looks like a tiny piece of botanical art, tied together with rustic twine for that charming handmade finish.

Use a textured white card base and attach a slightly smaller handmade paper panel (around 3.75 x 5 in). Arrange pressed flowers into a bouquet shape in the center. Secure them carefully using clear craft glue or decoupage glue applied with a small brush. Gather thin dried grass stems as the bouquet base and wrap natural twine around them to create a bow. Let dry flat for about 30 minutes.


20. Cute Strawberry Valentine Card

Sweet, playful, and totally adorable this Valentine card features smiling strawberries that make the whole design feel cheerful and fun. The pink gingham background gives it a picnic-date vibe that’s perfect for love notes.

Create an A2 card base and attach a pink gingham patterned paper panel (4 x 5.25 in). Die-cut a decorative label frame from red cardstock and glue it in the center. Stamp or draw two strawberries on white cardstock, color them with alcohol markers (red with light pink highlights), and cut them out. Attach with foam adhesive above the sentiment. Add tiny heart sequins or enamel dots for sparkle and stamp “Happy Valentine’s Day” underneath.


21. Rustic Heart Birthday Card

This card is proof that simple layers can still look totally chic. The teal background paired with earthy kraft paper and twine creates a cozy, rustic vibe, while the overlapping hearts add a sweet handmade touch. It feels like the kind of card you’d give with a heartfelt hug.

Start with a teal A2 card base (4.25 x 5.5 in). Cut two kraft paper strips about 1.5 in wide with zigzag or deckled scissors and layer them across the middle using double-sided tape. Wrap natural jute twine around the card twice and tie a small bow. Cut two heart shapes (approx. 1.75 in) from blue and kraft cardstock and attach with foam adhesive. Finish with a small “Happy Birthday” label and add pearl embellishments for subtle sparkle.


22. Daisy Bouquet Birthday Card

Minimal, sweet, and completely charming this little bouquet of daisies feels fresh from a sunny meadow. The thin stems tied with twine give it that delicate handmade look that’s perfect for a thoughtful birthday greeting.

Use a white cardstock base (5 x 7 in). Punch or die-cut small daisy shapes from white cardstock (about 0.75 in wide) and yellow circles for centers. Draw thin stems with a fine black pen starting from a central point near the bottom. Glue the daisies at the top of each stem and tie a small jute bow where the stems meet. Stamp or hand-write “Happy Birthday” below the bouquet.


23. Cute Animal Window Card

This card is pure cuteness overload! Three fluffy little animals peek through circular windows like they’re saying hello from their cozy spots. The soft pastel colors make it perfect for baby showers or welcoming a new little one.

Create a square card base (5 x 5 in). Cut a textured aqua panel and die-cut three circle windows (about 2 in each). Stamp cute animal images on white cardstock and color them with alcohol markers. Glue them behind the windows and attach the panel to the card base with foam tape. Add enamel dots and a small sentiment strip reading “Hello, Little One!” for the finishing touch.


24. Cozy Autumn Bear Card

Autumn vibes all the way! This adorable bear bundled up in a scarf and hat is surrounded by layered leaves and warm fall florals, making it the perfect seasonal greeting card. It’s like a little forest scene captured in paper.

Start with a deep green cardstock base and emboss a background panel using a leafy embossing folder (4 x 5.25 in). Die-cut leaves from rust, mustard, and burgundy cardstock. Assemble a bear figure using layered die-cuts and add a tiny knit-style hat and scarf. Arrange the leaves around the bear with foam squares for dimension. Finish with a metallic “happy” die-cut sentiment and a small banner that reads “Fall from all of us.”


25. Layered Christmas Shadow Box Card

This card is basically a mini Christmas scene in paper form layered with festive details, florals, stockings, and sparkly accents. It’s bold, dimensional, and perfect for anyone who loves elaborate holiday crafts.

Use a sturdy 5 x 7 in card base and attach patterned paper panels in red and mint tones. Create layered shelves using cardstock strips about 1 in wide and raise them with foam tape to form a shadow-box effect. Add die-cut Christmas trees, poinsettias, stockings, and small embellishments like pearls or sequins. Spell “Merry” with glitter letter dies and glue them across the top shelf.


26. Modern Fruit Birthday Card

Bright, playful, and stylish this fruit-shaped card feels like modern stationery straight from a boutique shop. The oversized fruit silhouette makes it instantly eye-catching while still keeping the design clean and minimal.

Cut a card base shaped like a fruit silhouette (around 5 x 6 in). Use coral or red cardstock for the fruit and add painted or splattered speckles using acrylic paint. Cut leaves from dark green cardstock and glue them at the top. Stamp or hand-letter the message “Wishing you the sweetest birthday” in the center using black ink.


27. Pastel Heart Grid Card

Soft pastel layers and little heart windows make this card look like a sweet scrapbook layout. It’s romantic, clean, and perfect for anniversaries, weddings, or Valentine’s greetings.

Start with a pink card base (A2 size). Layer a white panel (4 x 5.25 in) followed by a green panel (3.5 x 4.75 in). Cut four 1.5 in squares from pastel cardstock and punch heart shapes in the centers. Attach them in a neat grid using foam tape. Tie a white ribbon across the bottom and glue a tiny sentiment like “love” in one square.


28. North Pole Letter Christmas Card

This festive card looks like a magical letter headed straight to Santa! With holly accents, tiny envelopes, and gold details, it feels whimsical and full of Christmas spirit.

Use a red A2 card base and add a white stitched frame layer. Place a navy blue panel in the center and stamp a vintage-style message like “Kindly deliver to Santa Claus.” Create mini envelopes from red and white cardstock (about 1.5 in each) and glue them with foam tape. Add holly leaves, red berries, and a tiny “North Pole Mail” label for extra charm.


29. Floral Bouquet Pocket Card

This gorgeous design looks like a fresh bouquet wrapped in paper but made entirely from layered cardstock. The soft pink background and delicate ribbon bow make it feel elegant and gift-worthy.

Start with a light pink card base and attach a lattice die-cut panel (4 x 5.25 in). Create a bouquet wrapper using a folded triangle of pastel cardstock and glue it near the center. Die-cut flowers and leaves from colorful cardstock and tuck them into the wrapper. Add a sheer organza ribbon bow and attach a sentiment strip reading “For a Wonderful Friend.”


30. Thankful Floral Layer Card

Soft greens, delicate leaves, and a layered circle sentiment give this card a calm, heartfelt look. It’s the kind of design that feels thoughtful without being overly complicated perfect for gratitude notes.

Use a white A2 card base and attach a patterned green panel (4 x 5.25 in). Add a stitched rectangle frame cut from white cardstock. Die-cut leaf sprigs from white cardstock and arrange them behind a 2 in circle sentiment piece. Stamp “thankful for you friend” in black ink, attach with foam tape, and tie a thin white ribbon around the card for a polished finish.


31. Love Letter Valentine Card

This card looks like Cupid just delivered a stack of love notes! Layered hearts, tiny envelopes, and playful arrows create a sweet Valentine design bursting with romantic charm. The pink-on-pink palette makes everything feel soft, dreamy, and totally gift-worthy.

Start with a pink A2 card base (4.25 x 5.5 in). Add a patterned heart paper panel cut to 4 x 5.25 in and layer a scalloped frame on top using foam tape. Die-cut small envelopes from white cardstock (about 1.5 in wide) and seal them with tiny heart die-cuts. Cut arrow shapes from red cardstock and slide them through layered heart shapes in pink and red. Arrange the elements diagonally across the card, then add a satin ribbon bow and a stamped sentiment strip reading “Hugs & Kisses.”


32. Elegant Floral Friend Card

Soft neutrals and delicate florals give this card a calm, elegant look that feels straight out of a boutique stationery shop. The layered floral panel and script sentiment create a polished design that’s perfect for celebrating a special friendship.

Use a kraft or beige A2 card base. Cut a striped patterned paper panel (4 x 5.25 in) and layer a floral print rectangle (2.25 x 4 in) on top with foam tape. Die-cut the word “because” from olive green cardstock and place it across the floral panel. Stamp a smaller sentiment like “you’re a great friend” on a thin white strip and glue it underneath. Wrap natural twine behind the sentiment layer and tie a small bow for a rustic finishing touch.


33. Vintage Cottage Scrapbook Card

These cards feel like cozy scrapbook pages turned into greeting cards filled with vintage florals, wood textures, and charming little details. Each design has a soft cottagecore vibe that makes it perfect for birthdays, thank-yous, or sweet friendship notes.

Start with a white A2 card base and attach a textured white panel using foam tape for dimension. Add layered patterned papers like woodgrain and soft plaid (about 3 x 4 in). Use die-cut frames or stitched oval windows to create focal areas. Decorate with ephemera pieces such as a vintage camera, flowers, or small frames. Attach everything with foam adhesive, then add sequins or enamel dots for sparkle and finish with sentiments like “Happy Birthday” or “Say Cheese!”


34. Layered Floral Birthday Card

This chic neutral birthday card is proof that beige can be seriously beautiful. The textured kraft background, bold black scalloped circle, and tiny yellow florals create a clean layered look that feels modern yet cozy. Add the delicate twine bow and a few glossy enamel dots .

Start with a 5×7 inch kraft cardstock base. Cut a 4.5×4.5 inch square of distressed yellow patterned paper and mat it on 4.75×4.75 inch black cardstock. Wrap a 1.5 inch strip of white cardstock with black micro-dots across the middle and glue it flat. Die-cut a 3 inch white circle and a 3.25 inch black scalloped circle, stamp “Happy Birthday,” and layer them using foam adhesive for dimension. Add paper flower die cuts, green leaf pieces, black enamel dots, and a small white twine bow using hot glue. Sweet, simple, and stunning yes please!


35. Cozy Cottage Friendship Card

This card feels like sipping coffee with your best friend on a slow morning. Soft blush tones, tiny florals, and rustic wood textures create that dreamy scrapbook aesthetic Pinterest absolutely loves. The layered circle and delicate embellishments make the design feel soft, handmade, and full of charm.

Use a 5×7 inch white card base with embossed dot texture cardstock layered on top. Cut a 3.5×4.5 inch faux wood patterned paper panel and round the top corners to form a tag shape. Wrap a ½ inch pink ribbon strip across the card center. Die-cut a 2.5 inch stitched circle from white cardstock and glue a layered paper daisy in the middle using foam tape. Add small paper flowers, sequins, and leaf die cuts, then adhere a sentiment strip reading “I’m so glad we’re friends.” Finish with liquid glue and foam dots for depth. Instant cozy craft room magic!


36. Elegant Layered Christmas Tree Card

This holiday card is basically Christmas elegance wrapped in cardstock. The dimensional tree layers, soft green gradients, and tiny pearl ornaments make it feel like a handcrafted holiday ornament. Add the delicate doily background and suddenly it’s holiday magic in card form.

Begin with a 5×7 inch white card base and layer a 4.75×6.75 inch beige textured cardstock panel. Add a 4 inch round paper doily in the center. Die-cut multiple Christmas tree layers from green cardstock in slightly different shades, then stack them with foam adhesive for dimension. Decorate with flat-back pearl beads, mini pink bow die cuts, and white glitter paint splatter for snow. Add a sentiment banner reading “Peace on Earth” across the middle using foam tape. Festive, fancy, and absolutely frame-worthy!


37. Lavender Butterfly Thank You Card

Soft lavender hues, botanical prints, and delicate butterflies make this card feel straight out of a dreamy stationery shop. The layered frames and sparkly gems add just enough glam while still keeping the overall look calm and elegant. Perfect for thank-you notes, teacher gifts, or thoughtful messages.

Create a 5×7 inch lavender cardstock base and layer a 4.5×6.5 inch textured purple panel on top. Cut a 3.5×5 inch botanical patterned paper piece and mat it with ⅛ inch teal cardstock border for contrast. Die-cut a white butterfly from thin cardstock using a detailed butterfly die, then layer it on a small sentiment panel reading “Thanks for being the best.” Attach using foam squares so the wings lift slightly. Finish with purple rhinestone gems and a small white baker’s twine bow tied around the panel. Elegant, fluttery perfection!

38 DIY Glitter Craft Ideas You’ll Keep Rearranging Just to See Them Catch the Light

Prepare for a glitter explosion in the best possible way. These 38 DIY craft Glitter Craft Ideas unleash bold color, playful shine, and high-energy designs that make every project feel like a celebration. Each creation is packed with personality, sparkle, and pure crafting thrill.

Collage of   DIY Glitter Craft Ideas

38 DIY Glitter Craft Ideas So Sparkly They’ll Outshine Everything Else in 2026

Glitter crafts are exploding with drama in 2026, turning the simplest materials into radiant, light-catching creations that practically demand attention. With shimmering textures, bold color blends, and surfaces that look like they’re dusted in stardust, these projects take sparkle to an entirely new level.

This collection dives into glitter-drenched decor pieces, sculptural accents, dazzling accessories, color-shift finishes, and high-impact designs that gleam from across the room. Every idea unleashes full creative flair, giving you crafts that feel electrifying, expressive, and irresistibly dazzling to make and display.

1. Popsicle Stick Christmas Trees

Bright, bold, and bursting with sparkle these glittery triangle trees are pure classroom Christmas magic. Each one has its own personality with pom-poms, buttons, bows, and chunky glitter that totally screams “tiny hands made this!” Honestly, holiday craft day just leveled up.

Arrange 3 standard popsicle sticks into a triangle and secure the corners with hot glue. Paint with acrylic craft paint in festive shades like emerald green or cherry red, then brush on craft glue and sprinkle fine or chunky glitter evenly over the surface. Add mini pom-poms, buttons (¾ inch size), sequins, or small ornaments with craft glue. Finish with a 1×2 inch brown cardstock rectangle for the trunk and let everything dry 30–45 minutes before displaying.


2. Sparkle-Trimmed Dinosaur Shapes

Roar but make it fabulous. These pastel dinos with glittery spikes are the cutest mashup of prehistoric and Pinterest. They’re playful, colorful, and perfect for a kids’ craft table that needs a little sparkle moment.

Sketch a simple dinosaur silhouette about 6–8 inches wide onto colored craft foam and carefully cut it out. Add contrasting glitter foam triangles along the back for spikes, securing with craft glue. Clip two small wooden clothespins onto the bottom edge for legs so the dinosaur stands upright. Draw a tiny smile and eye with a black paint marker for that adorable finishing touch.


3. Layered Glitter Snowflake Ornament

This snowflake is giving winter royalty energy. The layered glitter foam details and delicate curves make it look store-bought but nope, you made that. Hang it in a window and let it catch the light like the sparkly queen it is.

Draw and trim two identical 5–6 inch snowflake shapes from glitter foam sheets in coordinating colors. Layer them slightly offset and secure with hot glue. Add thin curled strips of glitter foam on top for dimension, shaping them into soft loops before attaching. Glue a small pearl bead in the center and attach a 6-inch loop of metallic string to the back for hanging.


4. Mini Glitter Christmas House

A tiny glitter house with a bold red roof? It’s basically North Pole chic. Pop this on a mantel or holiday tray and suddenly your whole space feels like a cozy Christmas village.

Cut walls (4 rectangles, 3×4 inches) and roof panels (2 pieces, 3×4 inches) from white and red glitter foam. Assemble into a box shape with hot glue, attaching roof pieces at an angle. Add gold glitter foam window frames and a 1×2 inch green door with a mini wreath detail. Mount onto a 4×4 inch foam base for stability and allow glue to set completely before styling.


5. Glitter Snowman Decoration

Frosty but make him fabulous. This glitter snowman with a striped hat and pearl buttons is holiday cuteness overload. He’s the kind of DIY that instantly makes your shelf feel merry and bright.

Trace two circles (4 inch and 3 inch diameter) onto white glitter foam and glue them together slightly overlapping. Add a red-and-white striped hat cut from glitter foam, plus a small strip of faux fur trim along the brim. Attach black glitter foam circles for eyes, an orange triangle for the nose, and three flat-back pearl beads down the center. Let dry flat for 20–30 minutes before standing upright.


6. Shimmer butterfly wall piece

This butterfly is sparkle goals. The layered wings and gradient glitter make it look like it fluttered straight out of a craft dream. Perfect for bedrooms, party décor, or a glam gallery wall moment.

Draw symmetrical butterfly wings about 5 inches wide onto blue glitter foam and trim carefully. Cut a slightly smaller wing shape from solid foam and layer on top with craft glue for depth. Shape the wings gently upward before glue fully sets for dimension. Form antennae from thin black craft wire and secure at the center with hot glue.


7. Button & Glitter Snowflakes

Messy table? Good. That means the glitter party is in full swing. These mixed-media snowflakes with buttons, paint, and sparkle are winter craft perfection for little creatives.

Glue 6–8 popsicle sticks into a snowflake shape and let set firmly. Paint in icy blue or white acrylic and allow to dry 15 minutes. Brush craft glue onto sections and shake fine glitter over the surface. Add assorted buttons (½ to 1 inch wide) in coordinating shades using tacky glue, pressing firmly so they stay secure.


8. Layered Glitter Heart Ornament

Double the hearts, double the sparkle. This layered glitter ornament is sweet enough for Valentine’s Day but totally cute year-round. Hang it on a gift bag and watch it steal the spotlight.

Trim two heart shapes one 4 inches wide and one 3 inches wide from contrasting glitter foam sheets. Stack and secure with craft glue, aligning at the center. Punch a small hole at the top and thread a 6–8 inch piece of silver cord through, knotting at the ends. Let dry flat before hanging to prevent shifting.


9. Swirl Glitter Heart Ornament

Classic red and white swirl with a glitter twist? Yes, please. This ornament looks like a peppermint candy that decided to glow up for the holidays.

Cut a 4–5 inch heart from white glitter foam. Create curved swirl strips from red glitter foam, about ½ inch wide, and glue them in flowing S-shapes across the heart. Trim edges flush once attached. Add a small punched hole at the top and thread metallic string for hanging.


10. Glitter Penguin Ornament

Waddle into winter with the cutest glitter penguin ever. The red scarf pop against that sparkly black and white body? Chef’s kiss. This little guy belongs front and center on your tree.

Cut an oval body (5–6 inches tall) from black glitter foam and a slightly smaller white oval for the belly. Attach yellow glitter foam feet and beak, plus a red glitter foam scarf wrapped across the neck area. Add small black circles for eyes and secure a loop of silver cord at the top with hot glue. Let everything set completely before hanging on the tree.


11. Layered Glitter Globe Ornament

This ornament is giving luxe holiday drama in the best way. The layered red, green, and gold petals create a glowing globe effect that looks straight out of a designer Christmas tree moment. It’s bold, dimensional, and basically the star of the branch.

Trace and shape 12–16 petal pieces (about 3 inches tall) from red, green, and gold glitter foam. Slightly fold each petal vertically for dimension, then hot glue them in a circular pattern onto a 3-inch foam ball, layering as you go. Add a small gold glitter diamond detail in the center and insert a 6-inch gold cord loop at the top before securing the final pieces.


11. Glitter Foam Rose Magnets

Tiny, sparkly roses that look like they were plucked straight from a fairytale craft garden? Yes, please. These glitter foam beauties are perfect for fridge magnets, gift toppers, or even glam hair clips. The shimmer + spiral rose combo is basically Pinterest catnip.

To make one, cut a 2-inch circle from glitter foam sheet and trim it into a spiral (about ½-inch wide strip). Roll tightly from the outer edge inward, securing the end with hot glue. For leaves, cut two 1.5-inch teardrop shapes from green glitter foam and glue underneath. Attach a small round magnet (¾ inch) to the back with E6000 or strong craft glue and let cure for 24 hours. Cute, sparkly, and totally giftable—can you picture a whole bouquet on your fridge?


13. Double-Layer Glitter Tree Ornament

Minimal but magical. The layered green silhouette gives this tree ornament that chic shadow effect, and it pops beautifully against twinkle lights.

Form one 5-inch Christmas tree shape from dark green glitter foam and a slightly smaller one from light green glitter foam. Stack and secure with craft glue, keeping edges evenly spaced for a border look. Punch a small hole at the top and thread a 7-inch gold ribbon through, knotting firmly for hanging.


14. Blue Glitter Poinsettia

A blue poinsettia? Unexpected and absolutely fabulous. The layered petals and sparkly center make it perfect for winter décor that leans icy and elegant instead of traditional red.

Shape 10–12 pointed petals (about 2.5 inches long) from blue glitter foam. Warm gently with a low-temp heat tool for a few seconds to curve the petals slightly, then layer in two offset rows using hot glue. Add a 1-inch glitter foam circle in the center and finish with yellow glitter accents or a pearl cluster.


15. 3D Glitter Christmas Tree

This little tree looks like it belongs in a mini holiday village. The stacked glitter layers and metallic bead “ornaments” give it sweet dimensional charm.

Prepare three graduated tree tiers (4 inch, 3 inch, and 2 inch wide) from green glitter foam. Slightly curve each tier before stacking with hot glue to build depth. Add small metallic craft beads (¼ inch size) across each layer and attach a short glitter foam cylinder at the base for the trunk. Secure a gold hanging loop at the top.


16. Mixed Media Glitter Shamrock

Glitter, sequins, buttons oh my! This shamrock is a full-on texture party and perfect for St. Patrick’s Day crafts with kids who love a little sparkle chaos.

Create a large shamrock base (6–8 inches wide) from sturdy cardstock and paint with green acrylic. While the paint is slightly tacky, sprinkle fine green and gold glitter across the surface. Once dry, attach green buttons, sequins, and clover confetti with tacky glue, pressing firmly and letting it dry flat for 30 minutes.


17. Glitter Santa Table Décor

This Santa is serving cozy tabletop cuteness. With his sparkly suit and fluffy beard, he’s basically the centerpiece your holiday table has been waiting for.

Assemble Santa body pieces from red, white, black, and peach glitter foam (overall height about 6–7 inches). Layer beard, hat, and suit details using hot glue, adding a small black button to the coat and a gold jingle bell at the hat tip. Attach a folded foam strip at the back as a stand so he stays upright.


18. Lucky Leprechaun Craft

Big googly eyes, glitter hat, and a golden bow tie? This leprechaun shamrock is pure St. Paddy’s Day joy. It’s playful, bright, and perfect for little hands.

Form three 4-inch green paper hearts and glue together to create a shamrock. Add accordion-folded green paper strips for arms and small orange paper hands at the ends. Attach 1-inch googly eyes, orange pom-poms for cheeks, and a glitter foam hat with a tiny gold buckle detail. Finish with a gold glitter bow tie at the center.


19. Glitter Christmas Stocking Ornament

This stocking is giving sugarplum fairy vibes. The swirly glitter patterns and fluffy white cuff make it feel whimsical and festive all at once.

Trace two identical stocking shapes (about 5 inches tall) from purple glitter foam and glue around the edges, leaving the top open. Decorate the front with glitter foam swirls and stars in contrasting colors. Attach a strip of white faux fur along the cuff and secure a 6-inch ribbon loop inside the top seam for hanging.


20. Layered Glitter Foam Flowers

These little glitter blossoms are small but seriously glam. Perfect for hair clips, gift toppers, or party décor because sparkle flowers are always a yes.

Punch or shape scalloped flower bases (2–3 inches wide) from glitter foam in coordinating shades. Add smaller solid foam petals in the center, gently curling them with your fingers for dimension. Secure layers with hot glue and place a ½-inch pearl bead in the middle for that polished finish.


21. . Glitter Angel Tree Topper

This sparkling angel is basically Christmas magic in craft form. With her layered red-and-green glitter gown, golden wings, and glowing star, she’s giving cozy cocoa nights and twinkle-light vibes all at once. Set her on your mantel or crown your tree she owns the spotlight.

To make it, cut a 6-inch cone from cardstock for the body base. Layer 2-inch scalloped strips of red and green glitter foam sheets around the cone using hot glue, overlapping slightly. Cut large wing shapes (about 7 inches wide) from gold glitter foam and add red glitter glue swirls for detail; let dry 30 minutes. Glue to the back. Shape hair from craft yarn or thin strips of tan felt, attach a small wood bead (1.5 inches) for the head, and add a pipe cleaner halo. Finish with a battery-operated mini LED star glued between her hands.


22. Glitter Floral Birthday Card

This card is sparkle-on-sparkle perfection. The glittery floral bouquet pops against that shimmering background, making it feel handmade and totally frame-worthy.

Start with a 5×7-inch folded cardstock base and mount a slightly smaller glitter cardstock panel on top. Build layered flower shapes from colored glitter paper, arranging stems and leaves with craft glue before pressing firmly in place. Finish with a “Birthday Wishes” sentiment sticker or die-cut phrase centered near the bottom and allow everything to dry flat.


23. Glitter Angel Tree Topper

She’s glowing, she’s glam, and she absolutely belongs at the top of your Christmas tree. The layered scalloped dress and dramatic gold wings make this angel feel straight out of a winter fairytale.

Create the dress by stacking scalloped glitter foam layers in alternating red and green (each tier about 1 inch shorter than the one beneath). Form large wing panels from gold glitter foam and attach behind the body, adding red glitter swirls for detail. Secure a small LED tea light behind a star-shaped foam piece so it softly illuminates in her hands.


24. Mini Red Glitter Roses

These tiny roses are bold, romantic, and a little dramatic in the best way. The layered petals give them that realistic swirl while the glitter finish keeps things extra fabulous.

Shape multiple rounded petal layers (1–2 inches wide) from red glitter foam and gently curl the edges with your fingers. Roll a narrow foam strip tightly for the center bud, then wrap larger petals around it one by one, securing with hot glue at the base. Finish with a small circular backing piece to keep everything sturdy.


25. Golden Glitter Rose Stem

This golden rose feels luxe and gift-ready like something you’d tuck into a bouquet or use as a glam party favor. The sparkle against those bold green leaves? Chef’s kiss.

Form layered teardrop-shaped petals from gold glitter foam and curl slightly inward for dimension. Wrap petals around a small foam cone base, gluing as you build outward to create fullness. Attach two leaf shapes to a thin floral wire stem wrapped in green tape, then secure the bloom firmly at the top.


26. Rustic Glitter Acorn Ornaments

Cozy meets glam with these glitter acorns. They’re earthy, sparkly, and perfect for adding a woodland vibe to your holiday décor.

Coat small foam egg shapes (about 2–3 inches tall) with craft glue and roll in fine gold glitter, tapping off excess and letting dry completely. Glue real or faux acorn caps to the top and insert a small screw eye into each cap. Tie 8-inch pieces of jute twine through the loops for hanging.


27. Layered Glitter Daisy Trio

Bright, bold, and bursting with color these daisies are total mood-boosters. The layered petals and textured centers make them perfect for hair clips, brooches, or gift toppers.

Prepare two flower bases per bloom (about 3 inches wide) from contrasting glitter foam shades. Snip thin fringe details along the inner circle for texture, then stack and glue together with hot glue. Add a tightly rolled foam strip in the center and secure a felt circle on the back for extra stability.


28. Glitter Foam Dinosaurs

Glitter Foam Dinosaurs

These pastel dinos are adorable and slightly sparkly aka kid craft gold. The clothespin legs make them stand up on their own, which means instant playtime fun.

Trace simple dinosaur body shapes (about 5 inches long) onto colorful foam sheets. Add glitter foam spikes along the back and draw tiny facial details with a black marker. Clip two mini wooden clothespins underneath for legs, securing with strong glue so they stand upright.


29. Pink Glitter Rose Bloom

Soft, sweet, and totally swoon-worthy. This pink rose has that dreamy handmade look that works for gifts, décor, or even hair accessories.

Shape layered rounded petals from soft pink foam, slightly warming with a low-heat tool to make them flexible. Wrap the smallest piece tightly to form the center and continue building outward with larger petals, gluing at the base only. Attach green glitter leaf shapes underneath for a polished finish.


30. Spiral Glitter Mini Trees

These mini spiral trees are playful, modern, and perfect for desks or holiday centerpieces. The stacked rings and glitter finish make them feel like whimsical candy-colored Christmas décor.

Create graduated circular bases from glitter foam (largest about 4 inches wide) and stack with hot glue. Insert a sturdy plastic straw or wooden dowel vertically through the center for support. Wrap a thin glitter foam strip around the dowel in a spiral pattern, securing as you go, and top with a small glitter star.


31. Glitter Floral Bell Ornament

This bell ornament is basically festive sparkle wrapped in florals. The layered petals, bold jewel center, and glittery leaves make it feel like holiday décor with a glam twist.

Shape two bell halves (about 4 inches tall) from white glitter foam and join at the center with hot glue. Layer contrasting glitter foam flowers on top, stacking two sizes for dimension and finishing with a rhinestone embellishment in the middle. Attach two small gold beads at the bottom tips and secure a 6-inch gold chain loop at the top for hanging.


32. Glitter Rose Bouquet Display

This bouquet is giving handmade Valentine’s centerpiece energy. The vibrant pink blooms and glittered leaves look luxe but still totally DIY-able.

Form layered rounded petals (2–3 inches wide) from pink glitter foam and curl gently with your fingers for a natural shape. Wrap petals around small foam cone bases, securing at the bottom only to keep the bloom open. Attach each flower to a floral wire stem wrapped in green tape and arrange into a foam-covered circular base (about 5 inches wide) for stability.


33. Candy Cane Glitter Ornaments

Classic candy canes, but make them sparkle. The glitter stripes and bold bows give these ornaments major North Pole chic vibes.

Create a curved cane base from thick white foam tubing (approximately 6 inches tall). Wrap 1-inch-wide glitter foam strips diagonally around the cane, securing with hot glue as you spiral downward. Add thin gold bead garland along the edges and finish with a layered glitter bow at the center, attaching a hanging loop at the top.


34. Golden Glitter Calla Lily Bouquet

These calla lilies are sleek, modern, and so eye-catching in metallic gold. They look like something you’d see in a glam event centerpiece.

Roll a 4×4-inch square of gold glitter foam into a cone shape, sealing the edge neatly with glue. Insert a small bundle of white floral stamens into the center and secure at the base. Attach each bloom to a green floral wire stem and add long pointed leaves along the sides for a full bouquet effect.


35. Glitter Butterfly Wall Accent

Bright green and unapologetically sparkly this butterfly is made to stand out. Perfect for kids’ rooms, party décor, or a spring craft moment.

Layer two butterfly silhouettes (about 5 inches wide) from contrasting shades of green glitter foam for a dimensional outline. Add a thin rhinestone strip down the center as the body and curl narrow foam strips into spirals for antennae. Mount onto a small foam backing or hair clip depending on how you plan to display it.


36. Layered Glitter Poinsettia Décor

Bold, dramatic, and totally holiday-ready. The layered petal design with a spiral center makes this poinsettia feel extra luxe.

Shape eight large outer petals (about 3 inches long) and six smaller inner petals from red or gold glitter foam. Slightly curve each petal inward before layering in alternating rows with hot glue. Roll a thin strip of foam into a tight spiral for the center and secure firmly before adding a backing circle for support.


37. Glitter Floral Vine Arrangement

This floral vine is playful, colorful, and full of personality. The mix of bright blossoms and curved leaves makes it perfect for wall décor or festive displays.

Form five-petal flowers (2 inches wide) from blue and yellow glitter foam and add pearl beads in the centers. Create long curved leaf shapes and attach along a thick foam strip stem, layering flowers at varying angles for movement. Secure the full arrangement onto a small foam base or frame backing so it holds its shape beautifully.


38. Glitter Christmas Elf Ornament

This jolly little elf is basically Santa’s cutest employee. With sparkly boots, striped legs, and a glittery hat, it’s giving full-on North Pole charm. Hang it front and center because this one deserves spotlight status.

Print or sketch a simple elf template about 8 inches tall. Cut each piece from colored glitter foam (green hat and boots, red shirt, gold accents, beige face). Glue layers using hot glue, starting from the body base upward. Draw facial features with a black permanent marker. Attach a 6-inch loop of gold cord to the back with hot glue and cover with a small foam circle to secure. Let set 10 minutes before hanging. Can you picture this twinkling on your tree?

36 DIY Glass Painting Ideas Making Plain Windows and Jars Impossible to Ignore

Glass turns into a mesmerizing canvas the moment paint touches it, and these 36 DIY Glass Painting Ideas take that transformation to breathtaking heights. Expect luminous colors, sharp detailing, and designs that make everyday glassware look like gallery pieces.

Collage of DIY Glass Painting Ideas

36 DIY Glass Painting Ideas So Electrifying They’ll Make Ordinary Glass Look Like Studio Art in 2026

Glass painting is erupting with wild creativity in 2026, transforming everyday bottles, frames, jars, and panels into glowing masterpieces that look lit from within. With stained-glass illusions, blazing color blends, dramatic outlines, and patterns that shimmer when sunlight hits, even the most boring glass turns into a show-stopping centerpiece.

This collection of 36 DIY Glass Painting Ideas launches into jewel-toned panels, neon-splashed bottles, cosmic-inspired gradients, metallic-rimmed florals, and abstract strokes that feel almost cinematic. Every idea turns your brush into pure magic, giving you glass decor that feels bold, radiant, and powerful enough to steal attention from across the room.

1. Holly Jolly Stemless Wine Glasses

These are not just glasses — they are full-blown Christmas dinner icons. The layered holly leaves swoop and swirl around the glass like a festive wreath mid-twirl, while those glossy red berries pop like tiny ornaments. Imagine candlelight flickering through them at your holiday table… cozy-core activated.

Start with clear stemless wine glasses and wipe them down with rubbing alcohol (no fingerprints allowed, bestie). Use acrylic enamel paints in forest green, sage green, and cherry red. With a size 2 round brush, paint elongated teardrop leaves about 1–1.5 inches long, layering lighter green strokes on top before the base dries for dimension. Cluster three red berry dots using the back of a detail brush. Let dry 24 hours, then cure at 325°F for 30 minutes (place in cold oven first, cool inside after). Suddenly, your eggnog has a personality.


2. Lavender Dream Storage Jars

Lavender Dream Storage Jars

These jars are giving “Pinterest pantry but make it poetic.” Tiny lavender buds dance around the glass in soft lilac and violet tones, turning basic storage into cottagecore heaven. Almonds? Bath salts? Midnight snacks? Everything looks fancier in here.

Use small 8–12 oz glass jars with metal lids. Clean with alcohol. With acrylic glass paint in lavender, deep purple, and leaf green, paint mini oval petals stacked vertically to create 1-inch-tall lavender sprigs. Add two small angled leaves at the base using a liner brush. Space sprigs about 1.5 inches apart around the jar. Let air dry 24 hours and seal with dishwasher-safe Mod Podge if desired. Pantry glow-up in progress.


3. Midnight Sunflower Pitcher Set

Okay but this one? DRAMA. Glossy black glass paired with bold golden sunflowers is farmhouse glam with a side of sass. It’s moody, it’s vibrant, it’s basically summer sunsets in Tuscany but in drinkware form.

Spray paint clear glass pieces with glossy black enamel spray (2–3 light coats, 15 minutes between coats). Once fully cured, lightly sketch 3-inch sunflower outlines using a white chalk pencil. Paint petals in warm yellow using a flat brush, adding burnt orange near the center for depth. Stipple the center with dark brown and a hint of black for texture. Seal with clear gloss spray. Set this on a wooden table and watch it steal the spotlight.


4. Flirty Hearts & Bows Can Glasses

If iced coffee could blush, this would be it. Pink bows and cherry-red hearts scattered across trendy soda-can glasses? It’s giving Valentine’s brunch, Galentine’s gossip, and “yes I made these myself” energy.

Use Libbey-style can glasses and acrylic enamel in baby pink and crimson. For crisp hearts, apply small vinyl heart stickers (about 1 inch wide), sponge-dab paint, and peel while slightly tacky. Hand-paint bows using a liner brush — two loops, a center knot, and soft ribbon tails about 1.5 inches long. Cure according to paint instructions (oven-set or 21-day cure). Add a frothy latte and boom — café chic at home.


5. Blush Blossom Tumblers

These delicate pink florals feel like spring just whispered into your kitchen. Soft petals float around the glass with the prettiest barely-there greenery — subtle but seriously swoon-worthy.

Use rounded 10–12 oz tumblers and enamel paints in blush pink, rose, and soft green. Paint simple 5-petal flowers about 1 inch wide using a small round brush, blending darker pink toward the center while still wet. Dot tiny yellow centers with a toothpick. Add thin curved stems and petite leaves using a liner brush. Keep spacing airy and organic. Let dry 24 hours and cure per instructions. Picture these with sparkling lemonade on a sunny patio. Yes please.


6. Wildflower Meadow Wine Glass

This glass is basically a fairytale meadow you can sip from. Delicate lavender sprigs, tiny daisies, whimsical greenery — it climbs up the bowl like it’s chasing the sunshine. Cottagecore queens, assemble.

Start with a tall wine glass and enamel paints in lavender, white, periwinkle, sage, and soft pink. Using a liner brush, pull thin upward stems from the base, varying heights between 3–5 inches. Add clusters of tiny dot flowers for lavender and 5-petal daisies about ½ inch wide. Leave negative space so it feels light and breezy. Cure fully before use. It’s giving picnic in Provence and we love that for you.


7. Cherry Blossom Romance Set

Soft pink blossoms drifting across a carafe and matching glasses? It’s romantic. It’s bridal shower ready. It’s “I casually host beautiful dinners now.” The layered petals feel airy and hand-painted in the dreamiest way.

Use a clear glass carafe and wine glasses. With blush, white, and deeper rose enamel paint, create 5 rounded petals about 1.5–2 inches wide. Blend white along the petal edges while wet for dimension. Add darker pink centers with tiny radiating lines using a toothpick. Scatter blossoms organically, some overlapping slightly. Oven cure if paint allows. Set this on your spring table and just wait for the compliments.


8. Sunshine Pop Abstract Glasses

These translucent color blobs are pure joy. The way sunlight filters through those vibrant ovals? Instant summer mood. It’s artsy, playful, and totally conversation-starting.

Use stemless glasses and transparent glass paints in cobalt blue, lemon yellow, coral, and hot pink. With a sponge dauber or the back of a brush, press 1–1.5 inch oval shapes near the bottom, slightly overlapping for a layered look. Keep the design concentrated on one side for that modern asymmetry. Let air cure fully. Put these outside in the sun and watch them throw colorful shadows everywhere. Magic moment.


9. Bold Pink Petal Statement Wine Glasses

These oversized florals are not shy — and we adore that. Dramatic sweeping petals wrap around the glass in layered pinks and corals, giving boutique-art-gallery vibes.

Use large balloon wine glasses and enamel paints in coral, hot pink, and white. With a flat shader brush, paint elongated petals 2–3 inches long in confident sweeping strokes. Blend lighter pink toward the tips before the base dries. Create textured centers with clustered dotting in darker tones. Work in sections to keep blending smooth. Cure properly. These are dinner party showstoppers, period.


10. Soft Sakura Glassware Trio

Matching blossom wine glasses and vase? Oh we are coordinated. This set feels like heirloom spring magic — delicate petals floating along slender branches, soft greens peeking through.

Use clear wine glasses and a slim glass vase. First paint thin brown branches with a liner brush, letting them curve naturally around the surface. Add 5-petal blossoms about 1.5 inches wide using light pink as the base, layering medium pink toward the center. Dot tiny white highlights before dry. Finish with small oval green leaves for balance. Allow 24-hour dry time and cure. Wrap in twine for gifting… or keep them because honestly, you deserve pretty things.


11. Spooky Moon & Bats Halloween Glasses

Okay but these? They are serving haunted dinner party realness. Inky black branches stretch across the glass, bats swoop dramatically, and that bold yellow moon glows like it’s midnight on October 31st. Add the spiderweb detail on the base and suddenly your wine glass is in costume too. Obsessed.

Start with clear wine glasses and wipe with rubbing alcohol. Paint the stems black using acrylic enamel (2 thin coats). For the moon, sponge on a 2-inch yellow circle using a round foam dauber. Once dry, use a liner brush with black enamel to paint bare tree branches reaching upward and simple bat silhouettes (small “M” shapes with filled wings). Add tiny white dot “stars” with a toothpick. For the base, draw spiderweb lines from center outward and connect with curved lines. Air dry 24 hours, then oven cure per paint instructions. Your Halloween table just leveled up.


12. Happy Birthday Celebration Wine Glass

This is not a glass. It’s a full-blown party on a stem. Bright rainbow lettering, a frosted cake stacked with candles, glittered details — it’s giving main character birthday energy and we LOVE that for gifting.

Use a large balloon wine glass. Sketch a tiered cake about 3 inches tall in the center with a chalk marker. Paint with acrylic enamel in teal, white, and pastel accents. Add “HAPPY BIRTHDAY” in bold block letters using a small round brush (½-inch tall letters). Paint candle flames in yellow and orange with tiny white highlights. Wrap the stem in painter’s tape sections and paint alternating teal and gold. Seal with dishwasher-safe sealer or oven cure. Tie with ribbon and suddenly you’re the best gift-giver in the group chat.


13. Fiery Abstract Flame Glass

This one is pure drama. Bold red, orange, and gold strokes swirl like captured fire, wrapping around the bowl in fluid, artsy movement. It feels expensive. Gallery-core. Like you casually sip merlot while discussing modern art.

Use transparent glass paints in red, orange, yellow, and a touch of teal. With a flat brush, pull upward flame-like strokes from the base, blending colors while wet for that ombré heat effect. Add thin gold liner swirls using a metallic outliner for elegance. Let each layer dry slightly before adding more dimension. Cure according to paint directions. It’s bold, it’s fearless, it’s not for the shy decorators.


14. Pop Art Floral Tumbler

These chunky, outlined florals are giving retro 70s meets modern dopamine décor. Bright petals outlined in bold black make the colors pop like stained glass cartoons. Playful? Yes. Boring? Never.

Grab a straight-sided tumbler and glossy enamel paints in hot pink, teal, green, and red. First outline flower shapes (about 1.5 inches wide) using black glass liner — let dry fully so lines don’t smudge. Fill each petal with vibrant color using a small flat brush. Leave tiny gaps between flowers for a scattered look. Air dry 24 hours and cure. Add lemonade and suddenly it’s a summer picnic aesthetic.


15. Mosaic Jewel Toned Glass

This design is straight-up jewel box energy. Tiny painted squares in ruby, emerald, sapphire, and amber catch the light like faux stained glass tiles. It looks intricate, but it’s secretly just patience and vibes.

Use a short rocks glass. With gold glass liner, draw a loose grid of uneven rectangles (about ½ inch each). Let dry completely. Fill each “tile” with transparent glass paint in alternating jewel tones. Keep colors random for that true mosaic feel. Allow 24–48 hours curing time. Place near a window and watch the sunlight do its thing. Instant wow factor.


16. Whimsical Mixed Pattern Wine Set

Whimsical Mixed Pattern Wine Set

Why choose one design when you can have four? Florals, citrus dots, mini blossoms, cherry branches — this eclectic set feels like a creative mood board in glass form. It’s artsy, mismatched, and totally intentional.

Use four wine glasses. For citrus, dab yellow and orange circles with a sponge and add tiny white segment lines. For mini florals, dot clusters using the end of a brush handle. For branches, paint thin black limbs first, then layer pink blossoms. Keep each glass cohesive but unique. Oven cure after drying. Your dinner party just became a curated experience.


17. Mandala Dot Art Stemless Glass

This dot mandala moment is giving calm, symmetry, and a little bit of magic. Soft pink and white raised dots form a perfectly balanced pattern that feels almost meditative to create — and stunning to display.

Use a stemless wine glass and acrylic enamel in blush pink and white. Lightly sketch a 2.5-inch circle guide in the center. Using dotting tools (or the back of paintbrushes in various sizes), build concentric rings of dots, alternating colors and sizes. Add teardrop strokes between rings using a liner brush. Let dry 24 hours and cure. It’s the kind of piece people ask, “Wait… you made this?” Yes. Yes you did.


18. Cozy Winter Owl Tumbler

Tell me this little owl isn’t the cutest winter vibe ever. Perched on a branch with holly and a glowing candle above, it’s festive but still charming enough to use all season long. Storybook energy in the best way.

Use a round tumbler and sketch the owl shape about 2 inches tall. Paint base in warm brown enamel, then layer lighter tan feather strokes with a small detail brush. Outline with black liner once dry. Add holly leaves in deep green and bright red berries. For the candle, blend yellow and orange for a soft flame. Cure fully before use. Hot cocoa in this? Elite choice.


19. Daffodil Meadow Hurricane Vase

This tall glass feels like you plucked a field of daffodils and wrapped it around your décor. Soft yellow blooms and slender green stems create a delicate spring meadow effect that glows beautifully with a candle inside.

Use a large cylindrical vase. Paint thin vertical stems in varying heights (4–6 inches) using a liner brush and sage green paint. Add small daffodil blooms with 5–6 pale yellow petals and a deeper yellow trumpet center. Slightly overlap flowers for a natural look. Let dry thoroughly and oven cure if safe. Add a pillar candle and suddenly it’s Easter tablescape perfection.


20. Elegant Cherry Blossom Wine Glass

This one is pure romance. Dark sweeping branches curve dramatically across the bowl while soft pink blossoms float delicately along them. It’s graceful, timeless, and effortlessly stunning.

Start by painting bold black branches first using a liner brush, letting them curve naturally across one side of the glass. Once dry, layer 5-petal blossoms in light pink (about 1 inch wide), adding deeper pink centers and tiny dot stamens with a toothpick. Scatter a few loose petals for movement. Allow 24 hours drying time and cure properly. Pour rosé, set near window light, and just admire your handiwork.


21. Petite Blue Bud Wine Glasses

These tiny blue buds are giving effortless French countryside charm. Scattered delicately across the bowl with the sweetest little green bases, they feel airy, minimal, and quietly elegant — like something you’d sip chilled white wine from on a sun-drenched terrace.

Use clear wine glasses and enamel paints in cobalt blue, navy, and leaf green. With a small round brush (size 1), paint simple teardrop petals about ½ inch long, layering a darker blue at the base for depth. Add a short curved green stroke underneath each bloom. Keep spacing loose and organic, leaving plenty of negative space. Let dry 24 hours and oven cure per instructions. Subtle but seriously chic.


22. Wild Meadow Tumbler Set

This set is basically a field of wildflowers wrapped around glass. Soft lavender sprigs, pink daisies, wispy grasses, even tiny dragonflies — it feels like you bottled up a summer breeze.

Start with straight-sided tumblers. Paint a soft wash of diluted aqua enamel along the bottom 1 inch for a dreamy base. Using a liner brush, pull upward green stems (3–4 inches tall), varying thickness and height. Add 1-inch daisies in blush pink with yellow centers, plus clusters of tiny purple dot flowers. Keep layers light and slightly overlapping. Air dry fully, then cure. It’s picnic-core perfection.


23. Elegant White Blossom Pitcher & Glass

White florals with golden outlines against crystal-clear glass? That’s timeless luxury energy. The soft ivory petals and warm yellow centers feel refined and romantic — like heirloom glassware passed down through generations.

Use a wine glass and matching pitcher. First outline petals (about 2 inches wide) with metallic gold glass liner and let dry completely. Fill petals with opaque white enamel, brushing subtle pale gray strokes for dimension. Add golden yellow stamens using tiny dot clusters in the center. Paint soft olive stems connecting blooms. Allow 24 hours dry time, then oven cure. It’s giving classic garden soirée.


24. Ocean Mist Confetti Tumbler

This glass looks like seafoam kissed by deep blue waves. The layered speckles in cool tones feel modern, artsy, and slightly coastal — like beach house minimalism but with personality.

Use a short tumbler and transparent glass paints in teal, aqua, and cobalt. With a small round sponge, dab paint randomly around the bottom half, keeping the top third mostly clear. Overlap colors while wet for a blended effect. Add a few elongated vertical strokes in darker blue for movement. Let cure fully before washing. It’s subtle statement décor at its best.


25. Festive Dot & Holly Wine Glasses

These are holiday magic without going over-the-top. One glass sparkles with cascading red dots like floating ornaments, the other wraps a simple evergreen garland with snowy white speckles. Cozy Christmas dinner just got prettier.

Use large wine glasses and enamel paints in cranberry red, white, and pine green. For the dot cascade, use varying dotting tools to build a swooping pattern from rim to base. For the garland, paint thin green strokes in layered “V” shapes, then add small red berry dots. Finish with tiny white snow dots scattered above. Dry 24 hours and oven set. Hosting mode: activated.


26. Lucky Shamrock Stemless Set

Bold green shamrocks front and center? Oh yes. These are St. Patrick’s Day ready but honestly cute enough to use all spring. The layered greens and subtle gold accents give them depth instead of flat cartoon vibes.

Use stemless glasses and enamel paints in emerald, kelly green, and a touch of metallic gold. Paint four heart-shaped petals meeting in the center (about 2 inches wide total). Blend darker green along one side of each petal while still wet. Add thin gold veins for detail. Scatter tiny green dots around for a playful finish. Cure completely. Sláinte, bestie.


27. Bold Bloom Statement Glasses

These florals are not shy — and that’s the whole point. Bright cobalt forget-me-nots on one glass and a giant magenta bloom on the other? It’s colorful, confident, and absolutely scroll-stopping.

Use tall wine glasses and opaque enamel paints. For the blue cluster, paint 5-petal flowers about 1 inch wide, layering lighter blue highlights before drying. Add bright yellow centers with a dotting tool. For the pink bloom, use a flat brush to create sweeping 2–3 inch petals, blending lighter pink toward the center. Finish with leafy green strokes at the base. Let dry and cure. Instant table drama.


28. Modern Berry & Gold Leaf Glasses

These feel like autumn met glam and decided to collaborate. Glossy red berries and deep green leaves are woven through abstract swirls of metallic gold — festive but elevated.

Use balloon wine glasses. Paint loose, flowing gold shapes first using metallic enamel and a flat brush (let dry). Layer small clusters of 3–5 red berry dots using a round brush, then add almond-shaped green leaves with subtle vein lines. Keep composition asymmetrical for that designer feel. Allow 24 hours drying, then cure. It’s holiday chic, not holiday cheesy.


29. Delicate Ink Blossom Wine Glass

This design is pure poetry. Fine black branches twist gracefully while soft pink blossoms float like petals caught mid-breeze. It’s minimal, elegant, and quietly breathtaking.

Use a liner brush with black enamel to paint sweeping branches across one side of the bowl. Keep lines thin and organic. Once dry, dab 5-petal blossoms (¾–1 inch wide) in soft blush, layering a slightly deeper pink toward the center. Add tiny white highlight dots for dimension. Leave generous negative space. Let dry thoroughly and cure. It’s art gallery meets dinner party.


30. Rainbow Beaded Stem Martini Glasses

Okay but these stems?? Stacked rainbow bead effects make these martini glasses feel like wearable jewelry — playful, bold, and ready for the most colorful cocktail night ever.

Use clear martini glasses and glass bead paint or dimensional enamel in bright shades (yellow, orange, pink, blue, green). Apply painter’s tape to protect the bowl. Working section by section, build raised “beads” along the stem using small round dots stacked vertically. Let each color set slightly before adding the next to avoid smearing. Remove tape once tacky. Allow 48 hours full cure time. Margarita night just got a glow-up.


31. Sunset Garden Wine Glass Duo

These florals are giving golden-hour-in-a-garden energy. Warm oranges, coral pinks, and lush green leaves swirl around the bowl like a hand-painted bouquet you picked yourself. The tiny details on the stem and base? Chef’s kiss. It feels romantic, artsy, and just a little bit boho.

Use large wine glasses and glossy enamel paints in coral, peach, sunflower yellow, teal, and leafy green. Start by sketching loose flower clusters (about 2–3 inches wide) with a chalk marker. Paint petals using a flat brush in layered strokes, blending a darker shade toward the center while wet. Add thin stems and leaves with a liner brush, then finish with tiny white highlight dots. Let dry 24 hours and oven cure per instructions. Date night just got prettier.


32. Personalized Floral Champagne Flutes

Floral champagne flutes with names in elegant script? Yes please. These red and blush blossoms wrap around the glass like a celebration in bloom — perfect for weddings, anniversaries, or a Galentine’s toast moment.

Use tall champagne flutes and opaque enamel paints in crimson, blush pink, and soft white. Paint 1-inch 5-petal flowers in a scattered pattern, layering lighter strokes on top for dimension. Add tiny berry dots in the centers using a dotting tool. Once fully dry, apply a white paint pen or vinyl decal for the name in cursive (about 3–4 inches tall). Tie a satin ribbon around the stem for that gift-ready finish. Toast-worthy and totally Pinterestable.


33. Dragonfly Garden Gift Glass

This one is whimsical garden fairy-core in glass form. Bright blue dragonflies flutter between pink blooms and curvy green stems — and the spiral-painted stem detail makes it feel extra special (and giftable in that cute box moment).

Use a standard wine glass and enamel paints in sky blue, bubblegum pink, and fresh green. Paint dragonfly wings using elongated oval strokes (about 1.5 inches long), adding tiny yellow body stripes with a detail brush. For flowers, create 1-inch daisies with layered pink petals and yellow centers. Wrap painter’s tape diagonally around the stem and paint exposed sections green for a spiral effect. Remove tape while tacky. Cure fully. It’s basically spring in a sip.


34. Mystic Cat & Moon Stemless Glass

Okay but this is witchy-art-core and we are obsessed. A mystical cat framed by deep blue roses and a triple moon symbol? It’s bold, moody, and slightly magical — like your glassware just joined a coven.

Use a stemless glass and outline your design first with black glass liner (let dry completely). Fill in the cat face with muted gray enamel and add bright yellow-green eyes for drama. Paint roses in rich cobalt and navy, layering lighter blue highlights for depth. Add the triple moon symbol above using metallic silver or white enamel. Work in sections to prevent smudging. Let cure 48 hours before use. Perfect for spooky season sipping.


35. Mini Snowman Winter Tumblers

These tiny snowmen are dangerously cute. Scattered around the bowl with little orange hats and green scarves, they feel sweet, nostalgic, and ready for hot cocoa season. The delicate gold rim? Subtle holiday sparkle.

Use rounded tumblers and enamel paints in white, black, orange, red, and green. Paint small stacked white circles (about ¾ inch tall total) for each snowman. Add black dot eyes, tiny coal buttons, and a triangle carrot nose. Use a liner brush for the scarf. Scatter soft gray snowflake shapes and tiny gold dots around. Let dry 24 hours and oven cure if possible. Cozy winter movie night approved.


36. Romantic Wildflower Flute Trio

These tall flutes are a full floral fantasy. Packed with layered red, pink, cream, and mustard blooms, they feel lush, joyful, and made for celebrations. The soft ribbon tied at the stem? Immediate bridal shower vibes.

Use tall wine or champagne glasses and opaque enamel paints in red, dusty pink, mustard yellow, ivory, and sage. Paint layered petal clusters starting from the bottom third of the bowl and building upward. Use a flat brush for broad petals and a liner brush for thin leafy sprigs weaving between blooms. Add tiny brown or gold dot centers for texture. Keep the top inch clear for sipping space. Let cure fully before washing. Can you picture these clinking at sunset? Absolute main-character energy.

34 DIY Felt Decor Ideas You Can Customize for Any Color Direction

Felt has officially entered its power era, and these 34 DIY felt decor ideas show just how dramatically this simple material can transform. From bold cuts to sculpted, high-texture designs, every project feels like a creative upgrade that instantly wakes up your space.

Collage of DIY Felt Decor Ideas

34 DIY Felt Decor Ideas So Bold and Textured They’ll Completely Transform Your Space in 2026

Felt decor is exploding with energy in 2026, turning soft fibers into fierce, color-drenched statement pieces that feel sculptural, vibrant, and impossibly fun. With dramatic layering, playful shapes, and textures that practically leap off the surface, felt is stepping into the spotlight as one of the most exciting craft materials of the year.

This collection of 34 DIY Felt Decor Ideas dives into oversized felt florals, dimensional wall panels, geometric builds, luxe tassel creations, and bold mixed-media combinations that look straight out of a designer studio. Every idea encourages fearless creativity, giving you felt decor that feels expressive, artistic, and so striking you’ll want to redesign your entire room around it.

1. Sweet Sleepy Gingerbread Ornaments

These aren’t just gingerbread ornaments — they’re the softest, dreamiest little cookie babies to ever grace a Christmas tree. With their blushing cheeks, delicate blanket stitching, and perfectly tied bows, they feel like something straight out of a Scandinavian holiday fairytale.

Start with a 4½–5 inch gingerbread template and cut two body shapes from wool-blend felt (try warm brown, oatmeal, or soft gray for a chic neutral set). Cut a scalloped “icing hair” piece from white felt and stitch it on with tiny whip stitches before assembling. Embroider sleepy lashes and a curved smile using 2 strands of black embroidery floss in backstitch, and add blush with diluted pink fabric paint or pastel chalk. Blanket stitch the front and back together using matching floss, leaving a 1½-inch gap to lightly stuff with polyfill (don’t overfill — you want them softly squishy).


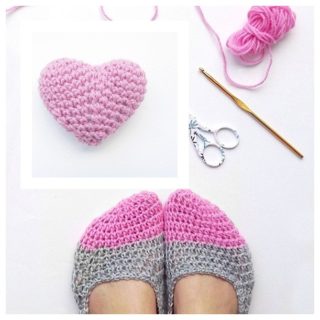
2. Vintage Romance Embroidered Heart

This heart is giving heirloom treasure energy — like something discovered in an antique sewing basket tied with faded ribbon. The layered scallops, delicate floral embroidery, and hand-stitched edging make it feel impossibly romantic.

Cut one 4-inch heart from rosy pink felt and a slightly larger scalloped heart (about ¼ inch bigger all around) from cream or white felt. Before assembling, embroider woven wheel roses using 6 strands of cream floss and add French knot centers in mustard yellow. Stitch small leaves with satin stitch in sage green. Layer the hearts and blanket stitch around the edge using contrasting olive or dusty green thread, spacing stitches about ¼ inch apart for that bold handmade look. Lightly stuff with polyfill before closing and insert a 5–6 inch cotton cord loop into the top seam.


3. Fiesta-Ready Felt Llamas

These llamas are basically the confetti cannons of the ornament world. Bright saddle blankets, tiny tassels, and embroidered details make them feel festive and full of personality. Hang them on a boho Christmas tree, string them into a nursery garland, or gift one to your most colorful friend — you know the one.

Cut two 5-inch llama shapes from white or cream felt and stitch together using small whip stitches, stuffing firmly so the body holds its shape. For the saddle blanket, cut a 2 x 3 inch rectangle from bold felt (hot pink, turquoise, or orange). Layer a slightly smaller contrasting rectangle on top and stitch zigzag and straight embroidery lines using 3 strands of bright floss. Add mini tassels made by wrapping embroidery thread around two fingers 10 times, tying at the top, and trimming the ends. Secure the blanket with tiny stitches (avoid hot glue if it’s an heirloom piece).


4. Woodland Banjo-Playing Badger

If whimsical woodland creatures had a bluegrass band, this little badger would be headlining. From his mossy green felt shorts to the teeny-tiny banjo slung across his chest, he’s pure storybook magic. He feels like he belongs hanging in a cozy cabin at Christmastime.

Form the body using needle felting: tightly roll wool roving into a cylinder about 4 inches tall and felt with a 38-gauge needle until firm. Add black roving to shape the back and white roving for the face stripe, felting gently in thin layers. For the shorts, cut soft felt to fit around the waist (approx. 1½ inches tall), secure with a few hand stitches in matching thread, and add thin felt suspenders glued lightly with fabric glue. Create the banjo using layered cardstock or thin wood cut to about 2 inches long; glue carefully with a tiny dot of hot glue. Stitch a ribbon loop into the back for hanging. Woodland charm: achieved.


5. Glam Gothic Black Cat Wall Hanging

This is Halloween drama done right. Oversized orange eyes, sparkly sequins, a crescent moon backdrop — it’s spooky season but make it couture. It’s bold enough for a statement wall and festive enough to anchor your October mantel styling.

Draw an 8–10 inch tall cat silhouette and cut from stiff black felt. Cut a crescent moon (about 7 inches tall) from golden yellow felt and stitch behind the cat’s shoulder. Outline the cat with black sequins sewn individually using matching thread for that subtle shimmer. Embroider facial details using satin stitch (orange for eyes, pink for nose) and add tiny white felt fangs stitched into place. Lightly stuff the cat with batting for dimension before sealing the back with whip stitches. Add a sturdy ribbon hanger at the top. It’s spooky chic and unapologetically fabulous.


6. Pastel Floral Hoop with Sleeping Fox

Soft florals wrapped around a delicate metal hoop with a snuggly little fox in the center? This is nursery wall art meets springtime fairytale. The mix of pastel blooms and layered felt leaves makes it feel airy, romantic, and wildly pin-worthy.

Start with a 10–12 inch metal craft ring. Cut 2–3 inch leaves from mint and sage felt and attach around half the hoop using hot glue, overlapping slightly. For rosettes, cut 1 x 8 inch strips of felt, roll tightly, and glue at the base. Create the fox by cutting two 4-inch orange felt shapes, adding a white tail tip and belly patch before stitching together with blanket stitch. Lightly stuff and close. Tie strong thread around the fox and knot securely onto the hoop so it “floats” in the center. It’s woodland whimsy at its finest.


7. Folk Art Horse Ornament

This horse looks like it trotted straight out of a Scandinavian Christmas market stall. The earthy rust tones, embroidered leaf motifs, and delicate bead accents give it handcrafted heritage vibes in the most beautiful way.

Cut two 5-inch horse silhouettes from rust felt. Before assembling, embroider leaf shapes using satin stitch and long straight stitches in cream, tan, and muted mustard floss. Sew tiny seed beads along curved garland lines using clear thread for a floating effect. Layer with a thin sheet of batting inside and blanket stitch around the edge using cream thread, spacing stitches evenly at about ¼ inch. Add a twisted embroidery floss cord (6 inches long) into the top seam for hanging. Timeless, textured, and totally heirloom-worthy.


8. Snowy London Scene Ornament

This ornament is basically a holiday postcard you can hang on your tree. Big Ben, glowing windows, beaded snowfall, and the fluffiest little sheep in a red scarf — it’s festive storytelling in one perfect circle.

Cut a 4-inch base circle from mint or winter green felt and a slightly larger backing circle from gray felt. Appliqué building shapes from tan and brown felt, stitching window details with dark brown floss in tiny straight stitches. Add clear seed beads randomly across the sky using transparent thread for snow. Create the sheep face from gray felt, stitch on black eyes, and attach a small tuft of white roving for fluffy texture. Sandwich layers with light batting and whip stitch closed, inserting a decorative beaded hanger at the top. London Christmas magic? Absolutely.


9. Mini Needle-Felted Holiday Trio

These tiny holiday characters are dangerously cute. A smiling snowman, a chubby Christmas tree, and the sweetest little reindeer — they look like they belong in a snow globe village. Perfect for tiered trays or gifting in mini kraft boxes tied with twine.

Roll wool roving tightly into small balls and cones about 2 inches tall, then needle felt repeatedly until dense and smooth. Add colored roving for scarves, tree ornaments, and reindeer noses, felting gently to secure details. Insert a trimmed toothpick or floral wire inside the tree and reindeer for structure before finishing the shape. Attach tiny black beads for eyes with a dot of fabric glue. Arrange them together and try not to squeal.


10. Sunny Felt Pineapple Plush

This felt pineapple is sunshine in softie form. Bright golden yellow with layered leafy greens on top, it’s playful, modern, and ridiculously happy. Style it on a summer shelf, pop it into a kid’s room, or gift it to your most tropical-loving friend.

Cut two 6-inch pineapple body pieces from golden felt and, for extra dimension, add a 1½-inch wide side strip around the edge before closing. Stitch using a sewing machine with a ¼-inch seam allowance or hand sew with tight backstitch. Stuff firmly with polyfill so it stands upright. Embroider small diagonal “X” stitches across the front using darker yellow or gold floss. Cut 3–5 inch leaf shapes from two shades of green felt, fold slightly at the base for dimension, and stitch securely into the top seam. It’s juicy, joyful, and shelfie-ready. Can you even handle this level of cute?


11. Golden Retro Bauble Ornaments

These golden felt baubles are giving full-on vintage glam — like 1960s Christmas lounge meets modern handmade chic. The rich amber, marigold, and honey tones paired with delicate gold bead bursts? It’s sparkle without plastic. Hang a cluster together and suddenly your tree looks curated, not chaotic.

Cut classic ornament shapes (about 4–5 inches tall) from mustard, burnt orange, and ochre felt. Before assembling, stitch starburst designs using gold embroidery floss and bugle beads — anchor each bead with small backstitches so they lie flat and secure. Scatter tiny seed beads around for that retro shimmer. Place front and back together, blanket stitch in metallic gold thread, leaving a 1½-inch gap to lightly stuff with polyfill. Insert a 5-inch gold cord loop at the top seam and close. It’s mid-century magic, handmade by you.


12. Minimal Nordic Snowflake Set

Clean. Crisp. Classic. These white felt ornaments with bold red stitched snowflakes are Scandinavian Christmas perfection. The tiny gingham bows and personalized tag detail? Stop. It’s giving cozy cabin, cinnamon candles, and soft snowfall outside the window.

Cut star, heart, and circle shapes about 4 inches wide from white felt. Lightly trace a snowflake design with a disappearing fabric pen, then embroider using 2–3 strands of bright red floss in backstitch and straight stitch for crisp lines. Stitch front and back together with white thread, lightly stuffing for subtle dimension. Add a 4-inch white thread hanger and tie a mini gingham bow (about 1½ inches wide) at the top with hot glue. Optional: cut a small ½ x 2½ inch red felt tag for names and stitch it into the hanging loop. Nordic vibes unlocked.


13. Merry & Bright Felt Tree Ornaments

These felt Christmas trees are basically happiness stitched into shape. The colorful teardrop “lights,” golden garland swirls, and tiny star toppers make them feel playful and nostalgic — like childhood Christmas drawings come to life.

Cut two tree shapes about 5 inches tall from emerald green felt. On the front piece, stitch a spiral garland using chain stitch with yellow floss, spacing loops about ½ inch apart. Add colorful French knots or tiny satin stitches for lights in pink, blue, red, and purple. Glue or stitch a small ¾-inch felt star at the top. Layer both pieces, blanket stitch around the edges in green thread, lightly stuff, and insert a 6-inch pink ribbon loop before closing. They’re cheerful, bold, and totally tree-worthy.


14. Personalized Penguin Family Ornaments

Okay but these little penguins in red sweaters with names stitched across the front? My heart. They’re festive, slightly squishy, and ridiculously giftable. Perfect for family trees, teacher presents, or stocking stuffers that actually mean something.

Cut penguin body shapes (about 4½ inches tall) from black felt and belly panels from white felt. Stitch the belly onto the front using small whip stitches. Add a tiny gold glitter felt beak and embroider eyes with black thread. For the sweater, cut a red felt piece to wrap across the body (about 2 inches tall), stitch in place, then personalize with white embroidery floss using backstitch lettering. Stitch front and back together with blanket stitch, lightly stuffing before closing. Add red-and-white twine as a hanger. Family keepsake level: elite.


15. Felt Strawberry Play Set

These plump felt strawberries look good enough to snack on — juicy red, tiny yellow seed stitches, and leafy green tops that curl just slightly at the edges. They’re perfect for play kitchens, summer garlands, or the cutest bowl filler ever.

Cut two rounded strawberry shapes (about 3 inches tall) from bright red felt. Before assembling, stitch scattered seed marks using small straight stitches in yellow floss, spacing them randomly for a natural look. Cut leafy tops from olive green felt (about 2½ inches wide), snip small notches for detail, and stitch onto one strawberry piece. Blanket stitch front and back together, stuffing firmly with polyfill so they feel satisfyingly plump. Close tightly and fluff the top leaves outward. Summer sweetness, stitched up.


16. Gingerbread “HO HO HO” Felt Garland

This garland is peak cozy-core. Soft gingerbread letters, peppermint details, holly leaves, and whipped-cream-style icing edges? It’s like a bakery window display — but make it fabric. Draped across a mantel, it instantly screams holiday cheer.

Sketch block letters about 4 inches tall spelling “HO HO HO” and cut each from brown felt. Add white felt icing drips to the tops and stitch in place with small whip stitches. Embroider decorative dots and swirls using white and red floss. Lightly stuff each letter before sealing with blanket stitch. Thread wooden beads (¾ inch wide) onto strong twine and stitch each letter onto the string, spacing 2 inches apart. Add felt holly leaves and red bead berries between letters using hot glue. It’s sugary sweet without the calories.


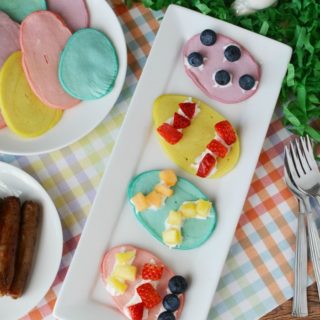
17. Pastel Floral Easter Eggs

These pastel felt eggs are springtime in ornament form. Layered felt blossoms, soft green leaves, and tiny pearl bead centers make them feel delicate and romantic — like something you’d display in a glass cloche.

Cut egg shapes about 4 inches tall from pastel felt (blush, lilac, baby blue, soft yellow). Cut simple five-petal flowers (1–1½ inches wide) from contrasting felt and stitch them onto the egg using matching thread. Add pearl beads in the centers with a few tight stitches. Tuck small leaf shapes behind flowers and secure with whip stitches. Stitch front and back together using coordinating floss, lightly stuffing before closing and inserting a 4-inch ribbon loop. It’s Easter décor that feels fresh and elegant.


18. Sleepy Farm Cow Ornaments

These felt cows are peak cottagecore charm — soft neutral bodies, sweet pink snouts, and tiny stitched lashes that make them look like they’re mid-daydream. Hang them in a farmhouse kitchen or add them to a country-style Christmas tree for a little rustic whimsy.

Cut cow shapes (about 5 inches wide) from cream, tan, or chocolate brown felt. Add irregular white spot pieces stitched onto the front using small whip stitches. Cut an oval snout (about 1½ inches wide) from blush pink felt and embroider nostrils with brown thread. Stitch sleepy lashes with black floss in small curved lines. Assemble front and back with blanket stitch, stuffing moderately for a soft but sturdy finish. Add a 5-inch twine loop at the top seam. Barnyard but make it adorable.


19. Cozy Winter Character Ornaments

From snow globes to reindeer to scarf-wrapped penguins, this mix-and-match set feels like a whole winter storybook collection. Each one has layered felt pieces and tiny embroidered details that make them irresistibly giftable.

Create base shapes (about 4 inches tall) from neutral felt. Layer contrasting felt pieces for faces, scarves, trees, or houses and stitch them down before assembling. Use French knots for snow dots, satin stitch for tiny details, and add micro seed beads for sparkle. Lightly stuff and blanket stitch closed, inserting baker’s twine loops at the top. Make a few different designs and bundle them as a handmade ornament set. Instant holiday hero.


20. Rustic Berry Star Ornament

This felt star with embroidered branches and glossy red bead berries is understated but stunning. It feels like something you’d find in a cozy mountain cabin — simple, natural, and timelessly festive.

Cut two 4½-inch star shapes from soft gray or cream felt. On the front piece, embroider branch lines using brown floss in backstitch, radiating from the center. Add short green straight stitches along the branches for pine needles. Sew clusters of three red glass seed beads at the ends for berries, securing tightly. Layer with the back piece, lightly stuff with batting, and blanket stitch closed using matching thread. Insert a 5-inch gold ribbon loop before sealing. Classic, cozy, and forever Christmas.


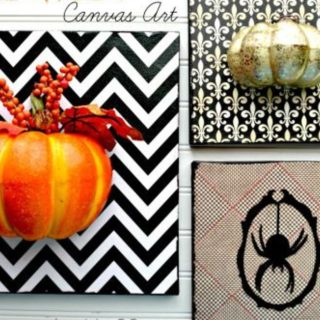
21. Pastel Pumpkin & Toadstool Set

Soft blush pumpkins, powder-blue gourds, and the cutest little toadstools? This is fall but make it dreamy. The muted palette feels straight out of a Pinterest-perfect autumn flat lay — cozy, whimsical, and just a little bit fairycore. Scatter them in a bowl, string them into a garland, or tuck them into your seasonal tiered tray for instant soft-spoken magic.

Cut pumpkin shapes about 4 inches tall from pastel felt (blush, dusty blue), stitching vertical curved lines down each panel with matching floss using long running stitches. Add a small ¾-inch rectangle of glitter gold felt at the top for the stem. For mushrooms, cut a 3½-inch rounded cap from rust felt and a small oval stem from cream; add white French knots for spots. Blanket stitch front and back together, lightly stuffing before closing. They’re autumn, but in the chicest way possible.


22. Regal Felt Peacock Softie

This peacock is not subtle — and we love him for it. Jewel-toned tail feathers layered in teals and greens, tiny stitched details, and that proud little curved neck? He’s basically a felt showstopper perched on your bookshelf. Statement decor but handmade.

Cut two body pieces (about 6 inches tall) from deep blue felt. Layer feather shapes (3–4 inches long) from teal, lime, and gold felt, stitching each with small satin stitches and adding French knots or sequins for eye details. Attach the layered tail between the body pieces before sewing closed. Blanket stitch the edges, stuffing firmly so he stands upright. Add tiny stitched “V” details on the body with darker blue floss. Bold, artsy, unforgettable.


23. Smiling Croissant Ornament

Tell me this little croissant doesn’t deserve a Parisian bakery window display. The soft golden felt layers, blushing cheeks, and bead eyes make it irresistibly sweet. It’s playful, cozy, and perfect for kitchen decor or foodie-themed holiday trees.

Cut three curved crescent layers (about 5 inches wide) from tan and golden felt. Layer them slightly overlapping and stitch along the curves with small whip stitches for dimension. Add two 4mm black beads for eyes and lightly blush the cheeks with pink chalk pastel. Stitch a white felt backing piece underneath and blanket stitch around the edges, stuffing gently so it stays puffy but structured. Add a 5-inch white ribbon loop. Bonjour, cuteness.


24. Hot Cross Bun Cuties

These felt hot cross buns are spring brunch energy in ornament form. The stitched cream cross, chocolate chip details, and soft, squishy shape make them look fresh from a (fabric) oven. Easter décor just got adorable.

Cut rounded bun shapes (about 4 inches wide) from warm beige felt. Stitch tiny brown ovals for “chocolate chips” onto the front. Cut a cream felt strip (½ inch wide) and stitch it across in a cross shape using small whip stitches. Place front and back together, lightly stuff with polyfill, and blanket stitch closed. Insert a 4-inch elastic or ribbon loop at the top seam. They’re festive, nostalgic, and honestly almost edible-looking.


25. Safari Animal Ornament Trio

A giraffe, a zebra, and a lion walk into your décor… and immediately steal the spotlight. These soft safari faces feel perfect for nurseries, baby shower gifts, or animal-themed birthday parties. Wholesome, handmade charm at its finest.

Cut simplified animal face shapes (about 4–5 inches tall) from neutral felt tones. Layer smaller felt pieces for muzzles, manes, and ears, stitching them down before assembling. Embroider simple dot eyes and tiny stitched smiles using black floss. Sandwich with a backing piece and blanket stitch closed, stuffing lightly for a plush feel. Attach 5-inch ribbon loops securely at the top seam. It’s safari chic — but soft and sweet.


26. Bejeweled Retro Star Ornaments

These layered felt stars are full-on glam. Metallic thread, sequins, glitter accents — they look like vintage tree toppers shrunk down into ornament form. Maximalist Christmas? Say less.

Cut two identical 5-inch star shapes from sturdy felt. For the front, layer smaller star shapes in contrasting colors and stitch around each edge with metallic gold or silver thread. Sew sequins and rhinestones individually using clear thread, spacing them symmetrically for that retro vibe. Place a thin batting layer inside and blanket stitch closed. Insert a metallic cord loop at the top point. They sparkle from every angle — yes, even in candlelight.


27. Enchanted Mushroom Fairy House

This isn’t just décor — it’s a tiny felt fairytale. A mushroom cottage with stitched windows, floral accents, and a teeny felt gnome sitting outside? It’s storybook whimsy brought to life. Perfect for woodland-themed shelves or imaginative play corners.

Create the base using tightly needle-felted wool over a foam core, shaping a rounded mushroom cap and cylindrical house base (about 6–7 inches tall). Add flat felt appliqué pieces for the door, windows, and flowers using fabric glue and small whip stitches for detail. Needle felt white dots onto the cap for texture. Build a circular felt base (6 inches wide) and attach small felt carrots and stepping stones. It’s miniature magic you can actually make.


28. Classic Red & Green Embroidered Set

Tree, star, and heart — but elevated. The delicate embroidered branches with red berry details give these ornaments timeless holiday elegance. They’re simple, yes, but beautifully intentional.

Cut 4½-inch shapes from white felt. On the front pieces, embroider thin branch lines using brown backstitch, then add small green straight stitches for leaves. Finish with tiny red French knots for berries. Layer with a backing piece and lightly stuff before blanket stitching closed. Insert a bold red satin ribbon loop at the top. Classic Christmas, but make it handcrafted.


29. Vintage Floral Felt Hearts & Trees

These floral felt ornaments feel like they belong in a cozy cottage with mismatched teacups and lace curtains. The layered fabric centers and scalloped felt edges make them soft, romantic, and wonderfully nostalgic.

Cut heart or tree bases (about 4 inches tall) from neutral felt. Cut smaller shapes from floral cotton fabric and adhere lightly with fabric glue before stitching around the edges using tiny running stitches. Layer onto a scalloped felt backing piece for contrast. Lightly stuff and blanket stitch closed. Add a red bead at the top where the ribbon meets the ornament for that charming finishing touch. Cottagecore Christmas? Absolutely.


30. Frosted Aqua Winter Tags

These icy aqua felt tags are winter elegance done right. Scalloped edges, layered snowmen and mittens, and delicate white embroidery details make them feel like gift wrap art pieces you almost don’t want to give away. Almost.

Cut rectangle bases (about 3 x 4½ inches) from aqua felt using scalloped-edge scissors or a die-cut machine. Layer white felt shapes (snowman, mitten, holly) and stitch around each with coordinating floss using backstitch and French knots. Add tiny seed beads for snow accents. Stitch a second rectangle behind, inserting a 6-inch white ribbon loop before closing. Tie onto gifts or hang as ornaments — they’re frosty, polished, and seriously pin-worthy.


31. Classic Cozy Christmas Ornament Set

This is the ultimate nostalgic Christmas lineup — snowman with rosy cheeks, gingerbread buddy, candy cane, mitten, stocking, tree, and a perfectly wrapped present. It’s giving handmade holiday market energy in the best way. The red-and-green palette with those sweet blanket stitches? Instant heirloom vibes.

Cut each shape about 4–5 inches tall from wool-blend felt (ivory, forest green, cherry red, tan). Add layered felt appliqués (stars, holly leaves, scarf, buttons) and secure with small whip stitches before assembling. Use 3 strands of embroidery floss for visible white blanket stitching around the edges, leaving a 1–1½ inch gap to lightly stuff with polyfill. Insert 6-inch red-and-white baker’s twine loops at the top seam and stitch closed. It’s a whole Christmas story stitched into ornaments — can you even handle the cuteness?


32. Pastel Felt Heart Garland

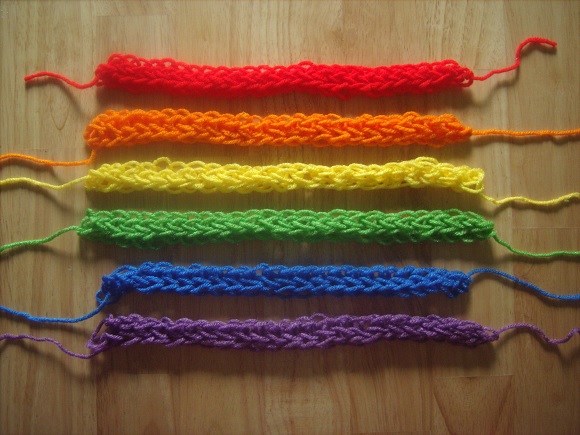
Soft peach, blush, coral, and creamy ivory hearts strung together with fluffy felt balls? This garland feels like Valentine’s Day met cottagecore and decided to stay forever. It’s delicate but cozy — perfect draped across a mirror, crib rail, or mantel.

Cut heart shapes about 3½ inches wide from pastel felt tones. Blanket stitch around each heart using contrasting white embroidery floss, lightly stuffing before closing so they stay plump but not bulky. Thread them onto sturdy cotton twine, alternating with 1-inch wool felt balls in coordinating shades. Space hearts about 2–3 inches apart and knot the twine behind each heart to keep them from sliding. Sweet, soft, and seriously swoon-worthy.


33. Spring Meadow Felt Wreath

This felt wreath is basically springtime in a circle. Bright green layered leaves, crisp white daisies with golden centers, and pops of lavender and cobalt florals — it’s fresh, happy, and guaranteed to wake up any door. Hello, new season glow-up.

Start with a 10–12 inch foam or grapevine wreath base and wrap it tightly with 1½-inch wide green felt strips, securing with hot glue at the back. Cut various leaf shapes (3–4 inches long) and layer them around the wreath, gluing at slight angles for fullness. Create daisies by cutting 2-inch white petal layers and adding a small ¾-inch fringed yellow felt circle in the center, rolled and glued for texture. Attach flowers with hot glue, clustering in groups of three for balance. It’s cheerful, bold, and totally front-door ready.


34. Pastel Easter Name Banner

These soft pastel felt letters spelling “HAPPY EASTER” are next-level adorable. Each letter is decorated with bunnies, butterflies, florals, and tiny bows — it’s like an Easter basket exploded in the cutest way possible. Nursery sweet meets spring party chic.

Cut large block letters (about 5–6 inches tall) from pastel felt and sew front and back pieces together using blanket stitch, lightly stuffing for dimension. Before closing, attach layered appliqués — tiny felt bunnies (2–3 inches), flowers with button centers, butterflies, and miniature bows — securing with whip stitches or fabric glue for tiny details. Add 8-inch white ribbon loops at the top of each letter, then string onto a long satin ribbon or cord, spacing about 1 inch apart. It’s festive, playful, and 100% photo-backdrop worthy.
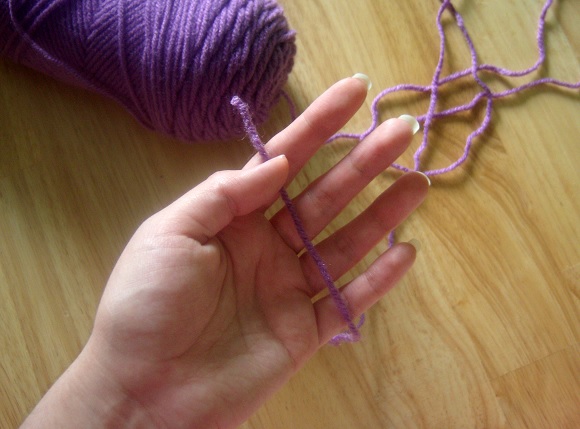
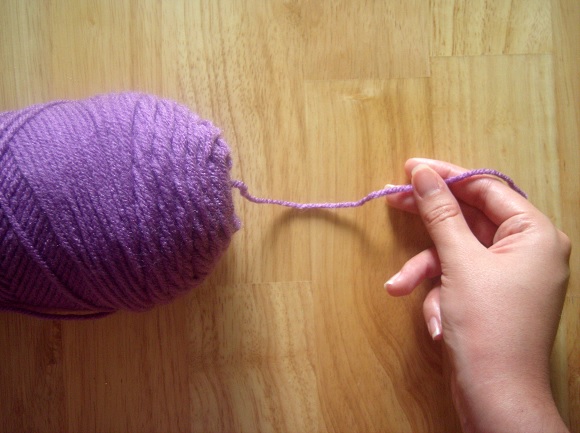
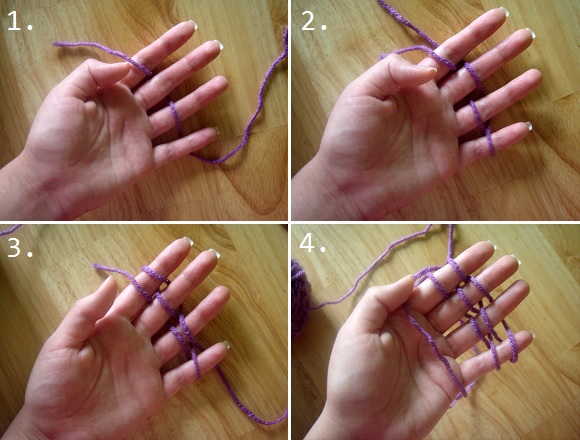
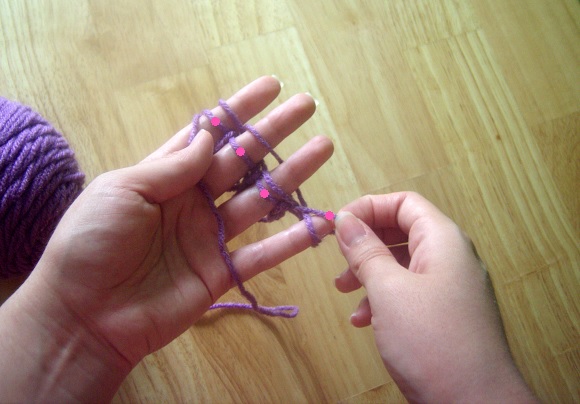
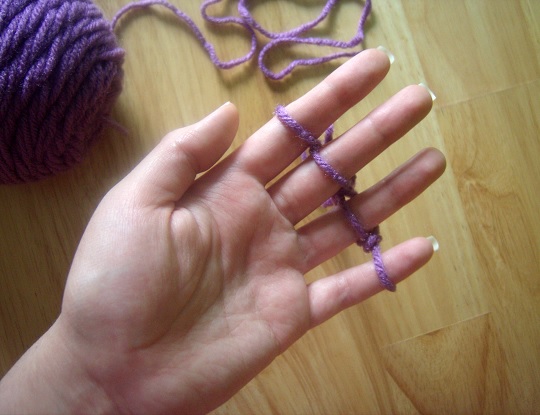
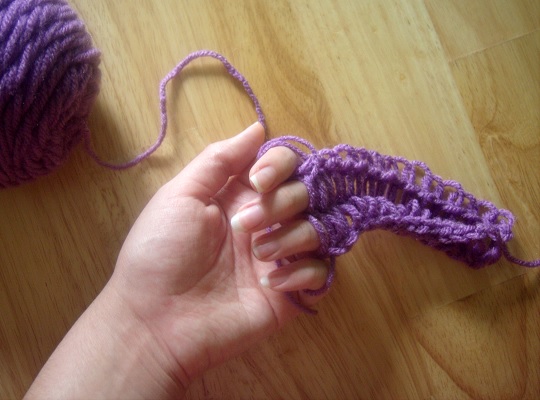
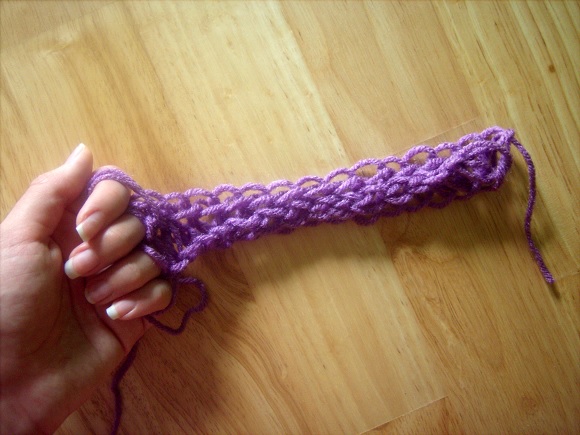
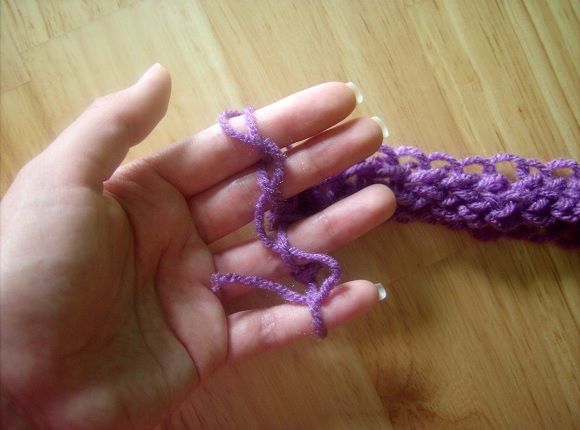
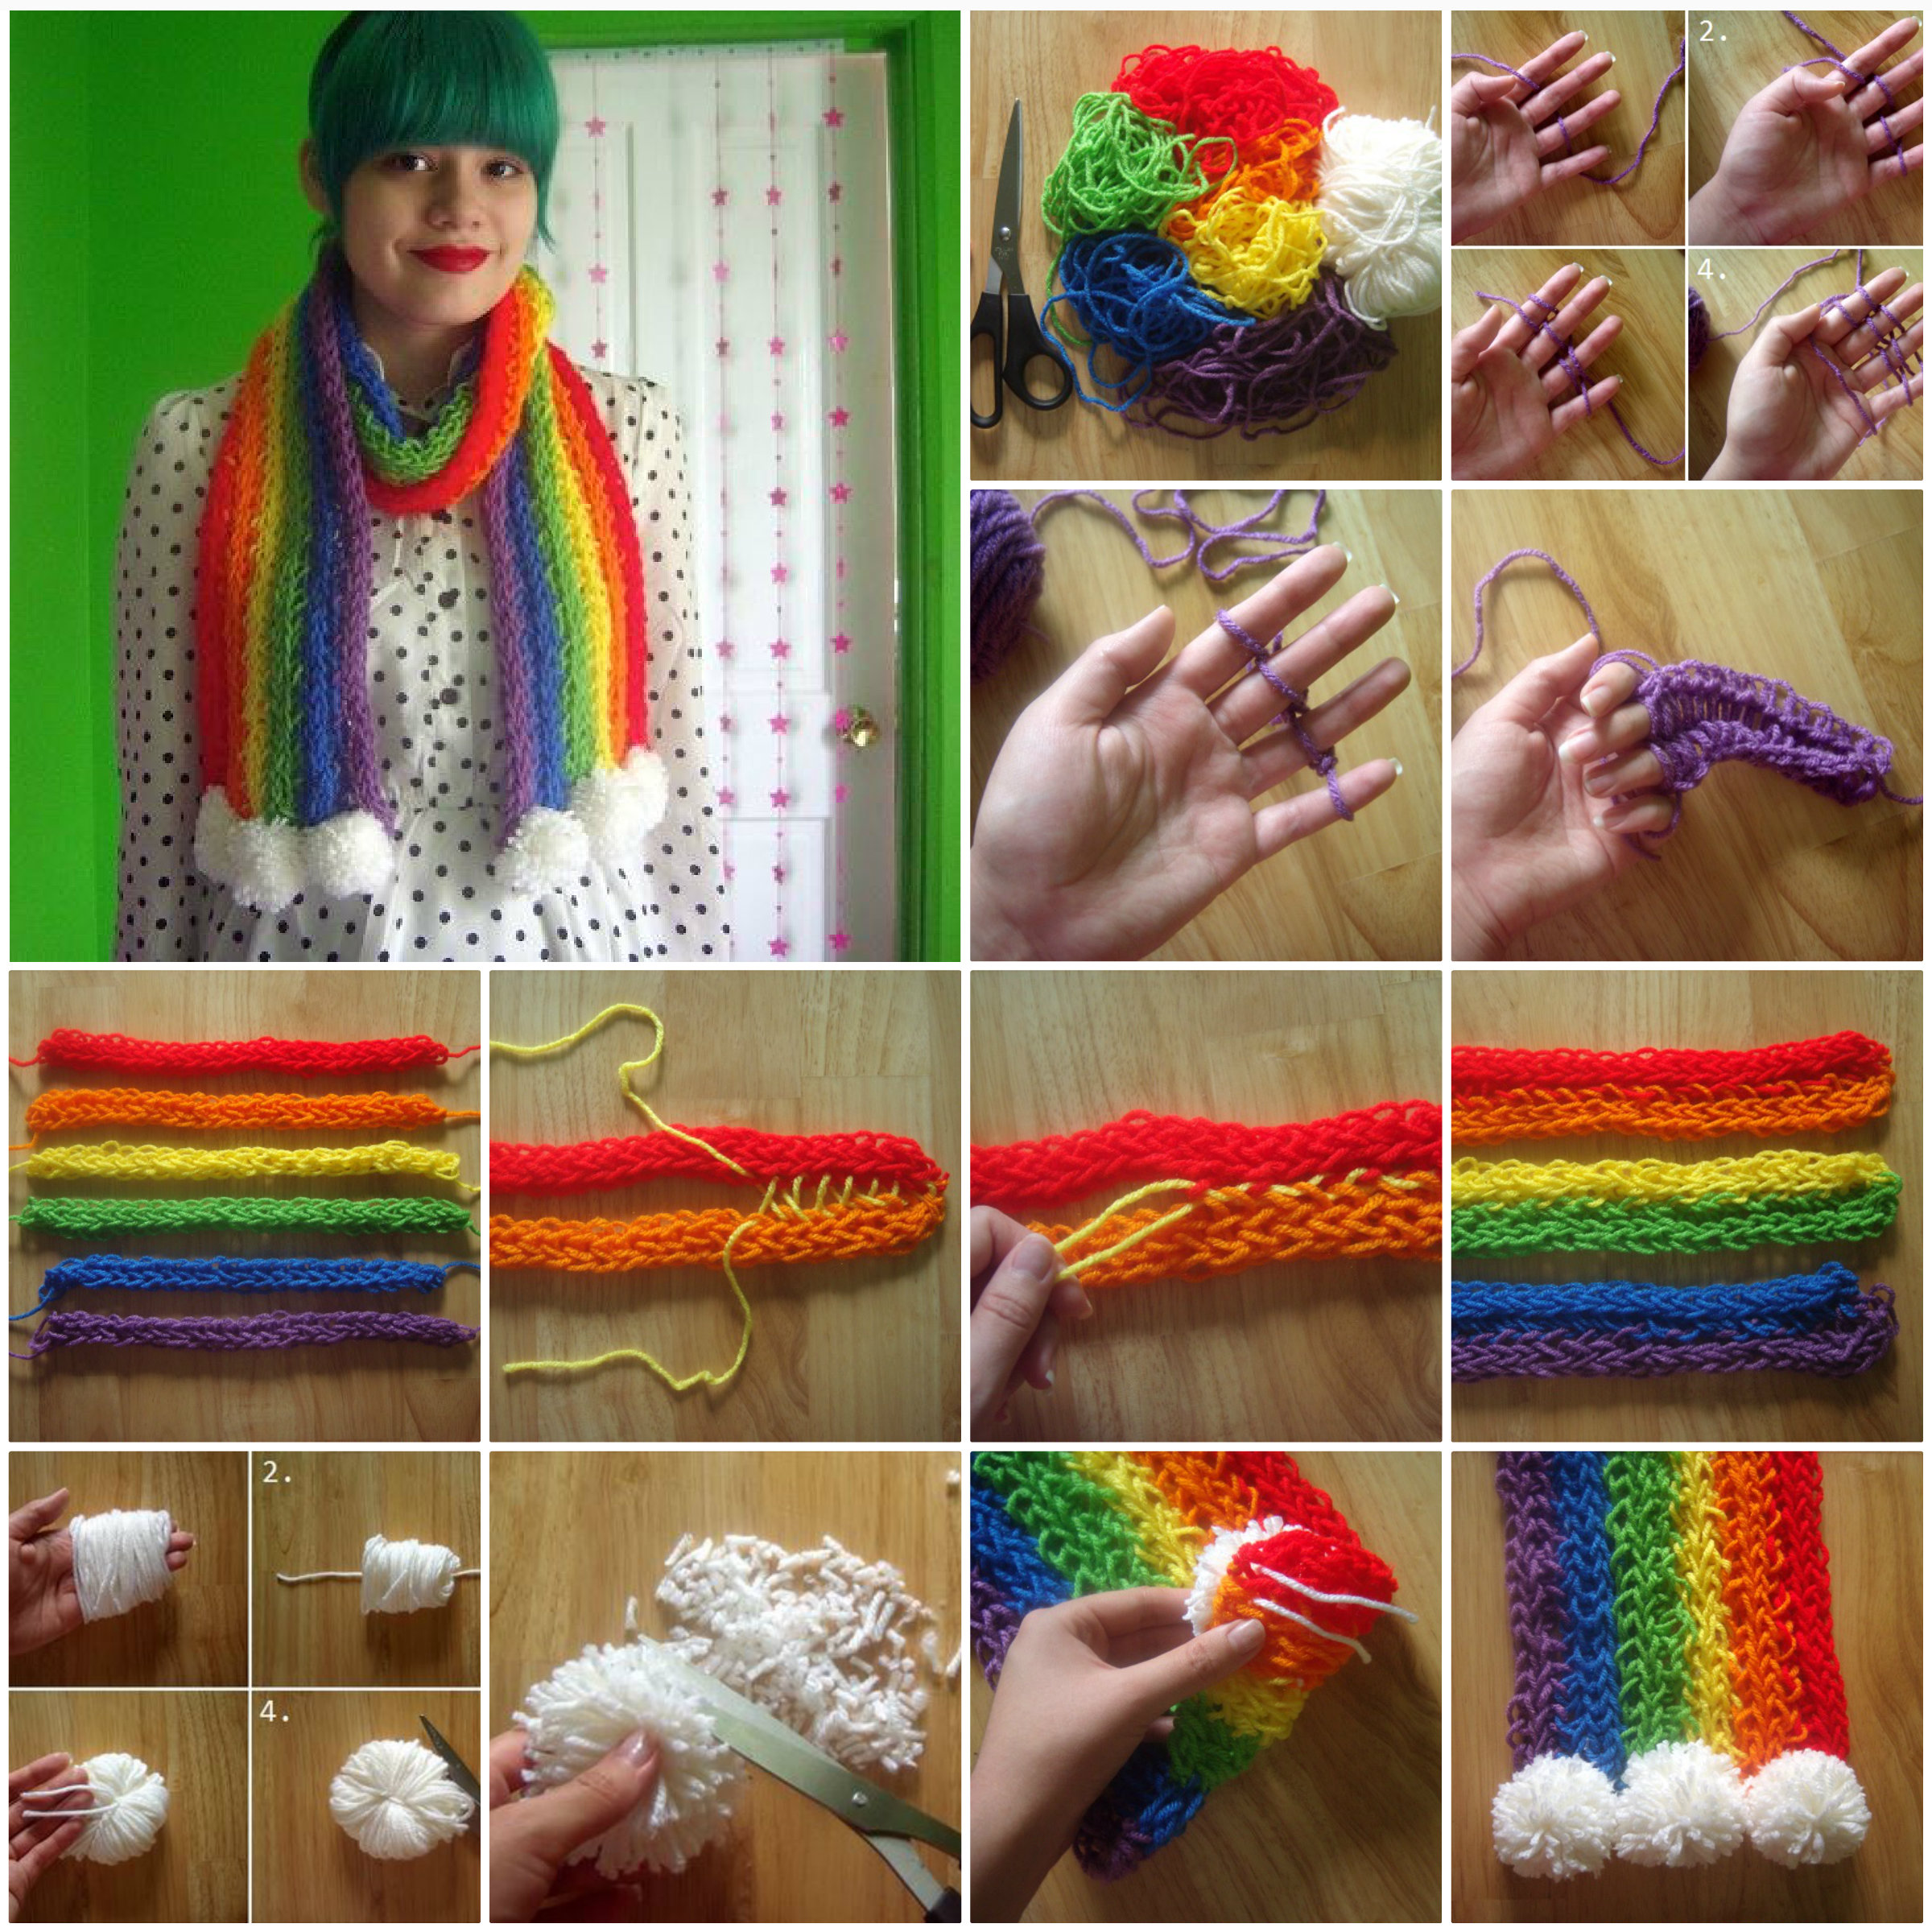
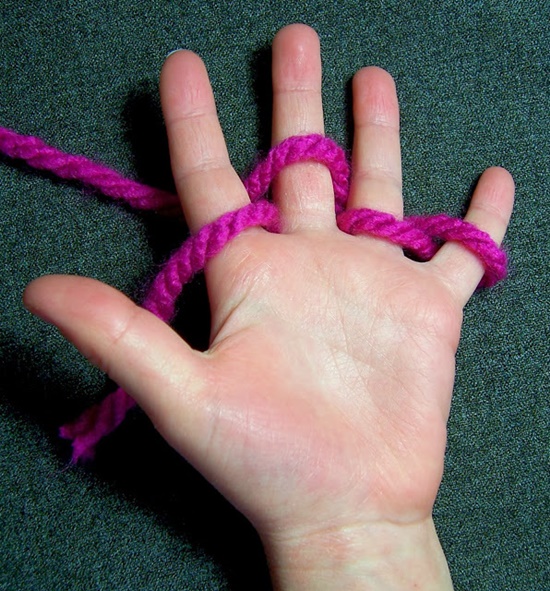
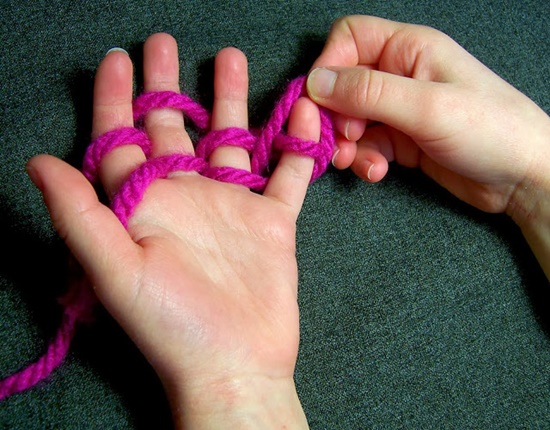
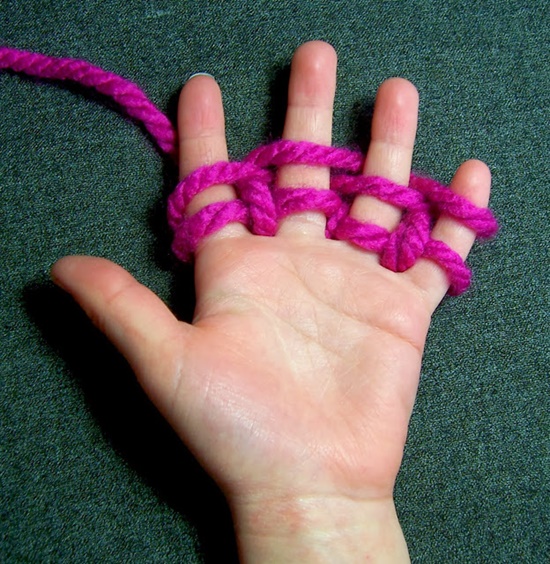
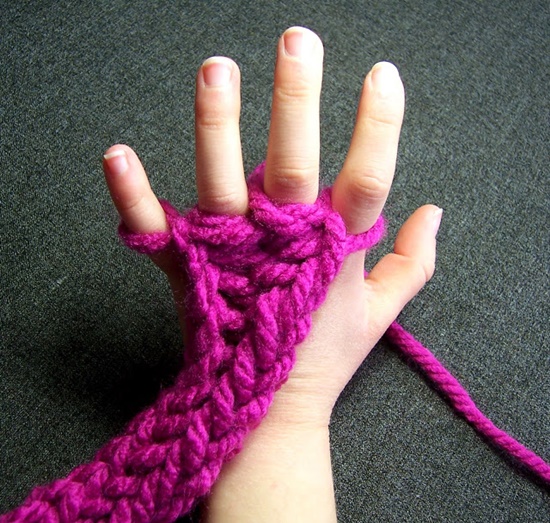
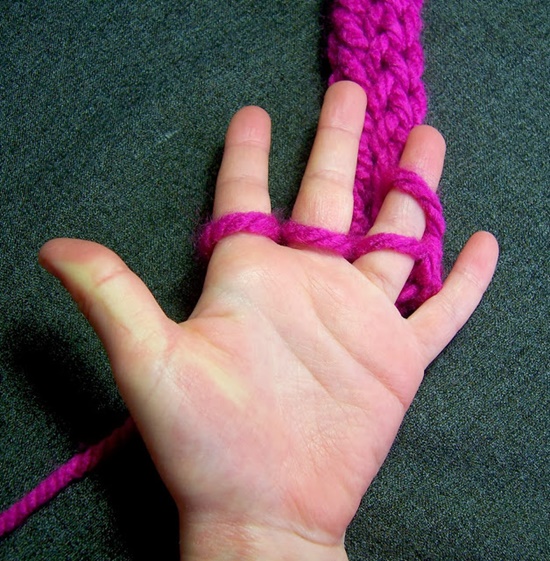
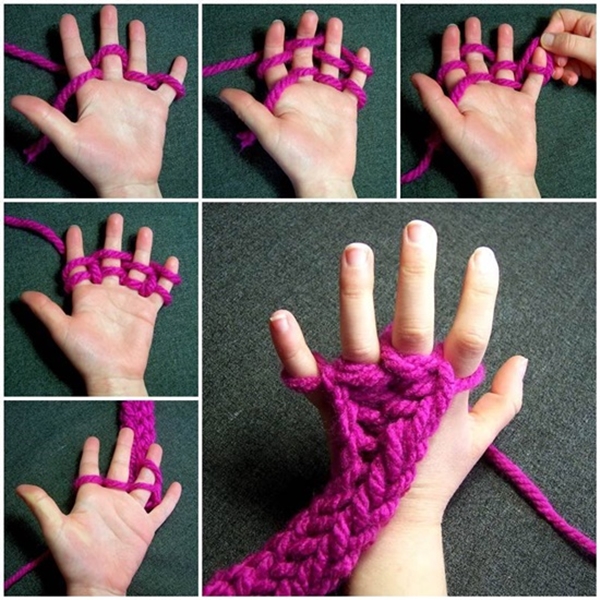
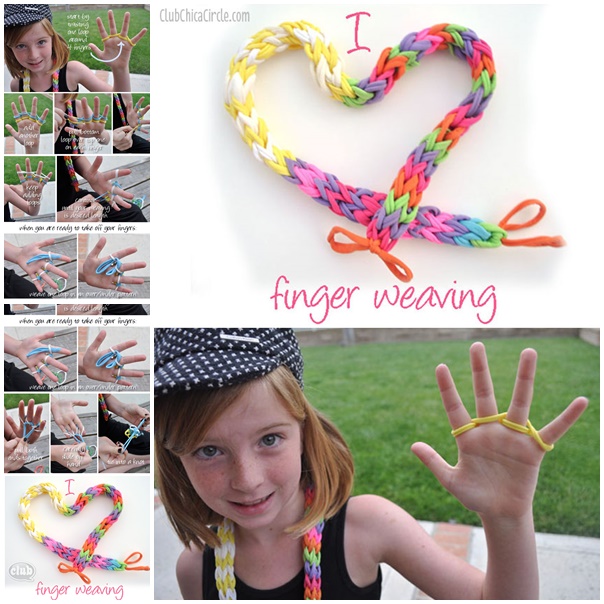
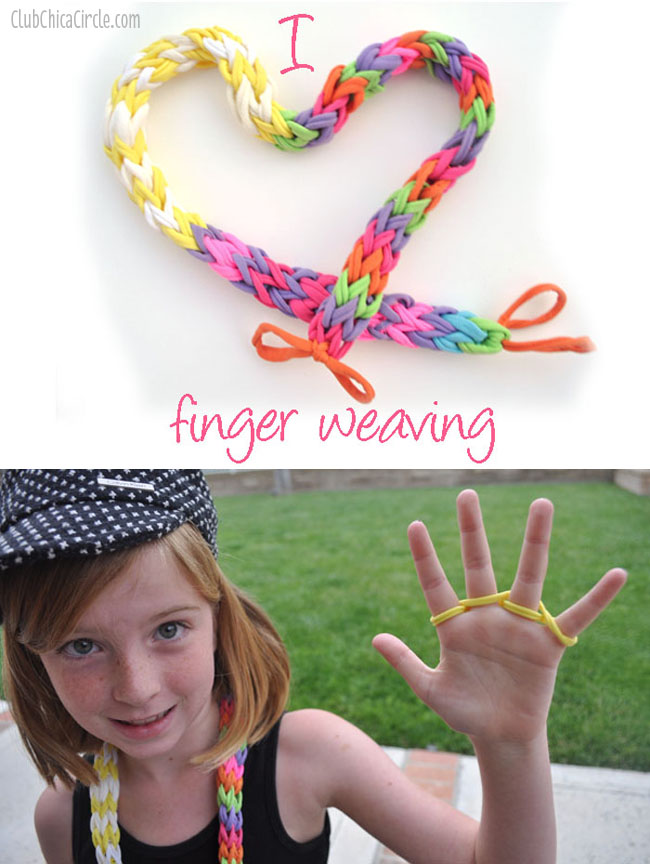
32 DIY Clay Monster Craft Ideas That Let You Go Full Imagination Mode

Monsters have officially escaped the scary movie and landed on your craft table. These 32 DIY clay monster craft ideas are packed with goofy grins, dramatic teeth, wild textures, and outrageous personalities that make every piece unforgettable. Expect creations that are weird and unapologetically fun.

32 DIY Clay Monster Craft Ideas That Bring Wild Imagination to Life in 2026

Clay monster crafts are taking over 2026 with big personalities, quirky shapes, and wildly expressive details that make every creature feel like it leapt straight out of a kid’s storybook or an artist’s sketch. Sharp teeth, goofy eyes, wobbly bodies, bold textures the weirder you sculpt them, the better they look.

This collection is packed with ideas ranging from cute, bubble-shaped monsters to dramatic multi-eyed creatures, colorful fantasy beasts, and textured little oddballs that instantly steal attention. Each project gives you a chance to go fearless with creativity, crafting monsters that feel playful, memorable, and delightfully unpredictable.

1. One-Eyed Clay Beastie

This chunky little cyclops is giving “friendly swamp monster who lives under a bridge but makes great soup.” The wonky horns, saggy arms, and single oversized eye make it perfectly imperfect and that’s the magic. Slightly creepy, wildly charming, totally pin-worthy.

To make it: sculpt a hollow dome body using air-dry or stoneware clay (about 4–5 inches wide). Add short arm stubs and cone-shaped horns with slip. Press in an eye socket, insert a clay eyeball, and texture the surface with a damp sponge. Once dry or bisque-fired, paint with acrylics or glaze in muddy browns and mossy greens. Seal with matte varnish if air-dry. Can you picture a whole shelf of these?


2. Goofy Monster Bowl Buddy

Meet the monster that just wants to hold your keys, crystals, or spare change. That wide-open mouth and pop-eye combo? Instant personality. It’s functional art with a wink equal parts silly and stylish.

Start with a pinch pot bowl about 3 inches tall. Pull the rim down into a big open “mouth” shape, then attach stubby arms and a single raised eye using slip and score. Smooth seams with a rubber tool. Glaze in glossy turquoise or seafoam and fire according to clay instructions. Perfect as a desk catchall—yes, please!


3. Nightmare Sculpture Showstopper

This one’s for the bold creatives only. Twisted, layered, and delightfully unsettling, it looks like it crawled out of a fantasy novel. Total conversation starter, total art flex.

Build this using oil-based clay or monster clay over a wire armature. Layer coils and slabs to create folds and ridges, blending with sculpting tools. Focus on asymmetry and exaggerated textures. Once finalized, mold and cast or seal with sculpting wax. Display it on a wood base for full drama. Are you brave enough?


4. Mini Monster Army

Tiny, colorful, and irresistibly cute these mini monsters look like they’re plotting something adorable. Each one has its own vibe, from devil horns to bunny ears. Collectible energy is STRONG here.

Roll polymer clay into 1-inch balls for bodies, then add tiny ears or horns. Use a needle tool to poke eye indents and insert micro beads or paint later. Bake according to package directions (usually 275°F for 15 minutes). Finish with gloss varnish for that candy-like shine. Warning: you won’t stop at just one.


5. Goblin Planter Head

This monster looks like it’s judging your plant choices and honestly? We love that for it. Droopy eyes, bat ears, and a perfectly hollow top make it spooky-cute planter perfection.

Hand-build a hollow head using pinch pot techniques, keeping walls about ¼ inch thick. Cut the top open for soil. Add ears and facial features with slip. Fire and glaze in mottled greens and yellows for a mossy goblin look. Add a succulent or trailing plant for extra personality. Can you picture this on a windowsill?


6. Cozy Axolotl Monster

This little guy is pure serotonin. Big glossy eyes, tiny hands, and those frilly horns? It’s giving “gentle monster who loves scarves and hot cocoa.”

Sculpt with polymer clay, starting with a pear-shaped body. Add stubby legs, arms, and axolotl-style horns. Bake, then paint with acrylics in soft blues and pinks. Finish with a satin or gloss sealant. Optional: sculpt a tiny scarf from clay or real yarn. Too cute to handle.


7. Retro Monster Diorama

Retro Monster Diorama

A monster… watching TV? Absolute icon behavior. This playful scene feels like stop-motion magic and childhood nostalgia had a baby.

Create the monster with polymer clay and wire for poseability. Build mini furniture from foam board or balsa wood, then paint. Bake the figure separately, assemble the scene with tacky glue, and seal everything with matte varnish. Perfect for shelf displays or storytelling photos. Who says monsters don’t chill?


8. Pocket-Sized Clay Creatures

These tiny monsters are giving collectible figurine vibes small enough to fit in your palm, cute enough to steal your heart. Bright colors and simple shapes make them beginner-friendly and giftable.

Use polymer clay in small marble-sized portions. Sculpt simplified animal-monster hybrids with tails and ears. Bake, then paint eyes with a dotting tool. Seal with gloss for durability. Pro tip: make them in sets of two or three for maximum Pinterest appeal.


9. Eyeball Tentacle Horror

Creepy but make it art. This surreal monster looks straight out of a sci-fi dream, with twisting tentacles and multi-eyes that demand attention.

Use armature wire for tentacles, wrap with aluminum foil, then cover in epoxy clay. Sculpt an eyeball sphere separately and attach before curing. Paint with layered acrylics reds, whites, and yellows then gloss the eyes for a wet look. Perfect for Halloween décor or creature collectors.


10. Whimsical Monster Bowl

Rustic, earthy, and just a little goofy this monster bowl feels like it lives in a fairy garden. Those tiny eyes peeking over the rim? Adorable surprise.

Throw or hand-build a small bowl, then distort the rim slightly for character. Attach little arms and eyes using slip. Glaze in speckled greens and browns for an organic finish. Fire and enjoy as a snack bowl, trinket dish, or plant holder. Can you picture this on your coffee table?


11. Spindly Bone Buddy Monster

This tall, skeletal monster feels like it wandered out of a whimsical dark fairytale. The stacked, ring-like limbs and oversized head give it eerie elegance creepy, but make it art-school chic.

Build this with stoneware clay using coil stacking for the legs and arms (roll coils about ½ inch thick). Keep joints exaggerated and uneven for character. Sculpt a hollow head separately, attach with slip, and texture lightly with a stiff brush. Fire and finish with layered underglazes plus white speckling for that dusty, ancient look. Totally shelf-stopping.


12. Round Creature Teapot

Functional monster alert! This rotund little being doubles as a teapot or lidded jar, and those red-tipped spikes? Chef’s kiss. Cute, quirky, and secretly very practical.

Throw or hand-build a round hollow body about 5–6 inches wide. Cut a lid opening and sculpt a snug-fitting lid with a knob. Add small feet, ear handles, and cone spikes using slip. Glaze in a soft speckled white and hand-paint accent colors. Fire carefully to avoid lid warping can you imagine serving tea from this?


13. Pumpkin Ghoul Cutie

This pumpkin monster is spooky-season perfection without being scary. Big grin, slouchy posture, and that tiny vine detail? Absolute fall vibes.

Use polymer clay and start with a teardrop pumpkin base. Add arms, flatten the bottom so it stands, then carve the face with a needle tool. Add a curled vine from green clay. Bake at 275°F for 15–20 minutes, then seal with satin varnish. A must-make for Halloween décor yes, please!


14. Triple-Eyed Monster Pots

These glossy monster containers are bursting with personality. From fangs to eye stalks, every angle gives you something fun to look at perfect for pens, brushes, or spooky treats.

Hand-build short cylinder pots with thick walls (about ⅜ inch). Add facial features and eye stalks with slip, making sure everything is well-supported. Glaze in bold, high-gloss reds and greens with contrasting teeth details. Fire and enjoy maximum monster energy on your desk.


15. Storybook Pumpkin Totems

Stacked pumpkins with soulful eyes and painterly textures these feel like they belong in an illustrated children’s book. Whimsical, cozy, and a little bit strange (the best combo).

Sculpt each pumpkin section separately using air-dry or ceramic clay, hollowing each piece. Stack with dowels or skewers for alignment. Once dry or fired, paint with acrylics in warm oranges and browns, adding fine line details with a liner brush. Seal matte. Can you picture a whole fall display?


16. One-Eyed Belly Laugh Monster

This chubby cyclops looks like it’s mid-laugh and we’re laughing too. The oversized mouth and wonky teeth make it delightfully goofy.

Create a hollow sphere body with slab construction. Cut out a large mouth opening and add individual tooth nubs. Sculpt tiny arms and feet, then attach. Glaze in speckled turquoise with pink lips for contrast. Fire and display proudly this one’s pure joy.


17. Clay Character Figure Study

More creature than monster, this sculpt feels cinematic and story-driven. From the pose to the accessories, it’s giving fantasy concept art brought to life.

Build over a wire armature using oil-based or epoxy clay. Block in anatomy first, then refine clothing folds and props. Smooth with isopropyl alcohol and sculpting tools. This is a longer-term project, perfect for advanced makers who love detail. Total creative flex.


18. Duck-Topped Cyclops

A monster… holding ducks? Wearing ducks? We’re obsessed. This playful piece blends surreal humor with pastel sweetness.

Sculpt a squat monster body in stoneware clay, keeping it hollow. Add multiple arm nubs and perch tiny duck figures on each (about ½ inch each). Glaze in soft blues and yellows with glossy finish. Fire and prepare for compliments because this is unforgettable.


19. Patchwork Plush-Style Monster

This monster looks like it leapt straight out of a plush toy collection. Soft shapes, stitched details, and pastel colors make it beginner-friendly and ultra-cute.

Use polymer clay and roll smooth balls for body parts. Layer flat clay patches for “bandages” and decorative stitches. Bake, then add tiny dot details with acrylic paint. Seal matte for a fabric-like finish. Perfect for kids’ crafts or gift ideas.


20. Mini Monster Party Crew

A whole gang of tiny monsters with googly eyes and bold colors these are pure playtime joy. Each one has its own personality, and together they’re Pinterest gold.

Roll small polymer clay balls (¾–1 inch) for bodies. Add arms, eyes, and silly tongues using contrasting clay colors. Bake in batches, then seal with gloss or satin. Pro tip: photograph them in groups for maximum pin appeal. Which one’s your favorite?


21. Eyeball Stack Monster Cups

These stacked monster mugs are pure nightmare-fuel chic in the best way. Bulging eyes, crooked teeth, and layered expressions make them feel like they’re gossiping when you’re not looking. Creepy-cute collectors, assemble.

Throw or hand-build short cylinder cups (about 4 inches tall), then sculpt facial features directly onto the walls. Stack two or three pieces vertically using slip and score. Glaze in mottled greens and bone tones, adding red underglaze lines for veiny eyes. Fire and display as a set spooky shelf candy.


22. Patterned Monster Trio

These monsters look like they stepped out of a psychedelic storybook. Bold colors, wiggly patterns, and exaggerated limbs give them playful, artsy confidence.

Build figures with solid forms using stoneware or air-dry clay. Keep limbs thick and stylized for strength. Once dry or fired, paint swirling patterns with underglaze or acrylics using small round brushes. Seal glossy for maximum pop. Total statement pieces yes, please!


23. Purple Pocket Face Monsters

Tiny, expressive, and full of sass these little monster faces are perfect for magnets, pins, or desk buddies. Each expression tells a story (and maybe a mood).

Use polymer clay and roll 1½-inch balls. Flatten slightly and add layered eye discs, tiny horns, and tongues. Bake according to package instructions, then glue magnets or pin backs on the reverse. Finish with matte varnish. So easy, so addictive.


24. Soft Neutral Monster Friend

This gentle giant feels calm, cozy, and quietly magical. Minimal details and soft neutral tones make it a monster even minimalists can love.

Sculpt with stoneware clay using a solid or lightly hollow form about 6–8 inches tall. Smooth with a damp sponge and add subtle texture marks. Fire and glaze with a satin beige or cream glaze. Perfect for shelves, nurseries, or calm corners can you picture it?


25. Cyclops Catchall Monster

Wide mouth, one big eye, and “feed me trinkets” energy. This monster bowl is functional art at its finest.

Hand-build a hollow bowl form, then cut a large mouth opening. Add teeth nubs and a single raised eye. Glaze in glossy greens or earthy tones, wiping glaze back on teeth for contrast. Fire and use as a candy dish, key holder, or desk organizer. So fun it hurts.


26. Rustic Holey Monster Lantern

This raw clay monster looks ancient and earthy, with pierced holes that hint at lantern or luminary potential. Spooky and soulful.

Build a hollow body with slab or pinch-pot technique. Poke holes evenly using a straw or skewer. Sculpt facial features on top. Bisque fire, then leave unglazed or wash lightly with oxide for a natural finish. Drop in a tealight for instant mood lighting.


27. Pink Blob Monster Family

These squishy-looking monsters are weirdly adorable. Wrinkly textures, tiny eyes, and mismatched teeth give them tons of personality like a monster sitcom cast.

Sculpt with polymer or epoxy clay, focusing on exaggerated folds and saggy shapes. Texture using silicone shapers or your fingers. Paint with acrylics in fleshy pinks and purples, then gloss-seal for a slightly slimy finish. Oddly lovable.


28. Horned Mouth Monster Planter

Big mouth, sharp teeth, glossy horns this monster is ready to hold your plant babies (or snacks, no judgment). Bold and playful with a hint of menace.

Hand-build a hollow sphere planter and cut a wide mouth opening. Insert cone teeth and curved horns. Glaze body matte or satin, horns glossy for contrast. Fire and add a small succulent or air plant. Can you picture this on your patio?


29. Masked Totem Creatures

These totem-style monsters feel ceremonial and mysterious, with human faces peeking through creature disguises. Art-forward and totally unique.

Build cylindrical bases and sculpt masks separately, attaching with slip. Add horns, textures, and layered clay details. Fire and paint with muted blues, ochres, and purples using underglaze. Seal matte. These feel gallery-ready major creative cred.


30. Drippy Slime Monster Pot

This hot-pink slime monster is a showstopper. The dripping texture and googly eyes make it feel like it just oozed onto your table and decided to stay.

Start with a basic pot or hollow cylinder. Layer flattened clay drips around the outside, blending edges upward. Add raised eyes near the rim. Glaze in ultra-bright pink with a high-gloss finish. Fire and prepare for compliments this one steals the spotlight.


31. Slime-Splattered Trash Goblin

This chaotic little gremlin looks like it just crawled out of a radioactive puddle and honestly? We’re obsessed. The drippy textures, bulging eyes, and neon slime accents give full punk-monster energy with zero apologies.

Build the body with polymer or epoxy clay using a rough, lumpy base shape about 5–6 inches tall. Press and pinch texture with fingers and silicone tools (messy is the goal). Sculpt oversized eyes separately, then attach with super glue after baking if using polymer clay. Paint with acrylics in electric blues and slime greens, dry-brushing lighter tones for depth.


32. Cute Kaiju Slushie Buddy

This monster just wants an ICEE and a wave hello . Big glossy eyes, soft kaiju vibes, and that tiny drink accessory make it equal parts collectible toy and art figure.

Sculpt with polymer clay, starting with a chubby upright body and thick tail for balance. Add small dorsal spikes, rounded limbs, and a slightly oversized head. Bake the main figure, then create the mini cup separately (tiny cylinder + dome lid). Paint with acrylics in muted blues and navy, sealing eyes and cup with gloss varnish while keeping the body satin.

35 DIY Book Page Craft Ideas That Will Definitely Be Your New Obsession

Book pages might look ordinary, but give them scissors, glue, and imagination, and they transform fast. These 35 DIY book page craft ideas feature dimensional art, intricate cutouts, wall-worthy designs, and sculpted pieces that prove printed pages still have stories to tell.

Collage of DIY Book Page Craft Ideas

35 DIY Book Page Craft Ideas Artistic Expression for Your 2026 Goals

Book pages have a magic no other craft material can replicate. Imagine sculpting roses from browned, timeworn text that look soft enough to belong in a romantic film, or creating floating paper butterflies cut from poetic lines that seem ready to flutter off the wall. Think layered canvases where ripped pages form dramatic texture, whimsical wreaths full of curled petals, and lanterns that glow softly through printed words like illuminated manuscripts.

These 35 DIY Book Page Craft Ideas take creativity into a beautifully nostalgic realm. From intricate folded art that feels impossibly clever to ornaments, garlands, shadow displays, and mixed-media masterpieces, each idea makes use of paper in ways that feel emotional, artistic, and spellbinding. If you want projects that look meaningful, magical, and arrestingly unique, this list will spark inspiration straight into 2026.

1. Folded Book Flower Display

This project turns an open book into a soft floral arrangement that feels thoughtful and intentional. The folded pages act as both the base and the backdrop, while the paper flowers rise from the center like a quiet bouquet. It works beautifully on a shelf, entry table, or nightstand where you want something handmade but calm.

Cut book pages into strips about 1.5 x 6 inches. Roll each strip tightly from one end, securing the edge with hot glue, then pinch the bottom flat to create a petal shape. Glue the rolls side by side to form flowers, then attach them directly into the book’s center fold using hot glue. Add dried filler stems or baby’s breath and let everything cool fully before moving. Can you picture this styled with stacked books?


2. Vintage Book Page Ornament

This ornament feels classic and nostalgic, perfect for holiday decor that leans handmade instead of shiny. The folded pages give it structure, while the bow and bells add just enough detail to make it feel finished and gift-ready.

Cut 10–12 book page strips to about 1 x 5 inches and accordion-fold each one. Glue the ends together to form a circle. Attach a cardstock round to the center for stability, then glue on a paper image or label. Finish by hot-gluing ribbon, greenery, and small jingle bells to the top. Let dry flat for at least 15 minutes before hanging.


3. Rolled Book Page Wreath

This wreath uses repetition and texture to make a strong statement without heavy materials. The rolled pages create depth, while the neutral paper tones keep it flexible for different seasons and spaces. Let it cure overnight before hanging.

Roll full book pages into loose tubes and secure the ends with glue. Starting at the outer edge of a foam or cardboard wreath form, glue each roll standing upright, packing them closely together. Work inward in layers until the form is fully covered. Add a center embellishment like a paper flower or cutout using craft glue.


4. Book Page Flower Stem

These flowers are structured and long-lasting, making them perfect for vases that need something permanent. Each bloom feels detailed, even though it’s made from a single page. Display alone or bundle several together for a fuller arrangement.

Cut a spiral from a book page, keeping the width consistent. Roll from the outer edge toward the center, gluing as you go to hold the shape. Flatten the base and glue it to floral wire. Wrap the wire with floral tape or paper strips. One page equals one flower, making it easy to scale up.


5. Book Page Table Decor Set

This setup shows how book pages can anchor an entire vignette. Paper roses mixed with wood, glass, and metal create contrast while keeping everything neutral and balanced. Layer heights and textures to create visual interest without overcrowding the display.

Cut 2-inch spirals from book pages and roll them into roses, gluing the bases firmly. Arrange them on cake stands, trays, wire holders, or pedestals using tacky glue for better grip on smooth surfaces. Let pieces dry completely before stacking or grouping.


6. Folded Book Snowman

This folded book project turns a simple paperback into a seasonal figure without cutting pages. It’s playful but still neat enough for indoor decor.A perfect winter shelf piece. Use them on wreaths, frames, or handmade cards.

Fold each page inward toward the spine at the same angle, creating a rounded shape as the pages stack. Once all pages are folded, decorate with buttons, felt details, and a scarf using hot glue. Make a hat from cardstock or a small box lid. Allow glue to cool between steps so embellishments stay secure.


7. Book Page Paper Flowers

These layered flowers are ideal for embellishing other projects. They’re lightweight, easy to customize, and work across seasons. . They’re great for cards, frames, wreaths, or gift wrap. Let it dry flat for several hours before hanging.

Punch or cut flower shapes in three sizes from book pages. Stack them from largest to smallest, gluing only at the center so the petals stay dimensional. Add a gem, brad, or button to finish. Ink or lightly paint the edges before assembling if you want extra contrast.


8. Illustrated Page Wall Medallion

Illustrated book pages add color and character without extra supplies. The medallion shape gives this piece structure and makes it feel intentional on the wall. They look best clustered together for a forest-style display.

Roll illustrated pages into cone shapes and glue the seams. Attach the cones evenly around a sturdy cardboard circle using hot glue. Build layers until the base is full. Add faux florals or paper accents to the center. Secure a hanger on the back and let everything dry completely before hanging.


9. Book Page Botanical Art

This project blends paper crafting with nature-inspired design. The result feels sculptural and calm, perfect for desks or shelves.. It works well on desks, shelves, or as a small centerpiece. Simple materials, strong visual impact.

Cut leaf shapes from book pages and draw vein details with a fine-tip marker. Glue each leaf to thin wire stems. Insert the wires into a small wood block, branch, or drilled base. Let the glue set fully so the leaves hold their position.


10. Folded Book Trees

These folded book trees create height and rhythm, especially when displayed as a group. The layered pages mimic branches, giving them a clean, sculptural look. The pages create layered branches that feel intentional and structured.

Fold each page toward the spine in angled layers to form branch shapes. Keep folds consistent for a tidy silhouette. Once complete, secure each book to a wood base using strong adhesive or screws. Let cure overnight before styling.


11. Spiral Book Page Wreath

This wreath leans into texture and fullness, letting every folded page do the visual work. The uneven edges, visible text, and layered depth give it a collected, handmade look that feels right at home against wood doors, shiplap walls, or gallery-style spaces.

To make it, roll full book pages into loose tubes, securing the seam with hot glue so the rolls keep their shape. Attach each roll upright around a foam or cardboard wreath form, starting at the outer edge and working inward in tight rows. Keep spacing close so the wreath looks dense. Finish with a fabric or book-page bow attached at the top.


12. Folded Book Page Pumpkin

This pumpkin uses nothing but careful folding to create shape, making it a favorite for fall decor lovers who prefer clean lines over clutter. The curved pages naturally form the pumpkin silhouette, while the paper texture adds warmth.

Fold each book page toward the spine, keeping the folds even so the shape stays symmetrical. Once all pages are folded, gently fan the book to round it out. Add a cinnamon stick or rolled paper stem secured with hot glue. A pressed or faux leaf finishes the top. Display it on a tray or mantel for seasonal styling.


13. Book Page Paper Flower Arrangement

This arrangement feels light and intentional, perfect for gifting, events, or library displays. The flowers hold their shape while still feeling organic, especially when grouped in simple vases. The neutral pages let the shapes shine without extra color.

Cut petal shapes from book pages and curl them slightly with your fingers or a pencil. Glue petals together in layers, starting small and building outward. Attach each flower to floral wire using hot glue. Arrange several stems into a vase, trimming wires as needed.


14. Layered Book Page Christmas Tree

This tree has a stacked, tiered look that feels soft but structured. Each layer adds dimension, making it a strong tabletop piece for winter displays. Style with pinecones or books underneath. Build outward by gluing petals in layers around the center, staggering seams for fullness.

Tear book pages into irregular rectangles, keeping edges rough. Stack layers from largest to smallest, gluing them around a cone base or stacked cardboard circles. Add a wooden bead or small ornament at the top. Let glue dry between layers so the tree holds its shape.


15. Book Page Starburst Decor

Book Page Starburst Decor

This piece brings movement and contrast through folded pages and painted accents. The radiating shape draws the eye and works well as shelf or wall decor. Classic and reusable year after year. Add faux berries or raffia for extra detail.

Accordion-fold book pages evenly, then fan them into a circle and glue the ends together. Secure the back with a cardstock circle for support. Add paint or glitter accents radiating from the center, using a dry brush to keep text visible.


16. Book Page Flower Flatlays

These flowers focus on layering and detail, making them ideal for styling photos, trays, or small displays. Mixing book pages with music sheets adds variation without overpowering the design. Let dry completely before styling near lights or glass.

Cut spirals or petal shapes from book pages and sheet music. Roll or layer them into flower forms, gluing the base tightly so they hold. Arrange them loosely on trays, wooden boards, or fabric backdrops. They work best in clusters where each flower feels slightly different.


17. Rolled Book Page Rose

This rose feels full and sculptural, even though it starts with a single page. The rolled layers mimic real petals and hold up well over time. Add moss, beads, or small accents to fill gaps. Displayed as a set, they bring height variation that works beautifully on mantels, shelves, or entry tables.

Cut a wide spiral from a book page, keeping the cut smooth. Roll from the outer edge inward, adjusting tension so petals flare naturally. Glue the base securely once rolled. Shape the outer layers gently with your fingers. Use as standalone decor or incorporate into wreaths and centerpieces.


18. Book Page Cloche Display

This display turns paper flowers into a curated centerpiece. The glass cloche elevates the craft, making it feel intentional and styled. Add a cardstock or wood star topper using hot glue and let everything set fully before styling.

Create multiple book page flowers using accordion folds and rolled spirals. Arrange them on a shallow tray or base, securing with glue dots or tacky glue. Place a glass cloche over the arrangement, making sure nothing touches the sides.


19. Folded Book Page Trees

These trees mix folding and fringe for a layered forest effect. Displayed together, they create height variation and visual rhythm. Perfect for trays, shelves, or table centerpieces. Adjust spacing before glue sets so everything feels intentional.

Cut book pages into strips and fringe the edges. Wrap the strips around cone bases, layering from bottom to top. Secure each layer with glue, allowing the fringe to flare outward. Add a folded star or bead topper. Let dry fully before grouping together on a tray or shelf.


20. Folded Book Sculpture

Folded Book Sculpture

This sculptural fold focuses on precision, turning a book into a statement piece through repetition and symmetry. It feels graphic and bold while still honoring the original pages. A true conversation piece for book lovers.

Mark folding points lightly in pencil to keep the pattern consistent. Fold each page inward following the same angles, forming a repeated shape through the book. Take your time to keep folds crisp. Once complete, stand the book open so the design is visible from the front.


21. Book Page Christmas Tree Trio

These slender book page trees feel calm, clean, and quietly festive. The simple silhouettes let the printed text shine, while the star toppers add just enough structure to make them feel intentional instead of crafty.

To make them, trace simple tree shapes onto book pages and cut multiple layers for each tree. Stack the layers evenly and glue down the center to create a slight fan. Mount each tree onto a wooden skewer or dowel and insert into a small metal bucket filled with moss or shredded paper.


22. Folded Paper Pumpkin Sculpture

This pumpkin has a full, rounded shape created entirely through folding, making it one of those projects that looks far more complex than it actually is. The layered pages give natural depth, while the textured stem and twine topper add a grounded, autumn-ready finish.

Fold each book page inward toward the spine at the same angle until the book forms a circular pumpkin shape. Gently fan the pages to round it out evenly. Create a stem using twine wrapped around a cinnamon stick or small branch, securing it at the top with hot glue.


23. Curled Book Page Pom Pom Wreath

This wreath feels playful and full, with curled strips creating soft movement across the entire surface. The mix of text and music pages adds subtle variation without overpowering the design. Hang once fully dry for a lightweight but eye-catching wall piece.

Cut book or sheet music pages into long strips about ½ inch wide. Curl each strip tightly using scissors, then hot glue the centers together to form pom pom clusters. Attach the clusters closely around a wreath form, covering the entire surface. Work in sections so glue stays hot and secure.


24. Book Page Rose Wreath

This wreath leans elegant and timeless, with layered roses evenly spaced for a balanced, polished look. The greenery softens the paper and gives the entire piece a finished, styled feel. A beautiful year-round option that works beyond seasonal decor.

Create roses by cutting wide spirals from book pages and rolling them tightly, gluing the base securely. Attach each rose to a grapevine or foam wreath form using hot glue. Tuck faux greenery between flowers to fill gaps and add texture.


25. Sculptural Book Page Floral Forms

These sculptural pieces feel more like art objects than crafts. Each flower is dimensional, layered, and intentionally shaped, making them perfect for minimalist displays or gallery-style shelves. Quiet, thoughtful, and visually strong.

Cut book pages into uniform strips and roll or fold them into petal shapes. Glue petals together in circular layers, building depth from the center outward. Mount finished forms onto small bases or display flat as standalone art pieces. Let glue dry completely so the shapes hold their structure.


26. Folded Book Page Columns

These folded columns use repetition to create height and rhythm. Grouped together, they feel architectural and sculptural, almost like modern paper sculptures made from vintage materials. They work well on floors, shelves, or beside furniture where height adds interest.

Fold each page inward toward the spine using consistent measurements to create a fluted pattern. Continue through the entire book, keeping folds crisp and even. Stack multiple finished books together for a clustered display.


27. Rolled Book Page Flower Wreath

This wreath combines tightly rolled flowers with natural textures for a full, organic look. The flowers feel soft, while the base keeps everything grounded. Let the wreath dry flat before hanging so nothing shifts. Simple materials, strong shape.

Cut book pages into long spirals and roll them into roses, securing the bases with hot glue. Attach the roses to a wreath form, packing them closely for fullness. Add moss or greenery between blooms to soften transitions. Let dry flat before hanging so the flowers stay secure.


28. Book Page Flower Totems

These stacked flower forms feel playful and bold, especially when displayed together. Each piece stands on its own but really shines when grouped in varying heights. Total main-character decor moment. Display on trays or shelves for maximum impact.

Create looped flowers by folding book page strips into teardrop shapes and gluing them around a center point. Stack multiple flowers vertically using wooden dowels or skewers. Secure each layer with hot glue and allow time to set between layers.


29. Sheet Music Paper Flower

This flower blends book pages with sheet music for visual contrast. The petal shapes are clean and graphic, making the center detail stand out. Attach the finished flower to a dowel, twig, or pencil using hot glue and let it cool completely before styling. Can you picture this on a front door or gallery wall?

Cut petal shapes from sheet music pages and layer them evenly around a tightly rolled paper center. Glue each layer slightly offset so the petals feel full. Mount on wire or use as a flat embellishment for wreaths or gift wrap.


30. Painted Book Page Pumpkins

These pumpkins combine folded book pages with painted edges for a bold seasonal twist. The color highlights the page edges while keeping the text visible. A perfect mix of rustic and creative for fall displays.

Fold book pages inward evenly to create round pumpkin shapes. Once formed, lightly brush paint along the outer page edges, letting the color fade into the text. Add stems made from twigs or rolled paper secured with hot glue. Let paint dry fully before styling.


31. Rolled Book Page Statement Flower

This oversized book page bloom is pure showstopper energy. With layered petals that spiral outward and a densely textured center, it feels more like sculptural art than a simple paper craft. Styled against stacked books or tucked into a shelf vignette, it instantly elevates the space with soft, literary charm.

To recreate it, cut book pages into wide petal shapes in graduated sizes, starting around 3 x 4 inches and increasing slightly. Curl each petal gently with your fingers or a bone folder. For the center, fringe a 1 x 6 inch strip and roll it tightly, securing with hot glue.


32. Vintage Book Page Rose Wreath

This wreath feels romantic and refined, with tightly rolled roses forming a full circular frame that reads timeless instead of trendy. The neutral book pages keep it classic, while the repetition of blooms gives it that lush, almost heirloom quality.

Create roses by cutting long spirals from book pages, about 1.5 inches wide. Roll from the outside in, letting the edges loosen naturally, then glue the base firmly. Attach each rose closely onto a foam or grapevine wreath form using hot glue, rotating the text direction for visual interest. Fill any gaps with moss or curled paper scraps.


33. Book Page Medallion Wall Art

This medallion is all about movement and texture. Rolled page cones radiate outward, while folded rosettes anchor the center, creating a layered piece that feels bold but still neutral enough for any room. It works beautifully as standalone wall art or layered into a gallery display.

Roll book pages into loose cones and secure each seam with hot glue. Arrange the cones in a circular pattern on a sturdy cardboard base, gluing from the outer edge inward. Add folded paper rosettes to the center for contrast and dimension. Once fully dry, attach a sawtooth hanger or loop of twine to the back.


34. Book Page Snowflake Hanging Decor

Book Page Snowflake Hanging Decor

These snowflakes feel light, airy, and incredibly satisfying to look at. The folded layers create depth without heaviness, making them perfect for windows, walls, or seasonal hanging displays. Instant winter magic with zero glitter mess.

Cut book pages into equal squares, around 6 x 6 inches. Fold each square diagonally and then again to form layered points. Cut small slits and shapes along the edges, unfold, and glue multiple layers together at the center. Add a ribbon loop or clear fishing line for hanging. Make several in different sizes for a floating effect.


35. Sheet Music Pom Pom Flower Stems

These pom pom-style flowers are playful, full, and incredibly versatile. Using sheet music instead of text pages adds graphic contrast, making them pop inside clear vases or minimalist containers. They’re cheerful, unexpected, and totally pin-worthy.

Cut sheet music pages into ½-inch strips, keeping them long. Loop each strip and glue the ends together, gathering multiple loops to form a dense pom pom. Attach the pom pom to a wooden skewer or twig with hot glue, reinforcing the base. Arrange several stems in a glass vase for a clean, modern look.

30 DIY Woodworking Christmas Gifts Ideas That Will Instantly Upgrade Your Holiday Gift Game

Your workshop becomes Santa’s most elite department when you start crafting these. These 30 DIY woodworking Christmas gift ideas carve simple lumber into heirloom trays, sculpted décor, custom organizers, rustic signs, and handcrafted treasures that look powerful, polished, and built to last for decades.

Collage of DIY Woodworking Christmas Gifts Ideas

30 DIY Woodworking Christmas Gifts Ideas That Look Like You Bought Them From a High-End Store (2025)

Woodworking gifts have a timeless charm that no store-bought item can compete with. Imagine smooth walnut cutting boards wrapped in velvet ribbon, hand-carved ornaments that sparkle under tree lights, rustic candle holders glowing like tiny winter lodges, or personalized name plaques sanded to perfection. Every piece carries the warmth of real craftsmanship, the scent of fresh-cut wood, and the unmistakable touch of something made from the heart.

These 30 DIY woodworking Christmas gifts ideas celebrate the power of handmade artistry. Whether you’re crafting elegant home décor, sentimental keepsakes, or clever functional pieces, this collection is packed with inspiration that feels bold, creative, and deeply meaningful. Get ready to create gifts that aren’t just opened—they’re cherished, displayed, and remembered long after the holiday season ends.


1. Wooden Snowman Family

These wooden snow-friends are basically the holiday equivalent of a warm hug. Each one has its own personality—little top hats, tiny wooden noses, and the coziest hand-knit scarves that look like they were styled by a mini winter fashion designer. Line them up on a windowsill and you’ve suddenly got a charming caroling crew ready to melt hearts (but, you know… not literally).

To make them yourself, turn 5–6″ wooden blanks on a lathe to form rounded bodies and domed heads. Slice scrap hardwood into 1–1.5″ circles and stack them to create the hats, securing with wood glue. Drill small holes for eyes and noses, then glue in painted toothpick tips or ¼” dowel slices for that classic carrot look. Add wood buttons using domed plugs or tiny cutoffs. Finish with Danish oil for a soft glow and wrap each in a yarn scarf—simply finger-knit an 8–10″ strip or twist bulky yarn into a mini muffler. Festive perfection!


2. Spalted Wood Candle Holders

Spalted Wood Candle Holders

Moody, glowy, and totally cabin-chic, these candle holders look like something you’d find in a Scandinavian winter retreat where everything smells like pine and warm pastries. The spalting adds that magical, earthy marbling that feels extra cozy when candlelight dances across the surface. They instantly elevate any Christmas table or mantel setup.

To recreate them, start with 3–4″ diameter spalted wood blanks and cut them into different heights—try 2″, 3.5″, and 5″ for a pretty trio. Use a 1½” Forstner bit to drill tealight pockets about ½” deep. Sand thoroughly up to 320 grit because spalting loves a silky finish. Seal with tung oil or matte polyurethane to enhance the grain without overpowering it. Pop in your tealights and bask in the glow!


3. Mini Wooden Winter Cottage

This tiny cottage looks like it should smell like gingerbread and be surrounded by freshly fallen snow. With its red roof, sweet little shutters, and warm glow from inside, it captures everything we love about winter villages—nostalgic, whimsical, and wonderfully handmade. It’s the kind of piece that becomes part of your yearly holiday tradition.

To build your own, cut thin plywood into wall pieces (3–5″ tall) and a pitched roof. Glue the structure together with wood glue and reinforce with brad nails if desired. Use popsicle sticks or craft sticks to create miniature shutters, balconies, and roof trim. Paint accents with acrylics—classic red for the roof, warm brown for details. Drill a small hole in the base and tuck in a battery tea light or micro LED to give the windows a magical glow. Add faux snow or a plaid scrap to finish the look. Adorable!


4. Intarsia Santa Wall Art

This Santa is giving full heirloom energy—rich, sculpted wood pieces that fit together like a jigsaw of holiday cheer. Each curve and contour adds personality, making him look like he’s ready to step off the wall with a hearty “ho ho ho.” It’s a forever-piece, the kind you proudly hang up every December and admire like the masterpiece it is.

To create your own intarsia Santa, print out a pattern and trace each segment onto different hardwoods—walnut for the boots, cherry for the coat, maple for the beard, and maybe a little padauk for warm red accents. Cut each section with a scroll saw, then shape the edges using a Dremel or sanding drums to give dimension. Fit them together like a puzzle, glue onto a thin backing board, and seal with satin polyurethane to highlight the natural color variation. Holiday craftsmanship at its finest.


5. Moose Pyrography Plaque

Rustic, woodsy, and totally mesmerizing, this moose plaque feels like stepping into a peaceful winter forest. The detailed burning captures every texture—from the fur to the tree line—making it a standout gift for nature lovers or anyone dreaming of cozy cabin getaways. It’s equal parts art piece and warm woodland moment.

To make one, grab a live-edge wood slice around 10–12″ wide. Lightly sketch your moose scene in pencil. Use a pyrography tool with fine, shading, and texture tips—start with outlines, then slowly build depth in the fur, antlers, and trees. Add shading to the background for atmosphere. When finished, buff with clear wax or finishing oil to keep the burn lines sharp and the wood nourished. Totally mantle-worthy.


6. Scalloped Wooden Serving Boards

These scalloped boards deliver cottagecore elegance with a dash of festive charm. They look like they belong at a slow Sunday brunch or a Christmas dessert spread filled with cinnamon pears and buttery cookies. The soft cloud-like edges feel both refined and playful—aka, the perfect holiday hostess gift.

Cut ¾” pine or cedar boards into rectangles like 6×12″ or 8×18″. Trace scallops using a drinking glass or round stencil, then cut along the curves with a jigsaw. Sand all edges smooth with 120→220 grit (the curves especially love attention). Finish with a food-safe mineral oil or beeswax blend, reapplying until the wood stops absorbing. Pair it with fruit or cheeses for gifting—instant cozy vibes.


7. Wooden Glue Caddy

For the woodworker in your life (or, let’s be honest, for your own shop), this glue caddy is organization heaven. It looks rugged yet polished, turning those constantly misplaced bottles into a neatly displayed lineup. It’s the kind of shop upgrade that inspires a deep, satisfied “ahh.”

To build one, cut side panels from ½” hardwood to about 8″ tall, and create a base around 10×4″. Add vertical dividers spaced to snugly fit 8oz glue bottles—measure twice so they don’t wobble. Cut a curved handle and attach it using screws and wood glue. Sand all surfaces, round any sharp corners, and finish with tung oil or shellac to enhance the grain. A genuinely useful, genuinely beautiful gift.


8. Hand-Painted Woodland Figurines

Whimsy overload in the sweetest way. These tiny hand-painted characters look like they wandered straight out of a storybook and decided to stay for Christmas. Perfect for kiddo gifts, stocking stuffers, or a magical little village on a shelf, they bring instant charm and color.

Start with small basswood blocks and carve simple humanoid and animal shapes using a craft knife or micro-gouges. Sand lightly so the paint glides on. Use acrylic paints to add clothing, faces, and details—opt for soft woodland tones like moss green, warm red, and honey yellow. Add tiny highlights with a liner brush, then seal with matte varnish. Make a whole cast for an extra-sweet set.


9. Wooden Christmas Gnomes

These gnomes are pure holiday serotonin. With their tall hats, squishy wool beards, and button noses, they bring a magical little presence to any shelf, table, or tree. They feel like they’re whispering tiny festive secrets and honestly, we’re here for it.

Turn cone-shaped bodies on a lathe from maple, beech, or whatever hardwood you love. Aim for 4–6″ in height. Sand smooth and paint some hats in holiday colors like deep red or forest green, while leaving others natural for contrast. Attach a ¾” wooden nose with wood glue. For the iconic fluffy beard, tease out wool roving and hot-glue it beneath the hat line. Seal with matte spray and enjoy the cuteness.


10. Sliding-Lid Pencil Box

Nothing says “thoughtful handmade gift” like a wooden pencil case that feels pulled from a vintage school desk. It’s elegant, practical, and just nostalgic enough to make someone smile every time they reach for a pen. A perfect gift for artists, writers, or anyone obsessed with stationery.

Cut your box from ½” hardwood—aim for about 3×10″ overall size. Rout out compartments with a straight bit, creating slots for pencils, pens, or tiny treasures. Use a ¼” board for the lid and cut matching grooves in the sides so it slides open and closed smoothly. Sand everything to 220 grit, soften the edges, then finish with linseed or tung oil for that timeless, warm glow. Wrap it with twine and you’ve got a gift that feels both classic and personal.


11. Rustic Carved Log Trees

These hand-carved log trees are giving straight-up magical woodland energy — the kind of cozy, forest-fresh décor you’d expect to see on a Pinterest-perfect chalet porch. Each one has that dreamy mix of rugged bark and soft, scalloped “branches” that catch the light like they’re snow-dusted. Imagine gifting someone their very own mini enchanted forest. Um, yes.

To make your own, grab log offcuts between 6–14″ tall. Use a chainsaw or angle grinder with a carving disc to shape the tip into a cone, then carve downward scoops in layered rings for the branches. After carving, sand lightly with 80–220 grit to smooth the edges without losing the rustic texture. Seal with matte polyurethane to preserve the warm tones. Cluster a few sizes together for instant winter magic!


12. Mini House-Style Birdhouse Gift

This adorable little birdhouse looks like a custom-built dream home shrunk down for your backyard’s tiniest residents. Think “HGTV Christmas Special” but feathered. The siding, the windows, the porch — it’s the kind of gift that makes people gasp and say, “Wait… you MADE that?”

Cut ¼” plywood into a front panel (with a 1.5″ entry hole), two side walls, a back wall, a floor, and two roof panels. Assemble with wood glue and brad nails. Add porch rails using craft sticks and small trim pieces. Paint the siding a soft sage, the windows black, and the roof charcoal grey. Don’t forget a coat of exterior polyurethane for weather protection. Mount on a post and boom — instant backyard charm.


13. Wooden Heart & Star Ornaments

These ornaments are rustic, romantic, and impossibly giftable — like something you’d find in a boutique gift shop where everything smells like cinnamon and handmade soap. The mix of vibrant stains and leather ties gives them that “collected on a winter market stroll” vibe.

Use ½” hardwood scraps and trace heart or star shapes before cutting them out with a scroll saw. Sand all curves smooth, then stain each piece in rich tones like cherry red, teal patina, or deep walnut. Drill a tiny ⅛” hole at the top, thread a 6–7″ leather cord, and knot. For extra charm, seal with satin varnish. Tie one onto a wrapped gift and watch it become the star of the present stack.


14. Round Christmas Door Sign

This door sign is the main character of holiday porch décor. The bold lettering, the plaid truck hauling a little Christmas tree, the pop of greenery — it’s basically a Hallmark movie invitation hanging on your front door. Festive perfection.

Start with an 18″ round plywood blank and paint it matte white using two coats. Cut “Merry Christmas” and the truck silhouette from ⅛” MDF using a scroll saw or laser cutter. Paint the lettering black, then create the plaid truck using adhesive vinyl or Mod Podged scrapbook paper. Add bottle-brush-style greenery and berries with hot glue. Finish with a jute rope hanger stapled to the back. It’s the holiday welcome sign dreams are made of.


15. Geometric Wood & Resin Serving Tray

This tray looks like it wandered out of a high-end design gallery — all moody walnut tones, mesmerizing geometry, and silky resin that feels like moonlight. It’s the kind of gift people keep out year-round just to show off.

Cut ¼” walnut pieces into triangles and diamonds using precise 45° and 60° miters. Arrange the pattern inside a 14–16″ round silicone mold, making sure the pieces fit tightly. Mix epoxy resin tinted with white pearl mica powder and pour it into the negative spaces, letting it fill the backdrop. After a full 24–48 hour cure, sand any uneven edges and attach matte-black handles using 1″ screws. A functional piece of art? Absolutely.


16. Mini Mountain Art Blocks

These little mountain scenes feel like tiny windows into winter adventures — starry nights, snowy peaks, and warm, sunset skies in miniature. They’re the ultimate “sit on your desk and smile at me” kind of gifts.

Use reclaimed wood strips and cut them into ½”–1″ segments with 30° and 45° miters to form mountains, trees, and horizon lines. Glue the shapes onto 5×7″ backing boards. Paint backgrounds with navy or bright gradient sunset tones, then add snowy splatters using watered-down white acrylic and a stiff brush. Seal everything with spray polyurethane. Group them as a set or gift one at a time — either way, they’re tiny treasures.


17. Luxe Cigar-Box Valet Tray

This gift is giving “gentleman’s study meets vintage treasure” — a sleek, glossy, richly colored cigar box repurposed into a luxe catch-all tray. Perfect for someone who appreciates craftsmanship and a touch of old-world flair.

Start with a wooden cigar box and remove all hardware. Sand gently with 220 grit to prep the surface, then apply clear gloss lacquer for that deep, mirror-like shine. Add felt pads underneath to protect surfaces. Optional: create inner compartments using ⅛” walnut strips glued into a grid. Store keys, coins, watches, dice — whatever needs a classy home.


18. Wood-Burned Butterfly Slice Art

This piece is earthy, botanical, and beautifully delicate — like a little woodland whisper you can hang on your wall. The butterfly paired with that leafy border hits all the cozy-natural notes people love in handmade gifts.

Choose a 7–9″ wood slice with smooth grain. Sketch a butterfly in the center and a simple wreath of leaves around the perimeter. Use a wood-burning pen with a fine tip to outline, then shade with light strokes for depth. Drill two holes at the top and thread jute through with ½” wooden beads strung in an arc. Finish with beeswax polish to enrich the grain. It’s soft, natural, and totally gift-worthy.


19. Custom Location Ornament

Sentimental, sleek, and wonderfully personal — this ornament turns a place into a memory. Whether it’s a hometown, favorite travel spot, or the place two people met, it becomes an instant keepsake.

Cut the state outline from ¼” hardwood using a scroll saw. Sand all edges clean, then laser-engrave the town name or use a wood-burning tool to write it vertically. Drill a ¼” hole at the top and thread a leather cord through. Finish with matte oil to deepen the grain. A simple gift with major heart power.


20. Live-Edge Statement Table

This table is a whole mood — earthy, dramatic, and undeniably jaw-dropping. The swirling grain, the natural curves, the thick slab presence… it’s the kind of gift people brag about for the next decade.

Choose a 2–3″ thick slab and flatten it with a router sled until perfectly even. Sand from 80 up to 320 grit to bring out those gorgeous rings. Fill any cracks with epoxy tinted black or left clear. Attach steel legs using 1½” lag screws for strength. Finish with Rubio Monocoat or satin polyurethane to create a smooth, durable surface that still feels organic. It’s a forever piece — the kind that becomes family legend.


21. Hand-Painted Holiday Snack Tray

This little wooden tray feels like it tumbled straight out of a storybook — snow falling, pine trees glistening, and a cheerful snowman waving like he’s your unofficial Christmas butler. It’s charming, nostalgic, and the kind of gift that makes people involuntarily say “Awwww.” Perfect for cookies, cocoa mugs, or small holiday treats.

Start with a carved wood tray (about 10–12″ long). Sand everything smooth with 220 grit, then sketch your festive scene in pencil. Use acrylics and tiny detail brushes to paint the snowman, greenery, and winter accents. Seal the entire piece with a food-safe finish like Odie’s Oil or Walrus Oil. Add felt pads on the bottom for a luxe touch. A tiny tray that delivers BIG Christmas feels.


22. Laser-Etched Meme Slate Coasters

These slate coasters are iconic — literally. They bring just the right amount of humor to holiday gifting, turning a classic internet meme into a sleek, modern coaster set. They’re witty, unexpected, and absolutely perfect for the friend who always quotes memes at family gatherings.

Grab 4×4″ slate coasters and mask them with painter’s tape if needed. Import your simple line-art design into a laser engraver, set power low (typically 15–30% depending on your machine), and etch slowly for clean contrast. Wipe with mineral oil to deepen the slate’s tone. Bundle them in twine and you’ve got a gift that’s equal parts classy and chaotic — we love balance.


23. Stacked-Wood Christmas Tree Sculpture

This modern, architectural take on a Christmas tree is sleigh-bells chic. Each beveled layer spirals ever so slightly, catching light like a wooden snowflake. Nestled among pinecones and holly sprigs, it becomes instant centerpiece magic.

Cut 1×6″ boards into squares ranging from 3″–10″. Bevel all four edges at 15°, then rotate each square a touch as you stack them on a ½” dowel. Build from largest to smallest, securing with wood glue between layers. Stain the pieces pine-green, attach the dowel into a 4×4″ base block, and top it off with a wooden star. Wrap in fairy lights for extra enchantment.


24. Custom Family Flower Engraving

Equal parts elegant and sentimental, this engraved walnut sign is the kind of gift grandparents cry happy tears over. Each flower symbolizes a family member, turning a simple board into a blooming family story. It’s thoughtful, timeless, and irresistibly gift-worthy.

Use a ¾” walnut board cut to about 10×20″. Sand to 320 grit for a buttery smooth finish. Use a laser engraver to etch each flower (bonus points if you use each person’s birth month flower!) along with their names. Add a script title at the bottom. Finish with Rubio Monocoat Pure to deepen the grain. Hang with a French cleat for an ultra-clean look.


25. Geometric Wood + Glass Wall Art

This piece is a total showstopper — modern lines, stained glass glimmers, copper accents, and a sophisticated winter palette that feels like frosty air and warm cabins all at once. It’s a gift for the person who loves décor that looks handcrafted and high-design.

Cut a mix of hardwood strips (walnut, ash, poplar) into ½”–1″ widths at varying angles (30°, 45°, 60°). Create a hexagon center frame from ¾” wood, then inlay stained-glass pieces before building outward with alternating wood and painted trim. Assemble inside a 1×2″ hardwood frame. Finish the wood with satin oil and the glass with a gentle polish. It’s basically art-meets-architecture for their wall.


26. Mini Cottage Porch Display

Straight-up storybook cottage vibes. This little wooden house looks like it’s hosting the coziest fall-into-Christmas porch scene ever — pumpkins, potted plants, tiny railing details that feel like a miniature holiday village come to life. Magical doesn’t even begin to describe it.

Start with ⅛–¼” plywood for the walls and roof. Build a 10–14″ tall cottage shape, adding trim from craft sticks, posts from ¼” dowels, and porch flooring from coffee stirrers. Paint in soft whites and grays, then distress lightly for charm. Fill the porch with mini pumpkins, dried florals, and tiny handmade pots. A gift that instantly becomes a seasonal centerpiece.


27. Sculpted Wooden Display Stands

These sculptural stands are sleek, modern, and wildly functional — perfect for holding books, artwork, tablets, or holiday recipe cards. Their curved lines and tiered slots give serious Scandinavian-minimalist energy.

Cut 1″ hardwood (maple, walnut, cherry) into two matching tapered side panels about 20–24″ tall. Use a router or CNC to cut evenly spaced horizontal slots. Add a curved platform shelf shaped from a ¾” board and attach with dowels or hidden screws. Sand to 320 for that silky touch, then finish with natural oil. Functional art for the stylishly organized.


28. Flip-Flop Key Holder

Adorable, beachy, and guaranteed to make people smile — this colorful flip-flop rack is the perfect whimsical gift for coastal décor lovers or anyone who wishes it were summer year-round.

Start with a 5–6″ wide board, paint it turquoise, and let dry. Cut flip-flop shapes from ½” plywood (around 6–7″ tall), then paint each one a bold color. Make the straps from cut wooden dowels or curved trim, attach with small screws, and add metal hooks underneath. Seal with clear coat. Suddenly the entryway feels like vacation.


29. Chunky Wooden Tic-Tac-Toe Game

This chunky wood tic-tac-toe set is rustic, tactile, and incredibly fun — a gift that feels both handcrafted and totally playable. Picture Christmas morning competitions right on the coffee table.

Cut a 6×6″ square from 1″ thick oak. Use a table saw or router to score the grid lines about ⅛” deep. For the game pieces, cut 1″ dowels into 1″ slices, stain half dark and leave the rest natural. Sand smooth and finish the entire set with matte polyurethane. Charming, simple, and guaranteed to stay out year-round.


30. Industrial Reclaimed Wood Hook Rack

This piece is giving rugged winter cabin meets Santa’s workshop energy — all warm, weathered wood paired with those heavy-duty industrial hooks that look like they could hang stockings, tools, dog leashes, scarves… maybe even a whole sack of presents. It’s bold, practical, and effortlessly cool — the kind of Christmas gift that makes someone say, “Where did you GET this?!”

To recreate it, start with a reclaimed wood board about 12–16″ long. Sand lightly with 120 grit to keep the rustic charm. Attach a 2–3″ wide steel strip using black wood screws. Mount 4–5 industrial forged hooks (look for tow or clevis hooks) spaced evenly across the metal plate. Seal the wood with matte polyurethane and spray the hardware with satin black enamel if needed. Add two steel L-brackets on top for wall mounting. Strong, stylish, and wildly giftable — yes, please.

36 *Archetype-Shattering* DIY Christmas Napkin Folding Ideas That Redefine Tradition

A single fold can change the entire vibe of your Christmas table. These 36 DIY Christmas napkin folding ideas take everyday napkins and reinvent them into dramatic holiday silhouettes, clever pockets, sculpted textures, and centerpiece-worthy accents that leave guests stunned before the meal even begins.

Collage of DIY Christmas Napkin Folding Ideas

36 DIY Christmas Napkin Folding Ideas That Shift the Vibe Instantly in 2025

Holiday dinners hit differently when the table looks magical, and nothing works quite like a cleverly folded Christmas napkin to spark instant joy. Think napkins transformed into tiny Christmas trees, jolly Santa suits, elegant poinsettias, and cute little gift pouches. Suddenly, even the simplest table setting feels like it belongs in a charming holiday movie scene filled with twinkling lights and warm laughter.

These 36 DIY Christmas napkin folding ideas bring personality, creativity, and a sprinkle of pure holiday cheer to every plate. Whether you want adorable designs for a kids’ table, chic shapes for a formal dinner, or playful folds that guests won’t stop talking about, this collection is packed with festive fun. Prepare to make your table look so enchanting that no one will dare unfold the napkin right away.

1. Classic Christmas Napkin Tent

Oh HELLO, holiday elegance! This little red napkin tent looks like it strutted straight off the runway of The Nutcracker Fashion Week. It stands tall, proud, and perfectly pointed — the kind of fold that makes guests think you secretly hired a tablescape stylist. Pair it with glowing tea lights and a plate of Christmas cookies and you’ve officially entered Cozy Luxury Mode™.

To make it, grab an 18″x18″ cloth napkin (cotton or polyester so it has structure). Lay it flat → fold in half to make a triangle → then bring the two bottom corners up toward the peak like you’re building a tiny fabric mountain.


2. Festive Ruffled Napkin Fan

This napkin fold is serving HOLIDAY DRAMA — the good kind. It’s ruffly, flouncy, and basically the napkin version of a twirl-worthy ball gown. Add gingham placemats and a few woodland touches (pinecones, cedar sprigs) and suddenly your dinner table feels like a rustic-Christmas fairytale.

Start with a square napkin and accordion-fold it into 1″ pleats — think tiny fabric waves. Slide one end into a napkin ring (glittery green? velvet? go wild), then fluff those pleats until it blooms like a festive flower.


3. Ribbon-Wrapped Name Tag Napkin Fold

This look? Pure holiday gala meets handwritten love note. A crisp white napkin, a delicate painted wreath card, and a satin bow that looks like it belongs on a high-end gift box. It’s elegant, intentional, and just the right amount of “hostess bragging rights.”

Fold the napkin in thirds vertically to create a long, sleek rectangle. Lay your handwritten place card (3″x3″ works beautifully) in the center. Wrap a 1″ satin ribbon around the whole bundle and tie the prettiest bow of your life. Cut the ribbon tails at a sharp diagonal for that luxe, ribbon-catalog finish.


4. Artsy Origami Napkin Cones

These napkin folds are absolute SCULPTURE — modern, quirky, and brimming with personality. They look like couture accessories in the world’s coolest dollhouse. If your holiday décor leans artsy, eclectic, or conversation-starting, this is the fold.

To craft them, start with a stiff patterned napkin. For the cone, fold into a triangle, then roll one side tightly toward the center, keeping the tip perfect and pointy. For the spiral version, roll from one corner diagonally while twisting the napkin gently to create that sculptural swoop.


5. Layered Christmas Tree Napkin

This fold is literal CHRISTMAS CHEER stacked into adorable layers. It sits on the plate like a tiny evergreen that definitely shops at Anthropologie. Between the cascading “branches” and the jewel-tone green, this fold deserves its own jingle.

Start with a green napkin and fold it in half, then in half again. Rotate into a diamond and fold each visible corner up toward the top, each one slightly lower than the one before. Flip it over carefully, fold the left and right sides in to shape your tree, then flip back.


6. Monogrammed Gingham Napkin

If Christmas had a dress code, this gingham napkin would be the “festive prepster” look. Cozy farmhouse vibes meet boutique embroidery — and suddenly your table looks like a Southern Living cover shoot. It’s charming, traditional, and undeniably giftable.

Use a red-and-white gingham cotton napkin. Add your monogram using machine embroidery or iron-on patches in holiday green. Fold the napkin diagonally so the monogram sits proudly at the top point. Lightly press with steam so the fold drapes cleanly.


7. 3D Standing Christmas Tree Fold

This fold is THE moment. A little standing Christmas tree — complete with a wooden star topper — that basically says, “Yes, I did spend my afternoon making magic.” It’s charming, whimsical, and the kind of detail that gets photographed before dinner even starts.

Use a stiff green napkin (18″x18″). Fold into quarters, then shape into a triangle. Fold the side corners inward like a paper airplane. Stand it upright and gently separate the layers to fan out the branches. Clip a tiny wooden star on top using a mini clothespin or glue dot.


8. Elegant Layered Napkin Fan

THIS is the napkin that whispers, “You’re about to have the best holiday dinner of your life.” Those cascading pleats look like a couture velvet gown draped across a plate. Add moody lighting and ruby-red wine glasses? Instant romantic winter soirée.

Fold a square napkin in half. Create evenly spaced accordion pleats (¾” to 1″), smoothing each crease with your fingers or an iron. Tuck one end slightly underneath or secure with a discreet clip so it curves gracefully across the plate. The key is crisp edges — so iron your napkin beforehand for maximum drama.


9. Poinsettia Tree Napkin

This beauty looks like a poinsettia magically transformed into a Christmas tree — festive, bold, and utterly ready for its own photoshoot. It brings instant color, instant joy, and instant “Wow, where did you learn to do this?” energy.

Start with a printed Christmas napkin and fold in quarters. Rotate to a diamond shape, then fold each layer’s corner upward, leaving small gaps between layers to show off that gorgeous pattern. Flip the whole napkin, fold the sides inward for a faux tree silhouette, then flip back.


10. Glitter-Snowflake Star Napkin

Cue the winter sparkle! This star-shaped napkin feels like a snowflake dipped in fairy dust and placed right onto your dinner plate. Pair it with silver décor, frosted pinecones, and soft candlelight and boom — your table becomes a shimmering winter wonderland.

Start with a square napkin and accordion-fold it from edge to edge. Fold the long strip in half and secure the center with a small elastic (clear or white). Fan out both ends until you create a multi-pointed star. Add a glittery snowflake embellishment in the center with a glue dot.


11. Red Layered Christmas Tree Napkin

This napkin? Oh, she didn’t just show up — she made an entrance. This red, tiered Christmas tree fold sits on that floral plate like the glamorous star of a Victorian Christmas novel. It’s dramatic, plush, festive, and slightly indulgent, like something Mrs. Claus lovingly irons at 6 a.m. because she refuses to be outdone by the in-laws.

To craft this luscious little tree, grab an 18″x18″ cloth napkin with some body. Fold it in half, then half again. Rotate that baby so it looks like a diamond. Now bring each visible layer’s point upward — spaced evenly, like careful, patient stair steps toward holiday greatness.


12. Monogram Velvet-Bow Napkin Roll

This napkin looks like it came straight out of The Nutcracker Ballet, possibly carried in by the Sugar Plum Fairy herself. A crisp white roll wrapped in thick, velvety bows, delicately monogrammed like a Victorian love letter? Absolutely intoxicating. It’s luxurious in a don’t-even-look-at-me-unless-you’re-holding-champagne kind of way.

To make it, lay a white linen napkin flat and roll it into a silky cylinder about 2 inches thick. Wrap each end with lush velvet ribbon — deep evergreen is the power move — and tie bows that look like they were sculpted by angels with excellent taste.


13. Layered Monogram Bow Napkin

This napkin setup is the love child of a Christmas heirloom and a royal tea party. The ruffled red napkin is already giving drama, but then you lay a snow-white monogrammed napkin hugged by the most graceful bow across it? That’s not a place setting — that’s an experience. It’s the kind of thing that makes guests text the group chat like, “Um… their table is insane???”

To recreate the magic, fold your ruffled napkin into a neat square or rectangle and give it pride of place. Then take your monogrammed napkin and fold it into a clean 4″ band. Wrap it around the center like you’re dressing the napkin for a winter ball.


14. Embroidered Christmas Napkin Pocket

Picture this: Your guests sit down, look at their place setting, and immediately gasp because their silverware is tucked into its own embroidered holiday pocket. This is functional AND fabulous — like if an elf majored in fashion design. It’s polished, personal, and has major “oh, we’re doing a classy Christmas this year” energy.

Start with a full-size napkin and fold it into a long, sleek rectangle. Fold the bottom third upward to form a tidy pocket, then lightly press so the crease stays crisp. Secure the sides with discreet hem tape — no sewing, just holiday magic.


15. Oversized Holiday Bow Napkin

This napkin fold is not a bow — it is THE bow. The kind of bow that saunters into a room wearing perfume and a floor-length gown and doesn’t apologize for taking up space. Dramatic? Yes. Ethereal? Absolutely. The long tails drape over the plate like luxurious satin ribbons on a designer gift box, creating a moment so pretty you might hesitate to eat dinner.

Use a generously sized napkin (20″x20″ is ideal). Fold it into a long band around 4–5″ wide, smoothing the edges so the folds look intentional. Pinch the center, wrap with ribbon or twine, and tie it into the most pillowy, glorious bow you can manage.


16. Whimsical Candy Cane Napkin Tie

THIS is the napkin fold that screams, “CHRISTMAS SPIRIT IS MY PERSONALITY.” It’s cheerful, playful, sugary-sweet chaos in the best possible way. A candy cane, a gingham or holly-pattern napkin, a sprig of greenery — it’s like letting Santa’s elves style your place settings after three peppermint mochas. Absolutely adorable and guaranteed to make adults revert to childlike squealing.

To assemble, fold your printed napkin into a loose rectangle or triangle — relaxed, unfussy, festive. Gather the center and tie it with thin ribbon or baker’s twine. Tuck in a mini candy cane (or a giant one because who’s stopping you?), plus a sprig of faux berries or greenery for that woodland whimsy.


17. Green Velvet Bow Napkin Roll

This entire aesthetic feels like Christmas morning inside a luxury chalet. These rolled napkins — wrapped in lush sage velvet, embroidered with delicate wreath motifs — look like tiny presents you can actually open. They’re soft, romantic, wintery, and sophisticated. The vibe is “high-end boutique in the Alps.” Guests will think they wandered into a holiday catalog.

Roll white linen napkins into snug cylinders. Use 1″ velvet ribbon (sage or olive is chef’s kiss) to tie bows at both ends, leaving little loops of fabric like wrapped gifts. Add embroidered wreath appliqués in the center — store-bought patches or iron-on designs work beautifully.


18. Red Christmas Tree Napkin with Star Topper

If there were a Miss Christmas Universe pageant, this napkin would absolutely win the tiara. It’s a layered red Christmas tree with a literal gold star on top — and yes, it even has its own little bow. It’s festive, fabulous, slightly over-the-top, and proud of it. This is the kind of fold that makes kids squeal, adults applaud, and your table sparkle with pure holiday magic.

Fold your red napkin into quarters. Rotate so it forms a diamond. Fold each layer upward one by one, spacing them neatly. Flip it, fold in the sides to form a sleek, triangular silhouette, then flip it back. Tuck all little points upward under the previous layer like tiny tree branches.


19. Felt-Embellished Napkin Roll with Initials

This project feels like stepping into the coziest indie Christmas market — felt florals, soft eucalyptus, glittered initials… it’s everything adorable about handmade holiday crafts rolled into one unbelievably charming napkin display. This is the fold that makes people say, “I NEED to recreate this,” and then proceed to buy three types of felt.

Roll your napkins tightly into neat cylinders. Cut felt shapes — eucalyptus leaves, flowers, stars, berries, you name it. Hot glue them onto simple wooden napkin rings, elastic bands, or even hair ties (Pinterest hack alert). Add glitter initials using chipboard letters or wood letters coated with Mod Podge + glitter.


20. Santa Hat Napkin Fold

This fold is pure, unfiltered, unhinged CHRISTMAS JOY. A red napkin transformed into Santa’s hat? With a pom-pom? With a FACE?? It’s festive, cheeky, and low-key iconic — the kind of place setting that makes everyone instantly happier, even your grumpy uncle who insists he “doesn’t get into all that holiday nonsense.” Too bad, because Santa Napkin is here to PARTY.

Fold a red napkin in half diagonally to make a triangle. Fold the bottom edge up to create the brim — thick or thin, depending on the Santa sass level you want. Stick a mini pom-pom on the tip with a glue dot (YES).


21. Tartan Christmas Tree Napkin

This tartan Christmas tree napkin is not merely folded — it is ascended. This little plaid icon sits on the plate like it owns the entire dining room, giving “Clan MacChristmas” energy with a side of festive mischief. With those layered flaps that puff out like tiny textile branches, this fold transforms your table into a Scottish holiday manor.

Start with a structured tartan napkin (18″x18″ is ideal so your layers stay crisp instead of floppy). Fold into quarters, rotate to form a diamond like you’re prepping for a magical ritual, then fold each visible corner upward — evenly, reverently, dramatically.


22. Standing Tiered Christmas Napkin

This is THE napkin fold for people who want their dinner table to scream, “YES, it is the holidays and YES, I am doing the absolute most.” These standing napkin trees look like they’re about to wobble off the table and audition for a role in The Nutcracker. Tall. Triangular. Dramatic. They’re basically tiny fabric skyscrapers dedicated to holiday glamour.

To make this showpiece, grab the firmest red napkin in your collection. Fold it into a triangle and start working upward in firm, bold pleats about 1–1½ inches deep. Keep the center sharp — that’s the spine of your fabric tree. Once it’s all pleated, you flip it upright like you’re revealing a magical relic.


23. Snowflake Table Red Tree Napkins

This table isn’t decorated — it’s celebrating. The bright red snowflake tablecloth is already shouting CHRISTMAS!!! and then these layered red tree napkins sit down like the main characters they are. Each one looks like a miniature Christmas tree that retired early from a life of luxury to live on your dinner plates.

For these impossibly cute trees, fold an 18″x18″ red napkin into quarters, rotate it to a diamond, and fold each visible corner upward in evenly spaced stair-step layers. Flip, tuck the sides inward until your napkin morphs into a chic geometric tree, then flip back.


24. Minimalist Luxe Red Napkin Tree

This napkin fold is the holiday equivalent of a velvet-clad supermodel arriving fashionably late to the party. It’s smooth, sleek, and visually stunning — a tiny, refined Christmas tree that looks like it was carved out of satin. And paired with that pink poinsettia centerpiece? It’s basically a magazine editorial called “Soft Christmas Sophistication” featuring your dining table as the cover star.

To craft this minimalist masterpiece, pick a napkin with a buttery-soft drape. Fold into quarters, rotate to a diamond, and raise each corner upward gently but precisely — this fold thrives on clean lines and controlled drama.


25. Snowy White Christmas Tree Napkin

This fold looks like a fresh snowfall on fine china. Crisp white napkin… gilded holly plates… crystal glasses sparkling like icicles. This place setting doesn’t whisper elegance — it declares it with a gentle British accent. It’s giving “White Christmas,” “winter wonderland,” and “my house smells like cinnamon and restraint.”

Grab a firm white napkin and fold it into quarters with intention (think: meticulous pastry chef energy). Rotate into a diamond, bring each layer upward in tidy increments, then flip and fold in the sides like you’re shaping a couture winter coat. Flip back and tuck each point with precision.


26. Ornament-Bedecked Plaid Tree Napkin

This little napkin tree said, “I’m not showing up unless I can wear accessories.” And honestly? Respect. The plaid alone is festive, but then someone said, “What if… ornaments?” and now this napkin is essentially cosplaying as a Christmas tree influencer. The mini baubles sparkle, the plaid pops, and the overall vibe is extremely decorative in the best way possible.

Fold your plaid napkin into a classic Christmas tree shape. Once folded and tucked, stick mini ornaments onto the layers using removable glue dots or tiny twist ties. A few baubles go a long way — three is chic, five is maximalist, twelve is a cry for help.


27. Glittering Poinsettia Napkin Explosion

This napkin fold does not believe in subtlety. It is BIG. It is RED. It is SPARKLING. It looks like a poinsettia took a deep breath and blossomed directly onto your dinner plate. This is holiday glamour with no chill — sequins, glitter, layered petals, and cheeky plaid accents peeking out like festive lingerie. It’s the visual equivalent of Mariah Carey hitting the high note.

Recreate the drama by starting with a folded napkin base (triangle, rectangle — whatever stage your poinsettia wants). Layer a faux poinsettia bloom with glitter-tipped petals on top. Add a second napkin underneath and fan it so it frames the bloom like couture foliage.


28. Soft Linen Scalloped Tree with Red Bow

Soft Linen Scalloped Tree with Red Bow

This napkin is the sweetheart of Christmas folds — delicate scalloped edges, soft linen texture, and the most charming pop of bright red ribbon. It looks like something created by a magical elf seamstress who specializes in Scandinavian minimalism. It’s sweet, tidy, whimsical, and so pretty you’ll want to stare at it instead of eating dinner.

Use a light-colored napkin with scalloped or embroidered edging for that fairytale vibe. Fold into quarters, rotate into a diamond, lift each tier upward like gentle snowdrifts, then flip and fold the sides in. Flip back and tuck the points with soft fingertips so you don’t lose those scalloped details.


29. Embroidered Christmas Tree Napkin

Embroidered Christmas Tree Napkin

This napkin is full-on Christmas nostalgia — a little embroidered tree, a sweet teddy bear, a tiny present. It feels like a vintage holiday storybook stitched onto linen. Place it on tartan and suddenly you’re transported to a cozy childhood Christmas morning, complete with hot cocoa, footie pajamas, and the faint jingle of sleigh bells. It’s unbelievably wholesome and impossibly charming.

To style it, fold the napkin diagonally so the embroidered design becomes the star. Drape it over a plate, tuck it into a glass, or fold the edge under to make a mini banner across your setting. Let the embroidery breathe — no extra embellishments needed.


30. Santa Embroidered Napkin Roll

Santa Embroidered Napkin Roll

This napkin is what happens when Santa himself becomes a fashion icon. The embroidered face! The swirling “ho ho ho!” script! The pristine rolled shape sitting proudly on a red-charged plate like the North Pole’s official holiday scroll! It is festive, bold, and just the right amount of ridiculous. It will make even the Grinch crack a smile.

Roll the napkin neatly into a slim cylinder, making sure Santa’s jolly face stays visible and perfectly centered. Tuck the end inside so it holds its shape. Place it on a red plate surrounded by gold accents, greenery, berries — basically anything that screams CHRISTMAS IS HERE.


31. Monogrammed Wreath Napkins

These embroidered beauties look like they leapt straight out of a Southern Christmas heirloom trunk — the kind kept under a bed in a Charleston mansion that smells faintly of pine and tradition. Each napkin is graced with a wreath of tiny, delicate stitches: reindeer, sleighs, Santa cameos, bows tied as perfectly as a ballet slipper… and then that swirling monogram at the center like the crown jewel.

For the fold, use a crisp white linen napkin so the embroidery stays the star. Fold the napkin into thirds vertically, then again horizontally so the monogram sits perfectly centered on the pointed flap. The bottom point should drop just low enough to draw the eye — like the napkin is intentionally posing.


32. Polar Bear Cutlery Pocket Napkin

Let’s talk about festive charm: THIS is the napkin pocket that walked in wearing a polar bear print scarf and said, “I am the moment.” The nutcracker soldiers marching across the fabric? The tiny holly sprigs? The crisp red bows? This place setting gives “children’s Christmas storybook meets fancy dinner party,” and truly, who could resist?

To recreate it, sew or hot-glue a simple double-layer pocket: cut two 8″x10″ rectangles of cotton fabric (mix prints for maximum whimsy), stitch around the edges leaving a bottom opening, flip right-side-out, and iron flat. Fold the bottom third up to form the pocket and stitch the sides.


33. Mini White Tree Napkin with Velvet Bow

This little folded tree is so sweet it should come with a warning label: May cause spontaneous squealing. It’s soft, snowy, and shaped like the tiniest Christmas tree attending the fanciest dinner of its life. The cherry-on-top? A perfect red velvet bow perched at the tip like a proud accessory. Add the matching mini “Merry Christmas” chocolate beside it and you’ve officially entered hostess-of-the-year territory.

To fold it, use a small lightweight napkin (around 12″x12″ works great for a mini tree). Fold into quarters, then rotate into a diamond with the open ends facing downward. Lift each layer’s point upward, spacing gently as you go, then flip and fold in the sides to sculpt the triangle.


34. Red Velvet Ribbon Monogram Napkin

This napkin is basically the Audrey Hepburn of Christmas place settings — timeless, elegant, and dressed with the kind of flair that never tries too hard yet ALWAYS wins. The embroidered wreath and monogram swirl with delicate detail, and the rich red velvet ribbon tied around the napkin? Stop it. That’s the kind of flourish that makes guests gasp softly, the way people do when they open jewelry boxes in movies.

To achieve this forever-elegant fold, take a crisp white napkin and fold it into a long rectangle, making sure the embroidered monogram rests near the lower third. Lay the napkin across your plate at a slight diagonal for drama.


35. Emerald Velvet Bow Napkin

Imagine forest-green velvet tied into the plushest, fattest bow you’ve ever seen — now place a snowy embroidered napkin underneath it, all resting on a scalloped plate that looks straight out of an English countryside Christmas. This is holiday opulence at its softest. That bow feels like something a Victorian gift would wear — lush, heavy, rich, and drama-filled. Chef’s kiss.

Fold your napkin into a narrow rectangle so the embroidered monogram lands front and center. Lay it across your plate, then top with a generous velvet bow tied from 2″ wide ribbon. Don’t be shy — let those tails cascade dramatically across the plate’s edge like it’s posing for a fashion magazine.


36. Burgundy Ruffled Napkin Wrap

This napkin fold is giving “French Christmas cottage meets moody holiday romance novel.” The deep burgundy ruffled napkin draped across layered scalloped plates? It practically sighs elegance. Add in the monogram stitched like a handwritten signature and suddenly your table is transporting guests into a candlelit European dining room where mulled wine is simmering nearby.

Fold the napkin into a long rectangle, making sure the ruffled edge faces outward for maximum drama. Drape it loosely across the plate, letting it spill a little over the side — like the napkin just lounged itself there without effort.