Prepare for a glitter explosion in the best possible way. These 38 DIY craft Glitter Craft Ideas unleash bold color, playful shine, and high-energy designs that make every project feel like a celebration. Each creation is packed with personality, sparkle, and pure crafting thrill.

38 DIY Glitter Craft Ideas So Sparkly They’ll Outshine Everything Else in 2026
Glitter crafts are exploding with drama in 2026, turning the simplest materials into radiant, light-catching creations that practically demand attention. With shimmering textures, bold color blends, and surfaces that look like they’re dusted in stardust, these projects take sparkle to an entirely new level.
This collection dives into glitter-drenched decor pieces, sculptural accents, dazzling accessories, color-shift finishes, and high-impact designs that gleam from across the room. Every idea unleashes full creative flair, giving you crafts that feel electrifying, expressive, and irresistibly dazzling to make and display.
1. Popsicle Stick Christmas Trees

Bright, bold, and bursting with sparkle these glittery triangle trees are pure classroom Christmas magic. Each one has its own personality with pom-poms, buttons, bows, and chunky glitter that totally screams “tiny hands made this!” Honestly, holiday craft day just leveled up.
Arrange 3 standard popsicle sticks into a triangle and secure the corners with hot glue. Paint with acrylic craft paint in festive shades like emerald green or cherry red, then brush on craft glue and sprinkle fine or chunky glitter evenly over the surface. Add mini pom-poms, buttons (¾ inch size), sequins, or small ornaments with craft glue. Finish with a 1×2 inch brown cardstock rectangle for the trunk and let everything dry 30–45 minutes before displaying.
2. Sparkle-Trimmed Dinosaur Shapes

Roar but make it fabulous. These pastel dinos with glittery spikes are the cutest mashup of prehistoric and Pinterest. They’re playful, colorful, and perfect for a kids’ craft table that needs a little sparkle moment.
Sketch a simple dinosaur silhouette about 6–8 inches wide onto colored craft foam and carefully cut it out. Add contrasting glitter foam triangles along the back for spikes, securing with craft glue. Clip two small wooden clothespins onto the bottom edge for legs so the dinosaur stands upright. Draw a tiny smile and eye with a black paint marker for that adorable finishing touch.
3. Layered Glitter Snowflake Ornament

This snowflake is giving winter royalty energy. The layered glitter foam details and delicate curves make it look store-bought but nope, you made that. Hang it in a window and let it catch the light like the sparkly queen it is.
Draw and trim two identical 5–6 inch snowflake shapes from glitter foam sheets in coordinating colors. Layer them slightly offset and secure with hot glue. Add thin curled strips of glitter foam on top for dimension, shaping them into soft loops before attaching. Glue a small pearl bead in the center and attach a 6-inch loop of metallic string to the back for hanging.
4. Mini Glitter Christmas House

A tiny glitter house with a bold red roof? It’s basically North Pole chic. Pop this on a mantel or holiday tray and suddenly your whole space feels like a cozy Christmas village.
Cut walls (4 rectangles, 3×4 inches) and roof panels (2 pieces, 3×4 inches) from white and red glitter foam. Assemble into a box shape with hot glue, attaching roof pieces at an angle. Add gold glitter foam window frames and a 1×2 inch green door with a mini wreath detail. Mount onto a 4×4 inch foam base for stability and allow glue to set completely before styling.
5. Glitter Snowman Decoration

Frosty but make him fabulous. This glitter snowman with a striped hat and pearl buttons is holiday cuteness overload. He’s the kind of DIY that instantly makes your shelf feel merry and bright.
Trace two circles (4 inch and 3 inch diameter) onto white glitter foam and glue them together slightly overlapping. Add a red-and-white striped hat cut from glitter foam, plus a small strip of faux fur trim along the brim. Attach black glitter foam circles for eyes, an orange triangle for the nose, and three flat-back pearl beads down the center. Let dry flat for 20–30 minutes before standing upright.
6. Shimmer butterfly wall piece

This butterfly is sparkle goals. The layered wings and gradient glitter make it look like it fluttered straight out of a craft dream. Perfect for bedrooms, party décor, or a glam gallery wall moment.
Draw symmetrical butterfly wings about 5 inches wide onto blue glitter foam and trim carefully. Cut a slightly smaller wing shape from solid foam and layer on top with craft glue for depth. Shape the wings gently upward before glue fully sets for dimension. Form antennae from thin black craft wire and secure at the center with hot glue.
7. Button & Glitter Snowflakes

Messy table? Good. That means the glitter party is in full swing. These mixed-media snowflakes with buttons, paint, and sparkle are winter craft perfection for little creatives.
Glue 6–8 popsicle sticks into a snowflake shape and let set firmly. Paint in icy blue or white acrylic and allow to dry 15 minutes. Brush craft glue onto sections and shake fine glitter over the surface. Add assorted buttons (½ to 1 inch wide) in coordinating shades using tacky glue, pressing firmly so they stay secure.
8. Layered Glitter Heart Ornament

Double the hearts, double the sparkle. This layered glitter ornament is sweet enough for Valentine’s Day but totally cute year-round. Hang it on a gift bag and watch it steal the spotlight.
Trim two heart shapes one 4 inches wide and one 3 inches wide from contrasting glitter foam sheets. Stack and secure with craft glue, aligning at the center. Punch a small hole at the top and thread a 6–8 inch piece of silver cord through, knotting at the ends. Let dry flat before hanging to prevent shifting.
9. Swirl Glitter Heart Ornament

Classic red and white swirl with a glitter twist? Yes, please. This ornament looks like a peppermint candy that decided to glow up for the holidays.
Cut a 4–5 inch heart from white glitter foam. Create curved swirl strips from red glitter foam, about ½ inch wide, and glue them in flowing S-shapes across the heart. Trim edges flush once attached. Add a small punched hole at the top and thread metallic string for hanging.
10. Glitter Penguin Ornament

Waddle into winter with the cutest glitter penguin ever. The red scarf pop against that sparkly black and white body? Chef’s kiss. This little guy belongs front and center on your tree.
Cut an oval body (5–6 inches tall) from black glitter foam and a slightly smaller white oval for the belly. Attach yellow glitter foam feet and beak, plus a red glitter foam scarf wrapped across the neck area. Add small black circles for eyes and secure a loop of silver cord at the top with hot glue. Let everything set completely before hanging on the tree.
11. Layered Glitter Globe Ornament

This ornament is giving luxe holiday drama in the best way. The layered red, green, and gold petals create a glowing globe effect that looks straight out of a designer Christmas tree moment. It’s bold, dimensional, and basically the star of the branch.
Trace and shape 12–16 petal pieces (about 3 inches tall) from red, green, and gold glitter foam. Slightly fold each petal vertically for dimension, then hot glue them in a circular pattern onto a 3-inch foam ball, layering as you go. Add a small gold glitter diamond detail in the center and insert a 6-inch gold cord loop at the top before securing the final pieces.
11. Glitter Foam Rose Magnets

Tiny, sparkly roses that look like they were plucked straight from a fairytale craft garden? Yes, please. These glitter foam beauties are perfect for fridge magnets, gift toppers, or even glam hair clips. The shimmer + spiral rose combo is basically Pinterest catnip.
To make one, cut a 2-inch circle from glitter foam sheet and trim it into a spiral (about ½-inch wide strip). Roll tightly from the outer edge inward, securing the end with hot glue. For leaves, cut two 1.5-inch teardrop shapes from green glitter foam and glue underneath. Attach a small round magnet (¾ inch) to the back with E6000 or strong craft glue and let cure for 24 hours. Cute, sparkly, and totally giftable—can you picture a whole bouquet on your fridge?
13. Double-Layer Glitter Tree Ornament

Minimal but magical. The layered green silhouette gives this tree ornament that chic shadow effect, and it pops beautifully against twinkle lights.
Form one 5-inch Christmas tree shape from dark green glitter foam and a slightly smaller one from light green glitter foam. Stack and secure with craft glue, keeping edges evenly spaced for a border look. Punch a small hole at the top and thread a 7-inch gold ribbon through, knotting firmly for hanging.
14. Blue Glitter Poinsettia

A blue poinsettia? Unexpected and absolutely fabulous. The layered petals and sparkly center make it perfect for winter décor that leans icy and elegant instead of traditional red.
Shape 10–12 pointed petals (about 2.5 inches long) from blue glitter foam. Warm gently with a low-temp heat tool for a few seconds to curve the petals slightly, then layer in two offset rows using hot glue. Add a 1-inch glitter foam circle in the center and finish with yellow glitter accents or a pearl cluster.
15. 3D Glitter Christmas Tree

This little tree looks like it belongs in a mini holiday village. The stacked glitter layers and metallic bead “ornaments” give it sweet dimensional charm.
Prepare three graduated tree tiers (4 inch, 3 inch, and 2 inch wide) from green glitter foam. Slightly curve each tier before stacking with hot glue to build depth. Add small metallic craft beads (¼ inch size) across each layer and attach a short glitter foam cylinder at the base for the trunk. Secure a gold hanging loop at the top.
16. Mixed Media Glitter Shamrock

Glitter, sequins, buttons oh my! This shamrock is a full-on texture party and perfect for St. Patrick’s Day crafts with kids who love a little sparkle chaos.
Create a large shamrock base (6–8 inches wide) from sturdy cardstock and paint with green acrylic. While the paint is slightly tacky, sprinkle fine green and gold glitter across the surface. Once dry, attach green buttons, sequins, and clover confetti with tacky glue, pressing firmly and letting it dry flat for 30 minutes.
17. Glitter Santa Table Décor

This Santa is serving cozy tabletop cuteness. With his sparkly suit and fluffy beard, he’s basically the centerpiece your holiday table has been waiting for.
Assemble Santa body pieces from red, white, black, and peach glitter foam (overall height about 6–7 inches). Layer beard, hat, and suit details using hot glue, adding a small black button to the coat and a gold jingle bell at the hat tip. Attach a folded foam strip at the back as a stand so he stays upright.
18. Lucky Leprechaun Craft

Big googly eyes, glitter hat, and a golden bow tie? This leprechaun shamrock is pure St. Paddy’s Day joy. It’s playful, bright, and perfect for little hands.
Form three 4-inch green paper hearts and glue together to create a shamrock. Add accordion-folded green paper strips for arms and small orange paper hands at the ends. Attach 1-inch googly eyes, orange pom-poms for cheeks, and a glitter foam hat with a tiny gold buckle detail. Finish with a gold glitter bow tie at the center.
19. Glitter Christmas Stocking Ornament

This stocking is giving sugarplum fairy vibes. The swirly glitter patterns and fluffy white cuff make it feel whimsical and festive all at once.
Trace two identical stocking shapes (about 5 inches tall) from purple glitter foam and glue around the edges, leaving the top open. Decorate the front with glitter foam swirls and stars in contrasting colors. Attach a strip of white faux fur along the cuff and secure a 6-inch ribbon loop inside the top seam for hanging.
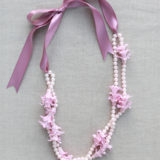
20. Layered Glitter Foam Flowers

These little glitter blossoms are small but seriously glam. Perfect for hair clips, gift toppers, or party décor because sparkle flowers are always a yes.
Punch or shape scalloped flower bases (2–3 inches wide) from glitter foam in coordinating shades. Add smaller solid foam petals in the center, gently curling them with your fingers for dimension. Secure layers with hot glue and place a ½-inch pearl bead in the middle for that polished finish.
21. . Glitter Angel Tree Topper

This sparkling angel is basically Christmas magic in craft form. With her layered red-and-green glitter gown, golden wings, and glowing star, she’s giving cozy cocoa nights and twinkle-light vibes all at once. Set her on your mantel or crown your tree she owns the spotlight.
To make it, cut a 6-inch cone from cardstock for the body base. Layer 2-inch scalloped strips of red and green glitter foam sheets around the cone using hot glue, overlapping slightly. Cut large wing shapes (about 7 inches wide) from gold glitter foam and add red glitter glue swirls for detail; let dry 30 minutes. Glue to the back. Shape hair from craft yarn or thin strips of tan felt, attach a small wood bead (1.5 inches) for the head, and add a pipe cleaner halo. Finish with a battery-operated mini LED star glued between her hands.
22. Glitter Floral Birthday Card

This card is sparkle-on-sparkle perfection. The glittery floral bouquet pops against that shimmering background, making it feel handmade and totally frame-worthy.
Start with a 5×7-inch folded cardstock base and mount a slightly smaller glitter cardstock panel on top. Build layered flower shapes from colored glitter paper, arranging stems and leaves with craft glue before pressing firmly in place. Finish with a “Birthday Wishes” sentiment sticker or die-cut phrase centered near the bottom and allow everything to dry flat.
23. Glitter Angel Tree Topper

She’s glowing, she’s glam, and she absolutely belongs at the top of your Christmas tree. The layered scalloped dress and dramatic gold wings make this angel feel straight out of a winter fairytale.
Create the dress by stacking scalloped glitter foam layers in alternating red and green (each tier about 1 inch shorter than the one beneath). Form large wing panels from gold glitter foam and attach behind the body, adding red glitter swirls for detail. Secure a small LED tea light behind a star-shaped foam piece so it softly illuminates in her hands.
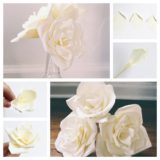
24. Mini Red Glitter Roses

These tiny roses are bold, romantic, and a little dramatic in the best way. The layered petals give them that realistic swirl while the glitter finish keeps things extra fabulous.
Shape multiple rounded petal layers (1–2 inches wide) from red glitter foam and gently curl the edges with your fingers. Roll a narrow foam strip tightly for the center bud, then wrap larger petals around it one by one, securing with hot glue at the base. Finish with a small circular backing piece to keep everything sturdy.
25. Golden Glitter Rose Stem

This golden rose feels luxe and gift-ready like something you’d tuck into a bouquet or use as a glam party favor. The sparkle against those bold green leaves? Chef’s kiss.
Form layered teardrop-shaped petals from gold glitter foam and curl slightly inward for dimension. Wrap petals around a small foam cone base, gluing as you build outward to create fullness. Attach two leaf shapes to a thin floral wire stem wrapped in green tape, then secure the bloom firmly at the top.
26. Rustic Glitter Acorn Ornaments

Cozy meets glam with these glitter acorns. They’re earthy, sparkly, and perfect for adding a woodland vibe to your holiday décor.
Coat small foam egg shapes (about 2–3 inches tall) with craft glue and roll in fine gold glitter, tapping off excess and letting dry completely. Glue real or faux acorn caps to the top and insert a small screw eye into each cap. Tie 8-inch pieces of jute twine through the loops for hanging.
27. Layered Glitter Daisy Trio

Bright, bold, and bursting with color these daisies are total mood-boosters. The layered petals and textured centers make them perfect for hair clips, brooches, or gift toppers.
Prepare two flower bases per bloom (about 3 inches wide) from contrasting glitter foam shades. Snip thin fringe details along the inner circle for texture, then stack and glue together with hot glue. Add a tightly rolled foam strip in the center and secure a felt circle on the back for extra stability.
28. Glitter Foam Dinosaurs

These pastel dinos are adorable and slightly sparkly aka kid craft gold. The clothespin legs make them stand up on their own, which means instant playtime fun.
Trace simple dinosaur body shapes (about 5 inches long) onto colorful foam sheets. Add glitter foam spikes along the back and draw tiny facial details with a black marker. Clip two mini wooden clothespins underneath for legs, securing with strong glue so they stand upright.
29. Pink Glitter Rose Bloom

Soft, sweet, and totally swoon-worthy. This pink rose has that dreamy handmade look that works for gifts, décor, or even hair accessories.
Shape layered rounded petals from soft pink foam, slightly warming with a low-heat tool to make them flexible. Wrap the smallest piece tightly to form the center and continue building outward with larger petals, gluing at the base only. Attach green glitter leaf shapes underneath for a polished finish.
30. Spiral Glitter Mini Trees

These mini spiral trees are playful, modern, and perfect for desks or holiday centerpieces. The stacked rings and glitter finish make them feel like whimsical candy-colored Christmas décor.
Create graduated circular bases from glitter foam (largest about 4 inches wide) and stack with hot glue. Insert a sturdy plastic straw or wooden dowel vertically through the center for support. Wrap a thin glitter foam strip around the dowel in a spiral pattern, securing as you go, and top with a small glitter star.
31. Glitter Floral Bell Ornament

This bell ornament is basically festive sparkle wrapped in florals. The layered petals, bold jewel center, and glittery leaves make it feel like holiday décor with a glam twist.
Shape two bell halves (about 4 inches tall) from white glitter foam and join at the center with hot glue. Layer contrasting glitter foam flowers on top, stacking two sizes for dimension and finishing with a rhinestone embellishment in the middle. Attach two small gold beads at the bottom tips and secure a 6-inch gold chain loop at the top for hanging.
32. Glitter Rose Bouquet Display

This bouquet is giving handmade Valentine’s centerpiece energy. The vibrant pink blooms and glittered leaves look luxe but still totally DIY-able.
Form layered rounded petals (2–3 inches wide) from pink glitter foam and curl gently with your fingers for a natural shape. Wrap petals around small foam cone bases, securing at the bottom only to keep the bloom open. Attach each flower to a floral wire stem wrapped in green tape and arrange into a foam-covered circular base (about 5 inches wide) for stability.
33. Candy Cane Glitter Ornaments

Classic candy canes, but make them sparkle. The glitter stripes and bold bows give these ornaments major North Pole chic vibes.
Create a curved cane base from thick white foam tubing (approximately 6 inches tall). Wrap 1-inch-wide glitter foam strips diagonally around the cane, securing with hot glue as you spiral downward. Add thin gold bead garland along the edges and finish with a layered glitter bow at the center, attaching a hanging loop at the top.
34. Golden Glitter Calla Lily Bouquet

These calla lilies are sleek, modern, and so eye-catching in metallic gold. They look like something you’d see in a glam event centerpiece.
Roll a 4×4-inch square of gold glitter foam into a cone shape, sealing the edge neatly with glue. Insert a small bundle of white floral stamens into the center and secure at the base. Attach each bloom to a green floral wire stem and add long pointed leaves along the sides for a full bouquet effect.
35. Glitter Butterfly Wall Accent

Bright green and unapologetically sparkly this butterfly is made to stand out. Perfect for kids’ rooms, party décor, or a spring craft moment.
Layer two butterfly silhouettes (about 5 inches wide) from contrasting shades of green glitter foam for a dimensional outline. Add a thin rhinestone strip down the center as the body and curl narrow foam strips into spirals for antennae. Mount onto a small foam backing or hair clip depending on how you plan to display it.
36. Layered Glitter Poinsettia Décor

Bold, dramatic, and totally holiday-ready. The layered petal design with a spiral center makes this poinsettia feel extra luxe.
Shape eight large outer petals (about 3 inches long) and six smaller inner petals from red or gold glitter foam. Slightly curve each petal inward before layering in alternating rows with hot glue. Roll a thin strip of foam into a tight spiral for the center and secure firmly before adding a backing circle for support.
37. Glitter Floral Vine Arrangement

This floral vine is playful, colorful, and full of personality. The mix of bright blossoms and curved leaves makes it perfect for wall décor or festive displays.
Form five-petal flowers (2 inches wide) from blue and yellow glitter foam and add pearl beads in the centers. Create long curved leaf shapes and attach along a thick foam strip stem, layering flowers at varying angles for movement. Secure the full arrangement onto a small foam base or frame backing so it holds its shape beautifully.
38. Glitter Christmas Elf Ornament

This jolly little elf is basically Santa’s cutest employee. With sparkly boots, striped legs, and a glittery hat, it’s giving full-on North Pole charm. Hang it front and center because this one deserves spotlight status.
Print or sketch a simple elf template about 8 inches tall. Cut each piece from colored glitter foam (green hat and boots, red shirt, gold accents, beige face). Glue layers using hot glue, starting from the body base upward. Draw facial features with a black permanent marker. Attach a 6-inch loop of gold cord to the back with hot glue and cover with a small foam circle to secure. Let set 10 minutes before hanging. Can you picture this twinkling on your tree?