Prepare for a color-packed crafting rush. These 33 DIY clay flower craft ideas burst with bold shapes, wild textures, and bloom-in-your-face energy. Every single project feels like a floral firework waiting to happen.

33 DIY Clay Flower Craft Ideas That Bloom With Handmade Beauty in 2026
Clay flowers are stealing the spotlight in 2026, offering a way to sculpt petals, textures, and colors into blooms that never wilt. Every piece carries a touch of artistry, whether shaped into tiny botanicals or fuller, more dramatic florals that immediately brighten up any display.
This collection of 33 DIY Clay Flower Craft Ideas brings together styles that feel delicate, bold, whimsical, or wonderfully detailed, giving you endless inspiration for décor, gifts, or creative play. Expect designs that look impressively crafted yet remain relaxing, fun, and deeply satisfying to make by hand.
1. Pastel Clay Tulip Bouquet

This bouquet is the definition of soft spring perfection. The gentle pastel tulips, neatly gathered and finished with a sweet bow, feel like something you’d find at a dreamy handmade market—or gift to someone who loves flowers that never wilt. It’s polished, cozy, and ridiculously giftable.
To recreate it, shape polymer clay into smooth teardrop petals about 1.5 inches long, lightly pinching the tips for that tulip look. Wrap three petals around a small cone-shaped center, blending seams with your fingers. Roll thin green clay strands (about ⅛ inch thick) for stems and attach using liquid clay. Bundle 10–12 finished tulips together, bake at 275°F for 15 minutes per ¼ inch thickness, then finish with a clay band or ribbon bow around the stems. Timeless and charming—can you picture this on your shelf?
2. Playful Daisy Clay Garden

These daisies are pure sunshine in clay form. Chunky petals, bright happy colors, and a playful, almost cartoon-like style make this project feel joyful and lighthearted. It’s the kind of craft that instantly lifts a space—and your mood—without taking itself too seriously.
Start by rolling small clay balls and flattening them into oval petals about ¾ inch long. Arrange 6–8 petals around a contrasting center disk, pressing gently so they bond. Add light texture with a toothpick or needle tool. Insert floral wire or toothpicks into the back before baking so they become stems. Once baked, secure the flowers into air-dry clay or a painted wooden base with hot glue. Easy, cheerful, and endlessly customizable—total win.
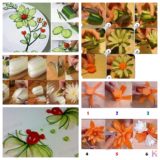
3. Strawberry & Floral Clay Mix

This floral-fruit combo is whimsical in the best way. Tiny strawberries nestled among delicate clay flowers give major cottagecore energy, with just enough detail to make you stop scrolling and zoom in. It feels playful, creative, and totally unique.
Use polymer clay in reds, pinks, creams, and soft greens. Form strawberries by shaping small ovals, then texture with a needle tool and add tiny green tops. Create flowers with thin petal layers about 2 mm thick, stacking them around a small center. Bake each piece separately for clean details, then assemble with E6000 or gel super glue. Finish with a satin or semi-gloss glaze for a soft, polished look. Perfect for trinket dishes, charms, or decorative accents—adorable overload.
4. Statement Clay Starflower

This flower is bold, sculptural, and unapologetically artistic. With its layered petals, dotted textures, and unexpected color combinations, it feels more like a gallery piece than a simple craft. It’s the kind of project that makes a statement wherever it’s displayed.
Create petals by cutting slab clay about ¼ inch thick, shaping each petal with soft curves. Layer from largest to smallest, attaching with slip or liquid clay. Add raised dots using the end of a paintbrush or stylus for texture. Bake or kiln-fire depending on your clay type, then finish with matte glaze or acrylic paint sealed with varnish. Artsy, modern, and seriously eye-catching—this one’s a showstopper.
5. Blush Ombre Clay Rose

Romantic and soothing, this ombre rose is pure elegance. The gentle fade from white to blush pink makes it feel soft, realistic, and perfect for sentimental projects like keepsakes or handmade gifts.
Condition two shades of clay and blend them slightly for a gradient effect. Roll thin sheets using an acrylic roller or pasta machine, then cut petal shapes ranging from 1 to 2 inches. Curl the edges gently with your fingers or a ball tool. Wrap smaller petals tightly around a center spiral, layering larger petals outward. Bake, then lightly dust the edges with chalk pastel if desired for extra depth. Classic, delicate, and always pin-worthy.
6. Balloon-Style Clay Flower Bouquet

These flowers look like they floated straight out of a party scene. Puffy, rounded petals and bright pastel colors give them a balloon-like charm that feels modern, playful, and full of personality.
Roll clay into smooth ropes about ¼ inch thick and form loops for each petal, pinching the ends together. Stack 5–6 loops to create one flower and add a small ball center. Insert wooden skewers as stems before baking so everything stays secure. Once baked, wrap the bouquet in tissue paper and cardstock for a polished, gift-ready finish. Fun, fresh, and guaranteed to make people smile.
7. Mini Clay Flower Shop Display

This miniature flower stand feels like a tiny world you could step into. Each bloom is thoughtfully shaped and colored, creating a charming display that feels cozy, nostalgic, and incredibly detailed.
Create small flowers with layered petals no wider than 1 inch, attaching them to floral wire stems. Arrange them into mini metal buckets or jars filled with floral foam or clay bases. Display everything on a painted wooden rack or shelf for that “mini flower shop” look. Perfect for craft rooms, displays, or selling setups—so charming it almost feels magical.
8. Textured Clay Flower Molds

If clean lines and consistency are your thing, molded clay flowers are the ultimate hack. These crisp, repeatable shapes look professional and are perfect for batch-making jewelry or embellishments.
Condition your polymer clay well, then press it firmly into silicone molds. Trim excess clay with a blade and carefully remove the piece. Add holes for earrings or charms before baking. Once baked, decorate with acrylic paint, mica powders, or leave them neutral for a minimalist vibe. Seal with matte or gloss varnish for durability. Simple process, high-end results—love that for us.
9. Autumn Floral Clay Earrings

These earrings are cozy fall vibes wrapped up in tiny clay florals. Warm oranges, soft neutrals, and delicate textures make them feel perfect for sweater weather and handmade gift season.
Create a small rounded base and layer mini petals (about ½ inch or smaller) to form clustered flowers. Texture with needle tools for added detail, then bake. Attach jump rings and earring hooks using jewelry pliers and strong super glue. Lightweight yet statement-making, they’re ideal for craft fairs or personal accessories. Fall fashion, but make it handmade.
10. Rainbow Clay Flower Bouquet

This bouquet is pure happiness. Bright colors, rainbow accents, and playful flower shapes make it feel celebratory and fun—like a party wrapped in paper.
Form flowers using simple petal loops or flat petal shapes sized between 1–2 inches. Use wooden sticks or paper straws as stems, securing them with liquid clay. After baking, arrange the bouquet and wrap it in layered craft paper, securing with tape or ribbon. It’s bold, cheerful, and impossible not to love. Instant joy, guaranteed.
11. Colorful Clay Flower Frame

This frame is basically happiness with a border. Bright roses, sunny daisies, and leafy pops of green wrap around a simple square base, turning an everyday photo frame into a full-on statement piece. It’s playful, bold, and perfect for kids’ rooms, craft corners, or gifting something handmade with serious personality.
Start with a plain wooden or cardboard frame and condition polymer clay in vibrant colors. Create roses by rolling thin clay strips into spirals, daisies with flattened oval petals, and sunflowers using layered petals with a textured center. Attach each flower directly onto the frame using liquid clay or strong craft glue. Bake if the frame is oven-safe, or bake flowers separately and glue them on after. Seal with a clear varnish for durability. Instant wall glow-up—so fun!
12. Cute Character Clay Flower Bouquet

This bouquet is adorable with a capital A. Sweet clay flowers mixed with tiny character faces give it a whimsical, almost storybook vibe—like a bouquet made just for smiles. It feels cozy, creative, and totally unique compared to traditional floral crafts.
Shape simple five-petal flowers using small clay balls flattened into rounded petals, then add soft pastel centers. For the characters, sculpt small spheres for faces, adding ears, snouts, and details with a needle tool. Attach everything to wooden skewers or floral wire stems using liquid clay. Wrap the finished bouquet in mesh fabric or tissue paper and tie with ribbon. It’s cute, charming, and absolutely Pinterest-bait.
13. Elegant Clay Flower Hatbox Arrangement

This clay flower arrangement is giving luxury gift energy. Soft peach, coral, and white blooms arranged tightly inside a round box feel elegant, romantic, and perfect for special occasions. It’s the kind of project that looks store-bought—in the best way.
Create layered flowers using thin clay petals, gently ruffling edges for realism. Stack petals from smallest to largest and secure with liquid clay. Bake flowers separately, then arrange them into a foam base inside a sturdy hatbox. Add faux filler greenery, pearl accents, or gold beads for extra detail. Finish with a satin ribbon tied around the box. This one’s a keepsake, not just a craft.
14. Minimalist Clay Floral Table Vases

These delicate, modern florals feel calm, airy, and beautifully understated. Small clay vases paired with simple flower stems create a serene, design-forward look that’s perfect for shelves, desks, or coffee tables.
Form small pinch pots or slab-built vases using air-dry or ceramic clay, keeping shapes organic and soft. For flowers, use thin petals cut from lightly rolled clay and attach to wire stems. Keep colors neutral or softly muted for that minimalist aesthetic. Once dry or fired, assemble the stems into the vases without overcrowding. Simple, stylish, and endlessly soothing to look at.
15. Neutral Botanical Clay Relief

This floral piece feels like art you’d find in a boutique gallery. Muted tones, layered petals, and textured leaves create a calm, earthy composition that’s perfect for wall decor or framed art.
Roll clay thin and cut petal and leaf shapes in soft neutral shades. Layer flowers carefully, using a ball tool to add depth and gentle curves. Press leaf veins lightly with a needle tool for detail. Mount the finished design onto a flat clay or wooden base and bake or cure as needed. Seal with matte varnish for a stone-like finish. Quietly stunning and very chic.
16. Framed Clay Tulip Wall Art

This piece feels like spring, framed. Pastel tulips tied together with a delicate bow bring soft, cozy charm to any space, making it perfect for seasonal decor or thoughtful handmade gifts.
Shape tulip buds using teardrop forms, gently scoring lines for petal texture. Add long green leaves using flattened clay strips with tapered ends. Arrange the bouquet on a round or square backing, pressing lightly so everything adheres. Add a clay rope bow for extra sweetness. Bake and mount inside a shadow box or frame. Simple, elegant, and very pin-worthy.
17. Tiny Clay Vase Flower Collection

These miniature vases are pure magic. Each tiny pot holding a single delicate bloom feels whimsical and dreamy, like a miniature flower shop frozen in time.
Create tiny vases by pinching air-dry or polymer clay into small cone or rounded shapes. For flowers, cut ultra-thin petals and attach them to wire stems. Once everything is dry or baked, place the flowers gently into the vases. Display them in a row or cluster for maximum charm. Small-scale crafts, big visual impact—obsessed.
18. Floral Clay Envelope Embellishments

This idea is creative, charming, and perfect for gifting or decorating. Clay flowers arranged on envelope-shaped bases feel like love letters turned into art.
Use white or pastel clay to shape small envelope forms, adding fold lines with a blade. Decorate with mini flowers made from tiny petal shapes and leaf accents. Add extra details like bees, buds, or dots using a needle tool. Bake and use as magnets, ornaments, or gift toppers. Sweet, thoughtful, and totally unique.
19. Simple Rustic Clay Flower Bases

These flowers lean into simplicity, texture, and earthy charm. Chunky petals and warm clay tones make them feel handmade in the best possible way—perfect for rustic or natural decor lovers.
Form petals from flattened clay ovals and arrange them in a circular pattern. Add a rounded center piece and score light lines for texture. Let natural imperfections shine instead of smoothing everything out. Fire or bake depending on clay type, then optionally seal with a soft matte finish. Minimal effort, maximum character.
20. Mini Potted Clay Flowers

These teeny tiny potted flowers are almost too cute to handle. Bright blooms popping out of miniature clay pots feel playful, cheerful, and perfect for desks, shelves, or handmade displays.
Create tiny pots using wrapped clay coils or pinched shapes. For flowers, roll small clay cylinders or discs and attach to thin wire stems. Add flat leaves using teardrop shapes. Bake or dry fully, then assemble by gluing stems into the pots. Arrange them as a set or scatter them around for instant charm. Tiny crafts, huge smiles—can you picture a whole shelf of these?
21. Mini Daisy Clay Studs

These teeny-tiny daisy studs are proof that small projects can still make a huge style statement. Soft pastel petals paired with textured centers give them that handcrafted, slow-made charm that feels both playful and timeless—basically the kind of earrings people lean in closer to admire.
Roll polymer clay into pea-sized balls for the centers and shape 8–10 teardrop petals about ½ inch long. Gently flatten petals with your fingertip, arranging them in a circle around the center. Texture the middle using a toothpick or needle tool for a pollen-like look. Bake at 275°F for 15 minutes, let cool completely, then attach stainless steel earring posts with E6000 glue. Seal with a matte or satin varnish for a soft, wearable finish. Tiny perfection, right?
22. Sculpted Statement Rose Wall Bloom

This oversized clay rose is pure wall-art drama—romantic, sculptural, and unapologetically bold. The layered petals and organic movement make it feel like a modern art piece pulled straight from a boutique gallery.
Start with air-dry clay rolled into slabs about ⅛ inch thick. Cut petal shapes in graduating sizes (roughly 2 to 5 inches wide), thinning the edges with a damp sponge for a delicate, realistic curl. Build around a foil ball core, layering from the center outward. Allow to dry for 48 hours, sand lightly to smooth rough edges, and paint with chalk paint or leave natural for a stone-like finish. Attach a sawtooth hanger or D-ring on the back. Instant focal point energy.
23. Ceramic Flower Paperweights

These glossy clay flowers double as functional desk decor—and honestly, we love a multitasker. With rich color and satisfying weight, they turn everyday office clutter into something artful and intentional.
Form a flat base about 3 inches wide using stoneware or air-dry clay. Build layered petals directly on top, pressing gently so each layer adheres securely. Add texture using a silicone shaper or toothpick. Let air-dry fully or bisque fire if using ceramic clay, then glaze in high-gloss or satin finishes. Seal air-dry versions with clear acrylic spray for durability. Your desk just got fancy.
24. Tulip Clay Bouquet

Forever tulips? Yes, please. These sculpted clay blooms capture that fresh spring feeling without the pressure of keeping real flowers alive. Bright, cheerful, and endlessly giftable.
Roll colored polymer clay into smooth egg shapes for the buds, then pinch and score three vertical petal seams. Insert trimmed floral wire stems (8–10 inches long) before baking at 275°F for 20 minutes. After cooling, wrap stems with green floral tape and add clay leaves if desired. Arrange in a vase or tie with twine for a sweet handmade bouquet moment.
25. Bookish Mug Flower Topper

This whimsical mug topper feels like a love letter to cozy mornings—books stacked just right, topped with cheerful clay flowers. It’s decorative, charming, and totally shelf-styling gold.
Sculpt miniature books from polymer clay, each about 1 inch wide, stacking two or three together. Texture page edges with a needle tool and bake according to package directions. Create tiny flowers separately, bake, then attach using E6000 or super glue. Secure the finished topper to the mug’s exterior rim or side (decorative use only). Coffee station glow-up unlocked.
26. Neutral Clay Flower Study

Soft, earthy, and beautifully understated, these neutral clay flowers feel like a pottery studio daydream. The muted tones and organic shapes make them perfect for minimalist or Scandinavian-inspired spaces.
Hand-form petals from stoneware or air-dry clay, keeping thickness around ¼ inch for strength. Layer loosely, allowing petals to curve naturally. Let dry completely, then lightly sand edges for a refined finish. Leave raw or brush with diluted acrylic wash to add subtle depth. Style as tabletop accents, wall pieces, or shelf decor. Calm vibes only.
27. Framed Clay Flower Art

This framed clay artwork is like capturing a joyful flower field in permanent form. Bright colors, playful shapes, and lots of dimension make it a true statement piece.
Roll polymer clay into small balls and petal shapes in assorted colors. Press directly onto an 8×10 canvas or wood panel, forming flowers in varied sizes. Bake according to clay instructions, allow to cool, then frame using a deep shadow box frame. Add a white mat for contrast and polish. Art that makes you smile—every time.
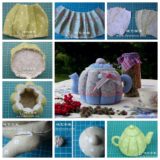
28. Teacup Clay Rose Arrangement

Vintage teacups and clay roses are a match made in cottagecore heaven. This arrangement feels romantic, nostalgic, and endlessly charming—perfect for gifting or display.
Create small roses by rolling thin clay strips (½ inch wide) and spiraling into tight buds, gently flaring outer petals. Add tiny leaves, then bake at 275°F for 15 minutes. Once cooled, secure roses inside a teacup using hot glue or epoxy. Fill gaps with moss or clay greenery. Tea party centerpiece energy, activated.
29. Kawaii Flower Figurine Ring

These adorable flower-topped figurines are peak cute—tiny characters with big personality. Each one feels collectible, playful, and totally irresistible.
Form small clay bodies about 1 inch tall using polymer clay. Add simple dot eyes with a needle tool and top each figure with a different flower bloom. Bake at 275°F for 15 minutes, let cool, then seal with gloss varnish for that toy-like finish. Arrange in a circle for display or turn them into charms. Warning: one is never enough.
30. Kawaii Flower Baby Figurine Ring

This circle of teeny clay cuties is pure serotonin in craft form—each tiny character popping up with a different flower “hat” like they’re playing peekaboo in a fairy garden. It’s whimsical, playful, and absolutely irresistible for collectors or anyone who loves cute-with-a-capital-C projects.
Start with polymer clay and form small rounded bodies about 1–1¼ inches tall. Add tiny arms and legs using toothpick-sized clay rolls, then dot on eyes with a needle tool. For the flower toppers, sculpt mini blooms separately—petals first, then a center—and attach gently before baking at 275°F for 15 minutes. Let cool completely and seal with gloss or satin varnish for that toy-like finish. Arrange them in a circle, turn them into charms, or display them as a set—because yes, one is never enough.
31. Ceramic Flower Wall Garden

This dreamy ceramic wall installation feels like a forever-blooming garden, with layered petals and soft glazes that give serious gallery vibes. Each flower stands alone beautifully, but together they create a jaw-dropping statement wall moment.
Use stoneware clay and hand-build individual flowers ranging from 4–8 inches wide. Roll slabs about ¼ inch thick, cut petal shapes, and gently curve them using your fingers or a foam pad. Layer petals from the center outward, scoring and slipping as you go. Once bone dry, bisque fire, glaze in muted or earthy tones, then glaze fire. Mount using wall anchors or ceramic-safe hanging hardware. Can you picture an entire wall like this? Stunning.
32. Polka-Dot Clay Flower Bouquet Picks

Bright, bold, and bursting with personality, these polka-dotted clay flowers feel like a celebration on sticks. They’re cheerful, artsy, and perfect for adding color to a plant pot, gift wrap, or centerpiece.
Create flower faces from polymer or air-dry clay, keeping them around 2½–3 inches wide. Add raised dot details using tiny rolled clay balls or a dotting tool for texture. Insert floral wire into the back before baking or drying so they become sturdy picks. Paint with acrylics if needed, seal with clear gloss, and bundle together with ribbon or twine. Instant happiness—no watering required.
33. Mini Clay Blossom Plant Decor

This sweet little clay flower plant is proof that small-scale projects can still make a big visual impact. With bright pink blooms and fresh green leaves, it feels like a handmade pop of spring that works year-round.
Use air-dry or polymer clay to sculpt tiny five-petal flowers (about ¾ inch wide) and simple round centers. Attach them to thin twigs or floral wire stems, adding flat leaf shapes along the way. Secure stems into a small container or mini wooden pot using foam or hot glue, then cover the base with green clay or moss. Let dry completely and seal if needed. Cute, cheerful, and totally display-worthy—can you picture this on a sunny windowsill?