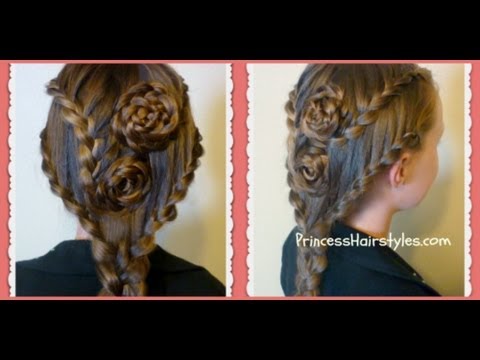
Been looking for something new and exciting to do with your long hair? Like the idea of professional quality results without the need to head to the salon? Well we’ve got just the thing for you – check out this incredible DIY lace braid rose hairstyle we came across while doing our rounds!

It’s pretty amazing to think that this is a simple DIY project you’ll come back to time and time again, but once you’ve tried it out we guarantee you’ll be hooked. It looks like the kind of thing only the pros would be able to pull off, but in reality it’s so much easier than you’d expect – the real-life results are also far above and beyond the pictures you see here.
What You’ll Need
- Two small elastic bands for hair
- One medium-sizes elastic band
- Two hair clips
- A few bobby pins
- A good brush
- Lacquer to hold the braid in place

Lace Braid Rose Hairstyle Tutorial
- Make sure your hair is well-combed and then take a section of your hair to the right-hand half of your head to create a braid in the usual way. When you get to the end of the braid, use an elastic band to secure it in place.
- After this, you’ll want to turn your attention to the left-hand half of your head to do exactly the same – again securing the braid with an elastic band.
- Take hold of the braid on the right-hand side and roll it to create the rose effect as you can see above. Secure it in place with bobby pins, then do the same on the other side of your head.
- The rest of the hair can either be braided and fixed in place as pictured, or styled any way you like.
Trust us when we say that just as you know your way around a standard braid, you’ll be able to take care of this amazing style in no time.
Give it a try today and let us know how you get on. Here’s the video tutorial.


![Easy Guide to Making Awesome Cake Pops [Video + 19 Mouth Watering Ideas]](https://cdn.wonderfuldiy.com/wp-content/uploads/2015/04/Delicious-Cakepops-160x160.jpg)