Now that the sun is coming out a little more an the spring flowers are just starting to peek through as the snow melts, I’m already basically in the full swing of Easter!
There’s just something so cheerful and celebratory about this particular holiday that gets me excited for celebrating a new season that’s full of colour and life. On top of that, my kids absolutely love the whole concept of the Easter bunny and going on egg hunts! That’s why I’m always trying to come up with cute Easter egg based crafts around this time of year that we can make together.
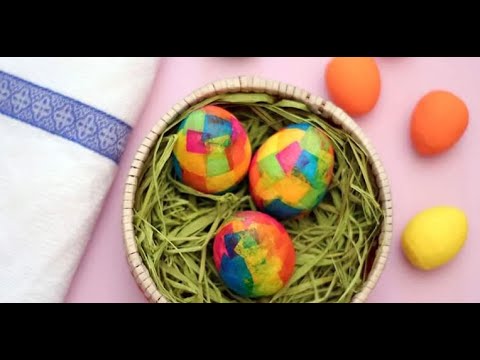
I always get bonus points from them for projects that involve as much colour as possible, since they’re total brightness lovers who will take just about any chance for creativity as an opportunity to make rainbows. That’s how these super colourful little paper maché eggs came to be.


I’m the kind of crafter who has always adored following other people’s crafting tutorials but I also really get a kick out of making tutorials of my own so other DY enthusiasts can follow along if they want to try their hand at what I’ve made.
These brightly coloured tissue paper eggs were no exception since I had every opportunity in the world to document the process because my kids found them so fun to do and made so many. Check out these step by step instructions complete with photos!
If you’d rather follow along with a video tutorial instead of written words, scroll to the bottom of this post to find just what you’re looking for.
For this project, you’ll need:
- Paper maché eggs (I got mine at the local crating store in the seasonal section)
- Coloured tissue paper (as many colours as you please)
- A paintbrush
- Decoupage glue (most school style white liquid glues will work)
- Scissors
Step 1:
Gather your materials!

Step 2:
Start with one colour of tissue paper (I started with blue) and turn it portrait-wise so the longer edges are at the sides and the shorter edges are at the bottom and bottom. Use your scissors to cut a strip from the righthand side that is about half an inch wide and the full height of the page, from top to bottom. Now, cut this strip into little squares. I tried to make mine as evenly sized as possible, but you don’t actually have to measure them to be precise. My squares were about half an inch tall each to match the width of the strip I cut them from. Brush these squares aside for the moment to be used later.


Step 3:
Repeat this strip and square cutting process with each of your colours of tissue paper! I used six colours in total- blue, green, yellow, orange, red, and pink- but you can use less, more, or different shades if you prefer. Scoop each pile of coloured tissue paper squares aside for the moment while you work on the next sheet until you’ve got squares in every colour.

Step 4:
Now you’ll cover the whole surface of your paper maché egg in tissue paper squares! The goal is to scatter, overlap, and alternate them to get a cool and eclectic rainbow effect, so feel free to choose your colours at random however you think looks best. First, apply some glue to the surface of your egg with your paintbrush, putting down enough to make the tissue paper stick well but not so much that it’s gooey; you want to work in thin layers.
Stick a tissue paper square where you just applied glue, positioning it however you please; the direction isn’t really important, so don’t feel like you have to make things look straight and even. In fact, I think it actually looks better if they’re a little wonky! Once you’re happy with how your square sits, use your paintbrush to apply more glue over the whole square, saturating it just a little and really pasting it into place. Make sure the square’s edges are all stuck down smoothly all the way around.


Step 5:
Repeat this gluing, sticking, and pasting process with a second square. Feel free to overlap, change colours, and alternate directions how you please! Remember the goal is to make the egg look scattered, fun, and creative. You can also use a square in the same colour to create larger patches in that shade if you like, which is how I started out. This gave me an almost striped effect!


Step 6:
Keep on with this gluing, sticking, and pasting process until your entire egg is covered in colourful squares! The goal is to overlap your pieces so that the entire egg is covered with no white spaces peering through. Feel free to go back and layered more pieces over if you catch a spot that you think needs more colour. You can also add more glue in places that have loose edges or are too dry to stuck smoothly and look like they might peel. Once you’re satisfied with the coverage and look of your egg, set the whole thing aside to dry.


Once your paper maché and tissue egg is dry, it’s ready to display! Make several and pile them in baskets or scatter them around the dinner table, mantel, and side table when you have company over on Easter.


Just in case you’d like to try this project out for yourself, leave us a comment to tell us how it went.
Cool Easter Eggs [Video Tutorial]