Practical pieces feel far more exciting when they double as decor. These 30 DIY decorative cutting board ideas showcase creative ways to design boards that look beautiful on display while still being useful in everyday cooking.

30 DIY Decorative Cutting Board Ideas That Turn Everyday Kitchen Pieces Into Jaw-Dropping Statement Decor
Decorative cutting boards are stealing the spotlight in 2026, transforming the most ordinary kitchen staple into bold, display-worthy pieces that instantly elevate your space. With the right mix of paint, carving, texture, and styling, a simple board can look like something straight out of a high-end kitchen shoot.
Inside this collection, cutting boards become everything from richly detailed art pieces and layered wood designs to modern painted statements and rustic-chic accents that demand attention. Every idea pushes you to experiment with patterns, finishes, and creative details so your final piece looks polished, eye-catching, and far too good to ever hide in a cabinet.
1. Faith Quote Engraved Board

This one is giving warm, meaningful, and front-porch ready a cutting board that doubles as a heartfelt statement piece. The mix of natural wood grain with that subtle inlay detail? Chef’s kiss for cozy home vibes.
Grab a wooden cutting board (10–14 inches tall), sand lightly with 220-grit sandpaper, then stain in a warm walnut tone. Use a Cricut or stencil to add your quote with black acrylic paint or wood-burning for a permanent engraved look. For that luxe stripe detail, glue thin strips of faux mother-of-pearl or resin inlay across the board using strong craft adhesive. Seal with a matte polyurethane and attach jute rope through the handle for hanging. Instant soul + style.
2. Minimal Halloween Ghost Board

Spooky but make it cute-core. This matte black board with a tiny ghost is the definition of understated Halloween décor that still gets compliments.
Paint a small cutting board (8–10 inches) with matte black chalk paint (2 coats, 1-hour dry between). Cut a simple ghost shape from white adhesive vinyl or paint it freehand using a stencil. Add a black-and-white gingham ribbon bow at the handle using hot glue. Optional: lightly distress edges with sandpaper for a farmhouse vibe. Boo-tiful, right?
3. Resin Edge Charcuterie Board

This board is serving luxury hosting energy that marble-like resin edge looks straight out of a boutique kitchen. Perfect for impressing guests without saying a word.
Use a long wooden board (18–24 inches). Tape off sections and mix epoxy resin with white, gold, and a hint of beige pigment. Pour along edges and tilt slightly for that natural flow effect. Use a heat gun to pop bubbles and create soft marbling. Let cure 24–48 hours, then sand edges smooth and finish with food-safe mineral oil. Hosting just got elevated.
4. Laser-Engraved Floral Board

Soft florals etched into pale wood? It’s giving cottagecore kitchen dreams. This is the kind of piece that just sits pretty on your counter.
Start with a bamboo or light wood board. Use a laser engraver or wood-burning tool to add delicate floral patterns across the surface (trace lightly in pencil first). Keep designs clustered in corners or edges for balance. Finish with a clear satin seal or food-safe oil. Add a lemon or herb illustration for extra charm yes please.
5. Farmhouse Display Board Set

Layered boards, soft neutrals, and cozy textures this setup is basically a Pinterest kitchen corner come to life. Effortlessly styled but totally doable.
Use 2–3 boards in varying sizes. Lightly sand and stain one dark walnut, leave one natural, and paint one with a soft whitewash (diluted white acrylic). Add a small painted detail like a lemon or simple pattern using a fine brush. Seal all with food-safe oil or matte sealer. Stack against your backsplash with a small plant or pitcher for that styled look.
6. Sunflower Decoupage Board

Bright, cheerful, and a little vintage this sunflower board feels like summer in your kitchen all year long. The layered design is pure cottage charm.
Paint your board with off-white chalk paint and let dry. Cut sunflower designs from napkins or decoupage paper and adhere using Mod Podge (apply under and over). Once dry, lightly distress edges with sandpaper and add soft brown shading with a dry brush. Seal with matte sealer. Tie raffia and ribbon around the handle for that extra pop.
7. “Bless This Kitchen” Sign Board

This one is basically a cutting board turned wall art clean, farmhouse, and full of charm. That bold lettering? It owns the space.
Paint the board white (2–3 coats), then sand edges slightly for a distressed look. Use black vinyl lettering or stencil the phrase using acrylic paint. Add layered ribbons (burlap + gingham) and faux greenery at the top using hot glue. Seal with matte finish spray. Hang it or lean it either way, it’s giving cozy kitchen energy.
8. Pig-Shaped Wooden Board

Okay but this is adorable. A pig-shaped board adds instant personality and makes your shelf styling feel playful but still aesthetic.
Trace or purchase a pig-shaped wood cutout (about 12–16 inches wide). Sand edges smooth and stain with a rich wood tone. Optionally, outline edges with a darker stain for dimension. Drill a small hole for hanging and finish with food-safe oil or clear sealer. It’s quirky in the best way.
9. Rustic Holiday Candle Board

This one screams cozy winter nights candles, pine, and that warm wood base. It’s basically a holiday centerpiece without the fuss.
Use a long narrow board (18–20 inches), stain in a rustic oak or walnut tone. Arrange pillar candles (3–4) and secure lightly with removable adhesive if needed. Add faux pine branches, pinecones, and red berries using hot glue or floral wire. Lightly dust with faux snow spray for that frosted look. Holiday hosting? Handled.
10. Seasonal Tiered Tray Board Decor

Mini but mighty this decorative board is made for tiered trays and seasonal swaps. From fall to St. Patrick’s Day, it’s your tiny décor MVP.
Use a small board (6–8 inches tall), paint or stain as your base. Add seasonal designs using layered wood cutouts or vinyl (like pumpkins, clovers, or tags). Attach embellishments (bows, mini signs, greenery) with hot glue. Seal lightly if needed. Switch out accents each season for a fresh look obsessed already?
11. Wood Burned Floral Board

This beauty is all about organic elegance that hand-burned floral detail feels like a little piece of art straight from a cozy artisan market. Minimal but so impactful, it’s the kind of board that whispers “I have taste.”
Use a bamboo cutting board (around 8–10 inches). Lightly sketch your floral design in pencil, then trace with a wood-burning tool (use a fine tip for details and shading strokes). Work slowly to build depth in petals and shadows. Once finished, wipe clean and seal with food-safe mineral oil. Hang it or lean it it’s giving soft botanical vibes.
12. Grateful Gather Serving Board

This one is fall hosting goals. Warm wood tones, cozy lettering, and just enough seasonal charm to make your charcuterie table feel extra special.
Start with a long acacia wood board (16–20 inches). Apply a vinyl stencil or Cricut-cut phrase (“gather with grateful hearts”) and fill with deep burgundy or brown acrylic paint. Carefully peel while slightly wet for crisp edges. Seal with a food-safe finish if using for serving, or matte sealer if decorative. Pair with mini pumpkins for the full vibe—can you picture it on your table?
13. Bless This Home Rustic Board

Rustic, heartfelt, and totally farmhouse-chic this one feels like it belongs in a cozy country kitchen with fresh coffee brewing nearby.
Use a medium wood board and stain it in a weathered oak tone. Once dry, stencil “Bless This Home” using off-white chalk paint. Lightly distress edges and lettering with 220-grit sandpaper for that worn-in look. Add a layered bow (gingham + lace ribbon) at the handle with hot glue. Seal with matte spray and hang with twine for instant charm.
14. Round “Eat” Statement Board

Bold, graphic, and just a little playful this round board is basically kitchen wall art with personality. That oversized “EAT”? It demands attention.
Grab a round wood board (12–14 inches). Paint horizontal stripes using neutral tones (cream, beige, soft brown) with a 1–2 inch flat brush. Once dry, stencil large block letters using black acrylic paint. Add tiny white dot accents with a detail brush for that handmade touch. Finish with light distressing and seal with matte polyurethane.
15. Split Stain Initial Family Board

Personalized and polished, this design gives custom boutique vibes without the boutique price tag. The half-and-half stain contrast? So good.
Tape off your board vertically. Stain one side dark walnut and leave the other natural or lightly whitewashed. Once dry, apply a large monogram letter and family name using black vinyl or stencil. Add small flourishes with a paint pen for detail. Seal with clear coat and style it on your counter instant heirloom energy.
16. Lavender Decoupage Cottage Board

Soft lavender, vintage textures, and dreamy cottagecore vibes this board looks like it belongs in a French countryside kitchen.
Paint the board with white chalk paint and let dry completely. Lightly sand for a distressed base. Apply lavender-themed napkin or rice paper using Mod Podge (smooth gently to avoid wrinkles). Once dry, add a light brown glaze to age the piece, then seal with matte topcoat. Tie raffia around the handle for that rustic finish oui oui!
17. Love Lives Here Accent Board

Sweet, simple, and full of heart this one is perfect for adding a little warmth to your walls without going over the top.
Use a faux shiplap-style board or score horizontal lines into wood for that plank look. Stain in a medium oak tone. Attach a small wooden or acrylic “Love lives here” cutout using wood glue or hot glue. Add a mini heart embellishment and a ribbon bow (leopard print if you’re feeling bold!). Seal lightly and hang with jute twine.
18. Typography Quote Board

Fun, bold, and a little sassy this board is basically your kitchen’s personality in one piece. Bonus points for the colorful accents!
Choose a round cutting board and clean thoroughly. Apply layered vinyl lettering with a mix of white, pink, and teal phrases (use transfer tape for precision). Smooth out bubbles with a scraper tool. Optional: seal lightly with dishwasher-safe Mod Podge if decorative only. Hang with leather cord or display on a hook instant conversation starter.
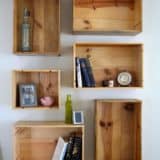
19. Minimal Layered Wood Boards

his is effortless styling at its absolute finest, where nothing feels forced yet everything looks intentionally curated to perfection. No paint, no complicated steps, no overwhelming process just rich, naturally beautiful wood tones layered with a quiet confidence that instantly elevates the entire space.
Select 2–3 cutting boards in varying shapes (round, rectangular, paddle). Condition each with food-safe mineral oil to enhance grain. Optionally sand edges for a smoother finish. Lean them against a backsplash or shelf, layering largest in back. Add a small plant or ceramic piece nearby for balance. Simple, stunning, done.
20. Custom Name Engraved Board

Personalized pieces always win and this one feels sleek, modern, and totally gift-worthy. Perfect for weddings, housewarmings, or just because.
Use a hardwood board (maple or walnut works best). Design your name layout using a stencil or laser file. Engrave with a wood-burning tool or laser engraver, keeping lines clean and centered. Lightly sand after engraving to remove residue, then apply food-safe oil or beeswax finish. Wrap it up or keep it no judgment here!
21. Geode Resin Glam Board

This one is pure kitchen luxury like a sparkly geode met your charcuterie dreams. The layered resin, gold accents, and crystal textures? It’s giving upscale hosting energy.
Start with a wood cutting board and tape off a wavy section. Mix clear epoxy resin and tint portions with black, deep green, and metallic gold pigments. Pour in layers, blending slightly for that geode effect. Sprinkle crushed glass, mica flakes, and glitter while wet. Use a heat gun to remove bubbles. Let cure 24–48 hours, then seal the wood side with food-safe oil. Showstopper status achieved!
22. Sunflower Market Farmhouse Board

Bright, cheerful, and straight out of a country roadside stand this board screams sunny-day happiness. That vintage truck + sunflowers combo? Instant mood boost.
Paint your board with white chalk paint, then lightly sand edges for distressing. Use layered wood cutouts or vinyl for the truck and sunflower design paint each piece (teal, yellow, black) before attaching with wood glue. Add text using stencil or vinyl lettering. Seal with matte topcoat and style with faux greenery hello farmhouse charm!
23. Rustic Cherry Accent Board

Simple, sweet, and a little bit nostalgic this cherry design feels like something from a cozy farmhouse kitchen with fresh pie cooling nearby.
Base coat the board with off-white chalk paint and distress edges using sandpaper. Sculpt cherries using air-dry clay (about 2–3 inches wide), let dry 24 hours, then paint in rich red and green. Attach with strong craft glue. Add a kraft tag with stamped text and tie with jute twine through the handle. Cute and crafty.
24. Vintage Tool Display Board

This is not just décor it’s a whole conversation piece. Rustic, collected, and full of old-world charm, like something you’d find in a tucked-away antique shop.
Use a large round wooden board (18–24 inches). Attach a small wood shelf (approx. 3–4 inches deep) with screws or wood glue. Add hooks underneath for hanging utensils. Decorate with lace trim, vintage tools, and small wood accents using screws or hot glue. Lightly stain or wax for an aged finish. Hang securely this one deserves a spotlight!
25. Whimsical Garden Gnome Board

Okay but how adorable is this?! It’s giving fairytale garden, cottagecore magic, and just a hint of “I definitely talk to my plants.”
Prime the board, then paint a sky-blue background with acrylics. Sketch gnomes and mushrooms lightly in pencil, then paint using fine brushes and vibrant colors. Outline with a black paint pen for definition. Seal with outdoor-safe clear coat if displaying outside. Bonus: add tiny white dots for that storybook sparkle.
26. Simple Typography Duo Boards

Clean, modern, and effortlessly stylish these boards prove that sometimes less really is more. Perfect for layering or leaning on your backsplash.
Use unfinished wood boards and lightly sand smooth. Apply black vinyl lettering (“cheers y’all” / “bless this house”) using transfer tape for precision. Burnish edges to prevent lifting. Optionally seal with matte Mod Podge (decor only). Tie leather or twine cords through handles for that polished finish.
27. Whitewashed Bless This Kitchen Board

Soft, airy, and Pinterest-perfection this one feels like a breath of fresh farmhouse air. The leafy wreath detail? Chef’s kiss.
Apply a whitewash by diluting white acrylic paint with water (1:1 ratio) and brushing lightly over the wood grain. Wipe excess with a cloth. Once dry, apply a stencil with gray or sage paint for the wreath and lettering. Lightly distress edges and seal with matte finish. Add greenery at the handle for that styled look.
28. Marble Resin Edge Boards

This is where rustic meets modern glam. The marble resin edges look like stone slabs melted right into the wood obsessed.
Tape off one or both ends of your board. Mix epoxy resin and divide into cups, tinting with white, black, and gold pigments. Pour along edges and use a stick or heat gun to swirl into a marble pattern. Let cure fully (24–48 hours). Sand edges if needed and finish wood with mineral oil. It’s basically art you can serve snacks on.
29. Vintage Decoupage Kitchen Set

Cozy, nostalgic, and oh-so charming this matching set feels like it belongs in a storybook kitchen window.The warmth, the texture, the subtle variation in grains all come together in a way that feels refined, grounded, and undeniably high-end.
Paint both board and bottle with cream chalk paint. Cut out vintage-style napkin or rice paper designs and apply using Mod Podge, smoothing gently. Once dry, lightly distress edges with sandpaper. Seal with matte topcoat. Add gingham ribbon bows for that final cottage touch can you even?!
30. Personalized Quote Cutting Board

Bold, personal, and totally giftable this one is all about celebrating you (or someone you love). Custom text always hits different.
Use a hardwood board and either engrave with a laser or apply a vinyl stencil for painting. Choose elegant script fonts and center your design carefully (measure twice!). If painting, use acrylic and a foam brush for clean edges. Seal with food-safe oil or clear coat depending on use. Wrap it up or display it front and center biconic energy only.