If you’re looking for an outdoor project that’s a bit off the beaten path, a pebble mosaic will give your yard, garden, or walkway a unique and unexpected focal point. This Spiral Rock Mosaic Path will make a fabulous addition to your backyard and it’s so easy to recreate yourself! This is a great DIY you’ll love to try and it’s sure to add real character to your garden!
Tools :
Spade to dig out the base
2x4s to screed the concrete and hold a tarp in place as the mosaic dries
Garden sprayer or hose with fine-mist attachment
Two large nails and string
Garden spade
4×4 to set and level the stones. It should be about the length of the mosaic’s radius so that you can work on one small section at a time.
Rubber mallet
Paint brush to spread the topping mix.
Stiff-bristled brush to shape and dress the topping mix.
Materials:
1. Sand and scrap plywood to make a box in which to lay out the mosaic’s design. (Or spread the sand on a plastic tarp.)
2. Mosaic stones. Choose flat pebbles or cobbles in colors you like. We used green and slate black from the Signature Stones collection at Stone Decorative
3. Paver base
4. Stone dust
5. Concrete mix, such as Quikrete.6. Topping mix. Also known as sand mix, it’s finer than concrete mix and contains no aggregate. Quikrete and other companies make it. You’ll add it like grout between the joints after laying the stones.
6. Pavers, bricks, or bluestones to surround the mosaic and hold it in place.
7. Plastic tarp or sheeting
Steps: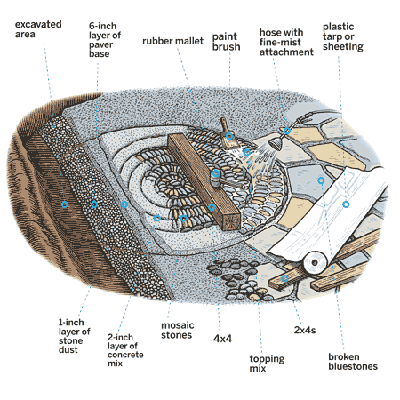
1.Prep and Sort the Stones
2. Lay Out the Mosaic
3. Prep the Project Site
4. Dampen the Concrete Mix
5. Mark the Mosaic’s Shape
6. Place the Center Stones
7. Lay Stones Alongside the Center Stone
8. Fill in the Pattern
9. Set the Remaining Stones
10. Spread the Topping Mix
11. Saturate and Shape the Mix
12. Let the Mosaic