“Crafting feels much more enjoyable when projects are quick, colorful, and simple to create. These 30 DIY easy kids craft ideas highlight fun designs and easy materials that make every project feel lively and rewarding.”

DIY Easy Kids Craft Ideas Everyone is Swooning Over in 2026
Easy kids crafts are taking over in 2026, transforming basic household supplies into playful projects that spark imagination instantly. With a little cutting, coloring, and creativity, ordinary materials can become exciting creations that keep kids entertained while making something they are proud to show off.
Inside this collection, simple supplies turn into colorful animals, fun characters, playful decorations, and hands-on projects that feel creative without being complicated. Every idea is designed to be quick, engaging, and full of personality so kids can make something exciting without needing tons of materials or a big setup
1. Pom-Pom Holiday Ornaments

These bright, fluffy ornaments are basically joy explosions colorful pom-poms, sparkly pipe cleaners, and cute shapes that scream “kid-made magic” in the best way.
Use wooden craft shapes (circles, triangles, or rings about 3–4 inches wide) as your base. Glue mini pom-poms (½ inch) and twist pipe cleaners into zigzags or spirals, securing with hot glue. Add a loop of jute string at the top (about 5 inches long) for hanging. Let everything set for 10 minutes before displaying tree-ready cuteness unlocked.
2. Paper Ladybug Craft

These little ladybugs are pure giggle material round, bouncy, and perfect for tiny hands that love bold colors and googly eyes.
Cut a 6×6 inch red paper circle, then slice halfway and overlap slightly to form a dome shape, securing with glue. Add a black paper head (2-inch oval), antennae from thin strips, and black spots punched or cut out. Stick on googly eyes and let dry for 5 minutes. Cute critter squad incoming.
3. Fall Dot Tree Painting

Messy in the cutest way these autumn trees look like mini masterpieces with splattered leaves and cozy fall colors.
Start with white cardstock (8×10 inches) and draw a simple tree trunk with brown marker or paint. Dip cotton swabs or fingertips into red, orange, and yellow paint, then dab around the branches to create leaves. Layer colors for depth and let dry for 20–30 minutes. Instant fridge-worthy art.
4. Toilet Paper Roll Halloween Crew

Spooky but make it adorable these little characters are giving Halloween party vibes without a single scare.
Wrap empty toilet paper rolls with colored construction paper (cut to 4×6 inches). Glue on faces, wings, hats, or pipe cleaner legs depending on your character (ghost, bat, pumpkin). Use markers for expressions and googly eyes for extra fun. Let dry 10 minutes and line them up for a mini monster parade.
5. Paper Plate Ladybugs

Big, bold, and perfect for group crafting these ladybugs are the oversized version of cute, ideal for classrooms or rainy afternoons.
Paint a standard paper plate red and let dry (about 15–20 minutes). Cut in half and add a black semicircle head, paper legs, and antennae. Glue on black circle spots (use a 1-inch hole punch if you have one) and googly eyes. Dry completely before playtime bug buddies ready.
6. Rainbow Paper Tunnel

This rainbow tunnel is part craft, part toy colorful arches that kids can crawl toys through or just admire like their own mini art installation.
Cut 1-inch wide strips of colored paper (about 8–10 inches long). Glue both ends of each strip onto a flat base strip, forming loops. Alternate colors to create a rainbow effect. Add cotton ball clouds on the ends with glue. Let set 10 minutes instant interactive magic.
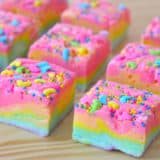
7. Lucky Charm Rainbows

Sweet, color-packed, and irresistibly playful, these cereal rainbows feel like a tiny burst of happiness on a plate. Each curve is lined with bright, cheerful colors that instantly pull you in, making the whole piece look almost too pretty to touch.
Thread fruit cereal (like loops) onto a pipe cleaner, bending into an arch shape (about 4–5 inches wide). Push mini marshmallows onto both ends to act as clouds. Twist pipe cleaner ends to secure. No glue needed just a cute, edible-ish craft moment.
8. Paper Bear Face Craft

Simple shapes, big personality this bear face is perfect for little artists learning to layer and glue. There’s something incredibly satisfying about how neatly the colors come together, creating that perfect rainbow shape with a soft, snackable texture that adds to its charm.
Cut a 5×5 inch square for the head, add two small circles (1.5 inches) for ears, and glue at the top corners. Layer a lighter oval for the snout and small circles for cheeks. Add googly eyes and draw details with marker. Let glue dry for 5–10 minutes bear-y adorable.
9. Hedgehog Card Art

This sweet hedgehog card is equal parts cute and clever perfect for a handmade note that actually gets kept.
Use a folded cardstock base (5×7 inches). Cut a hedgehog body shape from beige paper and glue onto the front. Add textured “spikes” by layering small cut slits or using a sponge with gray paint for a dotted effect. Write a message underneath with a gel pen. Cute and punny? Yes.
10. Beaded Corn Craft

This one is all texture and color bright beads and fuzzy pipe cleaner husks that turn into the cutest little corn ever.
Thread pony beads onto two pipe cleaners (about 6 inches long), twisting ends to secure into a cob shape. Add green pipe cleaners twisted at the base and fanned out for husks. Use around 40–50 beads per cob for fullness. No drying time just instant crafty satisfaction.
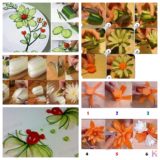
11. Fork Tulip Spring Painting

This is the ultimate “messy but make it cute” craft vibrant tulips stamped with forks and fluffy little chicks peeking through the grass. It’s giving spring picnic meets preschool Picasso, and honestly? Frame-worthy.
Dip a plastic fork into washable paint (pink, purple, red) and press onto white cardstock to create tulip shapes. Use a small brush for green stems and grass strokes, then paint simple yellow circles for chicks (about 1.5 inches wide) and add faces with a black marker. Let dry 10–15 minutes and voilà instant spring masterpiece. Can you see this on the fridge already?
12. Heart Collage Hedgehog

This little hedgehog is pure cozy-cute energy, covered in layered pastel hearts like it just rolled through a Valentine’s Day dream. Bonus: it’s basically cutting practice disguised as art. Sneaky and adorable.
Cut a hedgehog body shape from brown cardstock (about 6–7 inches wide). Then cut 15–20 small hearts (2–3 inches each) from pink and purple paper and glue them overlapping for the “spikes.” Add a googly eye and a tiny paper heart for the nose. Use a glue stick for easy layering and let everything set for 5 minutes. Tell me that face doesn’t melt you.
13. Painted Snowflake Art Circles

Minimal, modern, and secretly super easy these snowflake circles look like chic winter décor but are totally kid-made. That crisp white-on-blue contrast? Chef’s kiss.
Cut blue cardstock into 4–5 inch circles. Use white puffy paint or a paint pen to draw simple snowflake designs (lines + dots + tiny branches). Let kids freestyle patterns, then allow 20–30 minutes to dry fully so the paint stays raised. Pro tip: lightly sketch with pencil first for symmetry. Winter vibes, but make it stylish.
14. Paper Rainbow Cloud Scene

Soft clouds, pastel arches, and a dreamy little rainbow moment this craft is basically happiness glued onto paper. It’s bright, cheerful, and perfect for a rainy-day pick-me-up.
Cut 5 rainbow strips (about 1 inch wide, 6–7 inches long) from colored paper and glue in an arch onto a blue cardstock base. Add cotton balls for clouds on both ends using tacky glue. Let dry 10–15 minutes, and optionally glue a small embellishment (like a sticker or mini cutout) at the bottom. Instant mood booster. Yes, please!
15. Popsicle Stick Frame Rainbow Art

This tiny framed rainbow is giving soft pastel dreams with a handmade twist like a mini gallery piece straight from your kiddo’s imagination. It’s simple, sweet, and honestly cute enough to gift or hang anywhere.
Glue 4 popsicle sticks into a square frame (about 4×4 inches) using hot glue or strong craft glue, then attach to a piece of white cardstock backing. Paint a simple rainbow using acrylic paints (use a medium flat brush for smooth arches) and let dry for 10–15 minutes. Add twine to the top corners for hanging. Minimal effort, maximum charm. Can you picture a whole wall of these?
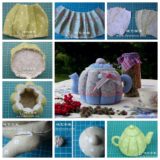
16. DIY Salt Dough Snowman Ornaments

These tiny snowmen are rustic, handmade, and full of charm the kind of ornaments that feel extra special because little hands made them. Holiday keepsake alert.
Mix 1 cup flour, ½ cup salt, and ½ cup water to form dough. Roll to ¼ inch thick and cut snowman shapes (about 3 inches tall). Poke a hole at the top for string, then bake at 200°F for 2–3 hours until hard. Once cooled, paint with acrylics and thread baker’s twine through the hole. Tree-ready cuteness incoming.
17. Pom-Pom Bunny Parade

Fluffy, bouncy, and ridiculously cute these pom-pom bunnies and chicks are basically springtime in craft form. It’s giving Easter table centerpiece energy with zero stress.
Make pom-poms using yarn (wrap around fingers ~40 times, tie center, trim). Glue on felt ears, tiny foam noses, and googly eyes using hot glue. Arrange several on a string or keep as individual figures. Pro tip: use white, yellow, and pastel yarn for that soft seasonal palette. Try not to smile challenge… failed.
18. Paper Plate Owl Craft

This wide-eyed owl is bold, colorful, and just the right amount of quirky. Plus, that folded plate shape gives it instant dimension we love a low-effort glow-up.
Fold a standard paper plate inward on both sides to form wings. Color or paint with crayons/markers in patterns, then glue on two large paper circles (2–3 inches) for eyes and a triangle beak. Add paper feet at the bottom and a string loop at the top for hanging. Let dry 10 minutes if using paint. Whooo made this? You did.
19. Marbled Paper Dress Art

This one is pure artsy magic swirling paint textures turned into a chic little dress design. It’s like mini fashion meets abstract art and honestly… gallery-worthy.
Create marbled paper by spreading 2–3 paint colors on cardstock and dragging a comb or brush through. Let dry completely (about 20–30 minutes), then cut into a dress shape. Add a paper collar, glitter hearts, or buttons using glue. Mount on a contrasting background for a finished look. Tiny designer moment unlocked.
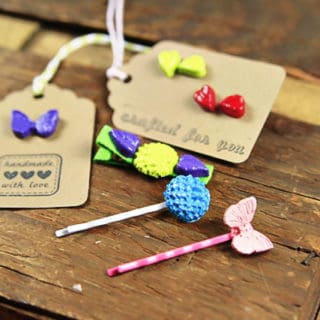
20. Yarn & Feather Boho Sticks

Earthy, whimsical, and slightly magical these decorated sticks feel like something out of a fairy garden. Perfect for nature-loving kiddos and chill craft days.
Collect small sticks (6–8 inches long), then wrap sections with colorful yarn, securing ends with hot glue. Tie on feathers, beads, or mini pom-poms using string. Layer textures for that boho vibe and let glue set for 5 minutes. Display in a jar or use as pretend play wands. Nature, but make it aesthetic.
21. Pipe Cleaner Dragonfly Craft

Simple, sparkly, and secretly genius this dragonfly is made from basic craft sticks but turns into a magical little bug with just one twist (literally). It’s giving nature craft meets five-minute win.
Lay 4–6 jumbo popsicle sticks in an “X” wing shape and secure the center by tightly wrapping a metallic pipe cleaner around the middle 5–6 times. Twist the top ends upward to form antennae. Optional: add googly eyes with tacky glue and paint the sticks with acrylics before assembling. Quick, cute, and done in under 10 minutes. Buzz-worthy, right?
22. DIY Mini Craft Station Setup

This colorful setup is basically a creativity buffet from maracas to mini guitars, it’s a whole vibe of hands-on fun. Perfect for keeping little hands busy (and screens far away
Create simple activity stations: use paper plates + cups to make mini instruments, tissue paper for collage numbers, and cardstock for flag crafts. Prep glue sticks, washable paints, and kid scissors in trays. Keep each activity on a separate 9×12 inch mat for easy cleanup. Rotate crafts every 10–15 minutes for max engagement. Chaos… but organized. We love it.
23. Nature Stick Christmas Tree

Rustic, earthy, and surprisingly chic this stick tree looks like something straight out of a cozy cabin Pinterest board. Nature walk, but make it décor.
Collect sticks in varying lengths (4–12 inches). Arrange in a triangle shape and glue horizontally onto a vertical stick base using hot glue. Add mini pinecones, pipe cleaners, or beads as ornaments. Let dry fully (15–20 minutes), then prop or hang with twine. Budget-friendly and aesthetic? Say less.
24. Pastel Pumpkin Arch Decor

Soft pastel pumpkins strung into a dreamy arch? This is fall décor with a modern twist think cozy but make it aesthetic.
Use small faux pumpkins (2–3 inches) and paint in pastel acrylics (peach, mint, lavender). Once dry, drill or poke small holes through centers and thread onto a sturdy wire or wooden dowel to form an arch. Secure ends into wooden bases with hot glue. Let set 20 minutes before displaying. Tell me this wouldn’t elevate your shelf.
25. Watercolor Feather Turkey Cards

These turkeys are equal parts adorable and heartfelt with colorful feather bursts and sweet little messages. Thanksgiving, but make it cute.
Cut a brown cardstock circle (about 4 inches) for the body. Paint feather shapes on paper using watercolors, then cut them out and glue behind the body. Add googly eyes, a paper beak, and write a message with a marker. Let paint dry 15 minutes before assembling. Instant keepsake energy.
26. Paper Frankenstein Faces

Silly, spooky, and full of personality these Franken-faces are all about letting kids go wild with expressions. No two look the same, and that’s the fun.
Cut green rectangles (5×7 inches) for the face. Add black paper hair, bolts, and stitched details using markers. Glue on mismatched googly eyes and cut different mouth shapes from black and pink paper. Use glue sticks for easy layering. Halloween craft? Sorted.
27. Tissue Paper Cat Collage

This little kitty is textured, colorful, and ridiculously fun to make perfect for tiny hands that love to scrunch and stick.
Draw or print a cat face outline on a paper plate or cardstock. Tear tissue paper into small squares (1–2 inches) and glue across the face using diluted white glue (1:1 with water). Add paper ears, googly eyes, and pipe cleaner whiskers. Let dry 20–30 minutes. Fluffy vibes only.
28. Sequin Sparkle Eggs Craft

These eggs are extra in the best way bold colors, shiny sequins, and major “look what I made!” energy. Perfect for spring or Easter baskets.
Paint foam or plastic eggs with acrylic paint and let dry (15–20 minutes). Then use craft glue to stick sequins all over in patterns or random sparkle chaos. Let fully dry before handling. Pro tip: use tweezers for easy sequin placement. Maximum sparkle, minimum effort.
29. Paper Plate Monster Craft

Googly eyes, wild textures, and big silly mouths these monsters are chaotic in the cutest way possible. Zero rules, all fun.
Cover a paper plate with green tissue paper using glue. Cut out a large mouth shape (about 3 inches wide) and glue inside with red paper. Add oversized eyes and any extra details like horns or teeth using cardstock. Let dry 15 minutes. The sillier, the better. Obviously.
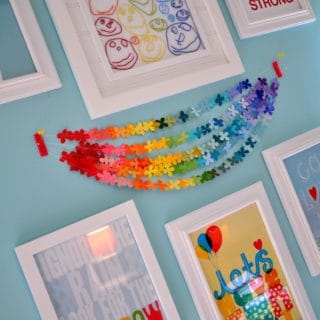
30. Paper Heart Snake Craft

This wiggly little snake made of hearts is equal parts adorable and interactive it literally moves when you play with it. Cute and clever? Yes.
Cut 8–10 heart shapes (about 3 inches each) from colorful cardstock. Punch holes at the top and bottom of each and connect using brass fasteners to create movement. Add a head with googly eyes and a paper tongue. Flexible, fun, and oddly satisfying to wiggle. Try not to make ten.