Clay Easter eggs are little canvases waiting for big creativity, and these 30 DIY clay Easter egg crafts prove just how magical they can look. From hand-painted florals to sculpted textures and pastel-perfect designs, every idea feels like pure spring artistry. Get ready to craft eggs that deserve a spotlight of their own.

30 DIY Clay Easter Egg Crafts That Bring Springtime Magic in 2026
Clay Easter eggs are taking celebrations to a new level in 2026, letting you sculpt patterns, colors, and textures into pieces that feel festive and wonderfully artistic. Each egg becomes a tiny canvas, perfect for detailing, carving, painting, or adding playful spring accents.
This collection of 30 DIY Clay Easter Egg Crafts gathers ideas that range from soft pastel elegance to bold, character filled designs, giving you plenty of inspiration for décor, gifts, and seasonal displays. Expect crafts that look beautifully made while staying easy, enjoyable, and full of creative charm.
1. Maximalist Folk-Art Clay Easter Eggs

These eggs are not whispering spring — they’re shouting it from a floral-covered rooftop. Juicy colors, layered petals, playful dots, and hand-built details make each egg feel like a tiny piece of wearable art for your Easter décor. They’re bold, unapologetic, and basically the craft version of dopamine dressing.
Start with polymer clay rolled to a generous ¼-inch thick so those layers really pop. Cut egg shapes, bake, then add raised details using thin clay coils, flattened petal shapes, and dot accents. Rebake, cool completely, and seal with a satin or matte varnish.
2. Painterly Botanical Ceramic Eggs

These eggs feel like they belong on a quiet windowsill in a sun-drenched cottage somewhere in the countryside. Soft brushstrokes, muted tones, and delicate floral motifs give them a timeless, almost poetic quality that feels slow and intentional. They’re calm, romantic, and effortlessly beautiful without trying too hard.
Form egg shapes from air-dry or ceramic clay, smoothing with a damp sponge as you go. Once fully dry, paint florals using fine brushes and acrylics or underglaze, keeping colors soft and layered. Seal with a satin clear coat to protect the design while preserving that gentle, handmade finish.
3. Hot-Air Balloon Easter Egg Decor

These eggs are pure whimsy — playful, imaginative, and straight out of a storybook sky. Turning oversized eggs into hot-air balloons feels unexpected and magical, making them perfect for party tables, kids’ spaces, or anywhere that needs a dose of Easter fun. They don’t just decorate a space, they lift it.
Paint large plastic or foam eggs in bright solids or color-blocked pastels and let dry completely. Hot-glue mini pennant banners around the center, then attach wooden skewers underneath. Secure the skewers into small pots filled with floral foam or air-dry clay and finish with faux moss.
4. Squishy Foam Clay Easter Animals

These adorable critters look like Easter candy that somehow came to life. Their soft, bouncy texture paired with rounded shapes and sweet faces makes them irresistible to kids and adults alike. They’re playful, tactile, and absolutely overflowing with cheerful spring energy.
Wrap foam eggs with foam clay, smoothing gently with damp fingers. Shape ears, wings, cheeks, and beaks separately and press them on securely. Add facial details with beads or paint pens, then let everything air-dry for about 24 hours before handling.
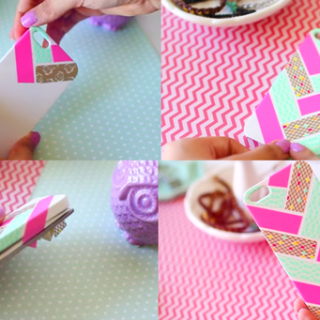
5. Minimalist Clay Easter Hanging Tags

These eggs are proof that Easter décor can be elegant, restrained, and still feel festive. Clean white clay paired with subtle gold lettering creates a modern, serene look that blends seamlessly into neutral homes. They feel thoughtful, calm, and quietly luxurious.
Roll air-dry clay to about ⅜-inch thick and cut egg shapes with a template. Punch a hanging hole using a straw, then let dry fully. Add lettering and tiny gold dot accents with paint or pens, seal lightly, and string with twine or ribbon.
6. Pastel Easter Egg Hanging Mobile

This mobile feels like spring floating gently through the room. Soft pastel eggs, colorful beads, and dangling ribbons create movement that’s light, dreamy, and full of charm. It’s whimsical without being overwhelming — the kind of décor that instantly softens a space.
Use faux or blown eggs and carefully cut small openings. Thread embroidery floss through each egg, adding wooden beads for color and balance. Tie strands at varying lengths to a wooden hanger and adjust until the mobile hangs evenly.
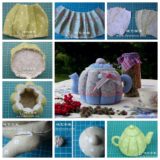
7. Vintage Fabric-Wrapped Easter Eggs

These eggs radiate cozy, nostalgic charm with a touch of farmhouse sweetness. Soft paint colors paired with lace, gingham, and wooden buttons make them feel collected, loved, and passed down through generations. They’re warm, familiar, and endlessly charming.
Paint wooden or clay eggs with chalk or acrylic paint and allow to dry completely. Wrap fabric or lace around the center, securing neatly at the back with hot glue. Finish with a small wooden button or twine bow glued to the front.
8. Personalized Clay Easter Egg Name Ornaments

These eggs feel extra special because they’re personal — the kind of detail people remember. Soft pastels, clean lettering, and custom names turn a simple craft into a keepsake-worthy moment. Perfect for baskets, place settings, or gifting with intention.
Roll air-dry clay to ¼-inch thickness and cut egg shapes. Add a hanging hole, let dry fully, then paint the bottom half in pastel shades. Write or apply names using paint pens or vinyl, seal lightly, and tie with twine or ribbon.
9. Mini Polymer Clay Easter Egg Studs

Tiny but bursting with personality, these earrings are the cutest way to wear Easter cheer. Bright colors, playful stripes, and dot patterns give them a fun, modern feel without going overboard. They’re festive, lightweight, and impossible not to smile at.
Shape polymer clay into small egg forms about ½ inch tall. Decorate with thin clay strips or dotting tools, then bake according to package instructions. Once cool, glue flat-back earring posts with strong jewelry adhesive and let cure fully.
10. Quirky Fried-Egg Clay Charms

These are Easter eggs with a sense of humor — playful, unexpected, and a little bit cheeky. Turning eggs into fried eggs feels delightfully unhinged in the best way, adding a modern, artsy twist to traditional spring crafting. They’re bold, funny, and total conversation starters.
Shape irregular whites from air-dry or polymer clay, then add a smooth yellow clay circle for the yolk. Bake or air-dry completely, then seal with gloss varnish for that just-cooked shine. Add jump rings to turn them into charms, ornaments, or keychains.
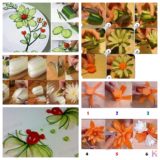
11. Pressed Flower Clay Easter Eggs

These eggs feel like spring paused mid-bloom and left behind a love note. Delicate flowers and leafy textures pressed into clay create a quiet, organic beauty that feels both wild and intentional. They’re soft, earthy, and romantic in a way that makes you want to craft slowly with the windows open.
Roll air-dry clay into egg shapes and gently press fresh flowers or leaves into the surface. Carefully lift the botanicals away, letting the impressions remain, then allow the clay to dry completely. Seal with a matte varnish to protect the fragile details and keep that natural, stone-soft finish.
12. Old-World Terra-Cotta Patterned Eggs

These eggs feel ancient, soulful, and deeply rooted in tradition. Warm terracotta tones paired with carved symbols and patterns give them an heirloom quality that feels timeless rather than trendy. They look like something discovered on a potter’s shelf after decades of quiet use.
Shape eggs from terracotta or air-dry clay and allow them to firm slightly before decorating. Carve patterns using wooden tools, needles, or toothpicks while the clay is leather-hard. Let dry fully and leave raw or lightly buff for a soft, authentic ceramic finish.
13. Whimsical Mixed-Media Clay Egg Creatures

These eggs are joyful chaos in physical form. Bright colors, googly eyes, stickers, and unexpected textures turn each egg into a tiny personality-filled creature. They feel imaginative, expressive, and refreshingly free of perfection. Perfect for kids, classrooms, or anyone who loves art with a sense of humor.
Create egg shapes from thick clay slabs or sturdy cardboard bases and paint them with bold acrylic colors. Layer on stickers, beads, pipe cleaners, and washi tape using hot glue. Add legs or antennae so each egg can stand proudly as its own little character.
14. Lace-Pressed Clay Easter Ornaments

These eggs feel soft, romantic, and quietly luxurious. Delicate lace pressed into the surface creates raised textures that feel vintage and timeless, like fabric frozen in porcelain. They bring elegance without heaviness and charm without noise. Perfect for neutral lovers and vintage-inspired Easter décor.
Roll air-dry clay to about ⅜-inch thick and press lace firmly into the surface. Cut egg shapes, remove the lace carefully, and add a hanging hole if desired. Let dry fully, paint white or cream, and seal lightly to preserve the texture.
15. Textured Clay “Egg Hunt” Tassel Ornaments

These clay eggs feel playful, cozy, and softly nostalgic, like a handmade detail you’d spot while wandering through a thoughtfully styled Easter home. The raised lettering, subtle dot textures, and muted white clay give them a tactile, almost storybook quality that invites you to reach out and touch. Paired with gentle blush tassels and wooden beads, they strike that perfect balance between whimsical Easter fun and modern handmade charm.
Roll air-dry clay to about ¼-inch thick and cut egg shapes, smoothing the edges with a damp finger. While the clay is still soft, stamp or carve words like “egg hunt,” add dot textures, and poke holes for hanging. Once fully dry, thread cotton cord through the holes, add wooden beads, and finish with yarn tassels tied securely at the bottom for a cozy, polished look.
16. Minimalist Clay Egg Word Ornaments

These eggs are simple, but never boring. Subtle textures paired with stamped words create quiet moments of personality and meaning. They feel thoughtful, modern, and intentionally understated. Stamped words and subtle textures give them quiet personality.
Roll air-dry clay flat and cut egg shapes, adding a hanging hole at the top. Stamp words while the clay is soft, then add small dots or texture for interest. Let dry completely and seal with a matte varnish.
17. Vintage Bunny Decoupage Clay Easter Ornaments

These eggs feel like they were lifted straight from a faded storybook and gently brought into the present. Soft bunny illustrations, muted florals, and hand-painted metallic edges create a dreamy mix of nostalgia and elegance that feels both whimsical and collected. Hanging from crisp white branches, they give off that quiet, heirloom energy that instantly makes Easter décor feel intentional and special.
Start by shaping air-dry clay into smooth egg forms and letting them dry completely before painting them white. Apply vintage-style bunny or floral napkin designs using decoupage glue, smoothing gently to avoid wrinkles, then add hand-painted gold edging and a small clay flower accent.
18. Personalized Pastel Clay Egg Name Tags

These clay eggs feel tender, thoughtful, and full of quiet celebration, like a soft pause in the middle of Easter morning. The gentle pastel washes, subtle speckling, and vertically stamped names give them an intentionally handmade look that feels warm rather than polished. They’re the kind of detail that makes a table setting, basket, or gift feel deeply personal and lovingly prepared.
Roll air-dry clay to about ¼-inch thick and cut simple egg shapes, smoothing the edges with a damp finger. While the clay is still soft, stamp names vertically, add a small hanging hole, and let dry completely before painting with muted pastel acrylics and light speckling.
19. Tropical Botanical Gold-Leaf Clay Easter Eggs

These eggs feel bold, sun-soaked, and unapologetically glamorous, like Easter décor that booked a one-way ticket to a tropical resort. Lush green monstera leaves layered over crisp white bases and streaked with imperfect gold accents give them a fresh, modern edge that feels both playful and high-end. They’re vibrant, confident, and absolutely made to be the statement piece in any spring vignette.
Start with smooth clay or wooden egg forms and paint them with a solid white acrylic base, letting it dry fully. Apply botanical designs using decoupage paper or hand-painted leaves, then layer torn gold leaf or metallic paint in organic vertical strokes for texture and shine.
20. Earthy Botanical Imprint Clay Easter Eggs

These eggs feel grounded, organic, and quietly powerful, like tiny artifacts collected from a forest floor after a spring rain. The rich teal, stone, and ochre tones paired with pressed leaf silhouettes give them a naturally weathered look that feels ancient yet modern at the same time. Each one carries its own personality, with subtle speckling and imperfect textures that make them feel intentionally handmade and deeply connected to nature.
Begin by shaping air-dry clay into smooth egg forms and letting them firm up slightly before decorating. Press real leaves firmly into the surface to transfer their natural veins and shapes, then remove carefully.
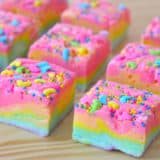
21. Rainbow Storybook Clay Easter Eggs

These eggs feel like tiny joy bombs straight out of a childhood art table, bursting with color, texture, and happy chaos. Each one tells its own little story through thick paint strokes, unexpected patterns, and wonderfully imperfect details. When grouped together, they radiate that carefree, creative energy that makes Easter feel playful instead of polished.
Start with fully dried air-dry clay eggs and layer bright acrylic paints in bold, overlapping sections. Use toothpicks, dotting tools, or even fingernails to scratch patterns and add texture while the paint is still soft. Seal with a satin varnish to protect the color and lock in that cozy, handmade magic.
22. Fantasy Dragon Eye Clay Easter Eggs

These eggs are dramatic, mysterious, and absolutely spellbinding, like artifacts discovered in a secret forest nest. Cracked shells reveal glowing, jewel-toned eyes that instantly flip Easter décor into full fantasy mode. They feel dark, imaginative, and just a little spooky in the best possible way. Perfect for anyone who loves Easter with a twist of myth and magic.
Shape clay eggs and carve cracked openings once the clay is leather-hard. Paint the base with layered greens, browns, and metallic accents, then place painted or printed eye details inside the cracks. Finish with a glossy sealant to deepen the colors and make those eyes seriously pop.
23. Bunny Cup Clay Easter Egg Holders

These eggs are dressed to impress, wrapped up as the cutest little bunnies you’ve ever seen. Soft pastel shells peek out from illustrated bunny sleeves, creating a playful mix of clay craft and paper whimsy. They feel cheerful, interactive, and totally made for little hands and big smiles. This is Easter joy, served extra sweet.
Paint smooth clay eggs in pastel acrylics and let them dry completely. Cut bunny wraps from cardstock, adding ears and faces, then secure them around the eggs with double-sided tape. Nestle them in shredded paper grass for an irresistibly cute display.
24. Chocolate-Dipped Clay Easter Eggs

These eggs look dangerously delicious, blurring the line between décor and dessert. Rich chocolate-brown bases paired with crinkled silver foil tops create a playful illusion that makes you do a double take. They’re clever, modern, and just cheeky enough to steal the spotlight on an Easter table. Zero calories, all the drama.
Form air-dry clay eggs and let them cure fully before painting the bottom half with dark brown acrylic. Brush adhesive onto the top portion and gently press silver leaf for that foil-wrapped effect. Seal lightly to keep the texture realistic and not overly glossy.
25. Pressed Botanical Clay Egg Tags

These eggs feel slow, calm, and deeply connected to nature, like they were made during a quiet spring afternoon. Soft clay surfaces capture delicate leaf veins and organic textures that feel effortlessly beautiful. They don’t shout for attention—they gently invite you closer. Perfect for earthy Easter lovers and minimalists alike.
Roll clay to about ¼ inch thick and cut egg shapes with softened edges. Press real leaves and flowers firmly into the surface, then peel away carefully. Punch a hole at the top and thread with twine once fully dry.
26. Minimal Sculptural Clay Easter Egg Containers

These eggs are sleek, sculptural, and undeniably chic, more art object than seasonal craft. Their smooth curves and quiet matte finish give them a gallery-worthy presence that feels timeless. They’re the kind of Easter décor that whispers elegance instead of shouting color. Minimal, modern, and effortlessly cool.
Build hollow egg forms in two matching halves, smoothing seams carefully for a clean fit. Let them dry slowly to avoid cracking, then sand lightly for a refined surface. Seal with a clear matte finish or leave raw for a natural look.
27. Raw White Textured Clay Egg Ornaments

These eggs feel light, airy, and poetic, like little heirlooms waiting to be discovered. Subtle textures, soft impressions, and creamy white clay create depth without overwhelming the eye. Hung together, they feel serene and intentional, adding quiet beauty to any Easter display. This is slow décor at its finest.
Roll clay evenly and cut egg shapes, keeping thickness consistent. Press lace, botanicals, or textured tools into the surface, then poke hanging holes at the top. Once dry, string with twine and leave unpainted for an organic finish.
28. Classic Raised Pattern Clay Easter Eggs

These eggs celebrate timeless Easter tradition with crisp shapes and raised decorative details. The clean white finish highlights every curve, dot, and line, making the patterns feel both nostalgic and fresh. Nestled together, they instantly evoke classic spring charm with a modern polish. Simple, elegant, and endlessly reusable.
Shape clay eggs and add raised designs using thin clay coils or molds. Smooth joins carefully and allow to dry fully before sanding any imperfections. Seal with a satin or gloss finish to emphasize the dimensional patterns.
29. Pastel Bunny Clay Hair Bow Embellishments

This tiny piece is pure Easter sweetness, packed into the most adorable scale. Soft pastel eggs, a sleepy bunny face, and playful textures turn a simple hair bow into a holiday statement. It feels gentle, whimsical, and totally giftable. The kind of accessory that makes Easter outfits extra special.
Sculpt miniature eggs and bunny faces using polymer clay for durability. Bake according to package instructions, then glue securely onto fabric bows with strong craft adhesive. Add blush and tiny painted details for personality and charm.
30. Hand-Stamped Folk Pattern Clay Easter Eggs

These eggs feel earthy, soulful, and rich with handmade tradition. Warm clay tones and hand-stamped patterns give each piece a story, inspired by folk art and ancient markings. They feel grounding and expressive, like décor made with intention instead of trends. Perfect for slow, meaningful Easter styling.
Shape clay eggs and let them firm up slightly before stamping patterns with handmade tools. Allow to dry fully or fire if using ceramic clay, then accent designs with light paint or slip. Finish with a matte seal to preserve their raw, artisanal beauty.