Scoop up some creativity with these 34 DIY ice cream craft ideas that are pure joy in every detail. From pastel paper cones to glittery sundaes and felt popsicles, each project looks good enough to eat. Perfect for parties, kids’ rooms, or just adding a sprinkle of happiness to your day!

34 DIY Ice Cream Crafts Ideas That Belong in a Candy Wonderland in 2025
Crafting just got a whole lot sweeter. Ice cream-inspired DIYs are the ultimate mood boosters fun, colorful, and totally Instagram-worthy. Imagine clay cones topped with pom-pom scoops, dreamy paper ice creams for party backdrops, or even keychains that look good enough to eat. Every craft is a sprinkle of happiness and a scoop of nostalgia rolled into one.
These 34 DIY ice cream craft ideas are perfect for summer parties, kid-friendly projects, or brightening up your workspace. Think of them as little reminders that creativity and dessert make life infinitely better.
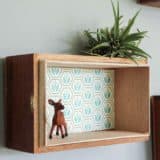
1. Pinecone “Ice Cream” Cones

Nature meets nostalgia in this impossibly cute summer craft! These pastel-painted pinecones look like ice cream scoops straight out of a fairy picnic and they won’t melt in the sun. Each “flavor” gets its personality through soft, sherbet-inspired colors like mint green, blush pink, and creamy vanilla. Perfect for pretend play, summer parties, or a charming table centerpiece that celebrates the season’s whimsy.
To make your own, collect medium-sized pinecones (the rounder, the better). Paint them with acrylic paint using a small brush two coats give the best coverage and let them dry for about 30 minutes. Roll kraft paper or tan cardstock into cones around 6 inches tall and secure the edge with tape or glue. Add playful line patterns with markers to mimic waffle cones. Finally, tuck your painted pinecones into the paper cones. Voilà — a scoop of forest chic that’ll have everyone saying, “Wait, that’s a pinecone?!”
2. Cupcake Liner Ice Cream Art

This one’s a total kid craft MVP! Imagine a rainbow of cupcake liners turned into scoops stacked sky-high on pastel cardstock. Each one gets a sprinkle of sequins or rhinestones to make it sparkle like the real thing. It’s bright, layered, and just the right balance of messy and magical an instant mood-booster for craft time or summer playdates.
Grab cupcake liners (standard and mini sizes work best), colored paper, glue sticks, and markers. Flatten the liners, glue them one above the other in a cone shape, and use brown crayons or paint to draw the cone beneath them. Let the kids go wild decorating each scoop with gem stickers, dot markers, or even a drawn-on cherry. Want to level it up? Frame their artwork in a bright frame for a “sweet gallery” wall that’s pure joy on display.
3. Paper Bowl Sundaes

These colorful paper sundaes look so real, you might just want to grab a spoon! Using paper bowls, bright cardstock, and a whole lot of imagination, kids can create their dream dessert complete with “chocolate drizzle,” “sprinkles,” and even a fluffy pom-pom cherry. This is the ultimate no-mess way to celebrate ice cream season.
Cut paper bowls in half to create the waffle dish base. Paint the outside a warm brown and use a dark brown marker to draw a crosshatch waffle pattern. Next, cut circles of colored paper (around 3–4 inches in diameter) for the scoops, layering them on top of the bowl. Add sequins, glitter glue, or confetti sprinkles to decorate, and glue on a pom-pom as the cherry. Tape a plastic spoon to the side for that picture-perfect sundae look. Hang them on the wall for instant summertime vibes no freezer required!
4. Perler Bead Popsicles

For a blast of retro fun, these Perler bead popsicles are serving serious 90s nostalgia! They’re bright, pixel-perfect, and make the cutest magnets, keychains, or room decorations. You can go full rainbow popsicle or design a “half-dipped chocolate” style with faux sprinkles. The color combos are endless and the results are totally sweet.
You’ll need a Perler bead pegboard, colorful beads, parchment paper, and popsicle sticks. Lay out your popsicle design on the board, making sure to leave a flat edge for the stick. Once your pattern’s ready, place parchment paper on top and carefully iron for about 10 seconds, melting the beads together. When cool, glue a popsicle stick to the bottom using hot glue. Bonus idea: glue magnets to the back for adorable fridge art. Bright, bold, and oh-so-satisfying these are a total crowd-pleaser!
5. Pom-Pom Ice Cream Cones

Fluffy, sparkly, and bursting with joy, these pom-pom ice cream cones are like a party you can hold in your hand. Think carnival vibes, glitter paper cones, and fluffy yarn “scoops” that make every color combo look delicious. This is one of those projects where creativity totally takes the wheel mix textures, glitter, and patterns for an explosion of craft happiness.
Create large pom-poms using yarn and a fork or pom-pom maker, trimming the edges for perfect roundness. For the cones, roll glitter cardstock into a cone shape (about 6–8 inches tall) and glue the seam shut. Add foam heart stickers, rhinestones, or even small character cutouts for personality. Glue your pom-poms on top, pressing down gently until secure. These look adorable as party favors, photo booth props, or even classroom displays. Basically, they’re impossible not to smile at.
6. Mosaic Paper Ice Cream

If you love bold color blocking and a little art-class flair, this paper mosaic ice cream cone is calling your name. It’s got that perfect mix of precision and fun a craft that feels satisfying to make and looks super modern when finished. Plus, it’s a genius way to use up leftover paper scraps!
Start by cutting a large triangle out of brown cardstock for the cone and draw diagonal stripes using a white gel pen or crayon. Next, cut small squares and rectangles from colored paper pinks, corals, and reds make an irresistible “strawberry dream” combo. Glue them slightly overlapping at the top of your cone in a scoop shape. Want extra texture? Outline with black marker or metallic pen for contrast. Frame it up for a chic, geometric art piece that totally screams “summer gallery wall.”
7. Bow-Topped Paper Cones

These dreamy little paper cones look like they just fell off a confetti cloud pastel colors, satin ribbons, and hand-painted “scoops” bursting with rainbow joy. They’re the perfect craft for birthdays, playdates, or any time you want to add a pop of cute to your day.
Use patterned paper (polka dots, stripes, or pastels) to cut out triangle shapes about 5×7 inches. Roll into cones and secure with tape. For the “ice cream,” tear or cut pieces of colorful painted paper or watercolor swatches and glue inside the top. Tie a bright satin ribbon around the middle for that giftable, party-ready finish. Scatter some confetti for presentation, and boom — instant Pinterest perfection.
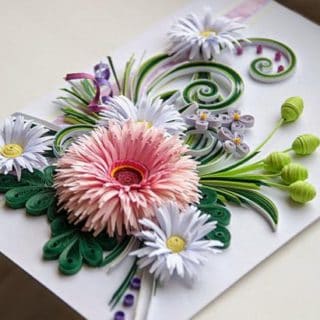
8. Quilling Ice Cream Cone

This one’s a total mini masterpiece dainty, detailed, and full of personality. Using the art of quilling, you can create a playful ice cream cone with swirly scoops and a cheeky smile that’ll melt your heart (but not your cone).
Grab quilling paper strips in bright shades like lilac, pink, and cream. Roll tight coils for each scoop, glue them together in a triangle formation, and add smaller curled strips for decorative “swirls.” Cut a small brown cone from paper, sketch the classic waffle pattern, and glue your scoops on top. Finish with tiny rectangles for sprinkles and a hand-drawn face. It’s the kind of miniature craft that deserves its own display shelf — tiny art, big smiles!
9. Puffy Cotton Ball Ice Cream Art

Who knew cotton balls could look this good? This 3D ice cream art is part painting, part sculpture, and all fun. The soft texture of the “scoops” mixed with glittery toppings makes it a showstopper on any art board. Perfect for kids who love a little mess and a lot of sparkle!
Start with a sheet of pink or pastel cardstock. Glue cotton balls in a tall cone shape, stacking them into layers like a towering sundae. Paint each cotton ball with acrylic paint or watercolors — mix, swirl, and blend for an artistic look — then sprinkle on glitter while the paint is still damp. Draw or paint a waffle cone underneath and outline with markers for extra depth. Once dry, hang it up — it’s basically a 3D ice cream dream that looks good enough to eat (but please don’t!).
10. Giant Tissue Ice Cream Cones

Big, bold, and beautifully whimsical these oversized tissue paper ice creams are pure décor goals. Standing tall and sparkling, they make the cutest party centerpieces, photo booth props, or even classroom decorations. Who wouldn’t want a giant glittery cone in their space?
Cut large triangles of gold glitter cardstock (10–12 inches tall) and roll them into cones, securing with clear tape or glue. Crumple sheets of white and pink tissue paper into large, fluffy “scoops,” layering them to create dimension. Glue the layers together and top with a red pom-pom or faux cherry. Place each cone into a mason jar or vase to display upright. The result? A larger-than-life dessert that brings instant joy and a touch of sparkle wherever it goes. Total showstopper status.
11. Painted Paper Ice Cream Cones

These dreamy pastel cones are the perfect blend of paint, paper, and play they look good enough to eat! With scoops in bubblegum pink, sky blue, and strawberry swirl shades, this craft is a total summer mood and an adorable activity for little hands. Plus, those painted waffle cones? Absolute chef’s kiss for texture and detail.
Cut out cone shapes from light brown cardstock and draw a crisscross waffle pattern using brown marker or paint. Next, trace and cut ice cream scoop shapes from thick white paper or cardstock. Let the kids paint them with pastel acrylics or tempera paint, stacking two scoops per cone. Add sprinkle details with small strips of colored paper or washi tape. Once dry, glue everything together for a colorful, layered cone masterpiece. Perfect for classroom displays or a pretend ice cream stand setup — sweet, right?
12. Nature Popsicles

Meet the most eco-chic popsicles you’ve ever seen! These nature-inspired treats are bursting with fresh florals and foraged finds think petals, leaves, and berries arranged like an edible bouquet (but please, no taste testing!). They’re the perfect outdoor craft to celebrate summer blooms.
Start by cutting popsicle shapes out of recycled cardboard roughly 4×6 inches for a hand-held size. Outline the shape with white paint or marker for definition, and glue on a cardboard stick. Head outside to collect small flowers, colorful leaves, or seed pods. Arrange and glue them onto your cardboard base in stripes or clusters, pressing gently so they stay flat. Display them in a vase, hang them from string, or photograph them for a nature art gallery moment. It’s sustainable, sensory, and stunning a triple scoop of creativity!
13. Paper Popsicle Collage

This craft is pure color chaos in the best way! Imagine a table scattered with bright paper popsicles, each one covered in bold geometric shapes triangles, circles, and squares in every color of the rainbow. It’s giving “art class party” energy and keeps kids creatively busy for hours.
Cut popsicle shapes from colored cardstock yellow, red, blue, purple, and more and glue on colored craft sticks as handles. Using leftover paper scraps, have the kids punch or cut out various shapes and glue them randomly across each popsicle. Layering adds that fun 3D look. Mix patterns, textures, and colors to make each one unique. Bonus tip: laminate them for reusable summer garlands or fridge art. Who knew geometry could look so delicious?
14. Doily Ice Cream Collage

Sweet, sparkly, and just a little bit fancy this ice cream craft is all about lacey doilies, sprinkles, and shimmer. It’s the perfect rainy-day project for little artists who love glitter and glue in equal measure.
You’ll need pastel cardstock, white paper doilies, glue, paint, sprinkles, and popsicle sticks. Glue two or three doilies together on the paper to form the ice cream “scoop,” overlapping slightly. Mix paint with glitter for that iridescent swirl and brush it on top. Add real or faux sprinkles (rainbow rice or sequins work too) before it dries. For the cone, glue popsicle sticks in a triangular arrangement. The result? A textured, sparkly masterpiece that’ll make your craft table look like an ice cream shop window.
15. Glitter Paper Plate Ice Creams

Say hello to the ultimate outdoor craft colorful paper plate ice cream cones that sparkle under the sunshine! Each “cone” bursts with personality: bright paint, glitter glue, and fluffy pom-pom cherries on top. Perfect for a group craft at summer camp or a backyard art day.
Cut paper plates in half for scoops and brown cardstock triangles for cones. Paint the cones tan and draw waffle lines with a brown marker. For the scoops, paint each half-plate in fun shades like turquoise, lavender, or lemon yellow, and while still wet, sprinkle on glitter. Once dry, glue the pieces together and top with a red pom-pom cherry. Scatter them on the lawn for an adorable photo-op or string them up for festive décor. So easy, so sparkly, so sunshine-approved!
16. Counting Ice Cream Cones

This is the kind of craft that’s secretly educational (but still totally adorable). Each paper cone gets numbered scoops, letting kids learn counting and sequencing while “stacking” their dream ice cream tower. Educational summer fun? Yes, please!
Cut out cone shapes from brown cardstock and draw a crisscross waffle texture. Then, trace and cut multiple scoop shapes in pastel colors pink, blue, yellow, and white work beautifully. Number the scoops from 1 to 3 (or higher) using a marker, and decorate each with stickers or foam pieces as “sprinkles.” Have kids glue the scoops in order onto the cone. Write their name at the bottom and you’ve got a personalized, math-meets-art keepsake that’s both classroom-worthy and fridge-door fabulous.
17. Paper Fan Ice Cream Cone

Folding paper never looked so sweet! This chic paper fan ice cream is equal parts simple and stunning it pops right off the page with that accordion texture and cherry pom-pom topper. Perfect for kids who love crafts that wow with minimal supplies.
Take a sheet of pink paper (8×8 inches), fold it accordion-style back and forth, and then fan it into a circle. Secure the ends with tape or glue to form a flat, ruffled “scoop.” Cut a large triangle from brown paper for the cone and draw faint waffle lines. Glue the fan scoop on top, then finish with a red pom-pom cherry. Hang it on the wall or add it to a summer bulletin board it’s simple sophistication with a playful twist.
18. Paper Plate Ice Cream Cone

Classic, cheerful, and delightfully hands-on this paper plate cone craft is a forever favorite for little artists. With glittery sprinkles and a heart topper, it’s got all the sweetness of a real sundae without the stickiness.
Cut a paper plate in half for the scoop and a triangle of light brown paper for the cone. Use a black marker to draw the cone’s waffle grid, then glue the pieces together. Decorate the scoop with tissue paper “frosting,” craft glue, and confetti glitter. Add a paper heart or pom-pom cherry at the top for that extra dash of cute. Hang them as a classroom display or summer garland the sprinkle sparkle catches the light just right!
19. Melty Cup Ice Cream

A sensory dream come true! This “melty” ice cream cup combines paint pouring, sparkly sequins, and a whole lot of drippy, glittery fun. The result is an abstract, 3D dessert that looks like art-meets-ice cream the kind of messy magic every kid loves.
Grab small plastic cups and fill them halfway with white glue. Mix in liquid paint or food coloring for swirl effects blue, pink, and purple shades make a gorgeous marbled combo. Pour the mixture slowly over the cup’s edges and sprinkle sequins or glitter before it dries. Add a mini bow or pom-pom cherry on top. Let dry overnight for a glossy, sculptural finish that’s part art experiment, part faux dessert masterpiece. Messy? Yes. Worth it? Absolutely.
20. Paper Gelato Stand

One scoop, two scoops, or ten? Why choose! This cheerful gelato stand craft is bursting with color, playfulness, and good vibes. With its crumpled paper “ice cream” scoops and pom-pom cherries, it’s the ultimate pretend-play centerpiece like an Italian gelateria made from pure imagination.
Roll tan paper into cones and draw waffle lines using a brown marker. Crumple colorful tissue paper (red, pink, yellow, mint, and orange) into loose balls and glue them inside each cone as scoops. Add pom-poms as cherries for that perfect finishing touch. Arrange the cones in an egg carton tray for display and decorate with a “GELATO” sign cut from cardstock letters. Kids can “run” their own ice cream shop creativity, play, and cuteness all in one. Bellissimo!
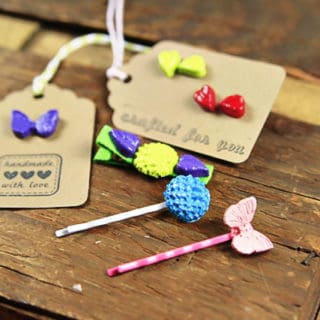
21. Clay Popsicle Sculptures

These handmade popsicles look so real you’ll want to stick them in the freezer but don’t, because they’re made of clay! Each one is bursting with bright, summery vibes: neon greens, watermelon reds, sunshine yellows, and even a faux “bite” for that realistic touch. This craft is a total sensory hit cool to shape, paint, and play with!
To make your own, grab air-dry clay, wooden popsicle sticks, and acrylic paint. Mold the clay into popsicle shapes (about palm-sized), gently insert a stick, and smooth the surface with a damp finger. Let dry overnight, then paint your “flavors” in bold colors like lime, strawberry, and chocolate fudge. Add small black dots for “seeds,” or use white paint for “frosting.” Seal with Mod Podge for that glossy, fresh-from-the-freezer finish. Display them in a bowl or stick them into floral foam for a playful summer centerpiece — adorable and calorie-free!
22. Ice Cream Writing Craft

Part writing prompt, part art project, all-around adorable these ice cream templates mix creativity with reflection! Each student (or mini crafter) can jot down their sweetest thoughts inside a giant cone while coloring their scoops with bright crayons and rainbow sprinkles. It’s the perfect “end of school year” or summer bucket list craft.
Print or draw a large ice cream cone outline with space for writing on the cone portion. Cut colored cardstock into scoops (pink, yellow, green, etc.) and glue them on top of the cone. Add sprinkles with cut paper rectangles and a red circle “cherry.” For a personal touch, prompt kids to write fun topics like “Cool things I’ll do this summer” or “Why this year was a treat.” The mix of creativity and journaling makes this one both cute and meaningful. Sweet reflections, indeed!
23. Corrugated Cardboard Ice Creams

Cardboard never looked this delicious! These cone cuties combine the earthy texture of corrugated cardboard with candy-colored scoops each one dripping with hand-drawn chocolate sprinkles. It’s crafty, colorful, and zero waste the perfect eco-friendly afternoon project.
Cut triangles from corrugated cardboard for cones (around 5 inches tall). Then, use bright construction paper to cut rounded “melting” scoop shapes. Paint or color each scoop with soft pastels or markers think orange sherbet, mint, or blueberry swirl. Add sprinkle details with felt-tip pens and glue your scoops on top. Bonus tip: lightly dry-brush white paint on the cones to highlight the texture. Arrange a set on the wall for a quirky summer art gallery that’s both rustic and vibrant!
24. Glitter Shaker Ice Cream Cones

Oh hello, sparkle lovers this one’s for you! These shimmering “shaker” cones are a mash-up of paper crafting and sensory play. Each scoop has a clear window filled with glitter confetti that actually moves when you shake it. It’s pure glitter magic disguised as dessert!
You’ll need colored cardstock, clear plastic (from packaging or laminating sheets), double-sided tape, and glitter. Cut cone and scoop shapes, then cut circular “windows” out of the scoop centers. Tape clear plastic behind the openings and sprinkle glitter or sequins inside before sealing with another layer of paper. Stack two or three scoops per cone, gluing as you go. Shake, sparkle, and shine this craft is a total sensory treat that’ll have kids mesmerized!
25. Puffy Paint Ice Cream Art

This craft is a fluffy, puffy dream part painting, part 3D texture fun! Using homemade puffy paint, kids can “pipe” scoops that rise as they dry, creating the ultimate tactile ice cream look topped with real rainbow sprinkles.
Mix equal parts shaving cream and white school glue in a bowl, then add drops of food coloring for vibrant shades. On thick paper, glue a brown paper triangle cone and use a spoon or paintbrush to dab on puffy paint scoops. Before they dry, sprinkle real (or craft) sprinkles on top for a textured finish. Let the artwork sit overnight to fully dry and puff up. The next morning? You’ve got a squishy, ice cream-inspired masterpiece that’s impossible not to touch.
26. Fluffy DIY Ice Cream Cones

Soft, sweet, and satisfyingly squishy these pom-pom ice cream cones are a feast for the eyes (and fingers)! Perfect for summer parties, pretend play, or playroom décor, they’re cheerful little creations that bring a smile every time you see them.
Use a pom-pom maker or fork to create fluffy yarn balls in sunny shades like cherry red, mango orange, and lemon yellow. Cut patterned paper into triangles (6×6 inches works perfectly) and roll into cones, securing with tape or glue. Draw subtle crisscross lines with a brown marker to mimic a waffle texture. Nestle your pom-poms on top and secure with hot glue. Instant, colorful cones that look fresh from a carnival stand cute enough to display year-round!
27. Painted Ice Cream Cones

These cheerful cones are all about creativity and color therapy! Each one features hand-painted “flavors” with sprinkle details, letting kids mix colors and patterns freely. The result? Whimsical ice cream art that looks straight out of a storybook.
Trace a large ice cream outline onto sturdy cardstock and cut it out. Paint the cones orange or tan, then layer on different scoop colors using washable paint. Once dry, use small paintbrushes to add sprinkle details in bright shades. Want to jazz it up more? Add texture with stamps, pom-poms, or even fingerprints. Laminate the finished pieces for a glossy art display that’ll last through every season.
28. Crumpled Paper Ice Cream Cones

This one’s a tactile, imagination-fueled delight! With just paper, glue, and pom-poms, you can whip up “ice cream scoops” that look delightfully real minus the drips. The crumpled texture gives it that creamy, swirly look that’s pure DIY perfection.
Cut tan or light brown paper into large triangles for cones and draw diagonal waffle lines. Roll them into cones and secure with glue. Next, crumple pieces of colorful paper (white, pink, purple, or brown) into loose balls — these are your scoops! Glue one or two into the top of each cone, adding small pom-poms or pipe cleaners as sprinkles and cherries. Arrange them in a bowl or egg carton for a mini “ice cream shop” setup. Playtime just got sweeter!
29. Yarn Scoop Ice Creams

It’s raining yarn, and we’re obsessed! These yarn-topped cones are soft, textural, and oh-so-cute like a cross between a sundae and a cozy craft project. Perfect for décor, pretend play, or party favors.
Roll brown craft paper into cones and draw a waffle pattern using a marker. For the “ice cream,” cut yarn into long pieces (about 10 inches each) and bunch them into loose piles. Glue or tape them inside the top of each cone, fluffing them for volume. Add a pom-pom cherry for the cutest finish. These cones look incredible as a summer garland, classroom decoration, or photo prop. Sweet and soft? Yes, please!
30. Sequin Sprinkle Ice Cream Cones

Talk about eye candy! These bright paper cones are decked out with sequins, stickers, and all the sparkly goodness. It’s a classic kids’ craft that hits all the marks easy setup, big color payoff, and endless creative combos.
Cut out large ice cream cone templates from yellow and pastel cardstock. Layer two or three scoops on each cone, gluing them together. Then comes the fun part decorating! Use sequins, foam stickers, buttons, and paper dots as sprinkles. Add a red paper circle cherry for that finishing flourish. Hang your creations on a wall or fridge to make every day feel like ice cream day. This craft’s only rule? The more sparkle, the better!
31. “All About Me” Ice Cream Sundae

A back-to-school craft that’s as heartwarming as it is adorable! This “All About Me Sundae” project lets kids introduce themselves one scoop at a time from favorite colors to goals for the year all piled high in a deliciously creative self-portrait. It’s the sweetest way to kick off classroom connections and celebrate individuality.
Print out or draw a sundae bowl with several ice cream scoops stacked on top. Each scoop represents something different: “My favorite color,” “What I like to do,” “My goal for the year,” etc. Kids fill them in with markers or crayons, then color and cut the whole design before gluing it to bright cardstock. Bonus points for a red paper cherry on top and laminated finish! Hang them on a bulletin board titled “We’re a Cool Bunch!” for instant classroom charm.
32.Cardboard Flower Popsicles

Who needs sprinkles when you have petals? These eco-inspired popsicles are made from simple recycled cardboard and adorned with foraged flowers and leaves. They’re a refreshing twist on summer crafting part art, part nature scavenger hunt, and totally gorgeous.
Cut popsicle shapes from corrugated cardboard and glue craft sticks to the bottom for handles. Then take a short walk outside to collect colorful petals, grass, or small leaves. Use glue to attach your finds to the “popsicles,” layering them for texture. For a little flair, wrap yarn or washi tape around the cardboard for a stripe effect. Once dry, these nature pops look stunning as summer wall art or eco-friendly décor. Zero waste, maximum whimsy — love that for us!
33. Glittery Popsicle Friends

Meet the happiest popsicles on the internet! With their sparkling eyes, glitter details, and bright pops of color, these paper popsicle pals are all about personality and play. Each one is unique some silly, some shy, all seriously cute.
Use colorful cardstock to cut popsicle shapes and glue craft sticks at the base. Add stripes of foam sheets, ribbons, or glitter paper across the popsicles to create “flavors.” Then draw cheerful faces with black marker, adding big eyes and long lashes for charm. Stick on sequins or gems for sparkle. These are perfect for a classroom display, kids’ party activity, or fridge art gallery. Warning: they might just make you smile every time you walk by.
34. Sprinkle Explosion Ice Cream Craft

Sprinkles, pom-poms, sequins oh my! This joyful cone craft is a total sensory celebration, bursting with texture and color. It’s easy enough for little hands but sparkly enough for big kids to love too.
Cut cone shapes from brown cardstock and draw a waffle pattern with a black marker. For the scoop, cut a large circle from yellow paper and add scalloped edges for that perfect “melt.” Spread glue generously over the scoop and start sprinkling literally! Add mini pom-poms, sequins, yarn bits, or real sprinkles for a confetti-style finish. Let everything dry flat before displaying. The result? A bright, bouncy, mixed-media ice cream masterpiece that’s impossible not to adore.