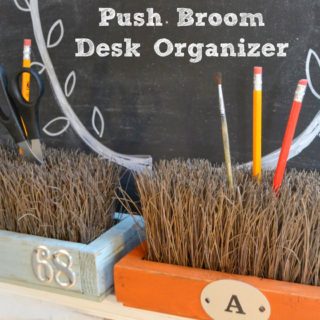
It’s incredible what a simple bottle cap can become in the right hands. These 28 DIY bottle cap craft ideas take the most ordinary leftovers and turn them into miniature masterpieces mosaics that shimmer, ornaments that pop, magnets that spark joy, and décor that looks shockingly high-end.

28 DIY Bottle Cap Craft Ideas You’ll Love in 2026
Bottle caps are tiny, but the crafts you can make with them deliver massive visual punch. Think shimmering wall art built from hundreds of multicolored caps arranged like a mosaic masterpiece, bold coasters sealed in glossy resin that look straight out of an artsy boutique, and fridge magnets so quirky they steal attention the moment someone walks into the kitchen. Even jewelry made from bottle caps suddenly feels edgy, artsy, and weirdly irresistible.
These 28 DIY Bottle Cap Craft Ideas take upcycling to an entirely new level. Expect vibrant centerpieces, statement keychains, holiday ornaments with personality, and décor pieces that make guests ask “Wait… you made that from bottle caps?!” If you want a project that’s addictive, creative, and guaranteed to make your craft table look wildly exciting, this lineup delivers pure inspiration all the way into 2026.
1. Glitter Bottle Cap Holiday Wreath

This tiny wreath is proof that small crafts can still bring major sparkle. The glittery red and green bottle caps create a playful, retro holiday vibe, while the oversized gold bow pulls everything together into something that feels cheerful, nostalgic, and totally giftable.
To make it, gather 6–8 metal bottle caps and paint or cover the tops with red and green glitter foam circles cut to size. Arrange the caps in a circle and hot-glue them edge to edge. Add a felt or foam glitter bow at the top and attach a ribbon loop to the back for hanging. Let the glue set fully before placing on a tree, wreath wall, or gift package. Mini but mighty cute.
2. Bottle Cap Beach Scene Wall Art

This mixed-media piece turns bottle caps into a full coastal story. With fishing net details, sandy textures, and bright cap labels, it feels like a vacation memory frozen in time and mounted right on the wall. It’s bold, dimensional, and totally one-of-a-kind.
Start with a wooden or canvas base and paint the background in ocean blues and sandy neutrals. Hot glue bottle caps in clusters to mimic coral, rocks, or sea life. Add real sand with tacky glue and press fishing net or twine into place for texture. Seal with a clear spray sealer once dry.
3. Montessori Bottle Cap Counting Flower

This craft is bright, playful, and secretly educational. Bottle caps become cheerful flower petals that help kids learn numbers through hands-on play, making it both adorable and purposeful. Perfect for learning spaces or playrooms.
Glue yellow or colored bottle caps in a circular flower shape onto a sturdy base like cardboard or wood. Add a number label in the center using cardstock or a wooden number tile. Attach a painted craft stick as the stem and foam or paper leaves on each side. Use beads, buttons, or ladybug embellishments to match the counting theme.
4. Bottle Cap Character Keychains

These tiny characters are full of personality and charm. Each bottle cap becomes a playful face, turning recycled materials into accessories that kids and adults both love. Instant smiles, guaranteed. Lightweight and expressive.
Flatten bottle caps slightly with a hammer if needed. Glue on googly eyes, buttons, or beads for facial features. Add felt ears, hats, or hair details using craft foam. Attach a jump ring and keychain clasp through a small drilled hole or glued loop. Seal with clear glue to keep everything secure.
5. Bottle Cap Animal Earrings

Bold, quirky, and conversation-starting, these earrings show just how stylish upcycled crafts can be. Each bottle cap becomes wearable art with a playful edge. These are perfect for craft fairs or statement outfits. Lightweight and expressive.
Punch small holes at the top of flattened bottle caps. Add jump rings, earring hooks, and stack wooden beads above for balance. Clean the caps thoroughly before assembling and seal the surface with resin or clear nail polish for shine.
6. Bottle Cap Wire Tree Sculpture

This sculptural tree feels artistic and organic, with bottle caps acting as colorful leaves. It’s a striking decor piece that works beautifully on desks, shelves, or as a handmade gift. It’s modern, eco-friendly, and seriously eye-catching.
Twist floral wire together to form a trunk and branching limbs. Attach bottle caps to the wire ends using hot glue or by threading wire through the caps. Wrap the base wires around a stone for stability. Adjust branches until the shape feels balanced.
7. Bottle Cap Toy Train

This playful train turns everyday recyclables into an imaginative toy. Bright colors and simple shapes make it perfect for kids’ craft time or classroom projects .Let everything dry completely before playtime. Creative, fun, and surprisingly sturdy.
Use toilet paper rolls as the train body and paint them in bold colors. Glue bottle caps on the sides as wheels, making sure they align evenly so the train sits flat. Add cotton stuffing for smoke and ribbon to connect train cars.
8. Bottle Cap Flower Art

This cheerful flower craft brings bold color and texture together in a way that feels fresh and playful. Bottle caps become layered petals that pop beautifully against a painted background. Great for wall art, kids’ rooms, or seasonal decor.
Paint bottle caps in coordinating colors and glue them in a flower pattern on cardstock or canvas. Add glitter glue or paint dots in the centers for extra detail. Use a straw or dowel for the stem and cut leaves from craft foam or paper.
9. Bottle Cap Figurine Shadow Box

This piece feels like storytelling in miniature form. Bottle caps become whimsical characters frozen mid-scene inside a display case, turning recycled materials into art. It’s playful, clever, and full of character. nstant coastal character no seashells required.
Create small figures using bottle caps for heads and wire for arms and legs. Wrap wire with embroidery floss for color and texture. Glue the figures onto a base inside a shadow box and add tiny props like beads or buttons. Secure everything with strong glue and close the case.
10. Bottle Cap Charm Necklace

This necklace is retro, fun, and unapologetically bold. Bottle caps become statement charms that feel nostalgic yet modern when paired with beads and trinkets. Lightweight but impactful, this is wearable upcycling at its best.
Punch holes along the edge of clean bottle caps and attach them to a ball chain or charm chain using jump rings. Mix in dice charms, resin fruit, or safety pins for extra flair. Balance the spacing so the necklace drapes evenly.
11. Bottle Cap Crab Wall Art

This quirky crab is pure personality, built entirely from bent bottle caps and bold color contrast. Mounted on rustic wood, it feels beachy, playful, and just the right amount of funky for patios, lake houses, or bar walls. The mix of flattened and curved caps gives it motion, like it might scuttle away at any moment.
To recreate it, flatten bottle caps with a hammer (protecting them with cardboard), then bend some slightly inward for legs and claws using pliers. Arrange the design on a wood board before gluing so spacing feels balanced. Use heavy-duty epoxy or industrial hot glue to secure each cap. Finish with a twine hanger stapled or screwed into the back.
12. Bottle Cap Macaron Trinket Pods

These mini macaron-style containers are soft, sweet, and unexpectedly functional. Wrapped in twine with colorful fabric tops, they feel like something you’d find at a charming handmade market and yes, they actually open.
Start with two plastic bottle caps per pod. Wrap the sides tightly with jute twine using hot glue, keeping layers neat and even. Cut fabric circles slightly larger than the cap tops, gather with thread, and glue onto each lid. Attach a small zipper or elastic loop detail for charm. Use them to store rings, beads, or tiny sewing notions. Cute and clever? We love a multitasker.
13. Bottle Cap Sunflower Wall Plaque

This sunny wall piece turns humble bottle caps into full-on farmhouse florals. The bright yellow petals pop against the white background, while the rope stems add warmth and texture. It feels cheerful, handmade, and totally timeless.
Paint flattened bottle caps yellow for petals and brown for centers, letting them dry fully between coats. Arrange petals in a circular pattern on a wood or MDF base and glue down securely. Use jute rope for stems, attaching with hot glue or small nails. Add green-painted caps for leaves. Seal with a clear matte spray to protect the finish. Hello, happy wall moment.
14. Bottle Cap Stackable Character Toy

This playful little figure is perfect for kids’ craft time, combining bright colors with simple shapes. Stacked caps become a friendly character that feels sturdy enough for play but cute enough for display. Easy, engaging, and endlessly customizable.
Stack plastic bottle caps largest to smallest, gluing each layer with strong craft glue. Use pipe cleaners for arms, securing them between layers. Add googly eyes and draw a smile with a permanent marker. A flipped cap or small lid makes the perfect hat. Let everything dry fully before handing it over to tiny hands.
15. Bottle Cap Palm Tree Art

This tropical-inspired piece turns caps into a breezy palm silhouette against a warm sunset backdrop. It feels relaxed, graphic, and perfect for summer decor or vacation homes. Total island vibes, zero airfare. Use jewelry pliers for clean connections and seal the caps with a clear spray if you want to protect the graphics.
Paint a canvas with blended sunset tones think coral, orange, and pink. Stack bottle caps vertically for the trunk, gluing firmly once placement feels right. Bend flattened green caps slightly to form palm fronds and glue them outward from the top. Let everything dry, then seal with clear spray.
16. Bottle Cap Flower Sculpture

These sculptural flowers feel organic and artistic, with painted bottle caps forming abstract blooms on slender wire stems. Displayed in a small pot, they blur the line between craft and art. Adjust stem heights for natural movement. Minimal, modern, and gallery-worthy.
Flatten and paint bottle caps in deep greens and muted tones. Bend the edges slightly inward using pliers to create petal shapes. Attach each cap to floral wire with epoxy, then arrange wires in a small clay or terracotta pot filled with stones.
17. Bottle Cap Flower Garden Decor

Bright, bold, and delightfully chunky, these bottle cap flowers are made to stand out. They’re playful garden accents that feel perfect for kids’ spaces, classrooms, or cheerful outdoor corners. This one’s a conversation starter guaranteed.
Drill small holes through plastic bottle caps and thread onto sturdy wire stems. Stack caps to form petals, securing with hot glue at connection points. Add a contrasting cap or molded plastic piece for the flower center. Anchor stems into painted wood bases or flower pots filled with gravel. Sunshine in craft form.
18. Bottle Cap Sunflower Trio Wall Art

This trio feels rustic and balanced, with rope stems and layered caps creating a cohesive, farmhouse-style design. Grouped together, the flowers create rhythm and visual flow across the wood backing. This one’s basically wall art with personality.
Paint metal bottle caps yellow and brown, then lightly distress edges with sandpaper. Arrange three flowers vertically or staggered for interest. Attach rope stems using hot glue reinforced with small nails. Add green caps for leaves. Let dry fully before hanging.
19. Bottle Cap Bloom Pot Sculpture

These sculptural blooms feel whimsical and a little surreal, like flowers from another planet. Painted caps form curled petals that sit beautifully in a simple clay pot. Unexpected, artistic, and totally conversation-starting.
Cut slits into plastic bottle caps and gently heat (with adult supervision) to curl petals inward. Paint in bold or earthy tones and let dry. Attach to wire stems with epoxy and arrange inside a pot filled with stones or foam. Adjust angles so each flower feels unique.
20. Bottle Cap Tree of Life Wreath

This tree-inspired wreath is symbolic, textured, and deeply satisfying to look at. Green bottle caps form a lush canopy, while twisted wire branches bring everything together into a strong focal piece. It’s nature-meets-upcycle magic and a total statement piece.
Wrap a metal or foam wreath form tightly with jute rope using hot glue. Twist wire into branching shapes and secure to the center. Glue bottle caps in varying green tones along the branches, adding small beads for berries if desired. Let dry overnight before hanging.
21. Bottle Cap Fringe Statement Necklace

This necklace is bold, edgy, and unapologetically cool proof that bottle caps can absolutely live their best life as wearable art. The mix of vintage soda caps and cascading silver chains gives it that perfect thrifted-but-editorial vibe, like something you’d spot at a street market and never stop thinking about.
To recreate it, start with clean, flattened bottle caps and drill small holes evenly around the bottom edge of each cap. Attach fine silver chains (about 2–3 inches long) using jump rings, varying lengths slightly for movement. Connect the caps together with short chain segments, then add a lobster clasp and extender chain at the back.
22. Floral Bottle Cap Wreath

Soft, sweet, and charming in the best way, this bottle cap wreath feels like cottagecore met up with upcycling and instantly became best friends. The dark caps paired with tiny floral details create a beautiful contrast, while the faux rose topper adds a romantic finishing touch.
Use identical-sized plastic or metal caps for a clean, uniform look. Arrange them in a circle on a foam or cardboard wreath base before gluing anything down. Secure each cap with hot glue or E6000, working section by section. Add dimensional flower embellishments to the center of each cap if desired. Finish with faux greenery and a statement flower at the top, securing everything firmly. Hang it on a ribbon or hook and admire your handiwork—adorable, right?
23. Bottle Cap Mini Tricycle Toy

This tiny tricycle is playful, colorful, and seriously clever. Made from everyday bottle caps and straws, it’s the kind of craft that makes kids’ eyes light up and adults say, “Wait…that’s made from caps?!” Simple materials, big imagination payoff.
To make it, use three plastic bottle caps for wheels and plastic straws for the frame. Poke holes carefully through the caps using a heated awl or nail (adult supervision recommended). Thread straw pieces through to form the bike structure, securing joints with hot glue. A bent straw makes the handlebars, and a short vertical straw connects the front wheel. Let everything cool completely before play.
24. Bottle Cap Floral Picture Frame

This frame is rustic, artsy, and full of handcrafted charm. Crimped bottle caps transformed into petals and leaves give it a dimensional, almost folk-art feel that turns a plain frame into a total statement piece. Suddenly, your photo has a whole garden around it.
Flatten bottle caps and gently pinch the sides with pliers to create petal shapes. Paint them in warm yellows, metallics, or florals tones and let dry fully. Arrange your design on the frame corners before gluing to ensure balance. Add curled craft wire or floral wire for vines and accents, securing with strong adhesive. Finish with a clear sealant for durability.
25. Bottle Cap Pineapple Wall Art

Bright, cheeky, and bursting with summer energy, this pineapple wall art is pure sunshine. The bold yellow caps pop against the turquoise background, while the bent green caps give the leaves that perfect spiky texture. It’s playful, graphic, and totally Pinterest-gold.
Start by painting a wooden board in a bold background color and letting it dry completely. Arrange yellow bottle caps in a pineapple shape, slightly overlapping, and glue them down securely. For the crown, bend green caps inward with pliers and attach them in layered rows at the top. Add a rope hanger to the back for easy display. Kitchen, patio, or bar area this one shines everywhere.