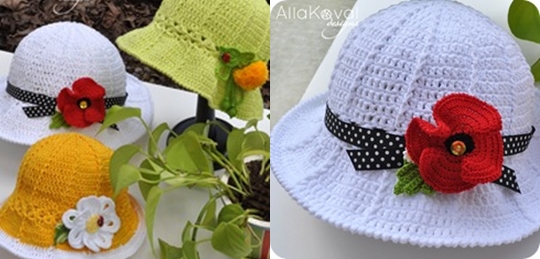
Why head out and buy a panama hat for the little lady in your life when you can whip up this amazing hat at home for next to nothing? There’s nothing quite as enjoyable or satisfying as getting stuck into a good crochet craft project – especially when there’s someone so special just waiting for an amazing gift like this!

We think this is one of the best patterns and guides on the web right now – the fact that it’s 100% free is of course a bonus! Take your pick of any colored yarn, arm yourself with the most basic crochet tools and you’ll be amazed how quickly this beautiful little bonnet begins to take shape!
Simple or Extravagant
The simple panama hat alone is a work of art in its own right, but we’re sure you’ll agree that these added flower details and decorative touches really do make it even more super-sweet! You’ll have total creative freedom just as soon as you pick up the basics – you’ll also find plenty of free crochet flower patterns across our website to help inspire you!
For your own daughter or as an amazing gift for any pretty princess in your life, nothing says more than a handmade gift with thought and affection in every stitch. You’ll need to know your way around a crochet hook to pull off the kinds of professional-quality results seen here, but even if you’re still finding your feet, you’ll have a wonderful time with this project!
You’ll find the pattern and video tutorial you need right here, 100% free of charge!
Happy crafting!
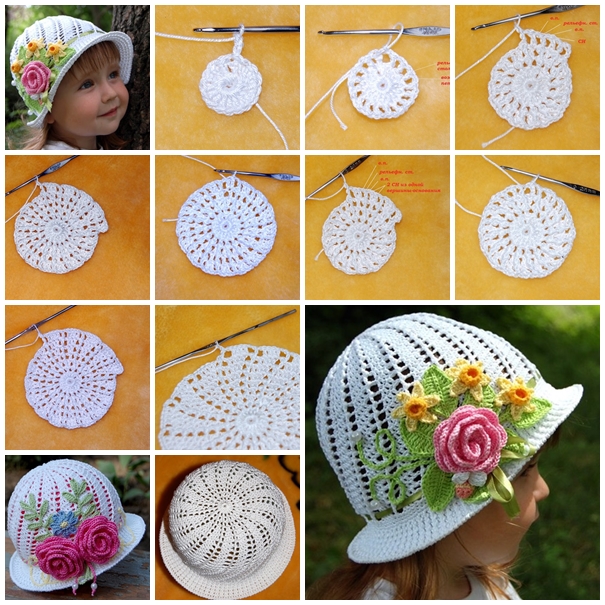
VIEW IN GALLERY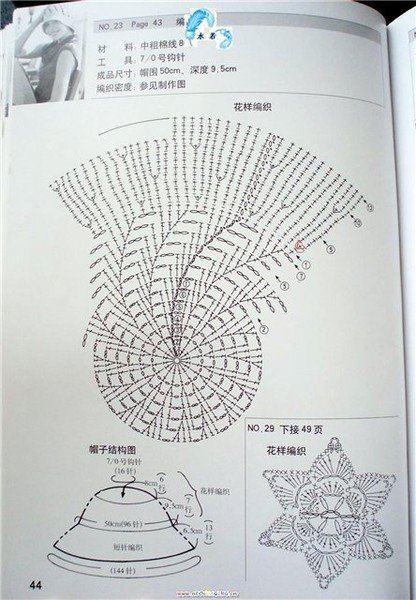

Quick note: please check the comments, Valerie, one of our friends wrote an English pattern for us, what a great job! Big thanks to Valerie, you did a wonderful job!
I wrote down the pattern while watching the video. I’ts probably not perfect, but this is what I got
Girls Panama Hat Pattern / Tutorial
Yarn: Baby weight / Hook: C, 2 – 2.75mm
Rnd 1). ch 5, sl st to form a ring, ch 4, 15 dc in ring, join with sl st to 3rd ch of beginning ch 3.
Rnd 2). Ch 4 dc around first post of dc in previous rnd (called front post double crochet stitch; fpdc), ch 1, *fpdc, ch 1* repeat from * to * until end, sl st to 3rd ch of [ch 3].
Rnd 3). Ch 3, fpdc around first st in previous rnd, ch 1, *dc in next st, fpdc around same dc in previous rnd, ch 1 * repeat from * to * until end, sl st to 3rd ch of [ch 3].
Rnd 4). Ch 4, fpdc around first front dc of previous rnd, ch 1, dc in next st, ch 1, * repeat from * to *till end, ending with fpdc, ls st to 3rd ch of beginning [ch 4].
Rnd 5). Ch 3, dc in same sd joining, ch 1, * 2 dc in next dc, ch 1, fpdc around next fpdc, ch 1 *, repeat from * to * until end, ending with [fpdc, ch1], sl st to 3rd ch of beginning [ch 3].
Rnd 6). Ch 3, dc in same as joining, and in next st, ch 1 fpdc around next post of fpdc of previous rnd, ch 1 * 2 dc in next st, dc in next st, ch 1, fpdc, ch1*, repeat from * to *, ending with fpdc, ch 1, sl st to 3rd ch of beginning [ch 3].
Rnd 7). Ch 3, 2 dc in same as joining, ch 1, fpdc, ch 1, * 2 dc in next dc, dc in next 2 dc, ch t, fpdc, ch 1 * repeat to last st, ending with [fpdc, ch 1], sl st in 3rd ch of beginning [ch 3].
Rnd 8 – 27). Ch 3, dc in same as joining, and in next 2 dc, leaving 1 st unworked, ch 1, fpdc, ch 2, * 2 dc in next st, dc in next 2 st, leaving 1 st unworked, ch 1, fpdc, ch 2*, repeat from * to * till end, ending with [fpdc,ch 2], sl st to 3rd ch in beginning [ch 3]. On last rnd, change color in last pull through of sl st, Do not cut yarn.
Rnd 28 – 29). 1 sc in each st, and 1 sc in each ch space around until end, sc into beginning st of previous rnd.
Rnd 30). 1 sc in next 3 st, drop yarn, pick up original color yarn, pull a loop through next st, ch 4, * fpdc around post of next sc, dc on left in same st*, repeat from * to * until end, sl st to 3rd ch of [ch 4].
Rnd 31). Ch 3, * fpdc around next dc of previous rnd, dc in next st *, repeat from * to * until end, sl st to 3rd ch of beginning [ch 3].
Rnd 32 – 35). Ch 3, * fpdc around fpdc of previous rnd, dc in next dc*, repeat from * to * until end, ending with [dc in last dc].
Rnd 36). Ch 1, working in opposite direction, using the crab stitch, work crab stitch around. Join with sl st to first st, finish off, weave in all ends.
VIEW IN GALLERY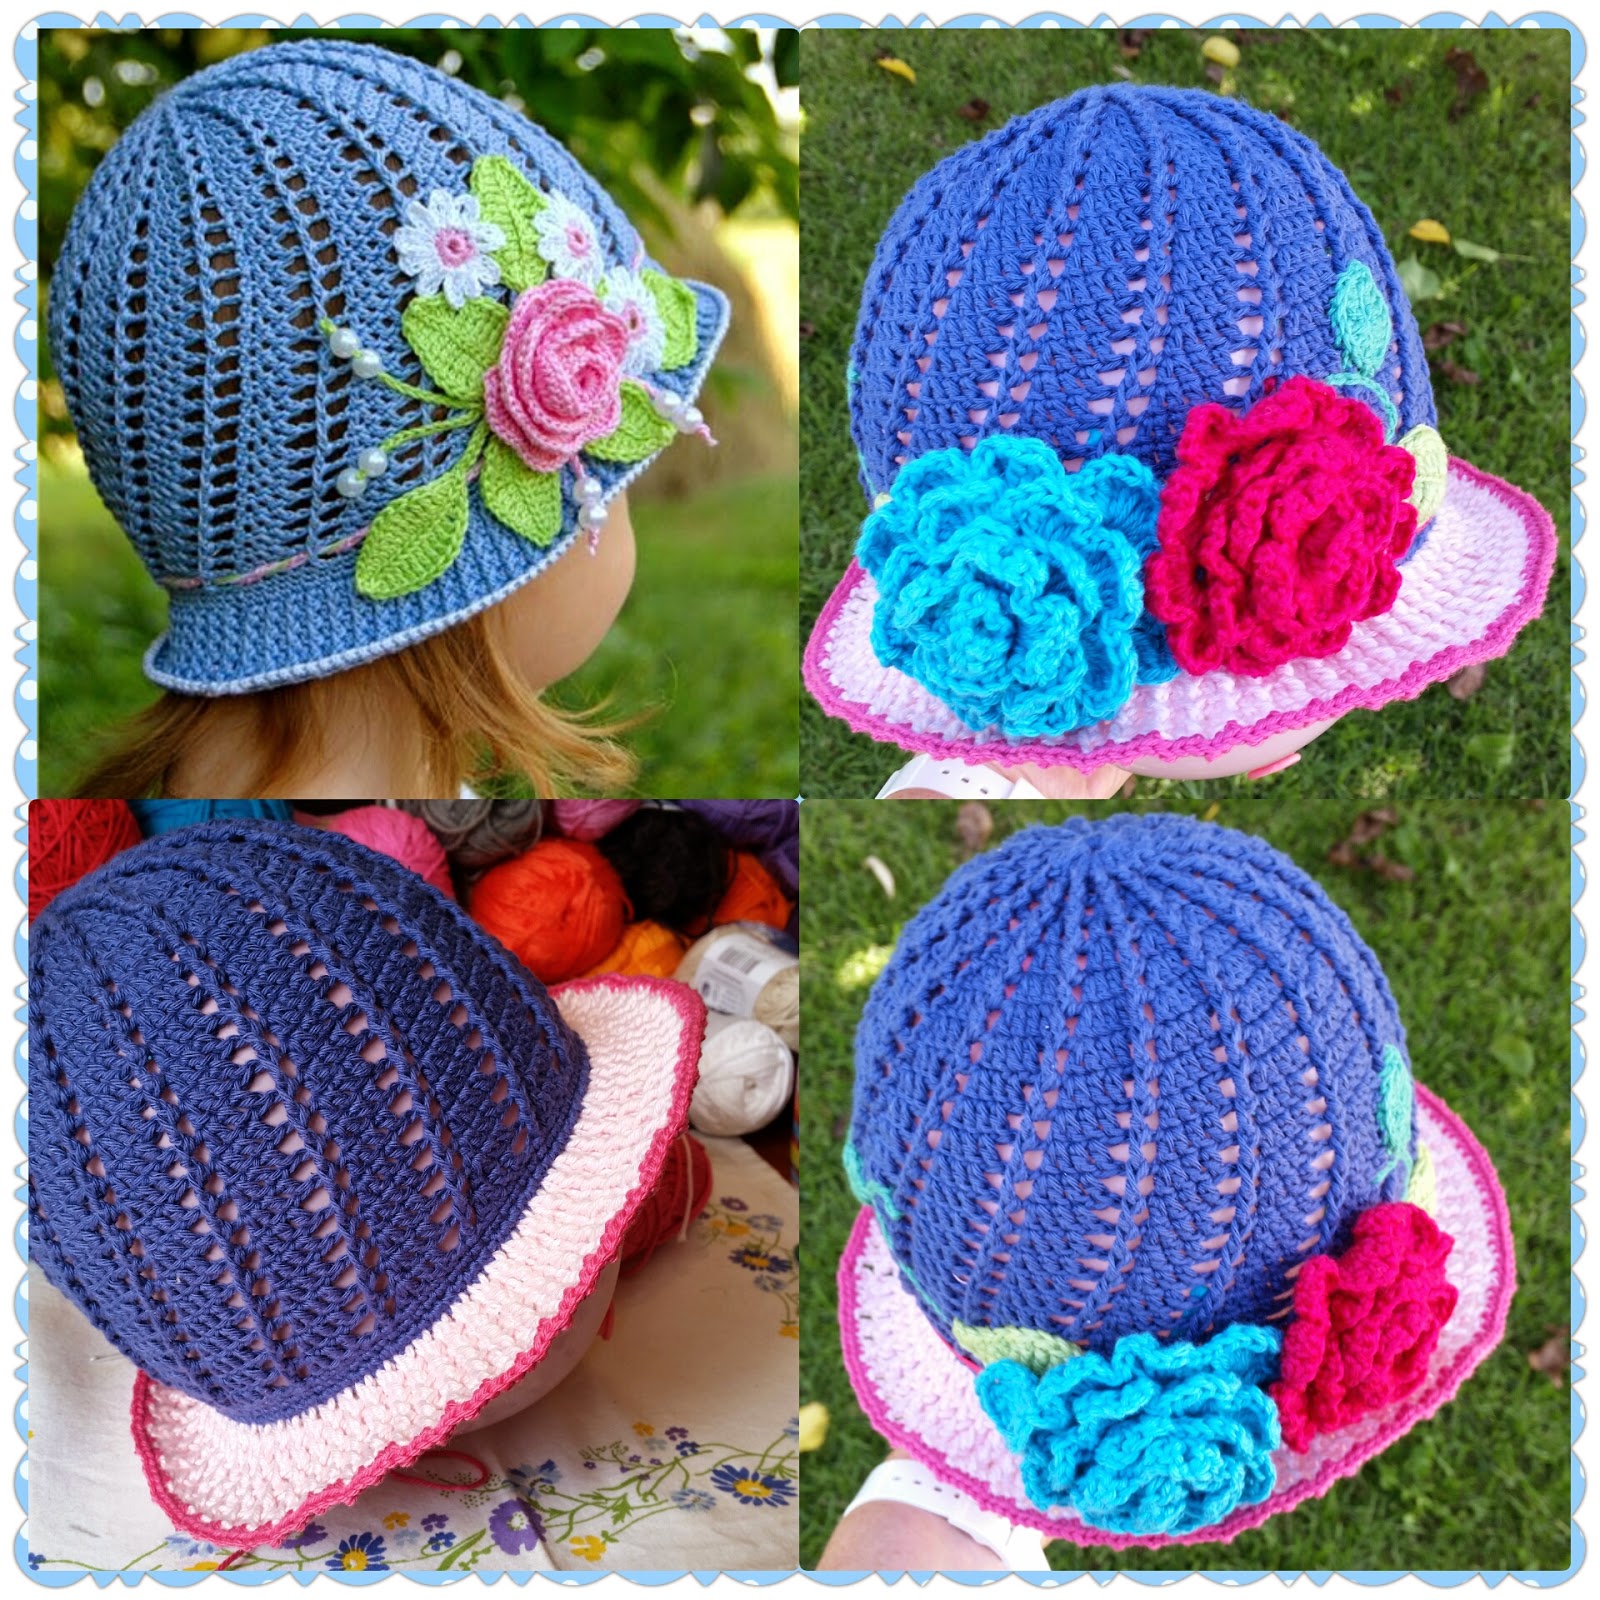
New Panama Hat Project to try
Similar with the one above, we also have this cute pattern for you to try. It’s from Mylittlecitygirl
VIEW IN GALLERY