Wooden ball decor proves that even the simplest materials can stand out when styled right. These DIY wooden ball decor ideas highlight bold builds and unique designs. Each one feels modern, artistic, and hard to ignore.

23 DIY Wooden Ball Decor Ideas That Look Expensive in 2026
Wooden ball décor is exploding in popularity in 2026, transforming the simplest round shapes into bold statement pieces that instantly make a space feel more styled and expensive. With smooth curves, natural textures, and endless ways to arrange them, wooden balls can become décor that feels modern, artistic, and seriously high-end.
Inside this collection, wooden spheres evolve into sculptural centerpieces, oversized garlands, layered trays, wall accents, and striking decorative displays that look straight out of a luxury interiors catalog. Every idea dares you to play with scale, stack unexpected shapes, and mix finishes so your final piece feels dramatic, polished, and impossible to ignore the second someone walks into the room.
1. Wooden Bunny Bead Ornaments

These tiny wooden bunny ornaments are the definition of cute-core meets Scandinavian minimalism soft neutral beads, sweet little faces, and dangling string loops that make them perfect for Easter branches or spring décor. They feel playful yet stylish, like something straight out of a dreamy Pinterest flat lay with fresh flowers nearby.
Use 2 wooden beads (1 large ~20mm, 1 small ~14mm), mini craft sticks for ears, and black twine. Glue the ears to the small bead with hot glue, then stack and glue beads together. Draw a simple face with a fine-tip marker. Thread twine through the top bead and knot for hanging. Optional: add blush with soft pink chalk.
2. Wooden Ball Baby Bonnet Prop

This cozy, handcrafted baby bonnet setup transforms a simple wooden ball into a soft, heirloom-style photo prop that feels warm, nostalgic, and beautifully textured. The smooth wood paired with knitted fibers creates that irresistible “newborn shoot” aesthetic earthy, gentle, and oh-so-charming.
Use a large wooden ball (around 3–4 inches diameter) as the base. Knit or crochet a bonnet using soft yarn (DK or worsted weight), adding small wooden beads along the trim if desired. Stretch the bonnet snugly over the ball and secure underneath with hidden stitches or fabric glue.
3. Hand-Painted Folk Art Wooden Balls

These intricately painted wooden balls are giving full artisan vibes rich colors, delicate florals, and mesmerizing patterns that instantly elevate any bowl or shelf display. They feel like collected treasures from a European market, adding personality and handcrafted charm to your space.
Start with smooth wooden balls (2–3 inches). Sand lightly, then paint a base coat using acrylic paint. Once dry, use fine brushes or dotting tools to create floral or geometric patterns. Seal with clear varnish for durability and a subtle sheen.
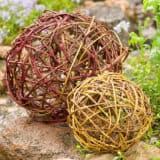
4. Boho Basket Wooden Ball Display

Earthy, bold, and beautifully curated, this wooden ball trio styled inside a woven basket feels like a cozy boho vignette straight out of a design magazine. The hand-painted details pop against natural textures, creating that layered, collected look we all secretly want on our coffee tables.
Paint wooden balls (2.5–3 inches) with acrylics in warm tones like terracotta, cream, and black. Add patterns using dotting tools or fine liners. Let dry fully (1–2 hours), then seal. Arrange inside a woven basket or tray for instant décor magic.
5. Wooden Bead Coasters

Simple, chic, and surprisingly addictive to make these wooden bead coasters bring that clean, natural aesthetic to your table while still being super functional. They’re minimal but cozy, like the kind of detail that quietly upgrades your morning coffee moment.
Thread 15–20 wooden beads (16–20mm size) onto a strong elastic cord. Form a circle and knot tightly, then secure with a dab of super glue. Trim excess cord and tuck inside a bead. Make multiple for a matching set.
6. Oversized Wooden Bead Trivets

These chunky wooden bead trivets are giving rustic farmhouse meets modern simplicity, perfect for protecting your table while doubling as décor. The oversized beads create a bold, tactile look that feels both practical and aesthetically on point.
Use large wooden beads (20–25mm) and thick cotton rope or elastic. Thread enough beads to form a circle (approx. 8–10 inches diameter), knot securely, and glue the knot. Optional: stain beads lightly for a richer tone.
7. Wooden Ball Fairy Light Holder

This glowing little setup is pure cozy magic,a simple wooden ball base turned into a dreamy candle-style centerpiece with twinkling fairy lights and delicate florals. It’s soft, romantic, and perfect for evening ambiance or seasonal table styling.
Glue small wooden balls (10–14mm) in a ring around the base of a glass vase using hot glue. Insert a battery-powered fairy light string inside the vase. Add faux mini flowers around the base for extra charm. Turn on and enjoy the glow!
8. Wooden Ball Egg Holder Bunny

This adorable bunny holder turns a wooden ball into a playful Easter display, complete with a real egg tucked inside. It’s quirky, cute, and just the right amount of crafty for seasonal decorating.
Use a wooden ball (~1.5–2 inches) for the head and an egg carton piece for the body. Attach fabric or felt ears with hot glue, draw a face, and glue the head onto the carton base. Place a dyed egg inside for the final look.
9. Wooden Ball Display Cube

Clean lines, simple structure, and that satisfying “design object” feel this wooden cube with a floating ball inside is minimal décor done right. It’s subtle but eye-catching, perfect for shelves, desks, or styled corners.
Cut 4 wooden dowels (about 6 inches each) and 2 square wood pieces (3×3 inches) for top and bottom. Drill small holes in corners, insert dowels, and glue. Place a wooden ball inside before sealing the top. Sand edges smooth for a polished finish.
10. Minimalist Wooden Cube Display

Clean lines, soft wood tones, and that perfectly centered sphere, this piece is giving “modern art gallery but make it cozy.” It’s simple, sculptural, and somehow makes a single wooden ball feel like a statement piece on your shelf or nightstand.
Cut 4 wooden dowels (6–7 inches) and 2 square wood pieces (approx. 3×3 inches). Drill small corner holes, insert dowels with wood glue, and place a 2–3 inch wooden ball inside before attaching the top. Sand edges smooth and finish with clear matte varnish for that luxe minimalist vibe.
11. Sculptural Wooden Ball Incense Holder

This one is moody, organic, and a little bit designer-core, the curved wood form paired with a resting wooden sphere feels like functional art. Perfect for slow mornings, incense burning, and pretending your life is a calming ritual.
Use a carved or pre-shaped wood base (about 6–8 inches long). Drill a small angled hole (approx. 3mm) for incense. Sand everything ultra-smooth, then oil with wood conditioner or linseed oil. Add a loose wooden ball (2–2.5 inches) as a decorative element that nests into the curve.
12. Wooden Ball Jar Lid Toppers

Ordinary glass jars just got a chic upgrade,these rounded wooden ball lids are giving apothecary-meets-modern kitchen. They instantly elevate pantry storage into something Pinterest-worthy and aesthetically satisfying.
Grab small glass jars and wooden balls sized slightly larger than the jar opening (2–3 inches). Attach balls to cork or wooden lids using strong wood glue or epoxy. Let cure 24 hours, then optionally seal with food-safe oil if using for spices.
13. Carved Wooden Ball Trinket Boxes

These rich, carved wooden spheres are secretly storage hello, hidden trinket magic. The detailed texture adds a global, artisanal feel while keeping things functional and stylish.
Use pre-made hollow wooden spheres or carve two halves from a 3–4 inch wooden ball. Sand interiors smooth, then carve or etch patterns outside using a wood carving tool. Stain with dark wood stain and seal with satin polyurethane.
14. Wooden Ball Tiered Tray Accent

That sweet little beaded detail around a tiered tray? It’s the kind of subtle upgrade that quietly steals the show. It adds texture, dimension, and that dreamy farmhouse-meets-modern charm that makes your coffee bar or kitchen counter look styled straight out of a magazine. Honestly, it’s one of those “why didn’t I do this sooner?” DIYs.
To recreate it, grab small wooden beads (around 10–12mm for that delicate look) and a strong adhesive like E6000 or wood glue. Carefully glue each bead along the rim of your tray tiers, spacing them evenly or placing them tightly side-by-side for a fuller effect. Let dry for at least 4–6 hours (overnight is even better). For extra flair, lightly whitewash or stain the beads to match your décor soft neutrals or rustic finishes work beautifully.
15. Rustic Wooden Ball Bowl Filler

This is your go-to “effortless but elevated” décor moment. A carved wooden bowl filled with textured wooden balls creates that cozy, layered look that instantly warms up any space coffee tables, entryways, or even shelves. It’s simple, earthy, and somehow always looks perfectly styled without trying too hard.
Start with wooden balls in mixed sizes (2–4 inches works best for visual interest). Use a wood carving tool, chisel, or even a rotary tool to add grooves, facets, or subtle patterns for texture. Lightly sand to smooth rough edges, then stain each ball in varying tones like oak, walnut, and natural wood for dimension. Arrange them in a long wooden or dough bowl, slightly overlapping for that curated, designer look.
16. Wood-Burned Decorative Balls

These little beauties are basically tiny canvases for your creativity. Delicate floral patterns, dotted borders, or whimsical vines turn plain wooden balls into intricate, handmade décor pieces that feel both cozy and artistic. Total cottagecore energy with a hint of boho charm.
Use smooth wooden balls (around 2–3 inches) and a wood-burning tool with a fine tip. Lightly sketch your design first with pencil if needed, then slowly burn your patterns into the surface using steady, gentle pressure. Take your time—this is the relaxing, mindful kind of DIY. Once finished, wipe clean and seal with a clear matte varnish or leave natural for a soft, organic finish.
17. Neutral Wooden Ball Coffee Table Tray

If “calm, cozy, and curated” had a centerpiece, this would be it. A tray filled with neutral-toned wooden balls creates that balanced, minimalist vibe that makes your living room feel pulled together in seconds. It’s the ultimate low-effort, high-impact styling trick.
Choose a shallow tray (wood, metal, or ceramic) and fill it with 5–7 wooden balls (around 3–4 inches each). Mix finishes some smooth, some carved, some slightly distressed for visual interest. You can even add a small accent like a faux succulent, candle, or dried florals for layering. No tools needed here just arrange, tweak, and admire your effortlessly chic setup.
18. Beaded Edge Pedestal Tray

This tray is all about those charming little details. The beaded edge adds a vintage-inspired touch that instantly elevates even the simplest pedestal tray into something that feels thoughtfully styled and boutique-worthy. Perfect for displaying candles, mugs, or sweet treats.
Grab small wooden beads (10–12mm) and attach them around the outer rim using wood glue or a strong craft adhesive. Work in small sections to keep spacing consistent, and press each bead firmly into place. Allow to dry overnight for a secure hold. Once set, paint or stain the entire tray soft whites, muted greys, or natural wood tones all give a beautiful finish depending on your aesthetic.
19. Wooden Ball Photo Prop Stands

Soft, dreamy, and oh-so-aesthetic—these wooden ball stands are perfect for photo styling, nursery décor, or delicate displays. They have that gentle, minimalist charm that feels straight out of a styled shoot, especially when paired with soft fabrics or florals.
To make one, use a wooden ball (about 3–4 inches) and a small pedestal base. Drill a centered hole into both the ball and base, then connect them with a short wooden dowel using strong wood glue. Let it dry completely for stability. Sand everything smooth, then finish with a baby-safe oil or matte sealant. Add tiny embellishments like fabric flowers, bows, or greenery for a soft, styled look that feels extra special.
20. Beaded Wooden Ball Mirror Frame

This mirror is giving soft Scandinavian meets handmade chic,those perfectly rounded wooden balls hugging the frame create such a warm, sculptural vibe. It’s minimal but still makes a statement, like the kind of piece that quietly upgrades your whole entryway or bedroom corner.
Start with a plain oval or round wooden mirror frame and medium-sized wooden balls (about 1.5–2 inches). Use strong wood glue or E6000 to attach each ball evenly around the outer edge spacing them tightly for that full, luxe look. Clamp lightly or press firmly and let dry overnight. Finish with a clear matte sealant or a light sand for that raw, natural aesthetic.
21. Sculptural Wooden Ball Coffee Table Base

Okay but THIS is functional art. Oversized wooden spheres as a table base? It’s bold, modern, and totally gallery-worthy. The smooth curves paired with a glass top create that dreamy balance between earthy and contemporary.
To DIY a version, use large wooden balls (6–10 inches) or hollow wooden spheres for lighter weight. Sand them ultra-smooth, then stain in a deep walnut or keep natural. Secure them to a sturdy base board using heavy-duty construction adhesive, spacing evenly for stability. Top with tempered glass (at least ¼ inch thick), adding clear rubber pads between glass and wood to prevent slipping.
22. Wooden Ball Holiday Characters

These are pure festive joy in tiny form wooden balls turned into adorable holiday figures with cozy felt outfits and playful details. Think ornaments that feel handmade, nostalgic, and totally gift-worthy.
Use small wooden balls (1–2 inches) for heads and cut felt into cone shapes for bodies. Hot glue the felt into cones, then attach the wooden ball on top. Add tiny details like yarn hair, mini scarves, buttons, or pipe-cleaner arms. Use acrylic paint or a fine-tip marker for simple faces. Finish with a loop of twine glued at the back for easy hanging.
23. Minimal Wooden Ball Bud Vase

Simple, organic, and a little bit poetic—this wooden ball vase feels like something straight out of a calm, curated Pinterest dream. One tiny branch or dried stem is all it needs to feel intentional and effortlessly beautiful.
Grab a larger wooden ball (around 3–4 inches) and drill a centered hole about ½ inch wide and 1–2 inches deep using a spade bit. Sand the opening smooth, then optionally seal the inside with waterproof wood sealant if using fresh stems. Leave the outside raw or finish with a natural oil. Pop in a single stem or twig and style it on a shelf or bedside table—minimal magic.