Kids love anything that brings a bit of character into their books. These 30 DIY kids bookmark ideas highlight fun designs and playful details. Every bookmark feels like a tiny companion for their reading adventures.

DIY Kids Bookmark Ideas That Turn Simple Supplies Into Fun in 2026
Kids bookmarks are getting a creative upgrade in 2026, transforming basic materials into playful designs that make reading feel more exciting. With bright colors, fun shapes, and interactive details, even the simplest supplies can become bookmarks kids actually love using.
Inside this collection, bookmarks come alive with cute characters, animal shapes, colorful patterns, and clever designs that add personality to every page. Every idea invites kids to cut, color, and create freely so their bookmarks feel fun, expressive, and impossible to lose inside a book.
1. Pressed Flower Wooden Bookmarks

Delicate, dreamy, and straight out of a cottagecore fairytale—these pressed flower bookmarks feel like tiny pieces of nature frozen in time. Each one has its own personality, with soft petals and leafy details that make reading feel extra magical (like you need a cup of tea and a cozy blanket nearby).
Start with thin wooden strips (about 1.5 x 6 inches), sand them smooth, and lightly stain or leave natural for that soft aesthetic. Arrange dried flowers and leaves, then seal them using clear-drying craft glue or a thin layer of resin for durability. Drill a small hole at the top, thread in a satin ribbon (about 6–8 inches long), and tie a neat knot or bow—instant bookmark glow-up!
2. Mini Fabric Embroidery Bookmarks

Cute, cozy, and just a little bit fancy—these fabric + wood bookmarks bring a handmade, stitched-with-love vibe that kids will adore. The tiny embroidered flowers give them that “I made this myself!” charm that feels super special and gift-worthy.
Cut a slim wooden base (around 2 x 6 inches) and glue a piece of neutral fabric (like linen or cotton) on top using fabric glue. Stitch simple floral designs using embroidery thread (think basic knots and straight stitches), then secure the fabric edges neatly with glue or tiny tacks. Punch a hole at the top and add colorful thread or ribbon for hanging.
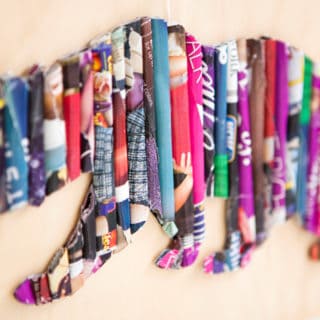
3. Quilled Paper Character Bookmarks

Bright, playful, and full of personality—these quilled bookmarks are basically tiny works of art that pop right off the page. From flowers to adorable owls, they’re perfect for kids who love bold colors and fun textures.
Use sturdy cardstock or thin wood strips as your base (around 2 x 6 inches), then create shapes using quilling paper strips rolled and glued into coils. Attach the designs with craft glue, layering for dimension. Add handwritten titles or doodles with a white gel pen for extra flair, and seal lightly with Mod Podge to keep everything in place.
4. Calligraphy Quote Wooden Bookmarks

Elegant but still totally kid-friendly—these bookmarks mix soft watercolor backgrounds with beautiful handwritten quotes, making reading feel a little more meaningful and a lot more aesthetic.
Paint your wooden bookmark base with watercolor washes (ombre or gradient works best), letting it dry completely. Use a fine-tip brush pen or calligraphy marker to write short quotes or names. Seal with a clear spray or Mod Podge for protection, then finish with a black or gold ribbon threaded through a drilled hole.
5. Hand-Stitched Felt Tag Bookmarks

Soft, squishy, and irresistibly cute—these felt bookmarks look like tiny stitched tags you’d find in a handmade gift shop. Perfect for younger kids, they’re safe, lightweight, and full of cozy texture.
Cut two matching shapes from felt (tag or rounded arch shapes work beautifully), then stitch around the edges using blanket stitch or running stitch with embroidery thread. Add simple embroidered flowers or patterns on the front layer before stitching together. Insert a looped string or yarn at the top before closing for that classic bookmark finish.
6. Painted Silhouette Scene Bookmarks

Moody skies, glowing streetlights, and dreamy little scenes—these bookmarks feel like mini paintings you can tuck into your favorite book. They’re artsy, expressive, and perfect for creative kids who love to paint.
Use thick cardstock or primed wooden strips and paint a gradient background using acrylic paints (blend while wet for smooth transitions). Once dry, paint silhouettes (trees, poles, lamps) using black acrylic and a fine brush. Seal with a matte varnish, and attach a bold tassel (about 4–5 inches long) for that dramatic finishing touch.
7. Minimal Line Art Bookmarks

Simple, modern, and effortlessly cool—these line art bookmarks are perfect for kids who love a clean aesthetic (yes, even kids can have style). The black-on-white designs feel fresh, artsy, and super Instagram-worthy.
Cut smooth wooden or thick cardstock strips and paint them white or cream. Use a fine liner or paint pen to draw minimal floral or abstract line art designs. Keep it simple—one continuous line design works best. Finish with a small ribbon or leave clean for a sleek, no-fuss look.
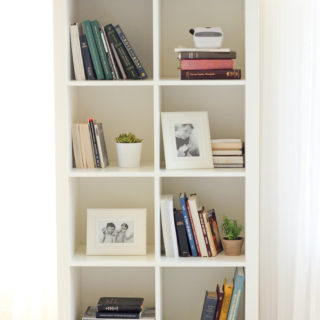
8. Mini Bookshelf Polymer Clay Bookmarks

Okay, this one is so fun—tiny colorful books stacked on mini shelves? Obsessed. These bookmarks are playful, 3D, and perfect for kids who want something a little extra (because flat is boring, right?).
Use a flat bookmark base (plastic or wood), then sculpt mini books and shelves using polymer clay. Bake according to package instructions (usually 110–130°C for 15–30 minutes), then glue the pieces onto the bookmark using strong adhesive. Add gloss varnish for shine and durability.
9. Resin Floral Luxe Bookmarks

Glossy, sparkly, and totally mesmerizing—these resin bookmarks feel like little glass treasures filled with flowers and gold flakes. Perfect for older kids or supervised crafting days, because wow, the result is stunning.
Pour a thin layer of clear resin into bookmark molds, add dried flowers and gold foil pieces, then top with colored or clear resin. Let cure fully (usually 24–48 hours), then remove from mold and drill a hole if needed. Add a tassel or metallic thread for that luxe finish.
10. Transparent Botanical Bookmarks

Light, airy, and almost ethereal—these transparent bookmarks make it look like flowers are floating right on the page. It’s giving delicate, dreamy, and totally Pinterest-core.
Use laminating sheets or clear plastic bookmark blanks, arrange pressed flowers inside, and seal using a laminator or strong adhesive sheets. Trim edges neatly, round the corners, and punch a hole at the top. Finish with a satin bow or ribbon for that soft, elegant touch.
11. Vintage Lace Collage Bookmark

Soft, layered, and effortlessly nostalgic, this bookmark feels like something tucked inside a well-loved novel from another era. The mix of aged paper, delicate lace, and butterfly accents creates a beautifully textured piece that turns even the simplest reading moment into something aesthetic and intentional.
Cut a 2×6 inch strip of sturdy cardstock for your base. Tear small pieces of old book pages or printed text paper and glue them down using a glue stick, slightly overlapping for a collage effect. Attach a vertical strip of lace with fabric glue, then layer on small embellishments like butterfly cutouts or word strips using foam tape for dimension. Lightly seal everything with matte Mod Podge and let dry for about 20 minutes for a polished, long-lasting finish.
12. Hand-Painted Tulip Bookmark

Fresh, soft, and full of spring charm, this tulip bookmark brings a calm, artsy energy to your reading routine. The gentle peach background paired with delicate floral illustrations makes it feel both minimal and thoughtfully handmade.
Start with watercolor paper cut to 2×7 inches. Apply a light peach wash using diluted watercolor paint and allow it to dry completely for about 15 minutes. Sketch tulips lightly in pencil, then outline with a fine liner and fill using brush pens or watercolors. Add a short quote at the top using a 0.5 mm pen, and optionally seal with a clear spray or laminate to protect the design from wear.
13. Galaxy Daisy Painted Bookmark

This design blends moody night-sky vibes with cheerful floral details, creating a striking contrast that instantly stands out. The deep black background sprinkled with stars makes the white daisies pop in the most eye-catching way.
Paint a 2×6 inch cardstock strip with black acrylic paint and let it dry completely. Dip a toothbrush in white paint and flick it across the surface to create a starry effect. Use a small round brush to paint daisies with white petals and yellow centers. Once everything is dry, apply a thin coat of gloss varnish for shine and durability, and finish by threading a yarn tassel through a hole at the top.
14. Sunset Forest Silhouette Bookmark

Warm, glowing, and a little bit dramatic, this sunset bookmark captures that golden-hour magic in a simple yet stunning way. The gradient sky fading into dark tree silhouettes gives it a peaceful, storybook-like atmosphere.
On watercolor paper (2×7 inches), blend yellow, orange, and red paints while still wet to create a smooth gradient background. Let it dry fully before painting tree silhouettes along the bottom using black acrylic and a thin brush. Add small bird shapes with quick strokes for extra detail. Finish with light white paint splatters if you want a slightly dreamy texture, then punch a hole and attach a tassel.
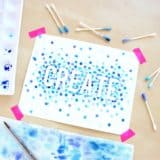
15. Minimal Watercolor Bookmark Set

Simple, modern, and quietly artistic, these bookmarks focus on soft color blending and delicate line work. Each one feels unique, making them perfect for experimenting with creativity without needing perfection.
Cut watercolor paper into 2×6 inch strips. Drop watercolor paint in random areas, allowing colors to blend naturally without overworking them. Once dry, use a black fineliner to draw minimal florals, abstract lines, or gentle patterns over the shapes. Add small details like dots or thin outlines for depth, and round the corners with scissors if you want a more finished look.
16. Mixed Media Scrapbook Bookmark

Bold, expressive, and full of personality, this bookmark is like a mini scrapbook page you can carry inside your book. It combines textures, colors, and layers to create something completely unique every time.
Use a 2×7 inch piece of thick cardstock as your base. Glue down scrapbook paper scraps, torn magazine pieces, or colored paper using a glue stick. Add washi tape, paint splashes, or stamps for extra interest. Attach decorative elements like stickers or butterflies with hot glue for a raised effect. Finish with a handwritten quote using a gel pen and seal with Mod Podge for durability.
17. Starry Night Whale Bookmark

Whimsical and imaginative, this bookmark turns a simple reading accessory into a tiny piece of fantasy art. A floating whale surrounded by stars creates a dreamy, storybook-inspired scene that feels calming and creative.
Paint a deep blue background on cardstock, layering lighter shades with a sponge or brush to add depth. Sketch a whale shape and fill it in with acrylic paint, adding lighter highlights for dimension. Use white paint and a toothpick or fine brush to dot stars across the sky. Once dry, outline details with a gel pen and attach a ribbon at the top for a soft finishing touch.
18.Pastel Cat Pattern Bookmark

Playful, colorful, and full of charm, this bookmark design is perfect for kids who love cute characters and soft pastel palettes. The mix of abstract shapes and tiny cat faces gives it a fun, slightly whimsical look.
Start with watercolor paper cut to 2×6 inches. Paint overlapping pastel circles using diluted watercolor paints, leaving some areas lighter for variation. After the paint dries, draw small cat faces peeking between the shapes using a fine liner. Add details like whiskers, ears, and tiny expressions, then enhance with a white gel pen if desired. Seal lightly to protect the artwork.
19. Chunky Crochet Tassel Bookmark

Cozy and textured, this crochet bookmark adds a handmade touch that feels warm and comforting. The chunky stitches and soft yarn make it both functional and decorative.
Using medium-weight yarn and a 4 mm crochet hook, chain about 25 stitches for the base length. Turn and work single crochet stitches across each row until the piece is approximately 1.5 inches wide. Fasten off and weave in loose ends with a yarn needle. Create a tassel by wrapping yarn around your fingers 20–30 times, tying it at the top, and trimming evenly before attaching it securely.
20. Crochet Flower Bookmark

Delicate and cheerful, these crochet flower bookmarks feel like a tiny bouquet that lives inside your book. The long stems and leafy details make them especially charming for gifting or seasonal crafts.
Begin by crocheting a small flower using a magic ring and double crochet stitches for the petals, switching yarn colors for the center and outer layer. Chain 20–25 stitches to form the stem, then create leaves by chaining 5 stitches and slip stitching back along the chain. Attach the flower to the top of the stem using a yarn needle, and repeat to create multiple pieces if you want a coordinated set.
21. Felt Corner Bookmark with Embroidery

Soft, cozy, and quietly charming, these felt corner bookmarks feel like tiny handmade treasures. The delicate embroidery—little flowers, books, and leafy details—adds a sweet, storybook touch that makes every reading moment feel extra special.
Cut two triangles (about 3×3 inches) from felt and layer them to form a corner pocket. Stitch along the edges using embroidery thread and a simple blanket stitch. Before closing, add small embroidered designs using basic stitches like satin stitch or French knots. Slide it onto the corner of a page, and you have a snug, reusable bookmark that feels both crafty and meaningful.
22. Vintage Autumn Scene Bookmark

Warm, nostalgic, and full of cozy fall vibes, these bookmarks look like tiny paintings straight out of a storybook. The soft sepia tones and autumn leaves create a calming, seasonal aesthetic that feels perfect for quiet reading days.
Print or cut out vintage-style images and trim them to about 2×6 inches. Mount them onto slightly larger cream cardstock to create a border, then glue securely. Punch a hole at the top and thread a satin ribbon through for a polished finish. Lightly ink the edges with brown ink for an aged effect, and let dry before use.
23. Cute Quote Character Bookmark

Playful, colorful, and full of personality, these bookmarks combine simple illustrations with fun reading quotes. They feel expressive and relatable, making them perfect for kids who love adding a bit of humor to their crafts.
Start with colored cardstock strips (2×6 inches). Sketch a simple character using a pencil, then outline with a black marker and color it in with markers or brush pens. Add a bold quote in neat handwriting or bubble letters. Let the ink dry fully, then optionally laminate for durability so it can survive plenty of page turns.
24. Paper Quilling Flower Bookmark

Delicate, detailed, and surprisingly eye-catching, quilled bookmarks bring a whole new dimension to paper crafts. The raised floral designs make each piece feel intricate and thoughtfully handmade.
Cut a 2×6 inch strip of textured cardstock. Roll thin paper quilling strips using a quilling tool to form petals and leaves, then glue them down with craft glue. Arrange into a simple flower design and press gently until secure. Allow at least 30 minutes for the glue to fully set before handling, and add a ribbon loop at the top for extra charm.
25. Moon Phase Minimal Bookmark Set

Clean, modern, and slightly celestial, these bookmarks use simple shapes to create a calming visual rhythm. The moon phase designs feel both artistic and easy enough for kids to recreate.
Cut cardstock into 2×6 inch strips and paint or color the background (black, white, or pastel). Use a circular stencil or coin to trace moon shapes in sequence, then fill them in with paint or markers. Add subtle texture with dots or lines if desired. Let everything dry completely, then round the corners for a neat finish.
26. Galaxy Quote Bookmark

Bold, vibrant, and full of dreamy energy, these galaxy bookmarks pair colorful backgrounds with inspiring quotes. They instantly stand out and make reading feel a little more magical.
Blend acrylic paints (purple, blue, pink) directly onto cardstock using a sponge or brush to create a galaxy effect. Once dry, splatter white paint lightly for stars. Write a quote using a white gel pen or paint marker, keeping the lettering bold and centered. Punch a hole at the top and attach a yarn tassel to complete the look.
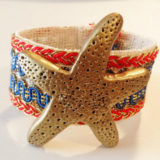
27. Beaded Flower Sticker Bookmark

Bright, textured, and packed with detail, these bookmarks use beads and embellishments to create a raised floral design that feels almost like jewelry for your book.
Use a sturdy bookmark base (2×6 inches) and sketch a simple flower layout. Apply craft glue and place small beads, pearls, or rhinestones carefully along the design. Press gently and allow to dry for at least 1–2 hours to ensure everything is secure. Add a loop string at the top for easy handling and a finished appearance.
28. Foam Flower Pattern Bookmark

Bold, colorful, and super tactile, these foam flower bookmarks are perfect for younger kids who love hands-on crafting. The layered petals create a fun 3D effect that feels playful and eye-catching.
Cut a base from thick cardstock (2×6 inches). Use craft foam sheets to cut out petal shapes and glue them in layers using hot glue or strong craft glue. Add small beads or buttons in the center of each flower. Let everything set fully before use, and optionally attach a tassel for extra flair.
29. Soft Pastel Painted Bookmark Set

Light, airy, and soothing, these pastel bookmarks feel calm and artistic without being complicated. The soft color blends paired with simple silhouettes make them visually gentle and easy to recreate.
Paint watercolor paper strips (2×6 inches) with soft pastel washes and let dry completely. Add simple black silhouettes like trees, birds, or lines using a fine brush or pen. Punch a hole at the top and thread a tassel through, optionally adding a bead for a decorative touch.
30. Botanical Line Art Bookmark Set

Minimal yet elegant, these bookmarks combine clean line drawings with subtle pops of color. The result is a balanced, modern design that still feels creative and handmade.
Cut white cardstock into 2×6 inch strips. Use a black fineliner to draw simple botanical illustrations like leaves and flowers. Add a vertical swipe of highlighter or watercolor behind the drawing for contrast. Let dry fully, then punch a hole and tie a ribbon at the top for a clean, finished look.