A coil bowl is never just a bowl once the texture takes over. These 23 DIY clay coil bowl ideas feature striking shapes, layered rings, and creative details that transform everyday clay into sculptural decor you actually want to display.

23 DIY Clay Coil Bowl Ideas That Turn Simple Rolls of Clay Into Stunning Handmade Art
Clay coil bowls are having a major creative moment in 2026, transforming basic rolled strips of clay into beautifully layered pieces that feel both artistic and satisfying to make. With each coil stacked and shaped by hand, even the simplest bowl starts to take on a bold, sculptural look full of texture and character.
This collection is packed with striking ideas ranging from rustic organic bowls and textured earthy designs to colorful modern pieces and sculptural statement bowls that look gallery-worthy. Each project invites you to play with height, patterns, and finishes so your coil bowl ends up looking unique, eye-catching, and far more impressive than you’d expect from such a simple technique.
1. Sculptural Swirl Statement Tray

This is not just a tray—it’s a full-on art moment. Those hypnotic coils and carved lines feel like something you’d spot in a boutique gallery, casually stealing all the attention on your coffee table. It’s giving modern, it’s giving abstract, it’s giving “wait…you MADE that?!”
Roll out coils about ¼ inch thick and line them up tightly into an 8–10 inch oval slab. Press them together gently, then smooth the back using a rib or flat scraper. Grab a wooden skewer or needle tool and carve bold grooves, swirls, and geometric sections right into the surface. Let dry for 24–48 hours (slow drying = no cracks!), then seal with matte varnish or a soft satin glaze. Display it under candles or books and prepare for compliments.
2. Chunky Cozy Coil Bowls

These bowls are basically the pottery version of your favorite chunky knit sweater—thick, squishy-looking coils stacked into the coziest little vessels ever. Imperfect edges? YES. Soft curves? OBSESSED. These scream handmade charm.
Start with a pinch pot base around 3–4 inches wide, then build up using thick coils (about ½ inch). Stack and lightly blend the seams with your fingers or a damp sponge, but don’t over-smooth—we want that texture! Keep walls about ¼–½ inch thick. Dry slowly under plastic for 2–3 days, then paint with earthy tones or glaze for that rustic finish. Tell me this wouldn’t be adorable holding your rings?!
3. Dramatic Loop Rim Bowl

This bowl said “basic?” and immediately left the chat. Those raised coil loops around the rim create the dreamiest shadows and sculptural drama—it’s like your bowl is wearing jewelry.
Form a base bowl (6–8 inches wide), then roll coils about ⅜ inch thick. Score and slip along the rim, then attach coils in loops, arches, or rounded blobs. Press firmly but gently so they hold. Use a modeling tool to clean joins and refine shapes. Let dry completely before glazing or painting—glossy black or creamy white would be STUNNING. Fruit bowl, but make it fashion.
4. Hypnotic Mandala Coil Plate

If “satisfying” had a physical form…this would be it. Perfect spirals, petal-like coils, and that mesmerizing symmetry—this plate is basically meditation in clay form.
Roll a slab ¼ inch thick and cut into a 7–9 inch circle. Roll thinner coils (¼ inch) and arrange them into spirals, petals, or radiating patterns. Attach with slip and press lightly so they stay put. Keep designs low-profile for durability. Let dry flat for 48 hours, then glaze in dreamy tones—think terracotta, sage, or creamy neutrals. Warning: you will stare at it for too long.
5. Pop Art Mini Coil Dishes

Tiny dishes, BIG personality. These little cuties are bursting with color, playful swirls, and funky patterns—basically the life of the pottery party. Each one has its own swirl pattern and bold painted rim, making them perfect for gifting or collecting.
Create mini pinch pots (3–4 inches wide), then add thin coils (¼ inch) in spirals or squiggles inside or along the rim. Once fully dry, go wild with acrylic paint or underglaze—bright yellows, bold blues, cheeky dots, stripes, all the fun. Seal with food-safe glaze if needed. Perfect for jewelry, snacks, or just vibing on your shelf. Instant serotonin boost.
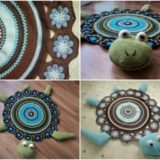
6. Sweet Honeycomb Bee Bowl

Stop everything—this bowl has a tiny bee. A. TINY. BEE. Paired with those honeycomb cutouts? It’s basically cottagecore dreams turned into pottery. Stop it right now—this is cottagecore perfection.
Shape a bowl (5–7 inches wide), then when it’s leather-hard, cut hexagon holes using a small cutter or craft knife. Smooth edges with a damp sponge. Sculpt a mini bee from clay (oval body, tiny wings!) and attach using slip. Let dry completely, then glaze in warm honey yellows and soft browns. Display with fruit or trinkets and prepare to be emotionally attached.
7. Texture Explosion Coil Bowls

These bowls are chaos—in the BEST way. Stamps, swirls, squiggles, random textures…each one looks like a little art experiment that totally paid off. It’s like every bowl tells its own little story.
Press coils into a bowl mold lined with plastic wrap, layering them while adding texture using forks, stamps, lace, or even leaves. Keep thickness around ¼–⅜ inch. Let dry in the mold for 24 hours, then remove and finish drying. Glaze or paint to highlight all that juicy texture. No rules, just vibes.
8. Bold & Blobby Coil Bowls

Think chunky, playful, slightly weird—and totally lovable. These bowls lean into thick coils and exaggerated shapes that feel almost cartoonish (in a cool, artsy way). Perfect for beginners or group projects.
Roll thick coils (about ½ inch), then press and layer them into a bowl mold. Add swirls, blobs, and uneven edges—don’t overthink it. Smooth just enough so it holds together. Dry slowly to avoid cracks, then paint in bold colors or keep it neutral for a modern look. It’s quirky. It’s fun. It’s impossible to mess up.
9. Vintage Lace Edge Plates

Delicate, romantic, and just a little fancy—these plates look like they belong at a dreamy tea party with mismatched china and fresh flowers. The edges have cut-out shapes and soft, scalloped vibes that feel straight out of a vintage dream.
Roll a slab (¼ inch thick) and cut into an 8–10 inch circle. Use small cutters or a knife to create lace-like cutouts around the edge. Gently drape over an upside-down bowl for shape. Add subtle coil details in the center if you’re feeling extra. Let dry 48 hours, then glaze in soft whites, blush pinks, or antique finishes. Tell me you wouldn’t serve cake on this.
10. Wild Coil Nest Bowl

This bowl is giving beautiful chaos. Tangled coils twist and overlap into a nest-like form that feels organic, artsy, and completely one-of-a-kind. It’s artsy, organic, and totally unique every single time.
Roll lots of thin coils (⅛–¼ inch), then layer them loosely inside a plastic-lined bowl mold. Attach lightly with slip, but don’t overdo it—you want that airy, open feel. Build up the sides gradually, letting coils overlap naturally. Dry slowly for 2–3 days (patience, bestie!), then remove from the mold and glaze or seal. It’s messy, it’s sculptural, it’s EVERYTHING.
11. Dreamy Loop Lace Bowl

This bowl is straight-up giving ethereal fairy teacup energy. Those soft, rounded loops dancing around the rim look like melted lace or little ceramic clouds—light, airy, and just a tiny bit magical. It’s the kind of piece that makes people lean in and go “wait…HOW did you make that?!”
Start with a shallow pinch pot base (about 5–6 inches wide), smoothing the inside with a damp sponge until silky. Roll coils about ⅜ inch thick, then form loose oval loops and attach them one-by-one around the rim using score + slip (don’t skip scoring—seriously). Let each loop slightly overlap for that flowy vibe. Dry slowly under plastic for 48 hours, then glaze in glossy white or soft pastel. It’s delicate drama, and we love her.
12. Wild Abstract Coil Sculpture Bowl

This is what happens when a bowl decides it’s actually a modern art icon. Twisting, looping, bending coils create a totally open, sculptural form that feels chaotic in the chicest way possible. It’s messy. It’s bold. It’s absolutely not here to be subtle.
Roll thick coils (about ½ inch) and start from a small base, building upward while letting each coil twist, overlap, and wander freely. Attach with slip at every connection point, but don’t over-smooth—this piece thrives on movement. Use a spray bottle to keep clay workable as you build. Let dry VERY slowly (2–3 days minimum), rotating occasionally so it doesn’t warp. Add a matte or satin glaze to keep that artsy edge. This is a conversation starter, period.
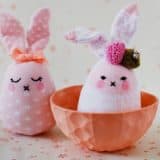
13. Whimsical Bunny Story Dish

I’m sorry but this is illegally cute. A soft, wavy dish with a tiny bunny popping up like it’s starring in its own little clay fairytale? Immediate heart-eyes. This is the kind of DIY that turns into a keepsake.
Form a small organic dish (about 4–5 inches) by pressing clay into a gentle curve—no perfect circles here. Sculpt a bunny using extra clay: oval base, pinch up ears, and lightly carve tiny details with a needle tool. Score + slip to attach, blending the base so it feels seamless. Let dry fully, then paint in soft neutrals, blush pinks, or even speckled finishes. Gloss glaze = next-level adorable.
14. Retro Swirl Power Plate

This plate is giving 70s sunshine meets hypnotic spiral realness. Thick, juicy coils curve and swirl like a lava lamp froze mid-motion—bold, graphic, and weirdly satisfying to look at.
Roll chunky coils (½ inch thick—don’t be shy), then press them into a slab base (8–10 inches wide), forming large spirals and curved sections that fill the space like a puzzle. Add small coil “dots” for extra retro flair. Gently press everything together without losing that raised dimension. Dry flat for 48 hours, then glaze in warm tones—mustard, rust, terracotta, or even color-block it. It’s groovy. It’s bold. It’s EVERYTHING.
15. Happy Rainbow Coil Bowl

This bowl is basically a serotonin boost in ceramic form. Bright rainbow stripes wrapped inside a wavy, hand-built bowl? It’s giving main character energy for your snack time.
Build a coil bowl (5–6 inches wide) using coils about ⅜ inch thick, blending seams just enough to hold. Once bone dry, paint the inside in layered rainbow bands—start from the center and work outward (yellow, pink, orange, red—go wild). Keep the outer rim neutral or add subtle texture. Seal with glossy glaze for that juicy, candy-like shine. Tell me this wouldn’t make everything you eat feel more fun.
16. Bubble Loop Lace Plate

This one feels like vintage china got a funky, artsy glow-up. Those bubbly looped coils create a lacy, see-through effect that’s delicate but still full of personality.
Roll coils about ¼–⅜ inch thick and form connected loops, building outward in a circular shape (6–8 inches). Attach each loop with slip, keeping spacing fairly even so it holds structurally. Use a soft brush to smooth connections without losing shape. Let dry completely flat (no shortcuts here), then glaze in creamy white with hints of blue or gray. It’s classic…with a twist.
17. Dark Gloss Statement Bowl

Moody. Glossy. Slightly mysterious. This bowl looks like it belongs in a candlelit dinner scene where everyone’s wearing linen and discussing art. The raised coil details? Chef’s kiss.
Create a smooth coil bowl base (6–7 inches), blending the outer walls slightly. Add decorative coils (arches, spirals, dots) using slip, layering them like a pattern wrapping around the bowl. Refine edges with a modeling tool for that clean-but-textured look. Once fired, glaze in deep tones—inky black, forest green, or metallic finishes. It’s subtle drama, and it hits.
18. Maximalist Texture Coil Bowl

If “more is more” is your life motto, this bowl gets you. Every inch is packed with swirls, bumps, and coil details—it’s like a tactile playground you can’t stop staring at.
Start with a bowl base, then roll thinner coils (¼ inch or smaller) and layer them EVERYWHERE—spirals, waves, dots, clusters. Attach with slip and lightly blend edges so nothing feels fragile. Build slowly, section by section. Let dry thoroughly before glazing. Use a wash glaze technique (wipe back color) to make all that texture pop. It’s busy, bold, and ridiculously satisfying.
19. Flower Power Coil Mandala Bowl

This bowl is pure symmetry magic. A tight spiral center blooms outward into petal-like coils, creating a design that feels both calming and visually addictive.
Press a spiral coil into the center of a bowl mold, then surround it with evenly spaced U-shaped coils to mimic petals. Keep coils about ¼–⅜ inch thick for structure. Lightly press everything together while maintaining definition. Let dry in the mold for 24 hours before removing. Glaze in soft pastels or earthy tones depending on your vibe. It’s peaceful, pretty, and totally mesmerizing.
20. Ocean Swirl Dream Bowl

This bowl looks like a wave, a tide pool, and a dreamy beach sunset all rolled into one. Soft swirls, blended textures, and glossy finishes make it feel almost…liquid.
Build a coil bowl (5–7 inches), then add thin coils along the inside and rim, swirling them gently with your fingers or a damp brush to soften edges. Think movement, not perfection. Once dry, glaze with layered blues, teals, and seafoam greens—let colors overlap for that ocean effect. Finish with a high-gloss glaze for that wet, glassy shine. It’s basically the beach…in bowl form.
21. Storybook Embossed Coil Bowl

This bowl is giving ancient artifact meets fairytale garden. Those raised swirls, stamped medallions, and leafy details look like they’re telling a quiet little story all the way around the bowl. It’s rich, intricate, and honestly feels like something you’d find in a hidden pottery shop in Europe.
Start with a sturdy coil bowl base (6–7 inches wide), smoothing the surface slightly. Roll medium coils (¼–⅜ inch) and create flowing S-shapes, spirals, and curved lines across the exterior. For those round medallions, flatten small clay discs (about 1–1.5 inches wide) and press in designs using stamps, carved tools, or even leaves. Score + slip EVERYTHING securely, then refine edges with a damp brush. Dry slowly for 2–3 days, then glaze in soft neutrals or antique washes to highlight all that texture. It’s detailed, dreamy, and totally heirloom-worthy.
22. Iridescent Ocean Wave Bowl

This one is pure mermaid-core magic. The rippled edges, glossy finish, and that insane color shift between turquoise and deep plum? It literally looks like a seashell kissed by a sunset. If bowls could glow up…this is it.
Build an organic coil bowl (5–7 inches), letting the rim stay wavy and uneven for that natural flow. Add subtle coil textures inside—soft swirls and raised forms—then smooth lightly with a damp sponge so it feels fluid, not chunky. Once bisque fired, layer glazes: start with a turquoise or aqua base inside, then brush or dip the outer rim in a contrasting plum or mauve glaze. Let them overlap slightly for that dreamy blend. Fire again and watch the magic happen. It’s glossy, moody, and straight-up mesmerizing.
23. Funky Patchwork Coil Bowl

Okay THIS bowl came to party. Bold swirls, chunky textures, bright colors, and even tiny feet?? It’s quirky, loud, and completely unapologetic—basically the life of your shelf décor.
Create a bowl base, then build the exterior using flattened coil spirals and blobs (about ½ inch thick). Press them together like a patchwork quilt, filling every gap with different shapes and textures. Add three or four small clay balls underneath as feet (about ¾ inch wide), attaching with score + slip for stability. Once dry, go wild with glaze—mix blues, teals, greens on the outside and a contrasting pop (like bright orange) inside. Gloss finish = maximum impact. This is not a subtle bowl…this is a statement.