Cardboard might be humble, but these 37 DIY cardboard craft ideas prove it can be downright spectacular. With clever cuts, layered textures, and design-forward shapes, ordinary boxes transform into creations that look shockingly high-end. If you love turning simple materials into jaw-dropping projects, this lineup will blow your mind.

37 DIY Cardboard Craft Ideas That Spark Big Creativity in 2026
Cardboard is becoming the star material of 2026, proving that everyday scraps can turn into impressively creative projects with just a little imagination. Its lightweight flexibility makes crafting feel effortless while still offering enough structure to build pieces that look surprisingly polished.
This collection of 37 DIY Cardboard Craft Ideas highlights cardboard ideas that range from playful décor to clever functional designs, all easy to recreate and bursting with personality. Expect projects that look far more stylish than their humble beginnings, giving you budget friendly crafts that still feel exciting and fresh.
1. Whimsical Cardboard Birdhouse Wall Art

Bold, graphic, and bursting with folk-art charm, this cardboard birdhouse feels like a mini art gallery moment for your wall. The contrast of black structure with hand-painted birds and florals makes it pop in the most Pinterest-scroll-stopping way. Instant happy décor? Absolutely.
To DIY: Cut a birdhouse shape from sturdy corrugated cardboard (about 10–12 inches tall). Add vertical slats using thin cardboard strips and hot glue. Paint with acrylics (black base, bright birds and flowers), outline details with a fine paint pen, and seal with clear varnish. Add twine at the top for hanging. Can you picture this in a cozy craft corner?
2. Glitter Fairy Cardboard House

This sparkly cardboard cottage is pure fairy-tale energy soft pastels, tiny flower details, and a roof that practically twinkles. It’s giving magical garden vibes and imaginative play all in one adorable package.
To DIY: Build a simple box house from cardboard (approx. 6x6x8 inches), glue panels with hot glue, then coat with glitter cardstock or glitter glue. Cut a pitched roof from foam board or layered cardboard. Decorate with paper flowers, sequins, and mini pots using tacky glue. Perfect for outdoor play scenes or shelf décor yes, please!
3. Cardboard Flower Tree Wall Décor

A statement wall piece that looks way more luxe than “cardboard,” this floral tree is bold, graphic, and seriously satisfying. The red flowers with pearl centers feel festive, artsy, and totally frame-worthy.
To DIY: Cut a large circular base (about 12–14 inches wide) from thick cardboard. Add a tree silhouette cut from black-painted cardboard. Layer flower cutouts from craft foam or cardstock and glue faux pearls in the center. Finish with painted grass details at the base. Who knew cardboard could look this polished?
4. Crescent Moon Cardboard Shelf Display

Holiday magic meets modern design with this crescent moon shelf hello cardboard glow-up! It’s minimalist, festive, and perfect for styling tiny trees, figurines, or seasonal décor moments.
To DIY: Trace and cut two crescent moon shapes from corrugated cardboard, spacing them with layered cardboard strips for depth. Add 3–4 circular shelves (4–5 inches diameter) and secure with hot glue. Paint or wrap in kraft paper, then decorate with mini bottle-brush trees and felt accents. Holiday chic on a budget? Obsessed.
5. Cardboard Parrot Pencil Holders

These colorful parrot pencil holders are playful, practical, and kid-approved. Bright feathers, googly eyes, and that adorable beak this is desk organization with personality.
To DIY: Use empty cardboard boxes (milk-carton size works great). Paint with acrylics, then layer colorful felt or paper circles for feathers. Add googly eyes, a triangle beak, and real feathers with hot glue. Cut a front opening for pencils. Homework just got way more fun, right?
6. Cardboard Farm Play Set

This cardboard farm scene is a full-on small-world play dream. Platforms, ramps, and tiny chicks make it interactive, open-ended, and perfect for sensory or imaginative play.
To DIY: Cut large cardboard circles for platforms and support them with paper towel rolls. Add ramps using folded cardboard strips. Glue everything onto a tray base, then scatter dried corn kernels or lentils for texture. Finish with mini chick figures or pom-poms. Kids will play forever promise.
7. Cardboard Jewelry Tree Stand

Minimal, modern, and secretly genius this cardboard jewelry stand proves storage can be cute and clever. The bold color makes it feel designer, not recycled.
To DIY: Use a paper towel roll as the trunk and smaller angled rolls for branches. Secure into a thick cardboard base with hot glue. Paint with acrylic paint and let dry fully. Slide bracelets and necklaces over the branches. Chic organization without spending a dime? Yes, please!
8. Popsicle Stick & Cardboard Birdhouse

Rustic, cozy, and totally winter-ready, this sweet birdhouse craft feels like a handmade ornament straight out of a storybook. The popsicle-stick roof is the cutest finishing touch.
To DIY: Cut a simple house shape from cardboard (about 7 inches tall). Glue popsicle sticks in an inverted “V” for the roof. Paint details with acrylics, add a paper bird, pom-poms, and faux snow dots using a cotton swab. Add twine for hanging. Can you picture this on a holiday wall?
9. Cardboard Mushroom Hanging Décor

This mushroom décor is whimsical perfection soft colors, playful shapes, and a yarn tassel that adds movement and charm. Cottagecore lovers, this one’s for you.
To DIY: Cut mushroom cap and stem shapes from cardboard. Paint with acrylics (pink cap, neutral stem), then add paper circles and a faux flower. Glue a loop of yarn at the top and a yarn tassel at the bottom. Light, easy, and adorable hanging décor? Absolutely.
10. Cardboard Coastal Quote Wall Art

Beachy, calming, and totally frame-worthy, this cardboard wall art proves recycled crafts can feel serene and stylish. The textured ocean layers and shells are chef’s kiss.
To DIY: Cut a large circle (10–12 inches) from cardboard. Paint layered ocean stripes using blue and turquoise acrylics with a sponge for texture. Write the quote with a black paint pen. Glue shells and pearl beads using strong craft glue. Seal with Mod Podge. Happiness really does come in waves.
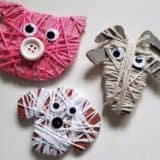
11. Cardboard Teddy Bear Masks on Sticks

These adorable teddy bear masks are giving sweet handmade nostalgia with a playful twist that kids absolutely love. The soft, rustic cardboard texture paired with rosy cheeks, tiny bows, and heart accents makes them perfect for pretend play, birthday parties, or Valentine’s Day crafts.
To DIY: Start by sketching a teddy bear face on sturdy corrugated cardboard, about 6–7 inches wide. Cut it out carefully with scissors or a craft knife. Punch or cut out two round eye holes. Paint the surface with white acrylic using a dry-brush technique so the cardboard texture shows through. Add cheeks, nose, mouth, and bow details with pink and black paint pens. Once dry, hot-glue a wooden craft stick to the back and reinforce with a small cardboard strip.
12. Fairy Cardboard Cottage

This fairy house is pure magical-core perfection. Covered in sparkle, soft pastel florals, and whimsical details, it looks like it belongs in a secret garden or fairy village straight out of a storybook. It’s the kind of craft that instantly sparks imaginative play and feels extra special sitting on a shelf or tucked under a tree outdoors.
To DIY: Cut cardboard panels to form a small box house (roughly 6x6x8 inches) and assemble using hot glue. Cover the walls with glitter cardstock or apply glitter glue evenly and let dry completely. Create a pitched roof using folded cardboard and trim the edges with gold pipe cleaners or glitter tape. Decorate with paper flowers, sequins, mini shutters, and cut-out doors.
13. Cardboard Horse Head Wall Art

These cardboard horse heads are rustic, bold, and unexpectedly artistic. With their sculptural shape and layered texture, they make a stunning wall feature for kids’ rooms, playrooms, or even farmhouse-style décor. It’s proof that cardboard can look truly elevated with the right details.
To DIY: Draw a horse head profile onto thick cardboard and cut out two identical shapes. Glue them together to create depth and strength. Add ears as separate pieces and attach with hot glue. Paint the base using brown, tan, and white acrylic paints, blending slightly for a natural look. Create the mane using yarn, fringed cardboard, or jute twine glued along the top edge.
14. Cardboard House Hanging Décor

This cheerful cardboard house hanging feels like a warm hug for your wall. Hand-painted details, cozy colors, and dangling geometric shapes give it that handmade charm that instantly makes a space feel more personal and welcoming. It’s cute without being cluttered and playful without being over-the-top.
To DIY: Cut a house silhouette from cardboard, about 10–12 inches tall. Paint the base color using acrylic paint and let it dry. Add details like bricks, fences, birds, and handwritten lettering with paint pens. Punch small holes along the bottom edge and tie yarn or twine through each hole. Attach cardboard triangles, moons, or beads to the ends as hanging charms. Add a rope loop at the top for hanging. Instant cozy vibes.
15. Cardboard Water Cycle Diorama

This cardboard water cycle diorama turns learning into a colorful, hands-on experience. With layered elements, floating raindrops, and clear labels, it makes science concepts easy to understand and visually exciting, perfect for school projects or curious little minds at home.
To DIY: Use a shoebox as the base and background. Paint or cover the inside with blue and green paper. Cut out clouds, a sun, water droplets, plants, and a river from cardboard or colored paper. Hang raindrops from thread or fishing line for a 3D effect. Glue everything in layers for depth and add labeled tags for evaporation, condensation, and precipitation. Educational and Pinterest-worthy? Big win.
16. Cardboard Multi-Level Parking Garage

This cardboard parking garage is a dream come true for little car lovers. With ramps, multiple levels, and painted road markings, it offers endless imaginative play while keeping toy cars organized in one fun setup.
To DIY: Build the base using a large cardboard tray or box lid. Stack additional cardboard platforms on top using paper towel rolls or folded cardboard supports. Create ramps from long cardboard strips folded slightly for strength. Secure everything with hot glue. Paint roads with grey acrylic paint and add yellow or white lines using masking tape.
17. Geometric Cardboard Wall Art with Florals

This geometric wall art is sleek, modern, and surprisingly bold for a cardboard craft. The sharp black lines contrast beautifully with soft white florals, making it feel high-end and gallery-inspired. It’s a total décor glow-up moment.
To DIY: Cut long cardboard strips (1–1.5 inches wide) and arrange them into overlapping geometric frames. Glue everything onto a flat cardboard backing. Paint the entire structure matte black and let dry fully. Create flowers using tissue paper or faux blooms and attach them at focal points with hot glue. Lightweight, dramatic, and perfect for modern interiors.
18. Cardboard Patchwork Teddy Bear

This patchwork teddy bear is heartfelt and cozy with a handmade, keepsake feel. The mix of cardboard and fabric scraps adds texture and personality, making it feel like a craft that’s meant to be treasured rather than tossed aside.
To DIY: Draw a large teddy bear shape (12–14 inches tall) on cardboard and cut it out. Outline the edges with a black marker. Glue fabric scraps, napkins, or patterned paper onto sections like the belly, scarf, and paws. Add painted details for the face and heart accents. Optional: seal with Mod Podge for durability. Perfect for seasonal décor or gifting with love.
19. Cardboard Animal Art Set

These playful cardboard animals are bursting with color, pattern, and personality. Each one feels like a mini art project, making them perfect for kids who love experimenting with shapes, textures, and mixed media.
To DIY: Cut animal shapes from cardboard think rabbits, owls, bears, or hedgehogs. Decorate using scrap paper, washi tape, paint, fabric bits, and markers. Layer pieces to add dimension and texture. Let everything dry and display as wall art or use them as storytelling characters. Creative freedom at its finest.
20. Cardboard Mini Scene Wall Frames

These tiny cardboard landscapes are calm, cozy, and beautifully detailed. Each miniature scene feels like a little story frozen in time, making them perfect for seasonal décor, gallery walls, or thoughtful handmade gifts.
To DIY: Cut cardboard circles about 4–5 inches wide. Layer small cut-outs of houses, hills, trees, and paths using cardboard scraps. Paint details with white acrylic or paint pens for a soft, snowy look. Mount inside shallow frames or create rings from rolled cardboard. Small-scale crafting with big aesthetic payoff—can you imagine a whole wall of these?
21. Cardboard Flower Garden Art

This sweet circular cardboard artwork feels like a tiny garden frozen in time. The layered flowers pop beautifully against the raw cardboard base, and that little ladybug detail? Absolute charm overload. It’s simple, earthy, and perfect for spring-themed décor or kids’ art displays.
To DIY: Cut a large circle from thick cardboard (about 8–10 inches wide). Create flowers by cutting petal shapes from cardboard or fabric scraps and layering them with a bead, button, or foam ball in the center. Paint stems and grass directly onto the base using acrylic paint. Finish with a tiny painted ladybug for a playful touch. Simple materials, big visual payoff love that.
22. Woodland Cardboard Shadow Box

This woodland scene is storytelling at its finest. With layered trees, forest animals, and natural textures like twigs and moss, it feels like a miniature stage straight out of a fairytale. Perfect for imaginative play or seasonal nature décor.
To DIY: Use a cardboard box as the base and trim the front open. Line the inside with kraft paper or paint it softly. Glue real twigs along the roof edge for a rustic cabin feel. Cut forest animals and trees from cardstock or printed paper, attach them to skewers, and anchor them inside with hot glue. Add moss or shredded paper on the base. A magical forest moment, right at home.
23. Cardboard Chicken Figurines

These quirky cardboard chickens are bursting with personality. The doodle-style designs, cork legs, and bright painted details make them fun, silly, and perfect for open-ended crafting with kids. Each one feels totally unique and that’s the magic.
To DIY: Draw a half-circle chicken body on cardboard and cut it out. Add a smaller wing shape and glue it on. Paint fun patterns using acrylic paints or paint pens. Attach googly eyes and a small cardboard beak. Insert wooden skewers or sticks into corks for legs and glue the body on top. Farm-themed fun that keeps little hands busy for ages.
24. Cardboard Yarn Portrait Art

This bold cardboard portrait is expressive, playful, and seriously creative. The textured yarn hair brings the whole face to life, turning simple cardboard into a mixed-media masterpiece that’s full of personality.
To DIY: Sketch a face onto a square piece of corrugated cardboard. Paint the skin tones and facial features using acrylic paint or markers. For hair and eyebrows, glue strands of yarn generously using white glue or hot glue. Add extra texture with layered cardboard for the nose or lips. Frame it or hang it as statement wall art instant conversation starter.
25. Daisy Sheep Cardboard Craft

This adorable sheep craft is soft, sweet, and totally spring-ready. Covered in real daisies, it feels playful and whimsical, perfect for nature-inspired crafting with kids. It’s one of those projects that looks extra magical outdoors.
To DIY: Cut a sheep shape from cardboard and paint it lightly if desired. Draw or paint the face with simple, cute features. Use fresh or faux daisies and glue them closely together across the body to create fluffy “wool.” Let everything dry flat. It’s a beautiful mix of nature and creativity pure joy.
26. Love Sheep Cardboard Card

This heartfelt cardboard sheep card is charming, cozy, and perfect for Valentine’s Day or anniversaries. The felt textures and tiny hearts make it feel handmade in the best way possible.
To DIY: Cut a square base from cardboard. Create sheep bodies using white felt or cotton cut into flower-like shapes. Add black felt faces, googly eyes, and thin wire or marker-drawn legs. Glue felt hearts around the sheep and add a small handwritten message. Sweet, simple, and guaranteed to make someone smile.
27. Firefly Learning Craft

This interactive firefly craft is both educational and adorable. With lift-up wings and a glowing belly, it’s perfect for teaching kids about insects while keeping learning fun and hands-on.
To DIY: Cut a firefly shape from cardboard. Attach wings using a brass fastener so they open and close. Paint details with acrylics or markers. Add yellow paper or translucent plastic underneath to mimic the glow. Label sight words or facts around it for learning play. Craft time meets classroom brilliance.
28. Cardboard Wall Hanging with Tassels

This colorful wall hanging is bold, festive, and full of movement. The geometric pattern paired with dangling tassels makes it a beautiful statement piece for festivals, kids’ rooms, or boho-inspired décor.
To DIY: Cut small square cardboard pieces and paint them in bright acrylic colors. Glue them into a diamond grid on a cardboard base. Add mirrors or sequins in the center of each square. Attach yarn tassels with beads at the bottom using strong glue. Hang with string or ribbon instant décor glow-up.
29. Cardboard Ramadan Play Set

This cardboard mosque play set is elegant, meaningful, and wonderfully minimal. With soft white painted details and architectural shapes, it’s perfect for storytelling, pretend play, or seasonal learning displays.
To DIY: Cut mosque shapes from cardboard panels and fold them to stand upright. Paint arches, windows, and outlines using white acrylic paint or paint pens. Add crescent moon cutouts on top using metallic paper. Arrange as a play scene or décor setup. Thoughtful crafting with heart.
30. Cardboard Dinosaur Egg Craft

These cardboard dinosaurs hatching from eggs are playful, clever, and totally irresistible. Using real eggshells adds a fun surprise element that kids absolutely love.
To DIY: Carefully crack and clean eggshells. Cut dinosaur shapes from cardboard and slot them so the egg fits in the center as the body. Add small cardboard legs, tails, and heads. Draw eyes with a marker. Display in shredded paper “nests.” A creative upcycle that’s prehistoric perfection.
31. Cardboard Bunny Spring Friends

These sleepy-eyed cardboard bunnies are pure springtime sweetness soft colors, fuzzy details, and total storybook vibes. Perfect for Easter shelves, playroom corners, or a seasonal table that needs a little aww. Can you imagine a whole bunny village?
Cut bunny silhouettes from corrugated cardboard (about 6–7 inches tall), then paint with acrylics in soft neutrals. Add ears from cardstock, cheeks with paint pens, and tiny pom-poms for tails using hot glue. Flowers and carrots are simple paper cutouts glued into their paws. Let paint dry 20 minutes between layers for crisp edges. Yes, please!
32. Mini Cardboard Wall Hangings

Tiny, colorful, and totally folk-art coded these mini cardboard hangings are small but mighty. They pop beautifully on gallery walls, door handles, or as festive accents for any cozy nook. Instant charm, zero clutter.
Cut thick cardboard into arched shapes (roughly 4×5 inches), paint with acrylic colors, and decorate using dotting tools or cotton swabs dipped in white paint. Punch a hole at the bottom and tie in yarn tassels about 3 inches long. Seal with matte Mod Podge and let dry for 1 hour. Obsessed already?
33. Cardboard Bird Wind Chime

These hand-painted cardboard birds feel like they flew straight out of a happy courtyard. Bright colors, playful patterns, and gentle movement make this a joyful decor moment for balconies or windows. Chirp-chic energy only!
Trace bird shapes onto sturdy cardboard, cut out, and paint both sides with acrylic paint. Add white detailing using a fine paint pen. Thread birds vertically on jute string with felt balls in between, finishing with small metal bells at the bottom. Secure knots with a dab of hot glue. Can you hear the compliments ringing?
34. Tribal-Inspired Cardboard Wall Art

Bold, graphic, and dripping with cultural flair this cardboard wall art is a total statement piece. It’s the kind of decor that makes guests lean in closer and ask, “Wait… that’s cardboard?!”
Layer cut cardboard shapes for the face, hands, and jewelry, then paint using matte black, terracotta, gold, and jewel tones. Outline details with metallic gold paint or a liner brush. Mount on a wooden dowel using strong craft glue and let cure overnight. Drama? Delivered.
35. Cardboard Dollhouse Dream

This cardboard dollhouse is architectural eye candy tiny windows, layered roofs, and landscaping details that feel straight out of a fairytale. It’s a showstopper for kids and adults who love miniatures.
Use corrugated cardboard sheets for walls and roofs, cutting pieces with a craft knife and metal ruler. Assemble using hot glue, reinforcing corners with strips of cardboard inside. Add roof tiles from scalloped cutouts and tiny fences from popsicle sticks. Paint or leave natural for a cozy neutral look. Mini mansion moment!
36. Cardboard House Play Set

Clean lines, cozy vibes, and endless play potential this cardboard house is minimalist magic. Perfect for pretend play, shelf decor, or as a base for kids to customize their own dream home.
Cut box cardboard into wall panels and a pitched roof, scoring fold lines with a blunt knife. Glue together with hot glue, then add windows and doors using layered cutouts. Felt or foam sheets make adorable bushes and flowers. Let kids paint it for a full creative win. Adorable overload!
37. Nature Bug Cardboard Craft

This leaf-winged cardboard bug is hands-on, eco-friendly, and toddler-approved. It’s messy in the best way and turns a nature walk into craft-time gold. Learning + crafting = parent win.
Cut a simple bug shape from cardboard (about 8 inches tall), then glue on real leaves for wings using white school glue. Add twigs or stems for body segments and draw a face with markers. Let everything air-dry flat for 30–40 minutes. Who knew cardboard could be this cute?