Handmade birthday cards just hit a new level. These 29 DIY birthday card ideas showcase chic layouts, elevated embellishments, and polished designs that look boutique-made. If you’re aiming for birthday wishes that feel thoughtful, refined, and visually striking, you’ll find endless inspiration right here.

29 DIY Birthday Card Ideas That Make Every Celebration Feel Extra Special in 2026
Handmade birthday cards are stealing the spotlight in 2026, turning simple paper and craft supplies into heartfelt keepsakes that feel personal and memorable. Even basic designs look impressive when layered with texture, color, and a thoughtful touch.
This collection 29 DIY Birthday Card Ideas highlights creative card ideas featuring playful layouts, charming details, and eye catching elements that bring joy the moment they’re opened. Expect designs that feel festive, fun, and wonderfully easy to customize for anyone you’re celebrating.
1. Flower Cone Birthday Card

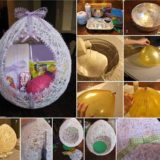
This handmade birthday card takes the shape of a paper flower cone, turning a simple greeting into something that feels thoughtful and gift-like. The cone design naturally draws attention upward, where clusters of pink flowers create the impression of a bouquet being presented rather than just a flat card. The dark background works as a strong base that allows the floral colors and handwritten lettering to stand out with clarity.
To create this card, begin by cutting black cardstock into a wide triangular shape and folding the sides inward to form a cone. Small flower shapes can be hand-drawn, colored, or cut from patterned paper and layered along the top edge. A white pen or marker works well for writing the birthday message across the front. Finish the card by tying a soft ribbon around the lower portion of the cone, which helps hold the shape and adds a gift-like detail.
2. Polka Dot Birthday Card

This birthday card uses repetition and color placement to create a design that feels full without becoming crowded. The polka dots surround the greeting in a way that frames the message and adds energy to the layout. Each dot brings its own pop of color, making the card feel playful and welcoming.
Start with a neutral card base so the colors remain the focus. Cut or punch circles from different shades of cardstock and arrange them across the front with even spacing. The birthday message can be stamped, embossed, or hand-lettered in the center.
3. Layered Paper Pocket Birthday Card

This card goes beyond a single message by incorporating layers, folds, and a small pocket, turning it into a keepsake rather than a simple greeting. The combination of torn paper edges, soft color tones, and handwritten notes gives the card a personal feel that works well for close friends or family members.
To make this style of card, begin with a tall folded base. Add layered panels using different paper textures such as kraft paper, scrapbook paper, or lightly colored cardstock. A small pocket can be created by folding a rectangle of paper and attaching three sides to the card.
4. Candle Cut-Out Birthday Card

This birthday card turns candles into the main visual feature, using shape and color to communicate the celebration theme without needing many extra decorations. The candles stand upright across the card, creating a sense of height and structure that mirrors a real birthday cake display.
To recreate this idea, cut candle shapes from colored cardstock and glue them in a neat row onto the card front. Add small flame shapes at the top using contrasting paper. A bold banner placed across the center carries the birthday message and helps connect all the elements into one design. Foam tape can be used under the banner to add depth.
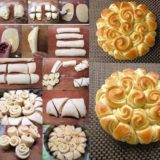
5. Cake Pop-Up Birthday Card

This pop-up birthday card opens into a layered cake scene that feels playful and memorable. The design transforms the card into a small display, making it enjoyable both to open and to stand up for viewing. Before finishing, test the folds to ensure the card opens and closes without bending the decorations.
Begin by cutting cake layers in different widths and stacking them inside the card using folded paper supports. Each layer can be decorated with paper frosting details, candles, or small shapes. Balloons and flowers add charm without overwhelming the cake.
6. Butterfly and Heart Birthday Cards

These cards use repeated butterfly and heart shapes to guide the viewer’s eye across the card surface. The shapes add movement and softness while keeping the design easy to follow. The layout allows space for the greeting while still feeling full.
To create this look, cut butterflies or hearts from colored cardstock and arrange them in a diagonal or cascading pattern. Small foam dots can be placed behind some shapes to give slight lift. The birthday message fits best in the open area left by the pattern, ensuring the text remains clear.
7. Floral HBD Card with Textured Background

This card combines layered paper flowers with a textured background, giving it a handcrafted and artistic appearance. The short “HBD” message keeps the focus on the visual elements rather than long text. Inside the pocket, include a note or tag for an extra surprise.
Start by creating texture on the background using paint, ink, or stamping techniques. Cut flower shapes from cardstock and layer them with glue, adding centers made from paper or small embellishments. A simple label placed near the bottom holds the message and anchors the design.
8. Balloon String Birthday Card

This card uses balloons and real string or thread to create a gentle sense of movement. The strings draw attention from the top of the card down to the message, giving the design a natural flow. Twine or string wrapped around the card keeps everything together and adds a handmade touch.
Cut balloon shapes from patterned or solid paper and attach them near the top. Glue thread or embroidery floss beneath each balloon to act as strings. The birthday greeting can be written below the balloons, leaving enough space so the strings remain visible.
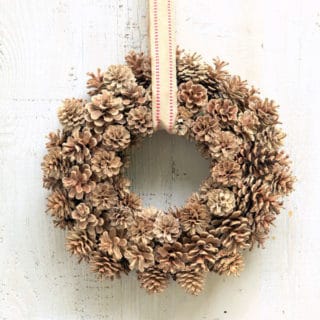
9. Dried Flower Birthday Card

This birthday card uses dried flowers to bring a natural and organic feel to the design. The kraft paper background supports the flowers without distracting from their texture and shape. Allow time for the glue to set before handling.
To make this card, attach a small bundle of dried flowers to the card front using strong adhesive. Wrap a ribbon or twine around the stems to hold them together. A paper strip stamped with “Happy Birthday” can be placed across the flowers or just below them.
10. Accordion Fold Birthday Card

This accordion-style card expands outward to reveal a message spread across several panels. The fold itself becomes part of the design, making the card feel interactive and engaging.
Cut a long strip of cardstock and fold it into equal sections. Write one letter of “Happy Birthday” on each panel using markers or paint pens. Add small illustrations like balloons or candles between letters to fill space. Attach backing panels to both ends so the card holds its shape when displayed.
11. Lace-Trim Kraft Birthday Card

This birthday card leans into a calm, handmade feel by combining kraft paper with delicate lace details and soft twine accents. The neutral tones give the design a timeless look, while the handwritten lettering adds personality and warmth. Everything about this card feels slow, thoughtful, and intentional, like something made during a quiet crafting afternoon.
To recreate this card, start with a kraft cardstock base cut to standard size. Trim a paper doily and glue it diagonally across one corner so it feels tucked rather than centered. Wrap jute twine around the card and tie it at the front, adding a small kraft paper heart as a tag. Write “Happy Birthday” using a brush pen or marker in the open space to keep the layout balanced.
12. Envelope Butterfly Surprise Card

This card turns the front into an envelope-style pocket filled with small paper butterflies, creating a sense of surprise and movement. When the card opens, the layered butterflies feel like they are lifting upward, which makes the design memorable without being complicated.
Begin with a square kraft or colored card base. Cut a simple envelope shape from black or dark paper and glue it flat onto the front. Create small butterfly shapes from pastel paper and arrange them so they appear to be coming out of the envelope. Add a narrow sentiment strip near the bottom and keep the inside message simple so the front remains the focus.
13. Hand-Drawn Balloon Birthday Card

This birthday card uses hand-drawn balloons and lettering to create a design that feels personal and expressive. Each balloon has its own pattern, which adds variety while keeping the theme clear and celebratory. The open background gives the artwork space to breathe.
To make this card, start with textured white cardstock. Draw balloon shapes near the top using a black pen, then fill them with colored pencils or markers using simple patterns like stripes and dots. Add loose string lines below each balloon. Write “Happy Birthday” across the center using a brush pen, allowing the letters to overlap slightly for a natural look.
14. Pop-Up Gift Box Birthday Card

This bold pop-up card opens to reveal a row of paper gift boxes, instantly turning the card into a display piece. The strong color contrast helps the shapes stand out and gives the card a festive presence.
To create this design, fold a card base and cut rectangular pop-up steps inside. Build small box shapes from colored cardstock and attach them to the steps so they stand upright when opened. Add thin strips of paper for ribbon details. Place a large “Happy Birthday” message on the back panel so it appears framed by the gifts.
15. Layered Cake Window Card

This card uses cut-out windows to reveal a cake design beneath, giving depth and a sense of reveal. The candles and balloon details guide the eye upward, reinforcing the birthday theme without overcrowding the card.
Start with a thick colored cardstock base. Cut two curved windows on the front panel and back them with white paper for contrast. Inside, layer cake shapes and candles using foam tape for separation. Add balloon shapes on one side using string or thread to connect them visually to the message.
16. Banner Fold Birthday Card

This birthday card opens to reveal a paper banner that stretches across the inside, creating a party-like feeling the moment it is opened. The banner letters feel playful and handmade, which makes the card feel friendly and approachable.
Cut small flag shapes from cardstock and punch holes at the top of each one. String them together with twine to spell “Happy Birthday.” Glue the string ends to the inside of the card so the banner hangs naturally. Keep the front simple so the surprise happens inside.
17. Cake Illustration Birthday Card

This card features a centered cake illustration against a dark background, which makes the colors stand out clearly. The simple drawing style keeps the design clean, while small white marks add texture and contrast.
Use black cardstock as the base. Draw the cake shape on white paper, color it with pencils or crayons, and cut it out neatly. Glue it to the center of the card and add stitched borders using a white gel pen. Write “Happy Birthday” directly onto the cake layers for clarity.
18. Stationery-Themed Birthday Card

This card feels modern and cheerful, combining bright paper, layered elements, and a clean layout. The cake image acts as a focal point while the surrounding colors support the theme without distracting from it.
Begin with a yellow or pastel card base. Layer patterned paper behind a cake illustration or sticker. Add small embellishments like sequins or dots near the edges. Keep the greeting short and placed near the bottom so the design stays grounded.
19. Gingham Floral Birthday Card

This birthday card pairs a gingham background with layered paper flowers, creating a soft and welcoming design. The repeated flower shapes add depth while keeping the layout organized and easy to read. Leaving some open space between the dots keeps the design balanced and easy to read.
Start with a gingham patterned paper panel attached to a white card base. Cut daisy shapes from white cardstock and layer yellow and black circles for centers. Attach the flowers using foam dots so they sit above the background.
20. Layered Floral Frame Birthday Card

This card uses layered flowers and leaves arranged around a circular greeting, giving it a framed look. The soft color palette keeps the design calm while the layered pieces add interest through depth. Add the greeting in script lettering on the side to balance the layout.
Create a textured background panel and attach it to a white card base. Cut flower and leaf shapes from pastel cardstock and arrange them around a circle cut-out or stitched circle. Secure each layer with glue or foam tape. Place the birthday message in the center so it becomes the anchor for the entire design.
21. Tea Cup Message Birthday Card

This birthday card feels playful and heartfelt, using a cheerful tea cup illustration as the centerpiece while turning a simple message into a charming visual moment. The dangling tea tag adds interaction, making the card feel personal and thoughtful, as if the message was brewed just for the recipient.
To recreate this design, start with a black cardstock base trimmed to a rounded square. Draw or paint a bright tea cup using acrylic paint or markers, outlining it clearly so it stands out against the dark background. Cut a small tag shape from cream paper, write the message by hand, and attach it with white string through a punched hole.
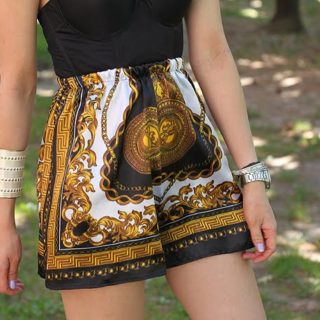
22. Fabric Dress Birthday Card

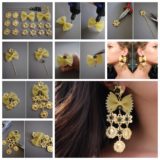
This card turns mixed materials into a miniature fashion moment by combining paper and fabric to form a delicate dress design. The soft lace skirt adds texture and dimension, giving the card a keepsake quality rather than a flat paper design.
Begin with a bold cardstock base in red or deep pink. Cut a simple dress bodice shape from matching paper and glue it near the center. Gather lace or net fabric and attach it below the bodice to form the skirt, securing it neatly with glue. Add small pearl embellishments at the neckline and place a handwritten birthday label in the corner to complete the look.
23. Standing Pop-Up Cake Card

This birthday card opens into a layered, upright cake that feels festive and structured. The stepped design gives the card depth and allows the cake illustration to take center stage, making it ideal for display on a shelf or desk.
To make this card, fold a sturdy card base and cut inner panels that allow the center section to stand. Create a cake illustration on separate paper using colored pencils or watercolor, then cut it out cleanly. Attach it to the standing panel with foam tape. Add small stars and accents on the side panels to frame the cake and guide attention inward.
24. Hexagon Fold Birthday Card

This card stands out through its geometric shape, instantly catching attention before it is even opened. The ribbon tie adds elegance, while the layered strips bring balance and symmetry to the overall design. Finish with hand-lettered “Happy Birthday” text at the bottom for a warm, handmade touch.
Cut the card base into a hexagon shape using a template. Layer patterned paper strips vertically along both sides, leaving space in the center for the greeting. Attach a sheer ribbon on one edge so the card ties closed. Add small floral cutouts near the center to soften the geometry and keep the design welcoming.
25. Minimal Kraft Birthday Card Set

These birthday cards use natural materials and simple layouts to create a calm, handmade look. The kraft paper background works beautifully with neutral embellishments, making the designs feel timeless and easy to personalize.
Use kraft cardstock as the base for each card. Add simple cut-out shapes such as balloons, gift boxes, or banners using white or muted paper. Attach twine or thread for details like strings or bows. Handwrite the birthday message using black ink to maintain the clean aesthetic.
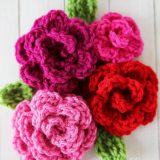
26. Soft Floral Frame Birthday Card

This birthday card layers soft florals over a framed background, creating a gentle and refined design that feels suitable for any age. The muted pinks and greens bring warmth without overwhelming the composition.
Start with a pale cardstock base and layer a slightly smaller patterned panel on top. Create flower shapes from pastel cardstock and arrange them vertically along one side. Add texture using light ink stamping or embossing behind the flowers. Finish with a small sentiment label centered within the frame to anchor the design.
27. Pressed Flower Envelope Card

Soft, romantic, and oh-so-keepsake-worthy, this card is basically a love letter dressed up for a birthday party. The dried florals tucked into a hand-drawn envelope feel vintage-meets-modern, and that tiny butterfly detail? Absolute main character energy. This is the kind of card that never gets thrown away it gets displayed.
To recreate it, start with heavyweight cream cardstock (A6 size works beautifully). Lightly sketch an envelope outline using a fine-tip brown or sepia pen. Arrange pressed or dried flowers (baby’s breath or mini florals work best) and secure them with clear-drying craft glue or a tiny dot of hot glue at the stems. Add hand-lettered text with a brush pen, then finish with a wax seal sticker or small embellishment. Let everything dry for 10–15 minutes before tying with decorative twine. Can you feel the charm already?
28. Pom-Pom Party Birthday Cards

Colorful, playful, and bursting with birthday cheer these cards are basically a confetti pop in paper form. From fluffy pom-pom candles to balloon bundles, each design feels kid-approved but secretly Pinterest-perfected. Bright colors + texture = instant smile.
Grab white cardstock, colorful craft paper, mini pom-poms, and double-sided foam tape. Cut simple shapes (candles, balloons, cakes) from paper, then layer them onto the card front using foam tape for dimension. Glue pom-poms on top with tacky glue and let set for about 5 minutes. Finish with a black gel pen for doodle details and a bold “Happy Birthday” sentiment. Easy, cheerful, and totally batchable for party season — yes please!
29. Pop-Up Cupcake Birthday Card

Bold, graphic, and delightfully interactive, this pop-up card brings the party literally off the page. Neon cupcakes, gift boxes, and chunky lettering give it a fun, modern vibe that feels like a mini celebration when opened. It’s the kind of card kids (and adults) open twice just for fun.
Use black cardstock for the base and bright foam or construction paper for the cupcakes and gifts. Cut cupcake shapes approximately 3×4 inches and layer frosting details with contrasting colors using a glue stick or craft glue. For the pop-up section, fold a 1-inch tab inside the card and attach elements with strong double-sided tape. Add die-cut or foam-letter “HAPPY BIRTHDAY” text to the inside panel.