Get your hands messy and your imagination running wild! These 28 DIY clay ideas are bursting with color and charm from tiny animals and fruit magnets to fun home décor pieces that make crafting feel like pure joy.

28 DIY Clay Ideas That Are Simply Beautiful in 2025
Get ready to roll, shape, and sculpt your way into a world of creativity. Clay crafting is the ultimate hands-on escape, messy in the best way and endlessly rewarding. Picture glossy trinket dishes swirling with marble tones, dainty jewelry charms shaped like moons and hearts, or modern vases that look straight out of a boutique. It’s art therapy, home décor, and pure fun all at once.
These 28 DIY clay ideas are bold, beautiful, and bursting with personality. From boho-inspired wall art and custom ornaments to dreamy ring holders and elegant candle trays, every project transforms a lump of clay into something extraordinary. Whether you’re crafting gifts or creating for yourself, these ideas will have you feeling like an artist in your own studio.
1. Mini Kawaii Critters

Tiny, round, and full of squishy charm these clay cuties are total serotonin in sculpted form! Picture a handful of pastel-colored animal blobs (yes, blobs, but make them adorable) sitting on your desk or turned into keychains. Each one has its own quirky face and chubby little paws total “aww” overload.
To make them, grab some polymer clay in soft pastel tones. Shape small ovals for bodies, then pinch and attach mini limbs, ears, and tummies using a dot of liquid clay as adhesive. Use a toothpick or needle tool to draw faces, then bake at 275°F (135°C) for about 15 minutes. Add a glossy finish with varnish instant charm squad, ready to go!
2. Sweet Cat Figurine

This little cat looks straight out of a pastel dream big eyes, cheeky tongue, and that anime-level adorableness. Perfect as a desk buddy or cake topper, it’s the kind of clay creation that practically purrs personality.
Start with white polymer clay for the base. Form a round head and a smaller body, then add black ears, tail, and whiskers from thin clay rolls. The pink tongue is just a tiny teardrop-shaped clay bit pressed in. Bake at 275°F for 20 minutes, then seal with a satin glaze for that soft sheen. Too cute not to make multiples!
3. Floral Mirror Frame

Mirror, mirror on the wall who’s the most colorful of them all? You, after making this adorable clay flower mirror! The rainbow petals pop against the reflective surface, giving your vanity or wall a total fairy-core glow-up.
You’ll need a plain round mirror, assorted polymer clay colors, and super glue. Shape small clay petals and leaves, assemble into flowers, and bake on parchment paper for 10–15 minutes. Once cooled, glue them around the edge of your mirror. Bonus tip: mix a few metallic clays for shimmery petals. Studio-style selfie station? Yes, please!
4. Mini Clay Flower Bouquet

Who needs fresh flowers when you can sculpt a bouquet that never wilts? These tiny blossoms are so cheerful and bright the perfect little accessory for your shelf, photo frame, or even a fridge magnet.
Roll small yellow clay balls for flower centers and press tinier petals around them. Shape leaves from green clay and attach everything to a black vase base. For tulips, roll pink and red teardrops, pinch them together at the top, and add stems. Bake for 15 minutes and glue to a pin back or magnet. Instant happiness, handmade style!
5. Bunny Candy Holder

This Easter-ready bunny holding a carrot candy tube is so darling, you’ll want to gift it and keep one for yourself! It’s playful, pastel, and totally Insta-worthy with its glossy candies peeking through.
You’ll need polymer clay in white, orange, green, and skin tones. Sculpt the bunny hugging a small plastic tube, adding a carrot cap to one end. Use a shaping tool for the face and tiny details, then bake at 275°F for 20 minutes. Once cooled, fill the tube with colorful candies, a perfect festive party favor!
6. Leaf Trinket Dish

Nature meets shimmer in this gorgeous leaf-shaped clay dish. With metallic green and gold accents, it’s giving “enchanted forest meets glam vanity.” Perfect for rings, earrings, or just as a decorative accent.
Roll out air-dry clay and cut a leaf shape about 4 inches long. Etch veins using a toothpick, curve the edges upward slightly, and let dry for 24 hours. Once hardened, paint with metallic green acrylic and brush gold along the edges for a luxe finish. Seal with Mod Podge pure leafy magic!
7. Mini Mermaid Charms

Mermaid lovers, this one’s for you! These tiny mermaid figures are giving major underwater fantasy vibes think sparkling tails, flowing red hair, and just the right amount of whimsy. They’re perfect for resin keychains, jewelry, or decor that brings a splash of the sea into your space.
To create them, use polymer clay in skin tone, red, green, and lavender. Start with the body roll a small cylinder for the torso and shape a tail with fin details using a blade or sculpting tool. Add delicate hair strands by rolling thin ropes of clay and curling them around the head for movement. Attach the pieces together with liquid clay, then bake for 20 minutes at 275°F. Once cooled, dust the tail with pearlescent powder or glitter for shimmer. These mermaids are totally ready for their next shell-fie!
8. Alice-Inspired Clay Doll

Step straight into Wonderland with this utterly adorable Alice-inspired clay doll! She’s bright, whimsical, and full of charm from her big blue eyes to her sweet little apron. Whether displayed on a shelf or used as a keepsake topper, she’s a perfect piece for any fairytale fan.
For this project, use polymer clay in blue, white, yellow, and black. Sculpt the body first dress, apron, and shoes included then roll thin strips of yellow clay for those luscious curls. Use fine sculpting tools to add folds, lashes, and facial details. Don’t forget her signature bow! Bake the completed doll for 20 minutes at 275°F, then brush on a light gloss glaze for a polished finish. It’s giving classic storybook chic and she’s ready for tea with the Mad Hatter!
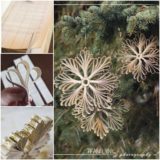
9. Mini Owl Wall Hanging

Wise, whimsical, and a little bit quirky this clay owl wall hanging is pure handmade magic! With its bold colors and simple shape, it’s perfect for rustic home decor or a fun kids’ craft session. Hang it by your desk, on a doorknob, or as part of a woodland-themed wall display.
Start with air-dry clay and form an oval for the owl’s head. Add small ear points by pinching the top edges and use a sculpting tool to define feather textures. Once dry, paint the face in yellow and brown acrylics, then add those big, expressive eyes using white and blue paint. Before drying, insert a small loop of jute or twine at the top for hanging. When it’s all dry, finish with a coat of varnish. Rustic charm with a side of whimsy? Absolutely
10. Pink Tulip Planter

A patch of pink tulips that’ll never fade? Yes, please! This mini clay planter is pure spring joy dainty petals, lush stems, and a faux terracotta base that looks straight from a cottage windowsill.
Roll pink polymer clay into teardrops for tulip buds, then blend the tips with soft white chalk pastel. Insert green clay stems using toothpicks for structure. Set them in a small rectangular box lined with orange clay “soil.” Bake everything separately, then assemble with strong glue. Hello, forever bloom garden!
11. Heart Egg Holder

Okay, this clay egg holder is the breakfast table upgrade we didn’t know we needed! It’s minimalist, adorable, and hand-painted with teeny red hearts that practically say “made with love.” Whether you’re serving soft-boiled eggs for brunch or just styling your kitchen counter, this is the kind of simple DIY that turns everyday moments into something Pinterest-pretty.
To make it, grab some air-dry clay and roll it out to about ¼ inch thick. Use a cup or small bowl to mark and press two circular indents for the eggs to sit snugly. Trim the edges into a soft rectangle and smooth them out with a damp sponge. Once it’s dry (around 24 hours), paint scattered hearts using a fine brush and red acrylic paint. Seal it with clear varnish to make it water-resistant. Breakfast just got handcrafted and heart-filled!
12. Wall Clay Flower Vases

Welcome to the ultimate wall art-meets-botanical dream! These clay wall vases are chic, artsy, and so spring-coded that they make your walls look like they’re blooming. Perfect for holding dried flowers, faux greens, or even real blooms if you slip a small test tube inside this DIY feels straight out of a design magazine.
Start with air-dry clay and roll out an oval or oblong base (roughly 8×4 inches). Mold a mini vase shape separately anything from sleek stripes to polka dots and gently attach it to the base using clay slip or water to blend the seams. Create a small hole at the top for hanging before drying. Once hardened, paint each one in pastel tones like mint, blush, or cream, and accent with gold leaf or stripes. Add your favorite flowers, hang a few in a cluster, and ta-da instant gallery wall magic!
13. Froggie Heart Earrings

These frog heart earrings are proof that clay jewelry can be both adorable and statement-making! Bright green frogs with pink hearts a total serotonin hit for your ears. They’re playful, charming, and perfect for anyone who loves handmade accessories that make people smile.
Roll out polymer clay in a fresh green shade and cut two matching frog shapes (roughly 1 inch each). For the hearts, roll pink clay flat and use a tiny cutter or freehand a heart to press into each frog’s belly. Use a needle tool to poke holes for the earring hooks, then bake at 275°F for 15 minutes. Once cool, attach metal hooks using jump rings. Add a glossy glaze for a candy-like finish. These little cuties hop straight into “favorite accessory” status no question.
14. Kawaii Decoden Case

This dreamy, over-the-top clay creation is every kawaii lover’s fantasy come to life! Think pastel swirls, miniature bows, characters, and candy textures piled high like the sweetest dessert. It’s perfect for decorating pencil boxes, phone cases, or organizers pure eye candy that’ll make you squeal with joy.
Start by spreading a layer of soft air-dry clay tinted with pastel paint (think lilac, baby pink, and cotton-candy hues). Pipe faux whipped cream using silicone caulk tinted with acrylic paint and swirl it around with a piping tip for that sugary look. Add pre-made mini clay charms bows, bunnies, hearts, or character pieces while it’s still soft. Let dry for 24 hours to harden, and boom a totally personalized, dreamy piece that screams “cute chaos.” It’s maximalist in the best way.
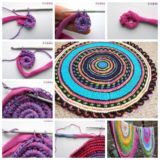
15. Mandala Clay Plate & Pot

Bright, patterned, and oh-so-meditative this mandala clay art duo brings instant zen to your space. The perfect mix of craft and calm, it’s giving boho home decor goals with every colorful dot and petal.
Start with plain clay plates or air-dry clay molded into simple discs and vases. Once dried and sanded smooth, grab your dotting tools and acrylic paints in yellow, blue, green, and teal. Start from the center, working your way outward with symmetrical dots and rings. Keep your hand steady and let your inner artist take over! Once finished, seal with clear varnish for durability. Whether you display it as wall art or on a side table, it radiates color, creativity, and total handmade charm.
16. Cute Blonde Clay Doll

This tiny clay doll is pure sass and sweetness rolled into one! With her long braid, sparkly shoes, and stylish overalls, she looks like she just stepped out of a dreamy handmade boutique. Perfect for collectors, decor, or gifting to someone special.
Use polymer clay in skin tone, blonde, and denim-blue shades. Shape the head and torso first, adding small arms and legs. Roll out thin strands for her flowing hair and braid them before attaching with liquid clay. Add texture to her overalls with a needle tool, and use a dusting of chalk pastel to give her cheeks a soft blush. Bake at 275°F for 20 minutes, let cool, then add glitter accents on the shoes and a satin glaze for a pro finish. Handmade glam? 100%.
17. Mini Snowman Decoration

This jolly little snowman is straight out of a winter wonderland scarf, hat, and all! It’s the perfect holiday DIY for your desk, tree ornaments, or mini dioramas. And the best part? No melting involved!
Grab white air-dry clay and form two stacked spheres for the body. Add black clay dots for buttons and eyes, and shape a tiny orange carrot nose. For the hat and scarf, roll out red clay and imprint texture with a fabric scrap or toothpick to mimic knit patterns. Assemble the pieces, press gently together, and let dry for 24 hours. Paint small details if needed and seal with varnish. Cute, festive, and made for holiday cheer let it snow (indoors)!
18. Mini Clay Donut Charm

A pink frosted clay donut that looks good enough to eat? Yes, please! This adorable charm is the perfect project for beginners simple, quick, and totally customizable. Clip it to your keys, phone case, or backpack for that touch of sweet whimsy.
Start with beige polymer clay for the donut base. Roll a small ball, flatten slightly, and poke a hole in the center with a straw or sculpting tool. Add a layer of pink clay “frosting” and blend the edges softly for that drippy look. Decorate with tiny pastel sprinkles rolled-out pieces of clay sliced into mini bits. Bake at 275°F for 10–15 minutes, cool, and add a glossy glaze. It’s mini, it’s cute, it’s the zero-calorie dessert you’ll love forever!
19. Whipped Flame Cake Sculpture

This fiery little clay cake is turning up the heat literally! With red and yellow piped “flames” that look like frosting from a fantasy bakery, it’s the perfect miniature for collectors, decor, or faux dessert displays.
Form a base with white polymer clay shaped into a mini cake cylinder. Use piping tips and tinted silicone caulk or air-dry clay whipped with cornstarch for the “frosting.” Layer the red and yellow swirls on top, blending them for a flame effect. Add tiny clay pearls or beads around the base for a finishing touch. Once dry, coat with glossy Mod Podge to seal and add shine. The result? A little cake with big drama it’s serving sugar, spice, and handmade nice!
20. “Believe in Your Dreams” Wall Plaque

This inspirational clay wall plaque is the perfect blend of bold color, positive energy, and artsy texture. With its vivid orange-yellow backdrop and leafy green clay succulents, it’s basically sunshine for your walls plus a daily dose of motivation!
Use a wooden board or recycled cutting board as your base. Paint it with warm acrylic gradients (sunset shades of orange, coral, and gold). Mix air-dry clay to sculpt small cacti and a planter pot add detail with a toothpick for texture. Once the clay dries, glue it to the board and paint highlights for dimension. Add a rope border for that handmade finish, and stencil or stick on your favorite quote (“Believe in your dreams” never fails!). Hang it where you’ll see it every morning your wall just got a motivational makeover.
21. Mini Clay Cars & Hearts

Who says tiny can’t be fabulous? These mini clay cars and heart charms are bursting with cheerful colors and retro vibes like a candy-colored parade rolling right across your desk. Each one looks hand-painted with personality, giving you that “made with love” energy that mass-produced trinkets could never match.
To make them, grab air-dry clay or polymer clay in your favorite hues and shape little cars about 1.5–2 inches long using your fingers or a sculpting tool. Roll out tiny circles for wheels, hearts, or even palettes if you’re feeling artsy. Let them dry completely, then paint with glossy acrylics add white highlights for a cartoon pop! Finish with a clear gloss sealer or Mod Podge for that irresistible shine. Stick magnets to the back, turn them into pins, or scatter them around your workspace for instant happy energy.
22. Heart Bouquet Sculpture

A bouquet that never wilts and stays just as adorable forever? Sign us up! This clay heart bouquet is giving total romantic energy the kind of handmade magic that makes you want to put on a rom-com soundtrack and craft your heart out. It’s simple, colorful, and the sweetest little statement piece for your desk or shelf.
To create your own, start with red air-dry clay. Roll small chunks into puffy hearts (about the size of a grape), then press bamboo skewers into the base of each one before they dry. For the stand, shape a thicker heart about 1 inch deep this will hold your bouquet. Stick the skewers in while the clay is still soft, then let everything air dry overnight. Once hardened, paint everything a bold red or pink, add metallic or white detailing with paint pens, and seal it all with a satin varnish. It’s the cutest handmade love note ever no florist required!
23. Adorable Clay Zoo

Warning: serious cuteness overload ahead. This little clay zoo looks like it just bounced out of a children’s storybook think penguins with blushing cheeks, chubby giraffes, and whales with happy faces. Perfect for kids’ craft time, classroom décor, or even turning into magnets or charms for backpacks.
Start with colored polymer or air-dry clay and shape your base animals using simple ovals and spheres. Attach limbs, ears, or tails by lightly pressing and smoothing them together with your fingers (a drop of water helps air-dry clay stick better). Use a toothpick for tiny lines and texture — like fur, feathers, or facial expressions. Once dry, paint each with acrylics and add gloss sealer for a shiny toy finish. Arrange them on a display tray, or gift them in sets — one clay animal for every mood!
24. Leaf Palette Holders

Bring a breath of fresh air to your art table with these elegant clay leaf brush rests. They’re minimalist, functional, and seriously gorgeous like something straight out of a boutique pottery studio. Plus, they double as mini paint palettes, spoon rests, or jewelry trays. A multitasker moment, yes please!
Roll out air-dry clay to about ⅛-inch thickness on wax paper, then cut leaf shapes using a craft knife or leaf-shaped cutter. Press a real leaf over the surface to capture natural vein details, then gently lift it away. Once dry, paint in your favorite colors think sage green, blush pink, or terracotta and outline the edges in metallic gold or bronze. Seal with matte varnish for durability. Whether you’re painting or just styling your desk, these little leaves will make your space feel like an artful garden.
25. Miniature Picnic Scene

This dreamy clay diorama looks like a storybook picnic come to life complete with tiny characters, sparkly grass, and dainty flowers. It’s part whimsical art piece, part keepsake, and all kinds of magical. Imagine it sitting on your dresser or shelf, catching the light with every little shimmer.
To make it, flatten a ball of molding clay into a round base about 4 inches wide, shaping gentle edges to look like grass. Sculpt mini items a campfire, picnic blanket, or tiny figure with air-dry clay, then arrange them on the base before the clay hardens. Once everything’s dry, paint with acrylics: bright greens for grass, golden yellows for details, and a sprinkle of glitter or shimmer paint for that “enchanted meadow” vibe. Add faux pearls or microbeads around the edge for texture. It’s basically a fairytale, just handmade!
26. Trio of Clay Ducks

Simple, elegant, and ridiculously charming these hand-sculpted ducks are the definition of cozy cottagecore. They’re sleek enough for a minimal shelf display but cute enough to bring a smile every time you pass by. It’s that perfect blend of handmade charm and modern simplicity.
Start with small pieces of white air-dry clay and roll them into teardrop shapes for bodies. Add smaller spheres for heads, smoothing the neck join with slightly damp fingers. Sculpt tiny orange beaks and attach them carefully, pressing just enough for them to hold. Once the ducks are fully dry (about 24 hours), paint the beaks and cheeks with acrylics and dot tiny blue eyes with a fine brush. Finish with a satin varnish for a porcelain-like sheen. Cluster three together for instant charm like a little pond parade in your hand!
27. Clay Quote Charms

Say it, stamp it, and keep it forever. These clay quote charms are the kind of thoughtful, minimalist project that looks as good on a keychain as it does as part of a gift tag. Think little reminders of faith, hope, and love that you can carry or give away as daily inspiration.
Roll out blush-toned air-dry clay about ¼ inch thick on parchment paper. Use circle or oval cookie cutters to create even shapes, then gently press in words with a letter stamping set. Smooth the edges with a fingertip dipped in water and let them dry overnight. Once dry, lightly sand and paint with a pale wash of acrylic or leave them natural for that organic look. Optional: seal with matte varnish and punch a hole at the top before drying if you want to thread ribbon or cord. They’re simple, heartfelt, and endlessly customizable the perfect pocket-sized positivity.
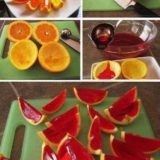
28. Ice Cream Clay Art

Three scoops of happiness, coming right up! This colorful clay ice cream art is pure joy in 3D rainbow scoops, whipped “frosting,” and sprinkle details that make you want to reach out and take a bite. It’s perfect for kids’ crafts, party décor, or just adding a pop of fun to your walls.
Cut triangle cone shapes from corrugated cardboard (for texture) and glue them onto a sturdy round board. Roll colored clay into balls for scoops and stack them on top think pink, yellow, and blue for that playful pastel vibe. Use a clay tool or plastic fork to texture the “ice cream,” then roll tiny dots for sprinkles and add faux whipped cream by piping clay through a plastic bag. Let everything air dry for 24 hours, then seal with gloss varnish for a smooth, bakery-style finish. Hang it up and watch everyone instantly smile sweet success! 🍦✨