DIY Easter Bunny Party Hat to Celebrate

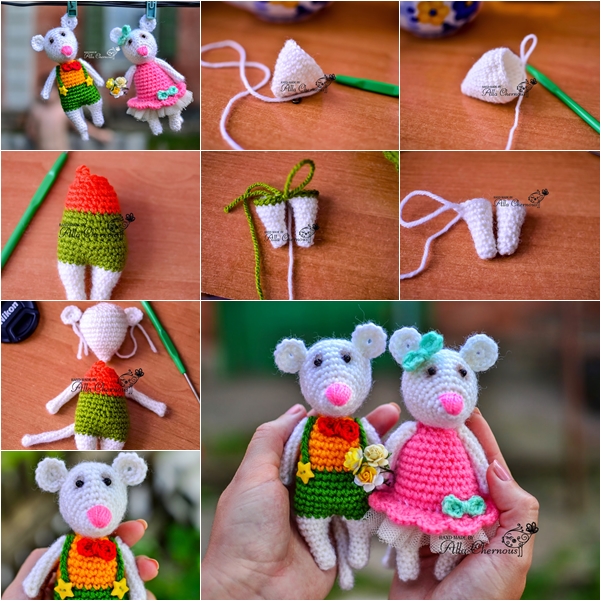
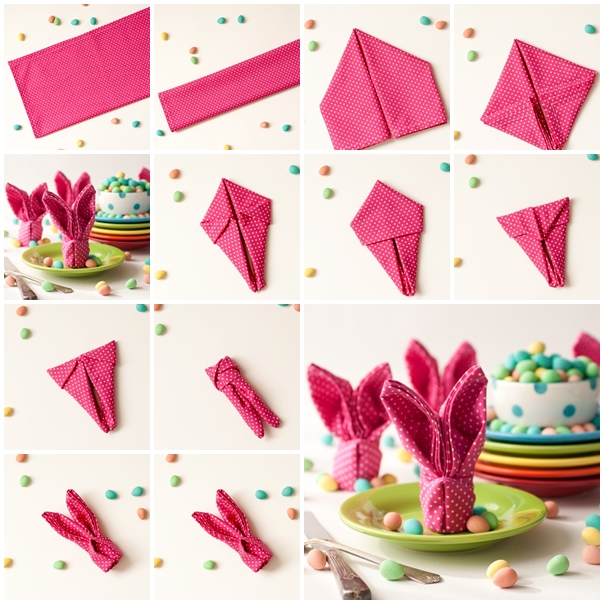
In my house, literally any holiday is a great excuse for the kids to play a little bit of dress-up! If I’m being totally honest, they don’t actually even need an excuse, but things are always a little extra fun when there’s a seasonal theme to work within their regular, rather crafty costuming endeavors.

That’s why I love coming up with ways to help them make their own pieces to celebrate different holidays, changes in season, and so on, and Easter is no exception.

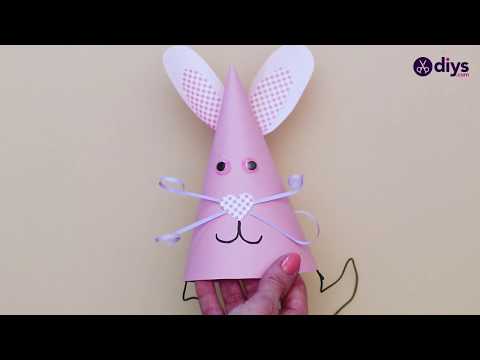
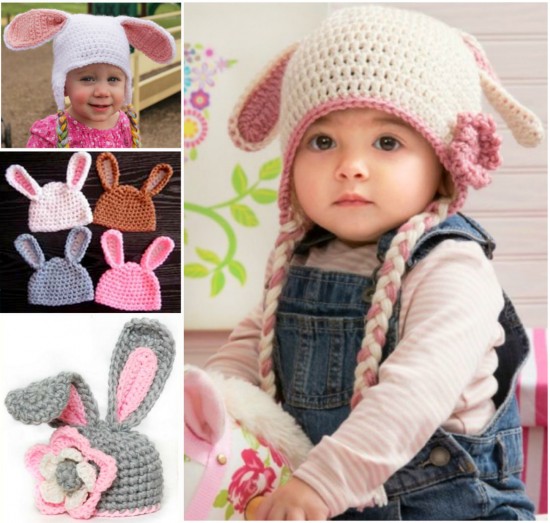
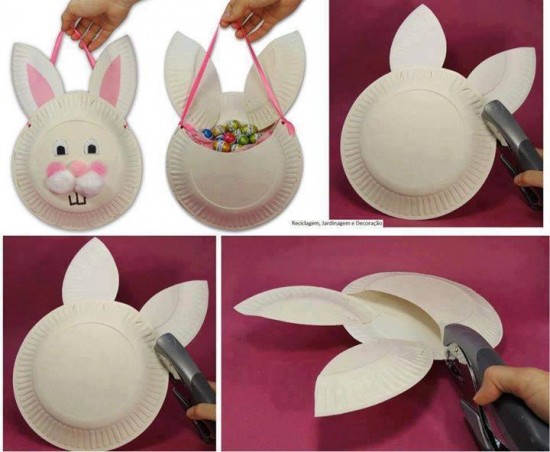
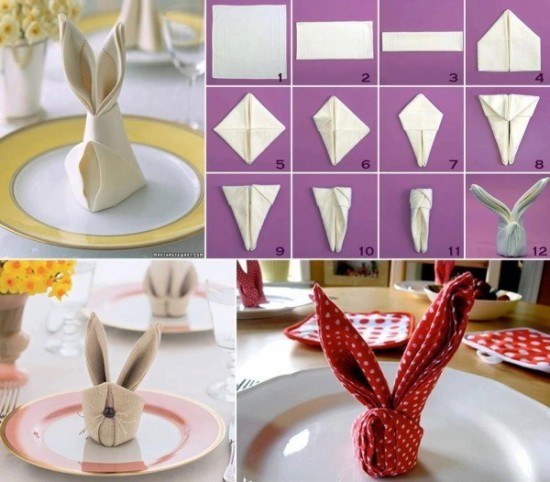
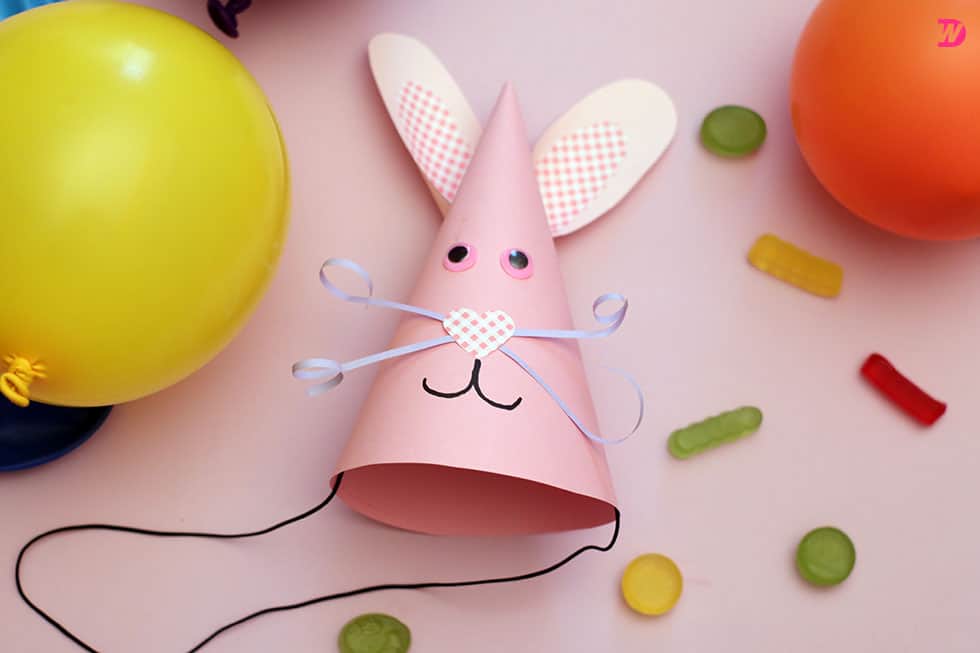
One of my children actually has a birthday just before Easter arrives and making all kinds of fun things for the party, including birthday hats, got us all talking about how much fun it would be if there was a funny party hat to wear for every occasion. That’s how these adorable little Easter bunny-themed party hats came to be!

VIEW IN GALLERY

VIEW IN GALLERY

Naturally, I knew I just had to document the process of making these the moment I finished the first one and saw how much my kids loved it. That’s why I decided to create a tutorial for other crafters to follow along with when the kids started begging me to make more! Now we’ve made enough for everyone who will be coming to our Easter dinner.

Check out these step by step instructions complete with photos! If you’d rather follow along with a video tutorial instead of written words, scroll to the bottom of this post to find just what you’re looking for.

VIEW IN GALLERY

VIEW IN GALLERY

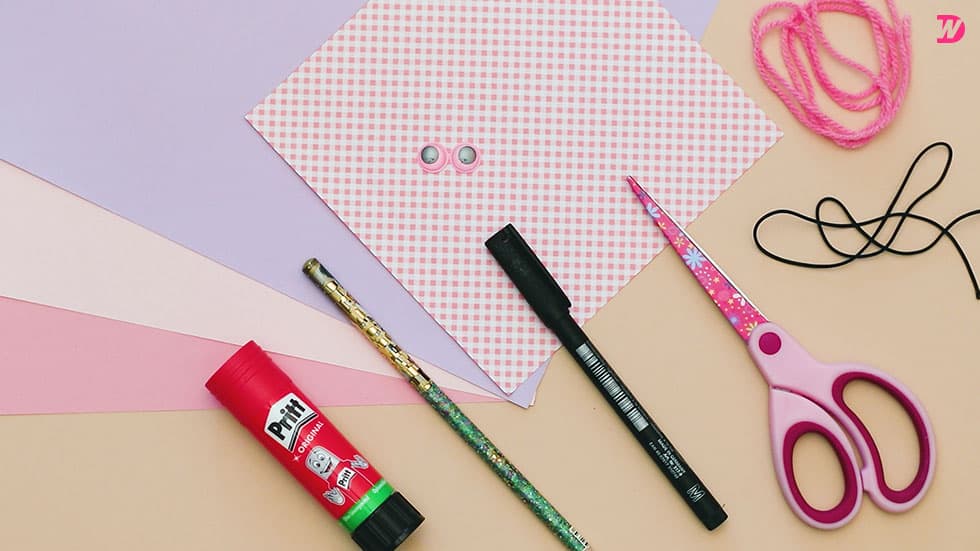
For this project, you’ll need:

Step 1:

Gather your materials!

VIEW IN GALLERY

Step 2:

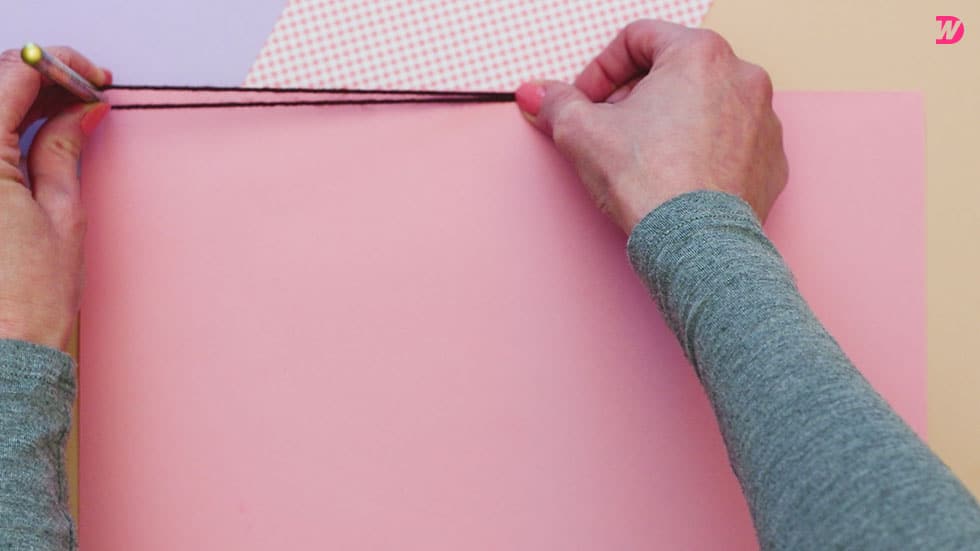
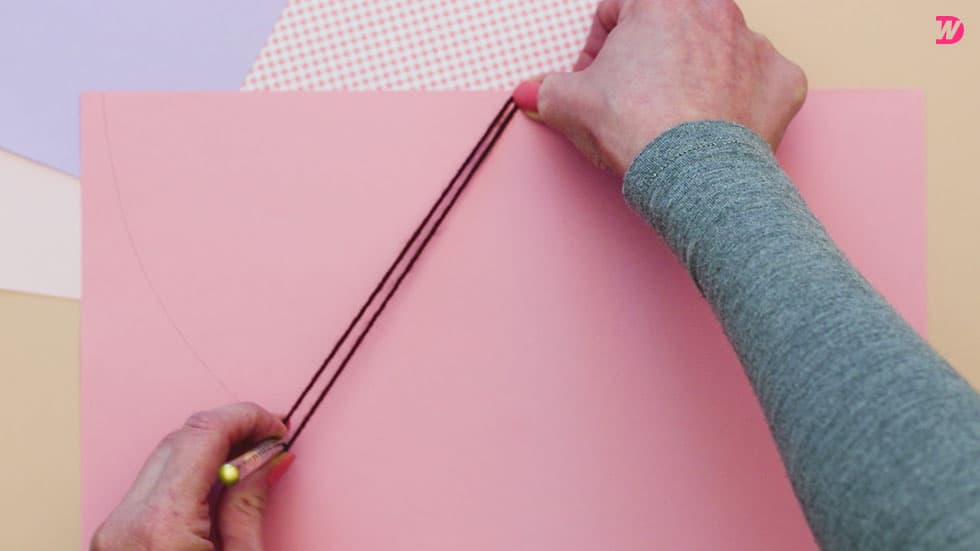
First, turn your piece of pink cardstock landscape-wise so its long edges are the top and bottom and its short edges are the sides. Now, cut a piece of yarn that’s the same length as the long edge of your pink card page. Fold it in half so the two ends meet evenly and a loop form at the string’s halfway point. Hold those two ends tightly together, hold your pencil in your other hand and place it in the looped end, and stretch the yarn straight and taught between your hands.

Now, place the tip of your pencil in the top lefthand corner of your pink page and use your thumb to pin the yarn ends at the centre point along the page’s top edge (which should measure halfway between the corners). Carefully arc your pencil downwards, across the page in an arcing motion, and back up to the opposite corner; the tension and control of the piece of yarn will help you draw a well-measured and even semi-circle.

VIEW IN GALLERY

VIEW IN GALLERY

VIEW IN GALLERY

Step 3:

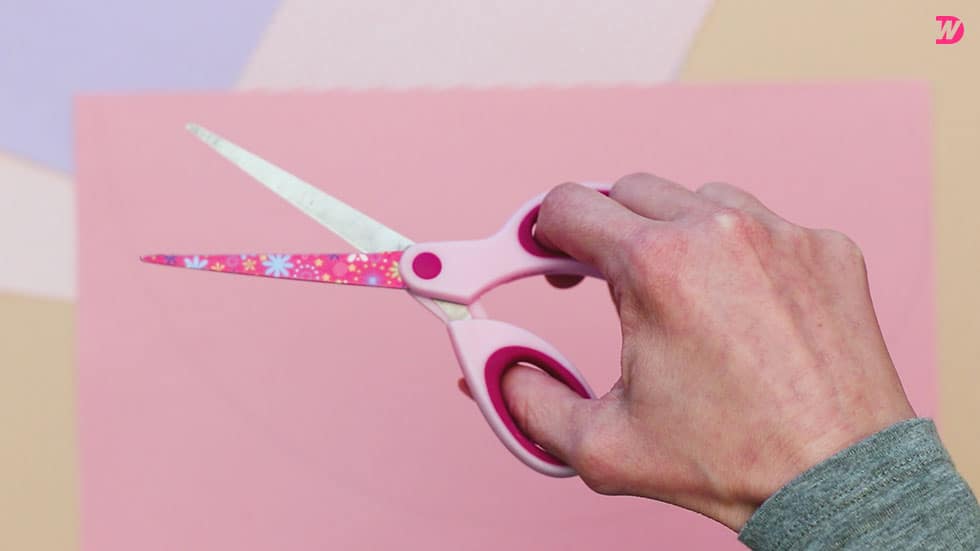
Cut the pink semi-circle out along the pencil line you just drew across your cardstock. This will be the base of your actual hat.

Step 4:

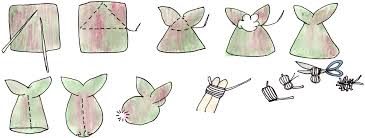
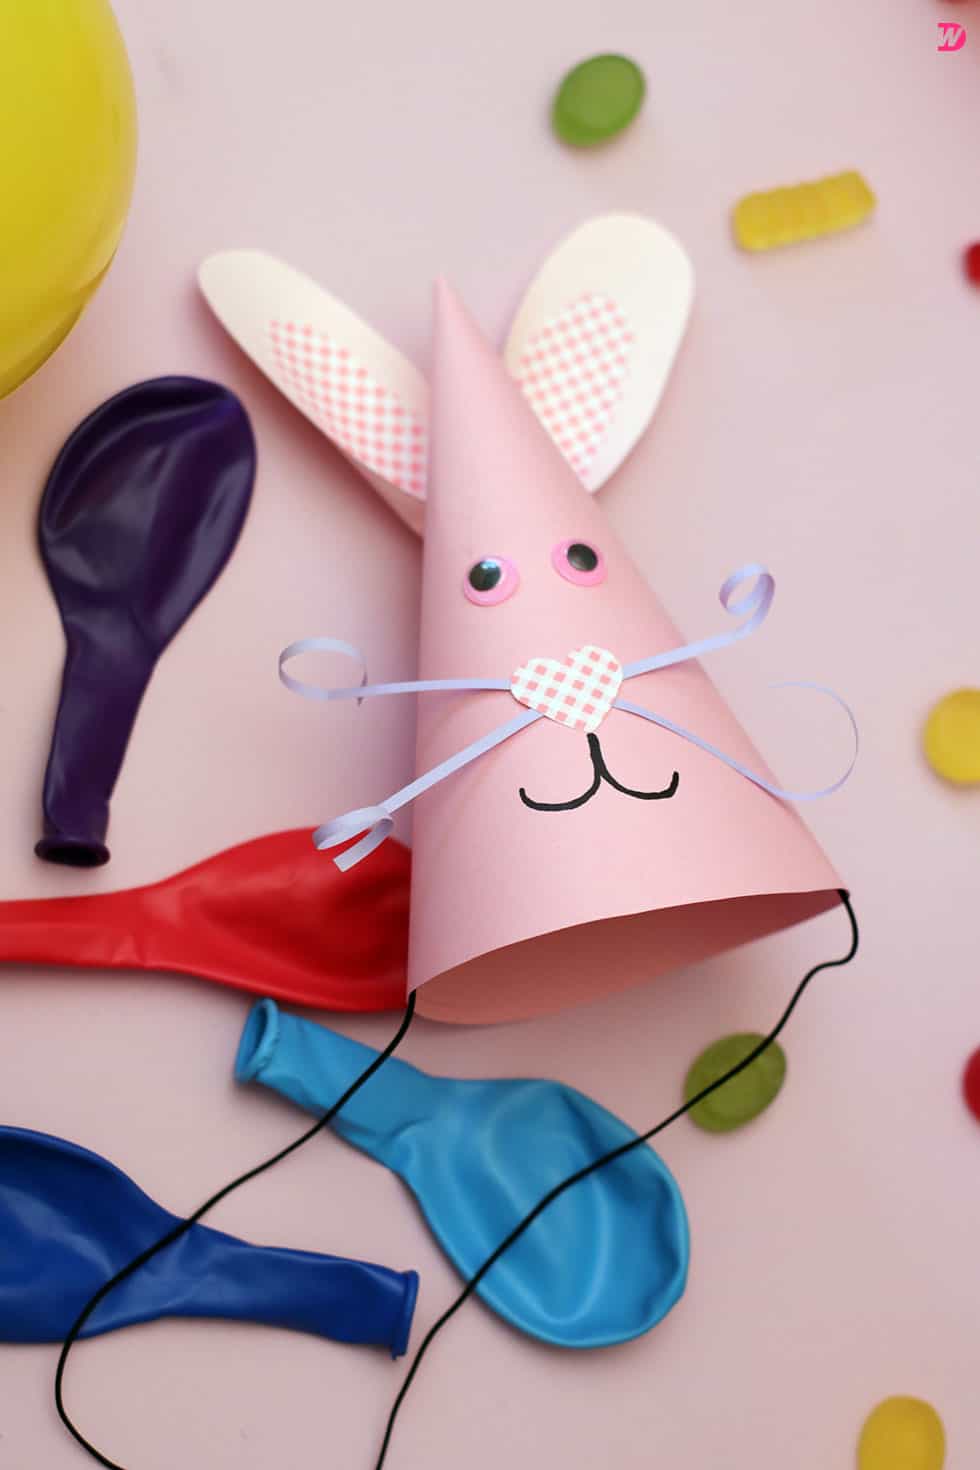
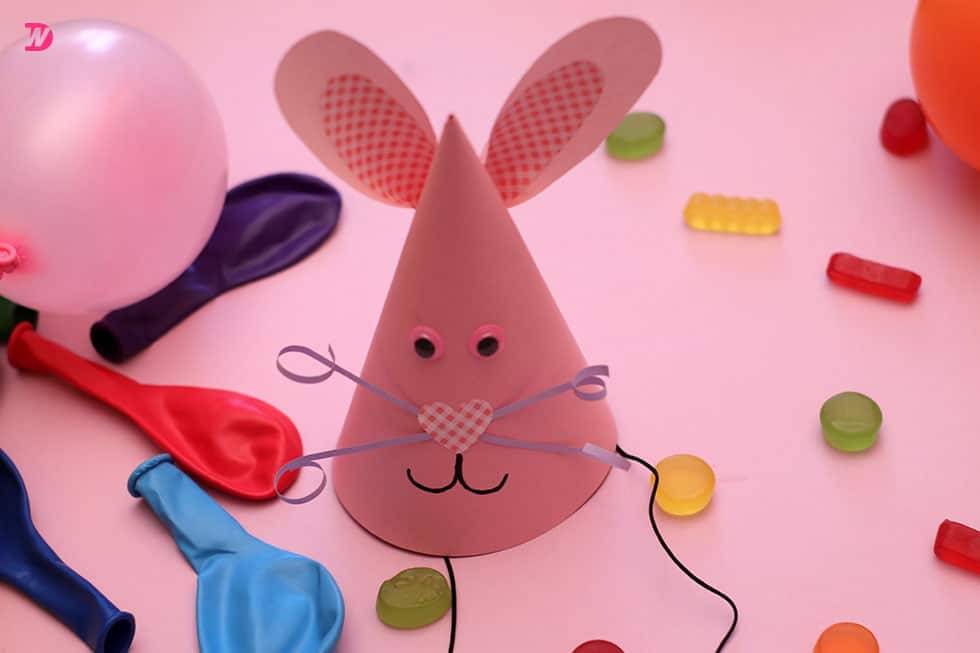
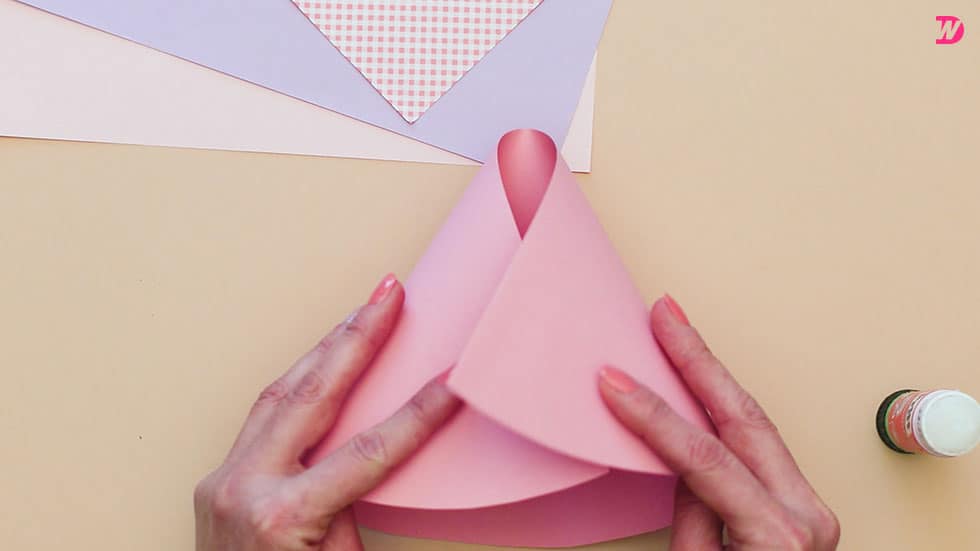
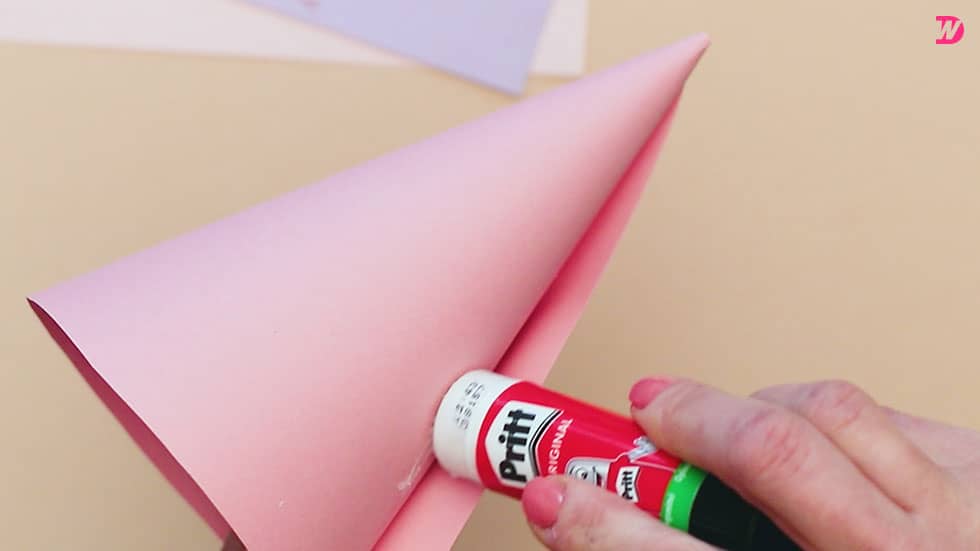
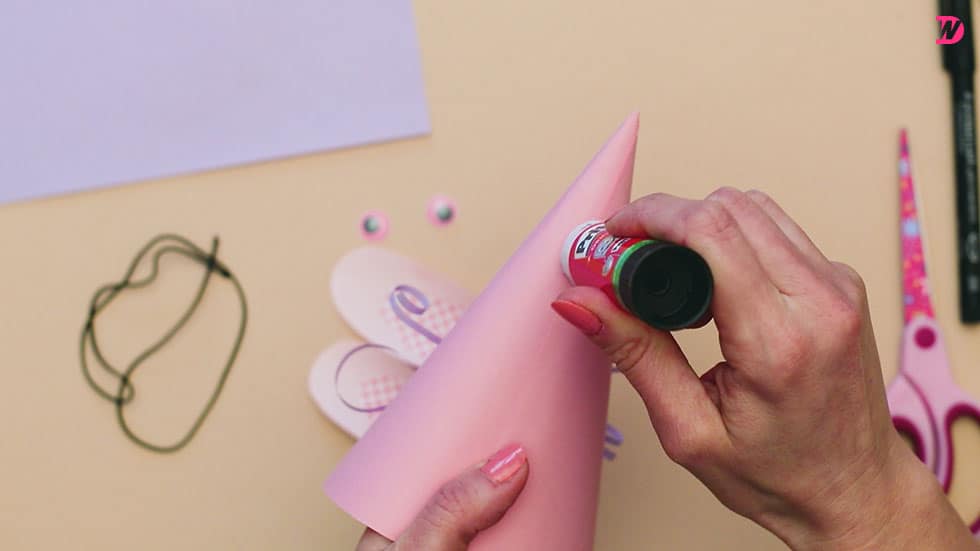
Holding your pink semi-circle so that the straight edge is at the top and the rounded edge is at the bottom, curl the corners towrds yourself, in towards each other, and down so that they meet up even with each other and the rounded edge at the bottom and make an open point at the top.

Then pass one corner over the other and start overlapping them, pulling one corner further along the bottom edge on the inside and one on the outside. This will close the opening in the top and make an actual point, while the bottom becomes a circular opening.

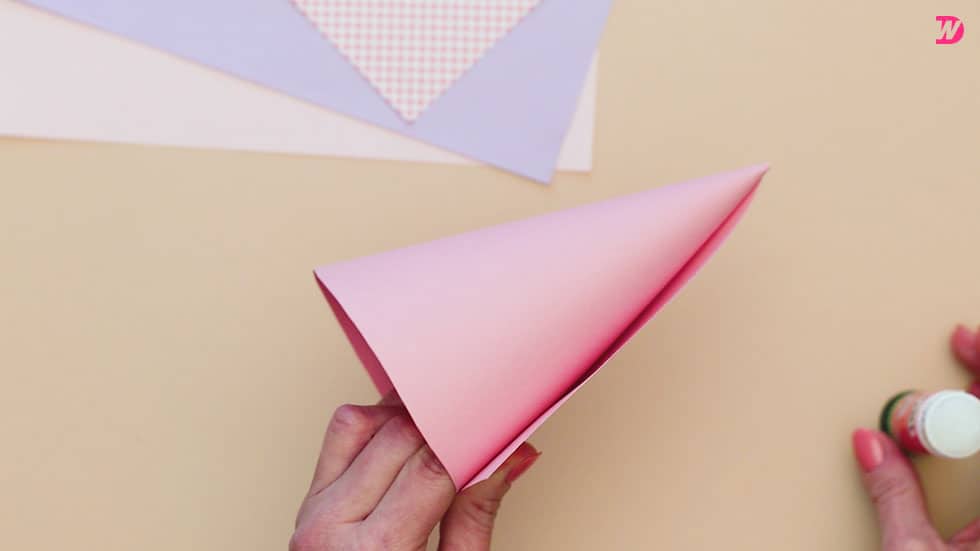
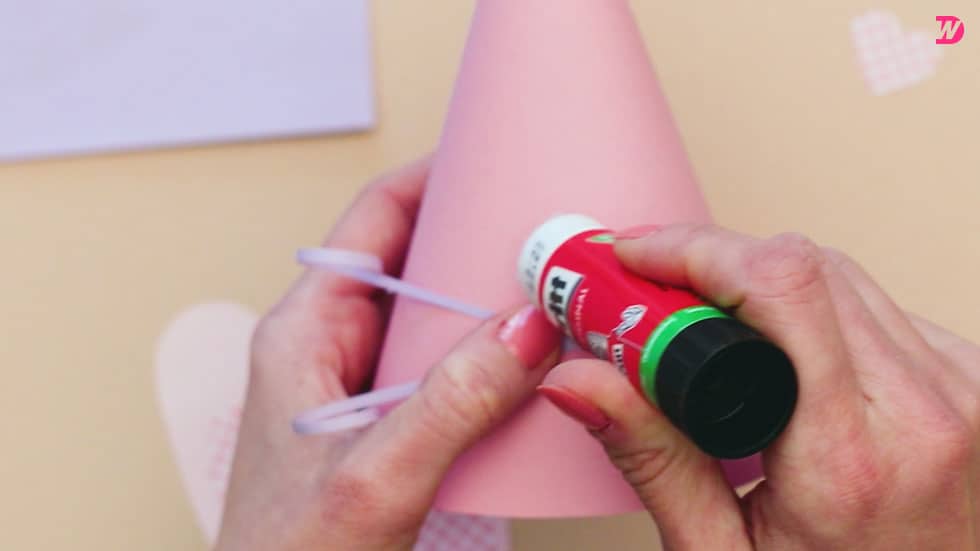
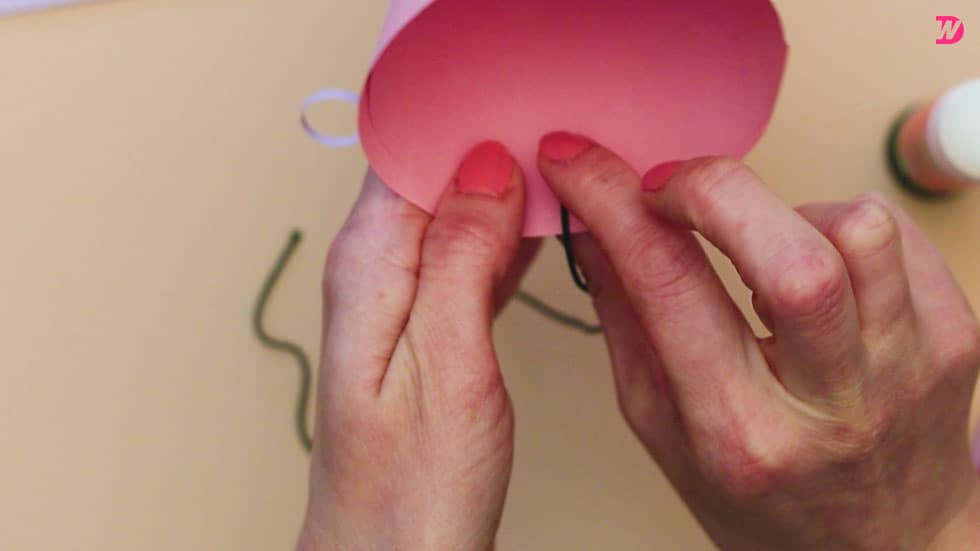
You now have a plain pink cone shaped party hat! Use your glue stick to apply glue to the outer corner and up its vertical edge to keep the cone shaped hat curled into place properly. Set it aside for a moment.
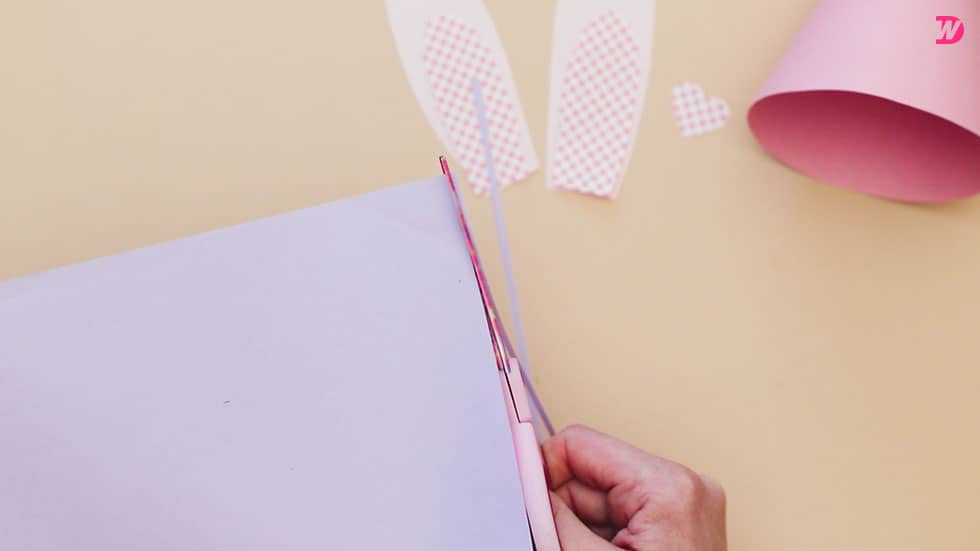
VIEW IN GALLERY

VIEW IN GALLERY

VIEW IN GALLERY

Step 5:

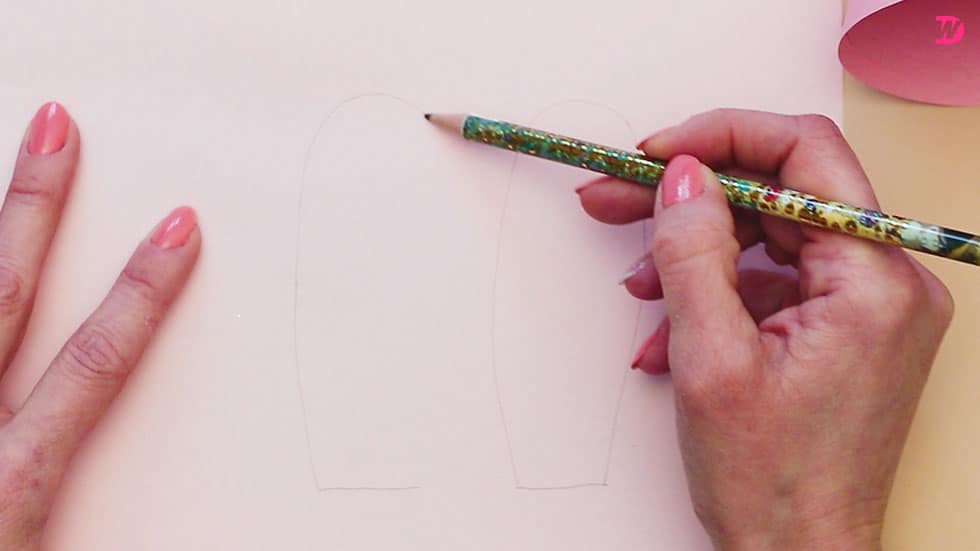
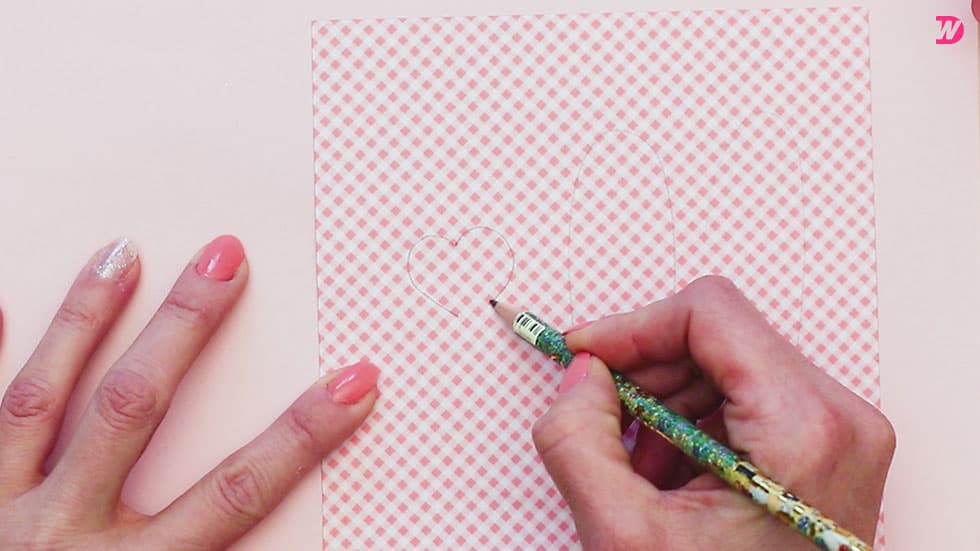
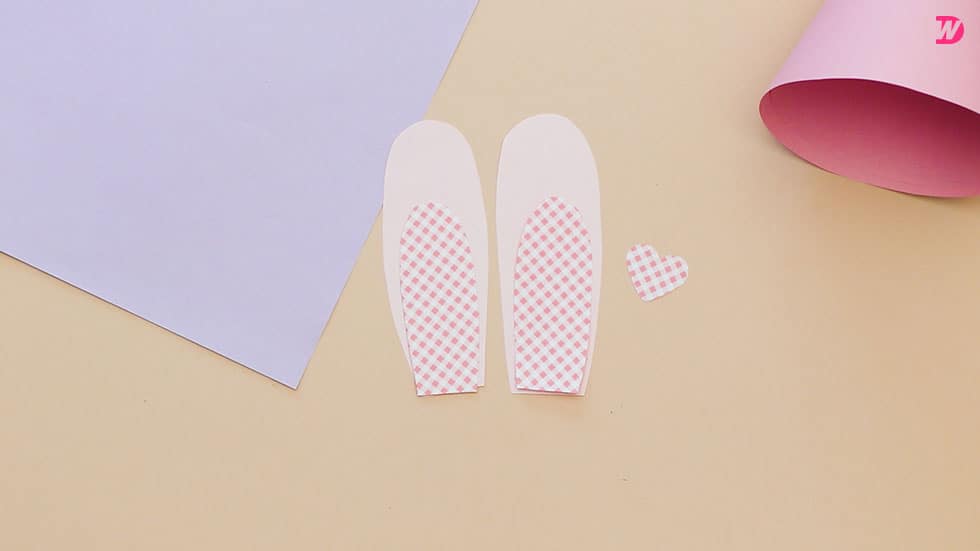
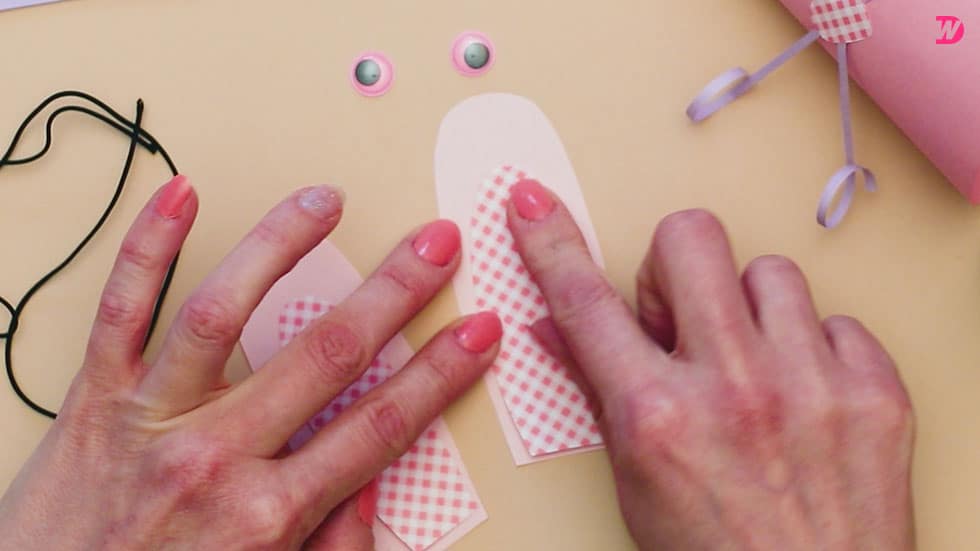
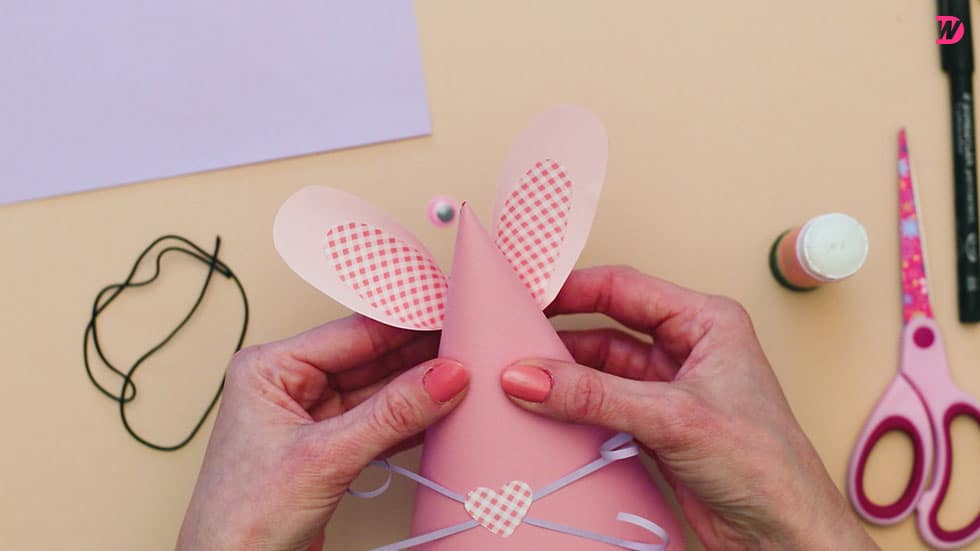
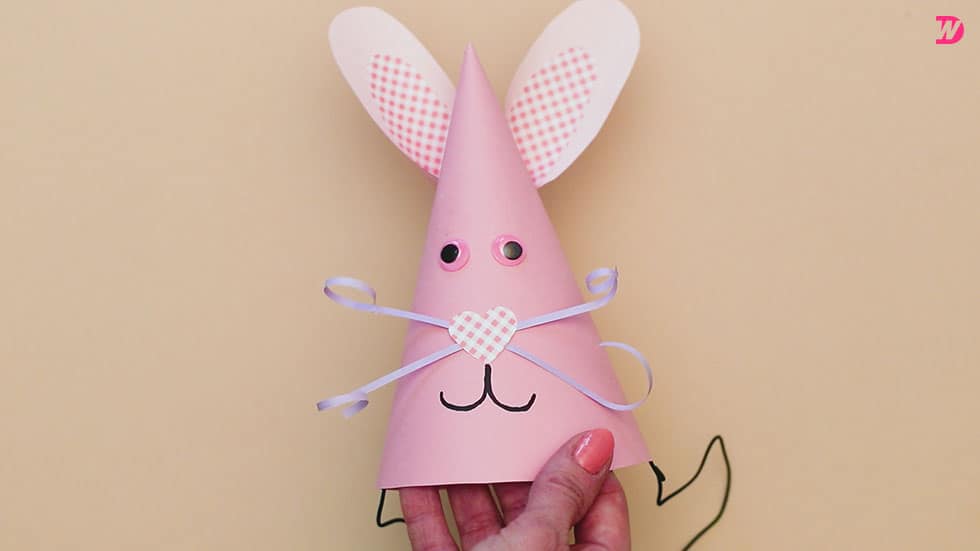
On your piece of white paper, draw the shape of a rabbit ear with a narrow, flat bottom edge and tall sides that widen towards a rounded top. Draw a second ear the same side. Now, take your piece of pink and white checkered paper and draw two more ears that are the same shape as your white ones, but this time smaller. These will layer on top of the first ones to make the pink inner ear of your Easter bunny. Finally, draw a heart shape about half an inch tall by half an inch wide on your pink and white checkered paper as well. Cut all of these shapes out.

VIEW IN GALLERY

VIEW IN GALLERY

VIEW IN GALLERY

Step 6:

From one of the short edges of your purple paper, cut two very thin strips from bottom to top, less than a centimetre wide each. Curl the ends of each strip by holding the paper tight between your fingers on one hand about an inch from the end and running your thumb nail down towards the tip, pressing hard enough to get the effect but not so hard that you just rip the end of the strip off. These two curled strips will be your Easter bunny’s whiskers!

VIEW IN GALLERY

VIEW IN GALLERY

Step 7:

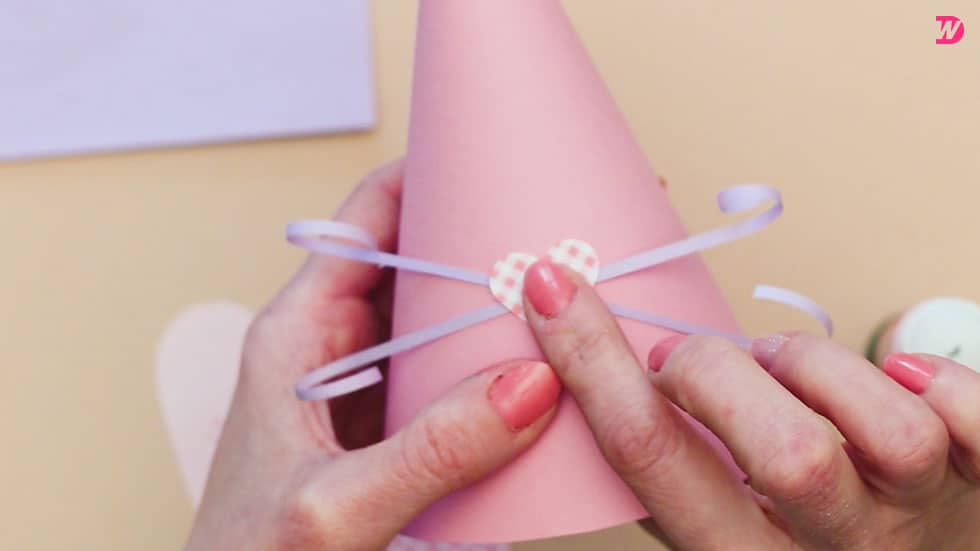
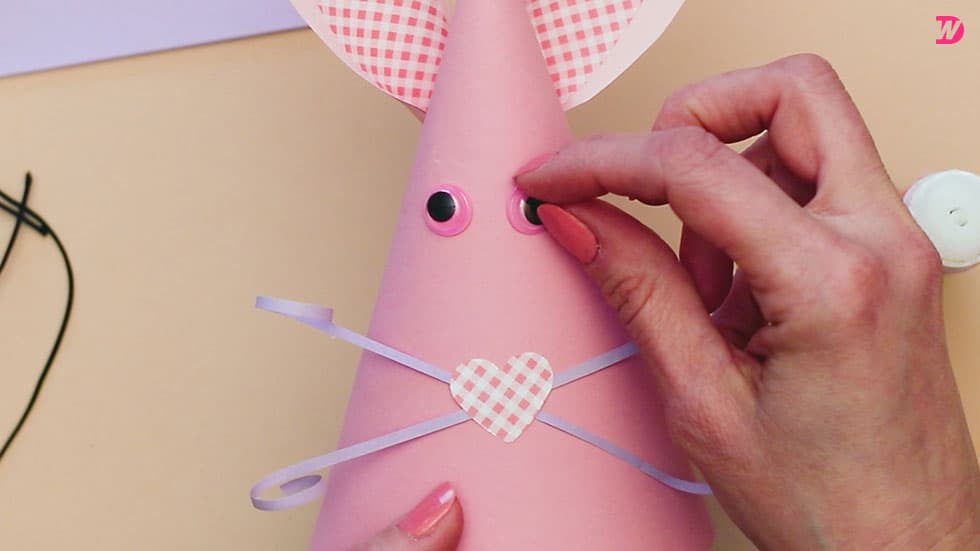
Pick a central spot to anchor your Easter bunny’s face around and use your glue stick to apply a dot of glue there. Stick your whiskers down at their central point, crossing them slightly over each other like a small X so the curled ends stick out at cute angles on each side. Then stick your heart shaped nose down right on top of that central point where the whiskers overlap.
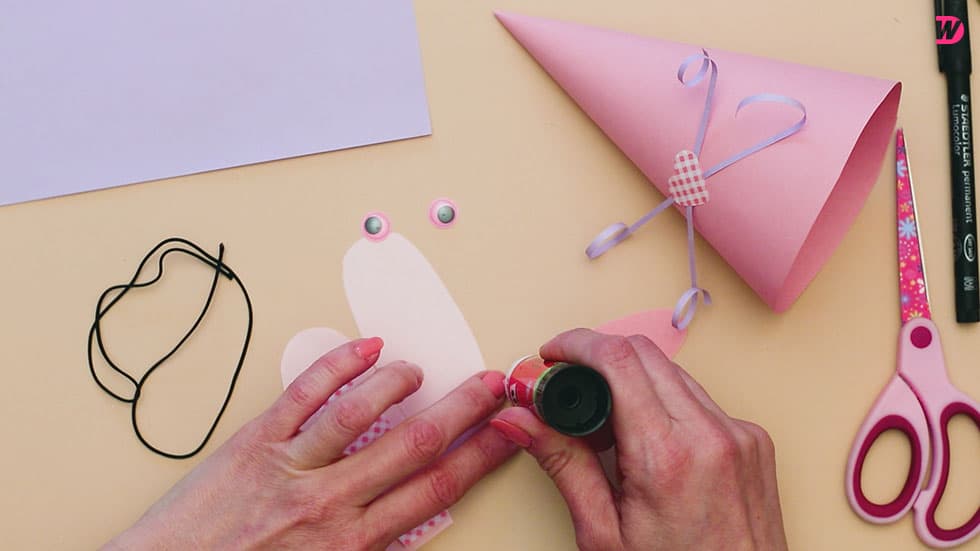
VIEW IN GALLERY

Step 8:

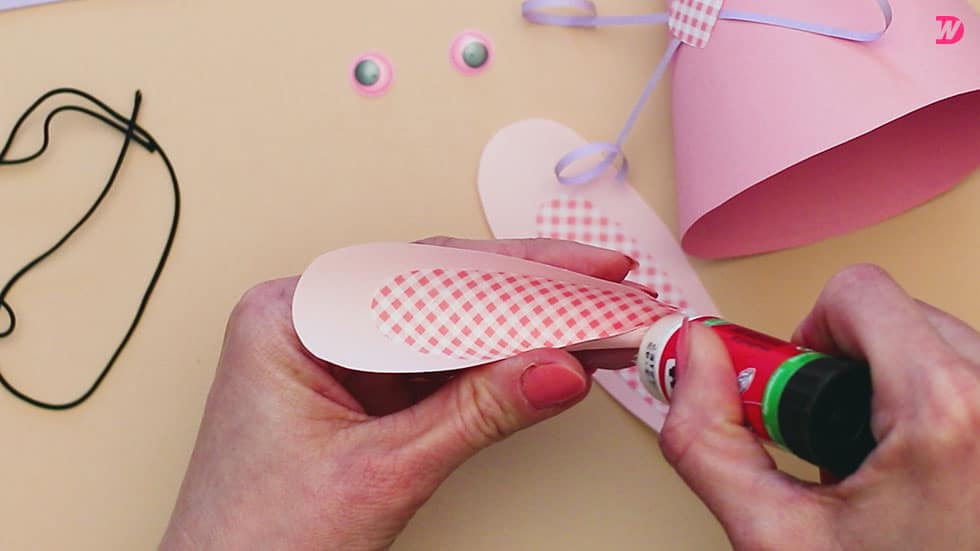
Apply glue to the backs of your pink and white checked inner ear pieces and stick them down in the centre of your larger white ear pieces, so the white peeks out around the pink edges like a border. Then curl the bottom corners of each newly layered ear in towards each other to make a point kind of like you did earlier with the pink hat, gluing them into place overlapping on each one. Your ears now have pointed bottoms instead of flat bottom edges.

VIEW IN GALLERY

VIEW IN GALLERY

VIEW IN GALLERY

Step 9:

Turn your pink hat around so you’re looking at the back, on the side with the seam opposite to where you just glued your nose and whiskers down. Apply a decently sized patch of glue closer to the top of the hat, just above the halfway point in its height. Glue your ears down here by sticking the front of each curled bottom into the glue with the pink inner ears facing the other direction, away from you and towards the other side of the hat. Angle them slightly diagonally so that they stick out the other side at a cute angle, like the bunny is very happy indeed.
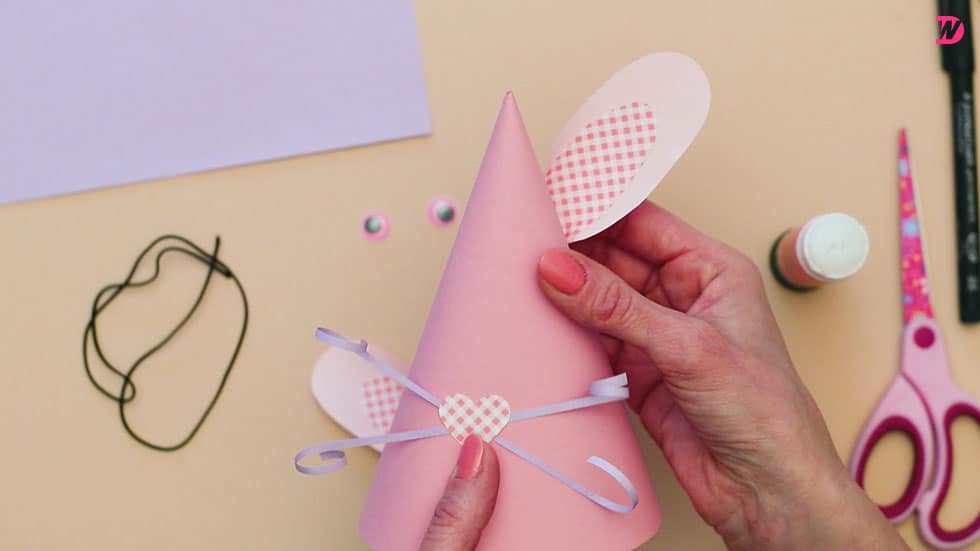
VIEW IN GALLERY

VIEW IN GALLERY

VIEW IN GALLERY

Step 10:

Turn the hat back around and then apply glue to the backs of your googly eyes and stick them down above the nose but below the ears.

VIEW IN GALLERY

VIEW IN GALLERY

Step 11:

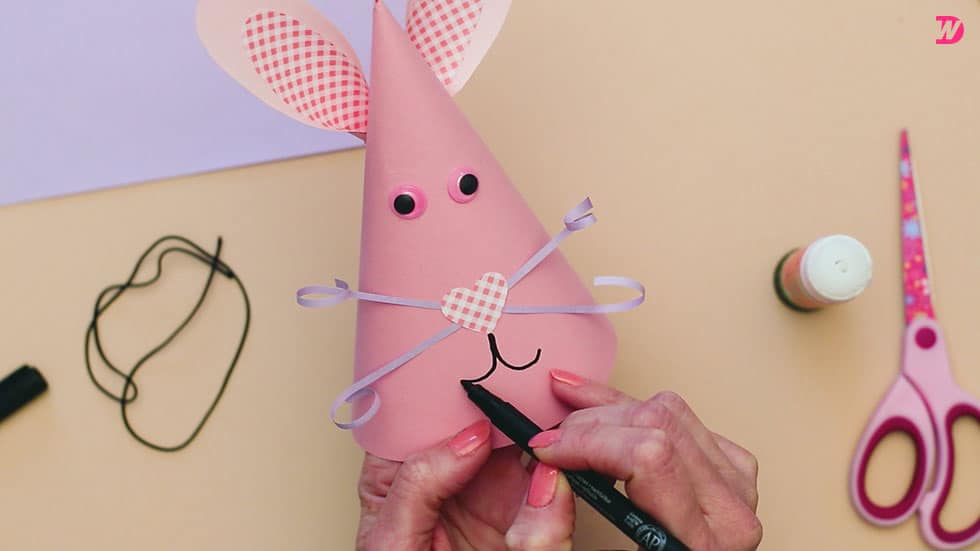
Starting at the tip of the heart shaped nose and drawing downwards to then curve outwards, use your black marker to draw the rabbit’s mouth, like a smile.

VIEW IN GALLERY

Step 12:

Cut a piece of elastic string that’s however long it needs to be to loop from the side of your child’s head (or your own, if you’re getting in on the fun too), down underneath their chin, and back up the other side to about their temple. Then turn the Easter bunny hat over so you can see inside the cone and apply glue on each side, about an inch or so higher than the circular bottom edge. Stick the two ends of your elastic string down there so it arcs downwards and can fit over a face easily but without being too loose.

VIEW IN GALLERY

Your Easter bunny party hat is officially ready to wear! Of course, you can feel free to play with colours, details, and embellishments if the pastel theme I opted for isn’t quite spring-like or bright enough for your tastes.

VIEW IN GALLERY

Just in case you’d like to try this project out for yourself, here’s a fantastic tutorial video to help you!

Easter Bunny Party Hat [Video Tutorial]

YouTube video

25 Wonderful DIY Easter Bunny Cakes

VIEW IN GALLERYBunny-Tail-Cake-Balls1-wonderfuldiyHow cute are these Bunny Tail Cake Balls ! You kids will love them and enjoy helping ,   they are very easy to make .  These bunny tail cake balls would be a fantastic  touch to your table  this Easter.   Tutorial by Rose Bakes.

VIEW IN GALLERYBunny Tail Cake Balls -wonderfuldiy1

Here are more 20 + Easter ideas and tutorials , hope you get inspire to give a try .

For making this quick bunny cake,  you will need :
2 baked 9-inch round white cake layers, cooled
1 tub (8 oz.) COOL WHIP Whipped Topping, thawed
1 pkg. (7 oz.) BAKER’S ANGEL FLAKE Coconut
Suggested decorations: licorice, gumdrops, jelly beans . photo credit Thefrugalfemale.
VIEW IN GALLERYMarshmallow-Bunny-Paws1-wonderfuldiy

Homemade Marshmallow Bunny Paws Tutorial by Hungry Happenings

VIEW IN GALLERYEasy Easter bunny Appetizer-WONDERFULIY

Easy Easter Appetizer , Recipe by The NEsting Corral .

VIEW IN GALLERYEaster-Bunny-Cupcake-Cake-wonderfuldiy

Easter Bunny Pull apart Cupcake  Tutorial by Land O Lakes

VIEW IN GALLERY15 yummy easter dessert-wonderfuldiyIheartnaptime —  15 yummy  Easter dessertsVIEW IN GALLERYCANDY bunny-cake

Party Pinching — Candy Coated Bunny Cake Tutorial

VIEW IN GALLERYEaster-Bunny-Sucker-wonerfuldiy1

DIY easy-Easter-bunny-suckers  — Check here

VIEW IN GALLERYBunny-Butt-Cakes-wonderfuldiy f

Easter bunny butt cake — Check here

VIEW IN GALLERYEaster-Bunny-Cake -wonderfuldiy

C oconut Easter bunny cake, Recipe and Instructions via Jenny Steffens

VIEW IN GALLERYMarshmallow-Bunny-Cake--wonderfuldiy

Easter marshmallow bunny cake

VIEW IN GALLERYTree Stump Bunny Butt Easter Cake

Chocolate  tree stump with bunny butt: Recipe and Instructions via My Button Cake

VIEW IN GALLERYEaster-Bunny-Cake -wonderfuldiy6

Funny Easter bunny cake: Recipe and Instructions via Staying Steyn

VIEW IN GALLERYEaster-Bunny-Cake -wonderfuldiy1

Cute Easter bunny cake: Recipe and instructions via Country Living

VIEW IN GALLERYEaster-Bunny-Cake -wonderfuldiy7

Gluten-free Easter bunny cake: Recipe and Instructions via Hold The Gluten

VIEW IN GALLERYEaster-Bunny-Cake -wonderfuldiy2

Bunny butt Easter cupcakes: Recipe and Instructions via Spend with Pennies

VIEW IN GALLERYEaster-Bunny-Cake -wonderfuldiy3

Bunny butt cake: Recipe and Instructions via Betty Crocker

VIEW IN GALLERYEaster-Bunny-Cake -wonderfuldiy8

Adorable Easter bunny cake: Recipe and Instructions via The Girl Who Ate Everything

VIEW IN GALLERYEaster-Bunny-Cake -wonderfuldiy9

Easter bunny butt cake: Recipe and Instructions via kidspot

VIEW IN GALLERYEaster-Bunny-Cake -wonderfuldiy10

Easter bunny butt cake: Recipe and Instructions via Sweet Eats Cakes

VIEW IN GALLERYEaster-Bunny-Cake -wonderfuldiy4

Adorable bunny butt cupcakes: Instructions via SugarEd Productions

VIEW IN GALLERYEaster-Bunny-Cake -wonderfuldiy5

Adorable Easter bunny cake: Recipe and Instructions via Bob’s Red Mill

VIEW IN GALLERYEaster-Bunny-Cake -wonderfuldiy11

Easter bunny cupcakes: Recipe and Instructions via Taste of Home

VIEW IN GALLERYBunny-Butt-Cupcakes-2

 Bunny Butt Cupcakes via ‘Buttercream Blondie’

VIEW IN GALLERYbunny-butt-easter-cakes

 Easter Bunny Cupcakes – Stock Image

VIEW IN GALLERYEaster-Peep-Cakes-and-Desserts-wonderfuldiy f

Super-cute-Easter-peep-cake — Check here

VIEW IN GALLERY10 easter egg tutorials-fb

12 Easter egg DIY tutorials – Check here

Wonderful DIY Cute Towel Bunny

VIEW IN GALLERYcute towel bunny-wonderfuldiyf

This is an easiest DIY bunny project that the kids can make .These towel bunnies are so cute and great for this coming Easter decoration and gift .

What you will need:

Small Washcloth or Fabric
Rubber band or elastic string
Plastic Egg , treats (option)
Googly Eyes
White PomPom
Glue or Glue Gun
Scissors

VIEW IN GALLERYcute towel bunny-wonderfuldiy2Directions :

1. Place the towel in front of you in a diamond shape.
2. Roll the towel from the bottom .
3. Bring in the two ends of the towel until they meet.
4.Fold the two ends upwards to form your bunny ears.Leave a small bump at the end
to form your bunny face. Keep a firm hold.
5. Hold your towel ,tie it into place using elastic string or a rubber band.
6. Add egg to the bunny’s body . You can also fill it with candy, treats…
7.Decorate your bunny ,glue on your bunny’s eyes and tail, . You can add as many decoration as you would like whiskers, bow tie,flower etc…VIEW IN GALLERYcute towel bunny-wonderfuldiy3

VIEW IN GALLERYcute towel bunny-wonderfuldiy1You may also like :

VIEW IN GALLERYTowel-Puppy F

DIY adorable towel puppy

VIEW IN GALLERYKnitted Bunny

                              A bunny from a knitted square

Wonderful DIY Sweet Bunny Bread

VIEW IN GALLERYSweet bunny bread

These bunny bread rolls are adorable! So perfect!

Ingredients:
2 c all purpose flour
3/4 tsp yeast
1/4 c sugar
1 egg
1 Tbsp butter
2 Tbsp warm whole milk
1/8 tsp salt
1 Tbsp butter, melted
1/4 c warm waterVIEW IN GALLERYeaster bunny bread-wonderfuldiy

Directions :
1.In a bowl, soften the yeast with 2 tbs warm milk (should not be hot) for 5 mins. Beat it nicely with a egg beater.

2.In a large bowl cream sugar and butter.
Add the lukewarm water, salt and egg and beat it nicely.
Add the flour and beat, till it’s well blended.

3.Place the dough in a bowl and cover it with a kitchen towel or plastic wrap and let it rise (it should double in size). Heat oven to 350*.
We can store this dough for a week.

4.Dust some flour, if the dough feels sticky, turn it onto a floured surface.
Gently roll it into a log, cut 2″ discs from it.

5.Make egg shaped balls with all the discs, place it on a baking sheet and cover it with plastic wrap and let it rest for 3 hrs.

6.For bunny’s ear: With a sharp knife, snip the dough on one side of the ball, and leave it hanging like a rabbit’s ear (from the wide side of the ball towards the narrow side, refer the above photo). Repeat it on the other side too.

7.For bunny’s fluffy tail: Snip slightly at the centre of the broad side of the dough ball, and roll the cut dough over to the top and press it.
For bunny’s eyes: place two black peppers under the ears.

8.Bake for 10- 12 mins or until lightly browned. Brush the bunny rolls with melted butter and serve it warm.

YouTube video

VIEW IN GALLERYEaster-Peep-Cakes-and-Desserts-wonderfuldiy fSuper-cute-easter-peep-cake — Check here

Bright and Bonny Easter Bunny Gift Bottles

Anytime of the year is a great time to plan ahead for next Easter – especially with a craft project that’s as amazingly fun and simple as this! There isn’t a kid in the world that can resist the allure of the Easter bunny or a generous dose of candy, so why not combine the two together with these gorgeous DIY Easter bunny gift bottles?

And when we say it’s simple we really mean it – all you need is an empty water bottle, a cupcake liner and a little added dash of imagination!

VIEW IN GALLERYeaster-bunny-bottle gift-wonderfuldiy

We just love a project that transforms household waste into something truly wonderful! Chances are that once you’ve knocked together a few of these, you might find yourself never throwing out a plastic bottle again! They’re of course just the ticket for Easter, but that doesn’t mean they don’t also make awesome gifts and craft projects for kids at any time of the year!

Perfect Projects for Kids

These are just the kinds of goodies that never fail to light up a kid’s face when they first lay eyes on them, but at the same time we highly recommend getting your own kids involved in the process. There’s a bit of cutting and sticking involved of course, but most of it is all about simple creativity and decorative touches. And if you let the kids pick their own favorite candy to go inside, chances are they’ll be even more impressed with the results!

VIEW IN GALLERYeaster bunny bottles

VIEW IN GALLERYEasterBunnyBottleBasket_thumb1

So next Easter, why not give a gift that’s not only fabulous, but also brilliantly unique and exceptionally eco-friendly too? Of course, the fact that they’ll also save you a fortune on the usual store-bought gifts is a sweet-as-candy bonus too!

Get started today and you could have yourself a whole army of bunnies by the time Easter rolls around!

YOU MAY ALSO LIKE

This super cute Easter peep cake

VIEW IN GALLERYEaster-Peep-Cakes-and-Desserts-wonderfuldiy7

Knitted Square Bunny Rabbit – Simple Steps, Tutorial

Would you believe it’s possible to make such an adorably soft bunny rabbit out of nothing but a simple square of fabric? Neither did we, until we came across this amazing guide we’re now totally addicted to!

VIEW IN GALLERYKnitted-Bunny-wonderfuldiy

Easter may be the bunny’s busiest time of the year, but there’s really no better time than right now to whip up a soft toy or two for that special little someone in your life! Especially when it’s as easy as this to do, as with little more than a square of fabric and a few basic embroidery supplies, you’ll soon find yourself able to build a small army of bunnies in no time!

What You’ll Need

Knitted Square Bunnies Guide

  1. Knit yourself a square of fabric or just but a sheet of fabric and cut out a square
  2. Sew a triangle into the top half of the square as illustrated above
  3. Pull the thread tight and push a pinch of soft stuffing into the fabric
  4. Sew the body half of the bunny tightly shut and push in more stuffing
  5. Sew the bottom of the bunny closed and make a fluffy pom-pom tale as described in the tutorial

It really is one of the easiest sewing projects we’ve ever come across and a wholly brilliant project for newcomers and first-timers. It’s almost impossible to go wrong as the whole idea is that every little bunny you create will be somewhat unique – one-of-a-kind gifts for family and friends, whatever the occasion!


VIEW IN GALLERYknitted-bunny-turorial-wonderfuldiy2

VIEW IN GALLERYknitted Bunny from square-wonderfuldiy f

YOU MAY ALSO LIKE

Another great idea is to make bunnies out of socks. Take our word for it, you CAN make them 🙂

VIEW IN GALLERYLong-Ear-Sock-Bunny-Tutorial-wonderfuldiy

Or a lovely crochet bunny blanket (free pattern included)

VIEW IN GALLERYCrochet bunny lovey blanket free pattern-wonderfuldiy

Last but not least, we have eight free patterns for bunny hats that will make your little one even more special.

VIEW IN GALLERYEaster-Bunny-Floppy-Ears-Free-Crochet-Pattern-woderfuldiyf

Wonderful DIY Easter Marshmallow Bunny Cake

VIEW IN GALLERYMarshmallow-Bunny-Cake--wonderfuldiyThis cute delightful Marshmallow Bunny Cake is perfect for your Easter celebration. Instead of frosting the cake, it just placed small marshmallows all over the cake. you will love this look and the taste . I think my favorite is the bunny decoration ,one is looking at the sandwich, another one holding a cupcake. How adorable are they . Tutorial by Pink Little Cake .

VIEW IN GALLERYMarshmallow-Bunny-Cake--wonderfuldiy1

Click here for the Marshmallow Bunny Cake Tutorial

VIEW IN GALLERYEaster-Marshmallow-Bark-wonderfuldiyThis is a quick and easy Easter Idea of making  Easter Marshmallow Bark.  They look  beautiful and tasty .  Tutorial by Butter with a side of Bread .

Click here for the Marshmallow Bunny Bark Recipe

VIEW IN GALLERYBunny-Tail-Cake-Balls1-wonderfuldiy

DIY Easter Bunny Tail cake — Check here

Wonderful DIY Easy Easter Bunny Suckers

VIEW IN GALLERYEaster-Bunny-Sucker-wonerfuldiy2

You kids will love these cutest Easter Bunny Suckers and enjoy making them ! These lovely bunny suckers are great homemade gifts for Easter! You can make some boy and Girl bunnies with your favourite color, and sure you will have a ton of fun marrying them all off :). Happy crafting !

What you will need :

VIEW IN GALLERYEaster-Bunny-Sucker-wonerfuldiy1Themotherhuddle —  Easter bunny  suckers Tutorial

VIEW IN GALLERYEaster-Bunny-Paper-Plate-wonderfuldiy

DIY easter-paper-plate-bunny-basket  – Check here

VIEW IN GALLERYwonderfulDIY -Nail-Polish-Marbled-Eggs

DIY Easter-marble-egg-using-nail-polish  — Tutorial here

Wonderful DIY Easter Bunny Peeps Race Cars

VIEW IN GALLERYeaster bunny race cars- wonderfuldiy f

These Easter Bunny Race cars will be the hit of the kids Easter party! They were a lot of fun to make and they were very simple! What a fun way to make an edible spring decoration with the kids! I bet the kids would have a blast too! They are great addition to holiday gift basket .

VIEW IN GALLERYeaster bunny race cars- wonderfuldiy2 VIEW IN GALLERYeaster bunny race cars- wonderfuldiy3 VIEW IN GALLERYeaster bunny race cars- wonderfuldiy5

Ingredients:

Large Marshmallows, cut horizontally
Marshmallow Bunny Peeps
Mini pretzels
Cream-Filled Cakes (e.g. Cloud Cakes or Twinkies)
Decorator Icing
Frosting
Sprinkles

Directions:
1. Cut a small rectangle out of the top of the cream-filled cake about a third of the way back from the “front” of the car.
2. Use the white decorator icing to adhere the bunny Peep, mini pretzel “steering wheel” and large marshmallows in place.
3. Use frosting and sprinkles to decorate your car. Allow to set, then enjoy! Photo credit : Pisforpreschooler.

VIEW IN GALLERYeaster peeps cake-wonderfuldiy

DIY super-cute Easter-peep-cake

8 Wonderful Free Patterns for Crochet Floppy Bunny hats

VIEW IN GALLERYEaster-Bunny-Floppy-Ears-Free-Crochet-Pattern-woderfuldiyfThese Floppy Easter Bunny Ear hats are super cute . They are great for Easter celebration . I can’t wait to make this one with crochet flower decoration . How about you ? All patterns are free . Happy crocheting ~~

VIEW IN GALLERYEaster-Bunny-Floppy-Ears-Free-Crochet-Pattern-woderfuldiy1

Pickadilly Charm — Easter Bunny Floppy Hat Free Pattern 

VIEW IN GALLERYEaster-Bunny-Floppy-Ears-Free-Crochet-Pattern-woderfuldiy2Crochet Easter Bunny Hat Free Pattern via Micah Makes

VIEW IN GALLERYEaster-Bunny-Floppy-Ears-Free-Crochet-Pattern-woderfuldiy3Sweet Bunny Easter Hat Free Crochet Pattern via Redheart

VIEW IN GALLERYEaster-Bunny-Floppy-Ears-Free-Crochet-Pattern-woderfuldiy4Crochet Bunny Hat Floppy Ears Free Pattern via lisaauch1

VIEW IN GALLERYEaster-Bunny-Floppy-Ears-Free-Crochet-Pattern-woderfuldiy5Bunny Hat Free Crochet Pattern via Beginner Crochet

VIEW IN GALLERYEaster-Bunny-Floppy-Ears-Free-Crochet-Pattern-woderfuldiy6Easter Bunny Hat and Diaper Set Free Crochet Pattern via Repeat Crafter Me

VIEW IN GALLERYEaster-Bunny-Floppy-Ears-Free-Crochet-Pattern-woderfuldiy7

VIEW IN GALLERYEaster-Bunny-Floppy-Ears-Free-Crochet-Pattern-woderfuldiy8

Easter Bunny Crochet Hat Free Pattern via Oombawkadesigncrochet

Bonus :

VIEW IN GALLERY10+ free patterns for animal hats-wonderfuldiy

14 FREE patterns for crochet animal hats

VIEW IN GALLERYAnimal-Slippers-Free-Patterns1-wonderfuldiyf

Cute knitted / Crochet animal slippers – FREE PATTERN

VIEW IN GALLERYKnitted-Bunny-wonderfuldiy

Easy to make a bunny from a square

Wonderful DIY Cute Bunny / Bear Planter from Plastic Bottle

VIEW IN GALLERY plastic bottle bunny bear planter-wonderfuldiy

There are many ways of reusing plastic bottles . This is one more creative idea — Make bunny and bear planters using plastic bottles. These planters are so cute and very easy to make once you get the template , they will look adorable at your home . It’s a nice idea to recycle your plastic bottles , and your kids will love them and enjoy making …Tutorial by Handimania.

What you will need:
Plastic bottles
Paints
Cardboard
Scissors
Paint brush

VIEW IN GALLERY  plastic bottle bunny bear planter-wonderfuldiy1VIEW IN GALLERYplastic bottle bunny bear planter-wonderfuldiy2DIY plastic-bottle bunny & bear planter — Click here for the tutorial

You can also make hedgehog planters from plastic bottles for your garden ! It is awesome and easy to make !

VIEW IN GALLERYHedgehog Planter from Plastic Bottle F

 DIY funny-hedgehogs from recycled plastic bottle for-your-garden  — Check here

Wonderful DIY Crochet Bunny Lovey Blanket with Free Pattern

VIEW IN GALLERYCrochet bunny lovey blanket free pattern-wonderfuldiyThis Crochet bunny lovey blanket is button cute ! Your kids and you will love it ! The pattern is very simple and FREE that shared by The Stitchin’ Mommy . For the blanket , it’s a basic granny square pattern. This pattern from the Purl Bee is also a great free pattern and very easy to follow. This bunny lovey will be a great gift for baby shower, and perfect for Easter .

Please check the link below for the free pattern, learn how to make this adorable bunny lovey ~~ Happy crocheting !

Materials you will need :

— Soft Baby yarn in 3 colors. Here used Bernat Softee(Affiliate Link) Baby in Prettiest Pink, Mint, and White
— Crochet Hook Size H
— Tapestry Needle
— Embroidery Floss in Pink and Black
— Fiber fill for bunny head

VIEW IN GALLERYCrochet bunny lovey blanket free pattern-wonderfuldiy1Thestitchinmommy — Crochet  Bunny Lovey Free Pattern

You might also like these DIY SOCK BUNNY crafts, they are very cute :

VIEW IN GALLERYLong-Ear-Sock-Bunny-Tutorial-wonderfuldiy VIEW IN GALLERYsock bunny

DIY cute sock-bunny — Check here

I love this crochet mice craft too, the pattern is free , how about you ?

VIEW IN GALLERYcrochet mice free pattern F

Cute-crochet-mice Free Pattern — Check here

Wonderful DIY Easter Paper Plate Bunny Basket

VIEW IN GALLERYEaster-Bunny-Paper-Plate-wonderfuldiy

This is a nice kids craft. Your kids will love  to make these easy and cute Easter Paper Plate Baskets. These bunny baskets  are  perfect for the Easter Egg Hunt , and also would to make a  homemade gift filled with Easter eggs or candy, chocolate… Tutorial by Small Steps Online .

VIEW IN GALLERYbunny basket-wonderfuldiy

Click here for the Easter Paper Plate Basket Tutorial

You might also like this Crochet bunny lovey blanket, it is button cute !  The pattern is very simple and FREE that shared by The Stitchin’ Mommy .

VIEW IN GALLERYCrochet bunny lovey blanket free pattern-wonderfuldiy

Crochet-bunny-lovey-blanket-with-free-pattern — Check here

Wonderful DIY Easter Bunny Butt Cookies

VIEW IN GALLERYBunny-Butt-Cookies-wonderfuldiy

These Bunny Butt Cookies are cute and nice for Easter celebration .  They are made with basic Sugar Cookie Biscuits and marshmallows, candy  for decoration,  that’s  really simple and sure to become Easter favorite .  Recipe by Pillsbury .

Ingredients:1roll (16.5 oz) refrigerated sugar cookies
1/3cup all-purpose flour
1 container (12 oz) fluffy white whipped ready-to-spread frosting
Pink gel food color, if desired
22miniature marshmallows
Assorted size candy sprinkles

Click here for the Bunny Butt Cookies Recipe 

VIEW IN GALLERYBunny-Tail-Cake-Balls1-wonderfuldiy

Make Easter bunny tail cake — Check here

Wonderful DIY Cute Sock Bunny

VIEW IN GALLERYsock bunny

I absolutely can not imagine this cute bunny is done with socks, I amazed of human creativity, with this kind of bunny to sleep, or watching it smiled at me on the windowsill , or  as a gift for children . . . I can not wait to do one, How about you?

VIEW IN GALLERYsock bunny fClick here for the tutorial from Craftpassion

Here are more DIY bunny projects, which one is your favorite ?

VIEW IN GALLERYLong-Ear-Sock-Bunny-Tutorial-wonderfuldiy

VIEW IN GALLERYLong-Ear-Sock-Bunny-Tutorial-wonderfuldiy1

DIY long ears sock bunny — Tutorial from Craftpassion

VIEW IN GALLERYLong-Ear-Sock-Bunny-Tutorial-wonderfuldiy2

VIEW IN GALLERYLong-Ear-Sock-Bunny-Tutorial-wonderfuldiy3

VIEW IN GALLERYLong-Ear-Sock-Bunny-Tutorial-wonderfuldiy2-DIY sock bunny — Tutorial by Lilblueboo

VIEW IN GALLERYSock-Bunny-Tutorial1 -wonderfuldiy

Sock Bunny Tutorial via A Princess and a Pumpkin

VIEW IN GALLERYCrochet bunny lovey blanket free pattern-wonderfuldiy

Crochet-bunny-lovey — Check free pattern here

Wonderful DIY Lovely Bunny Slippers

VIEW IN GALLERYbunny sippers F

Do you have a pair of lovely bunny slippers? They look so warm and comfortable! And they totally make me giggle. I thought they’d be cumbersome to wear, but these little bunnies are just as comfy as can be! How to make these lovely bunny slippers? trust me it’s not as hard as you think!

What you will need:

Wonderful DIY Cute Heart Bunny

VIEW IN GALLERYHeart Bunny M
I do love bunny .This handcrafted DIY projects and gifts will put a fresh face on spring. let’s make this interesting diy Bunny idea, which will bring happyness in your home.

Wonderful DIY bunny pencil holder

VIEW IN GALLERYDIY Bunny Pencil Holders

How cute are these crochet bunny pencil holders !  I hope you like this. It doesn’t need to be for putting pencil, it can be used as a utensil holder for toddler’s utensil, or as a vase for flowers, or just anything you can think of.

Materials & Tools:
1. Empty Vitagen bottle
2. Yarn stashes of pink & white colors (medium worsted weight), red & blue (light weight baby yarn)
3. 3mm, 1.5mm crochet hook
4. 5mm wiggly eyes
5. Tapestry needle
6. Stitch marker
7. Strong multipurpose adhesive
8. Scissors
9. Beads and string for the necklace.VIEW IN GALLERYbunny pencil holder F

Check Pattern : https://bit.ly/1fOCcJD

Wonderful DIY hand bunny toy

VIEW IN GALLERYhand bunny toy f

Wonderful DIY Easter bunny nail

VIEW IN GALLERYbunny nail fVIEW IN GALLERYbunny nail m

Wonderful DIY Bunny Napkins

VIEW IN GALLERYBunny-Napkins fThis bunny napkin fold is an easy way to dress up napkins on your Easter table .Folding a napkin into a bunny is a fairly straightforward exercise with an effective result. The bunny napkin is suitable for spring and Easter table displays, for children’s parties, and for any dinner party where you’d like to add a bit of fun.
Want to learn how to fold your very own bunny napkins? Sure you do!

VIEW IN GALLERYBunny-Napkins mVIEW IN GALLERYfolded napkin bunny-tutorial-wonderfuldiyFor Easter it would be so cute to fold the table napkin into bunnies! To go above and beyond, these Easter Bunny napkins can be holding Easter eggs. Adorable! Don’t be intimidated by napkin origami-your guests will love it!

Materials:

If you like this, share it & follow along on Facebook and Pinterest for more updates on the next Wonderful DIY !

Wonderful DIY craft bunny

VIEW IN GALLERYcraft bunny mI have always been very fond of bunny ! Easter is coming, let’s do this cute origami bunny project with kids , you can make it  as a home decoration, or functional for holding small treats for kids .
Materials you need:
Square sheets of origami paper (or any kind of patterned paper works as well!)
Cotton Balls
Chocolates or Candies you want to put inside the bunnies
Glue gun

Detail>>https://ohsoverypretty.com/2013/03/18/ulra-cute-origami-easter-bunnies-with-cotton-bums/